
 Community
 Video Library
 Agent Training
 Freshservice
 Freshdesk
 Freshchat
 Freshcaller
 Freshsales
 Freshteam
 Freshworks Neo
 Freshsurvey
 Freshservice for MSP
 The Email AI Agent in Freddy AI Agent Studio automates email interactions, detects employee languages, manages unanswered inquiries, and seamlessly routes complex conversations to human agents.
The Email AI Agent provides key settings that control how the agent communicates with users, processes fallback scenarios, and coordinates with support teams. You can configure these settings sequentially during setup or update specific areas as operational needs change.
TABLE OF CONTENTS
- Customize customer feedback
- Access configurations
Key capabilities
The Email AI agent supports the following capabilities.
Access configurations
Follow these steps to access the configuration settings for your AI Agent:
Open AI Agent Studio and select the agent you want to configure.
In the left navigation, expand Build.
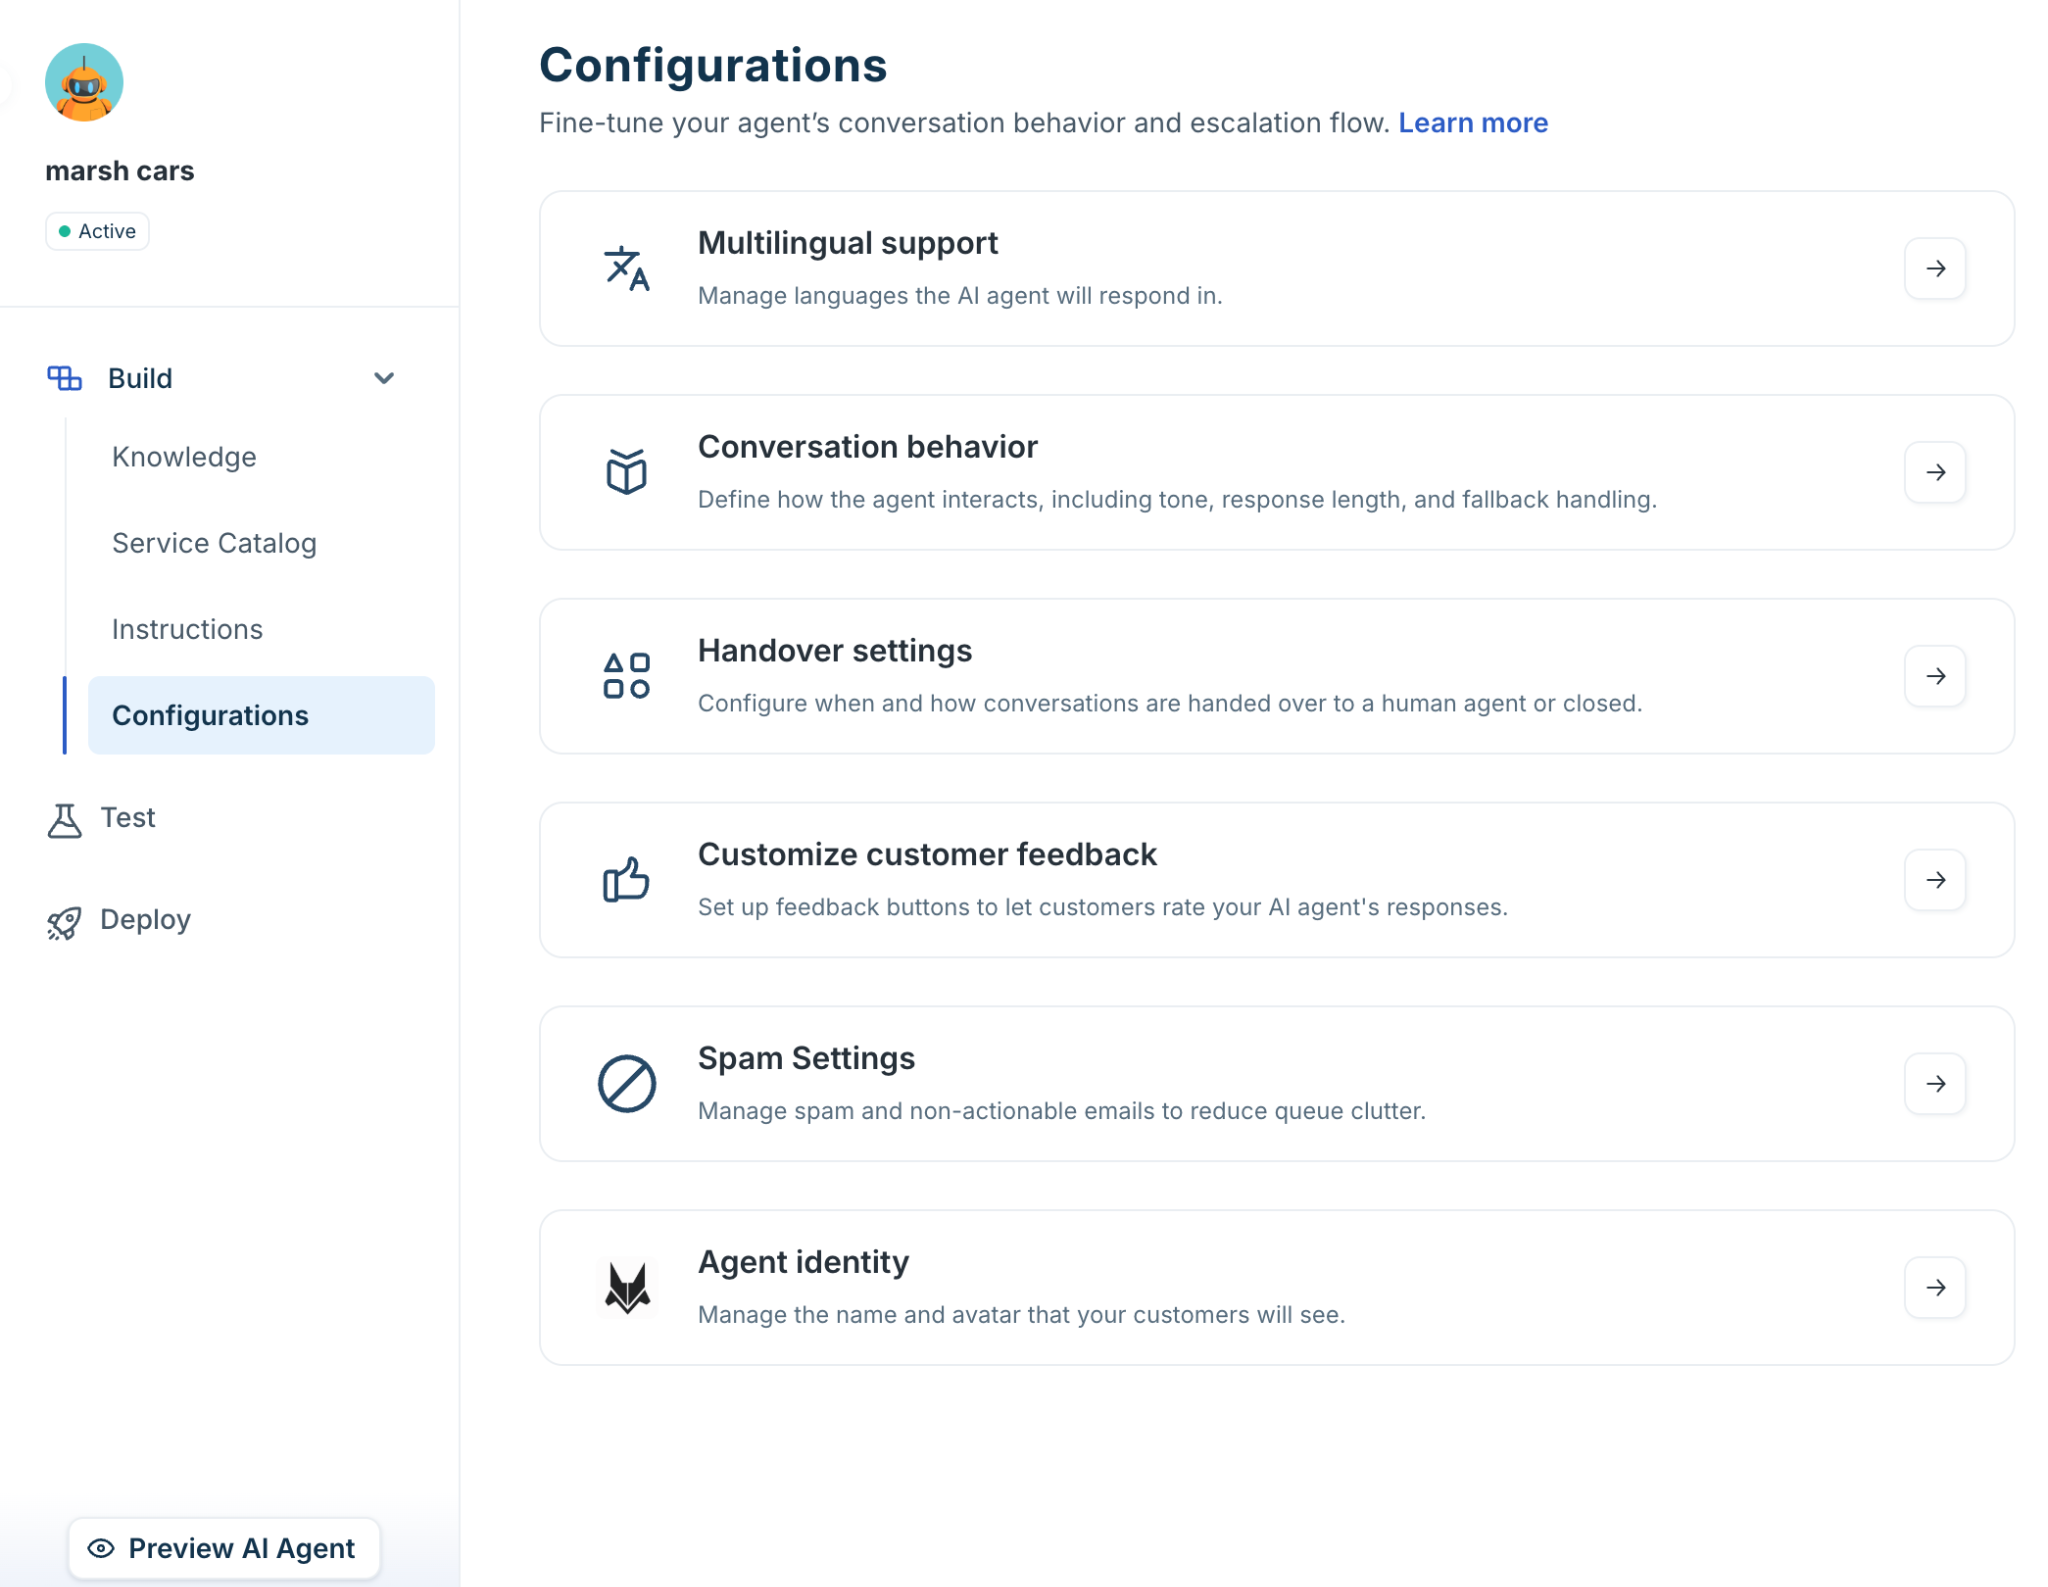
Click Configurations. The Configurations page lists four options: Multilingual support, Conversation behavior, Handover settings, and Agent identity. Click any option to open it.
Manage multilingual support
Multilingual support lets you define which languages the agent responds in. English is always the primary language. When you add additional languages, the agent detects what language an employee is writing in and matches its response to that language automatically. For the list of supported languages, see Supported languages for AI agents.
Add or remove languages
On the Configurations page, click Multilingual support.
The Language configuration section shows the languages currently selected. English (Primary) is always present and cannot be removed.
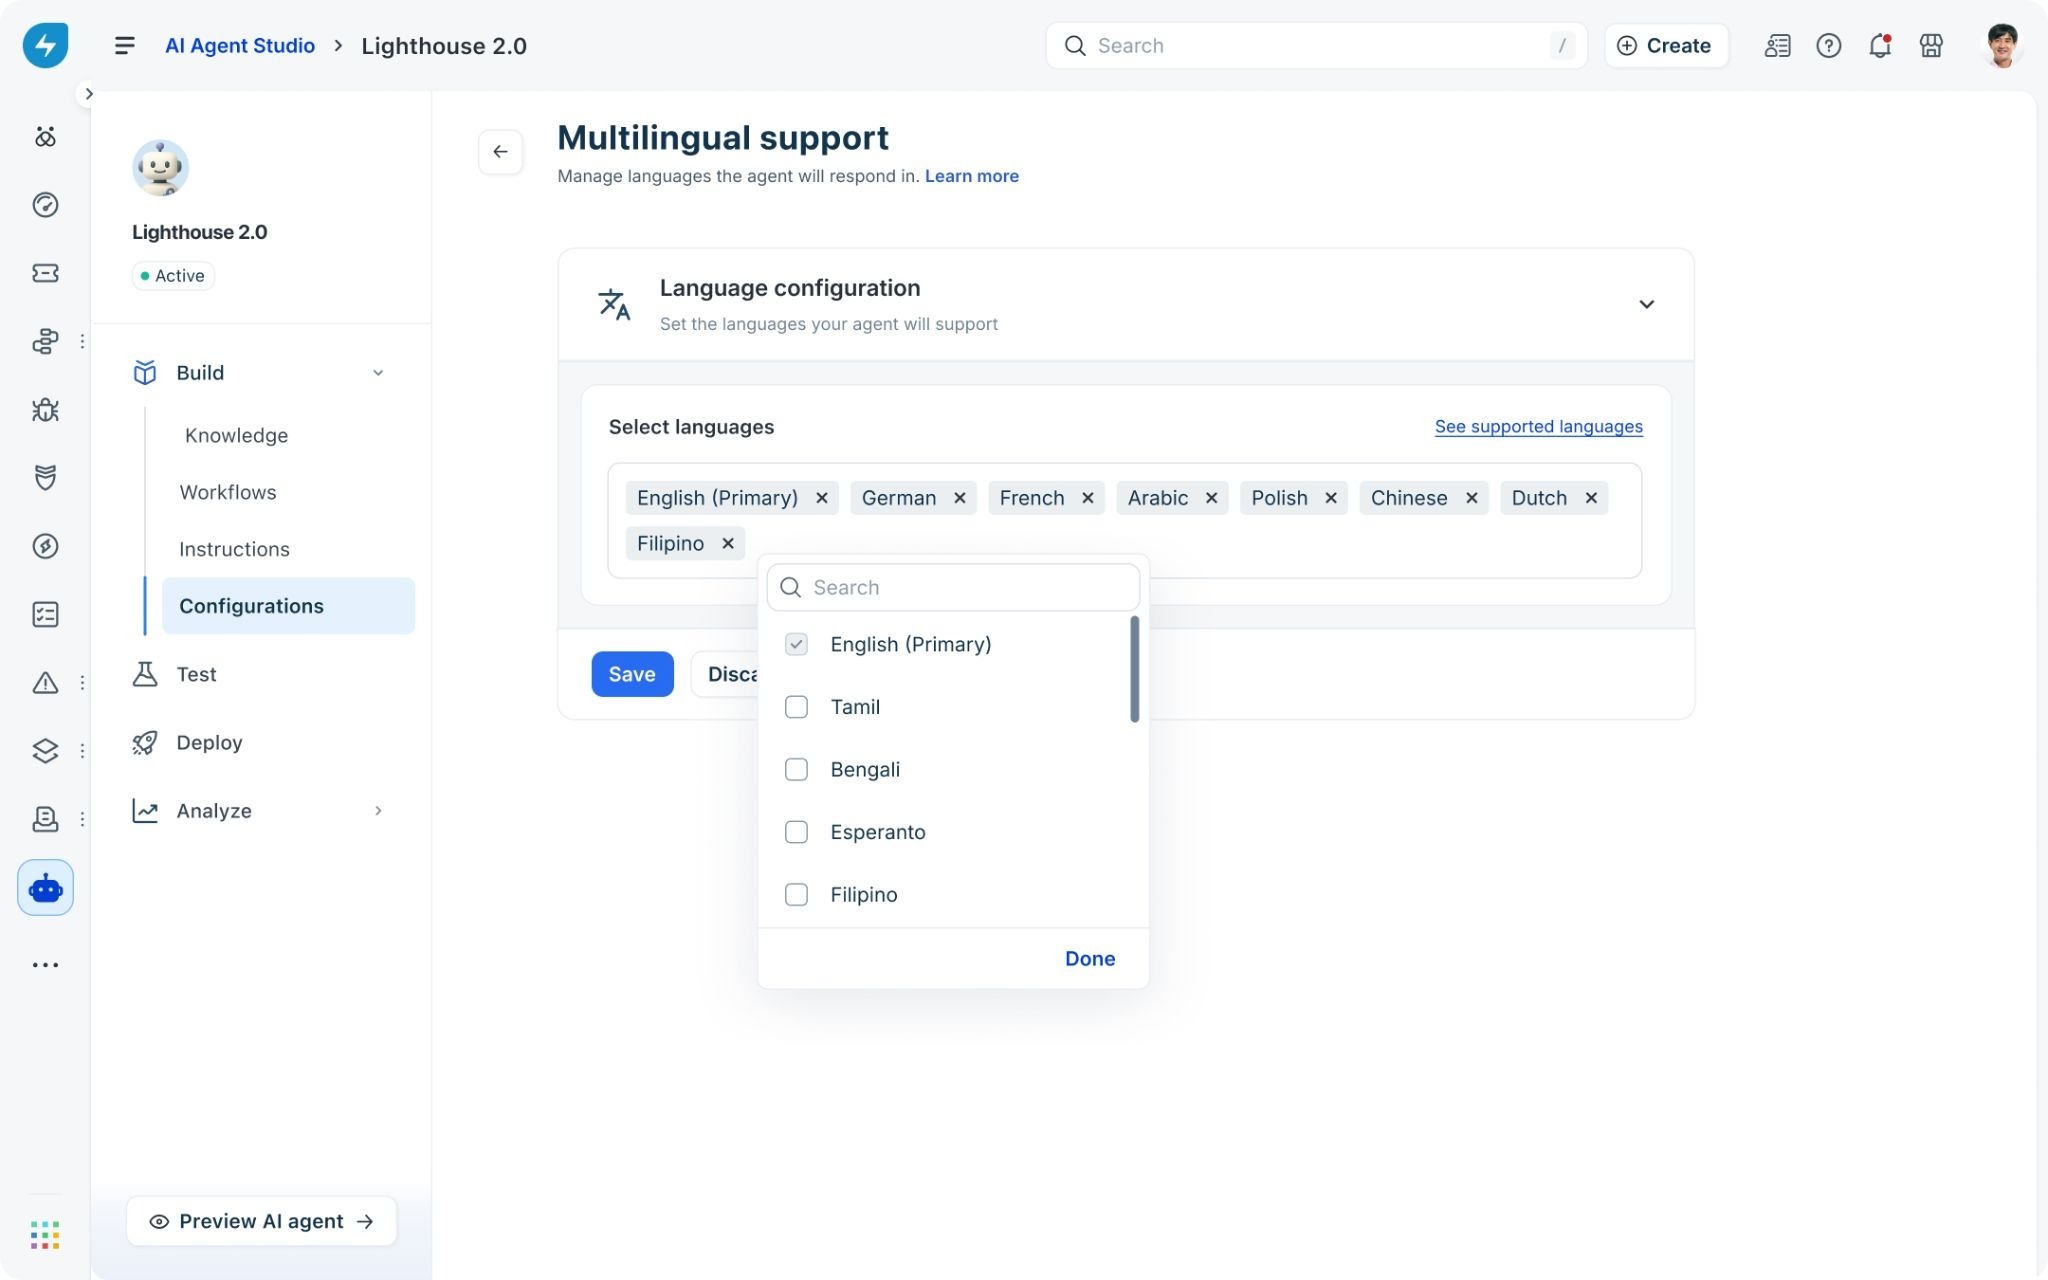
Click inside the language field to open the language picker. Use the Search box to find a language by name, or scroll through the list.
Check the box next to each language you want to add. You can add languages including German, French, Arabic, Polish, Chinese, Dutch, Filipino, Tamil, Bengali, Esperanto, and others. Checked languages are already selected.
Click Done to close the picker. The selected languages appear as tags in the language field.
To remove a language, click the X on its tag.
Click Save.
To see the complete list of languages the agent supports before making your selection, click See supported languages in the top-right corner of the Language configuration section.
Configure conversation behavior
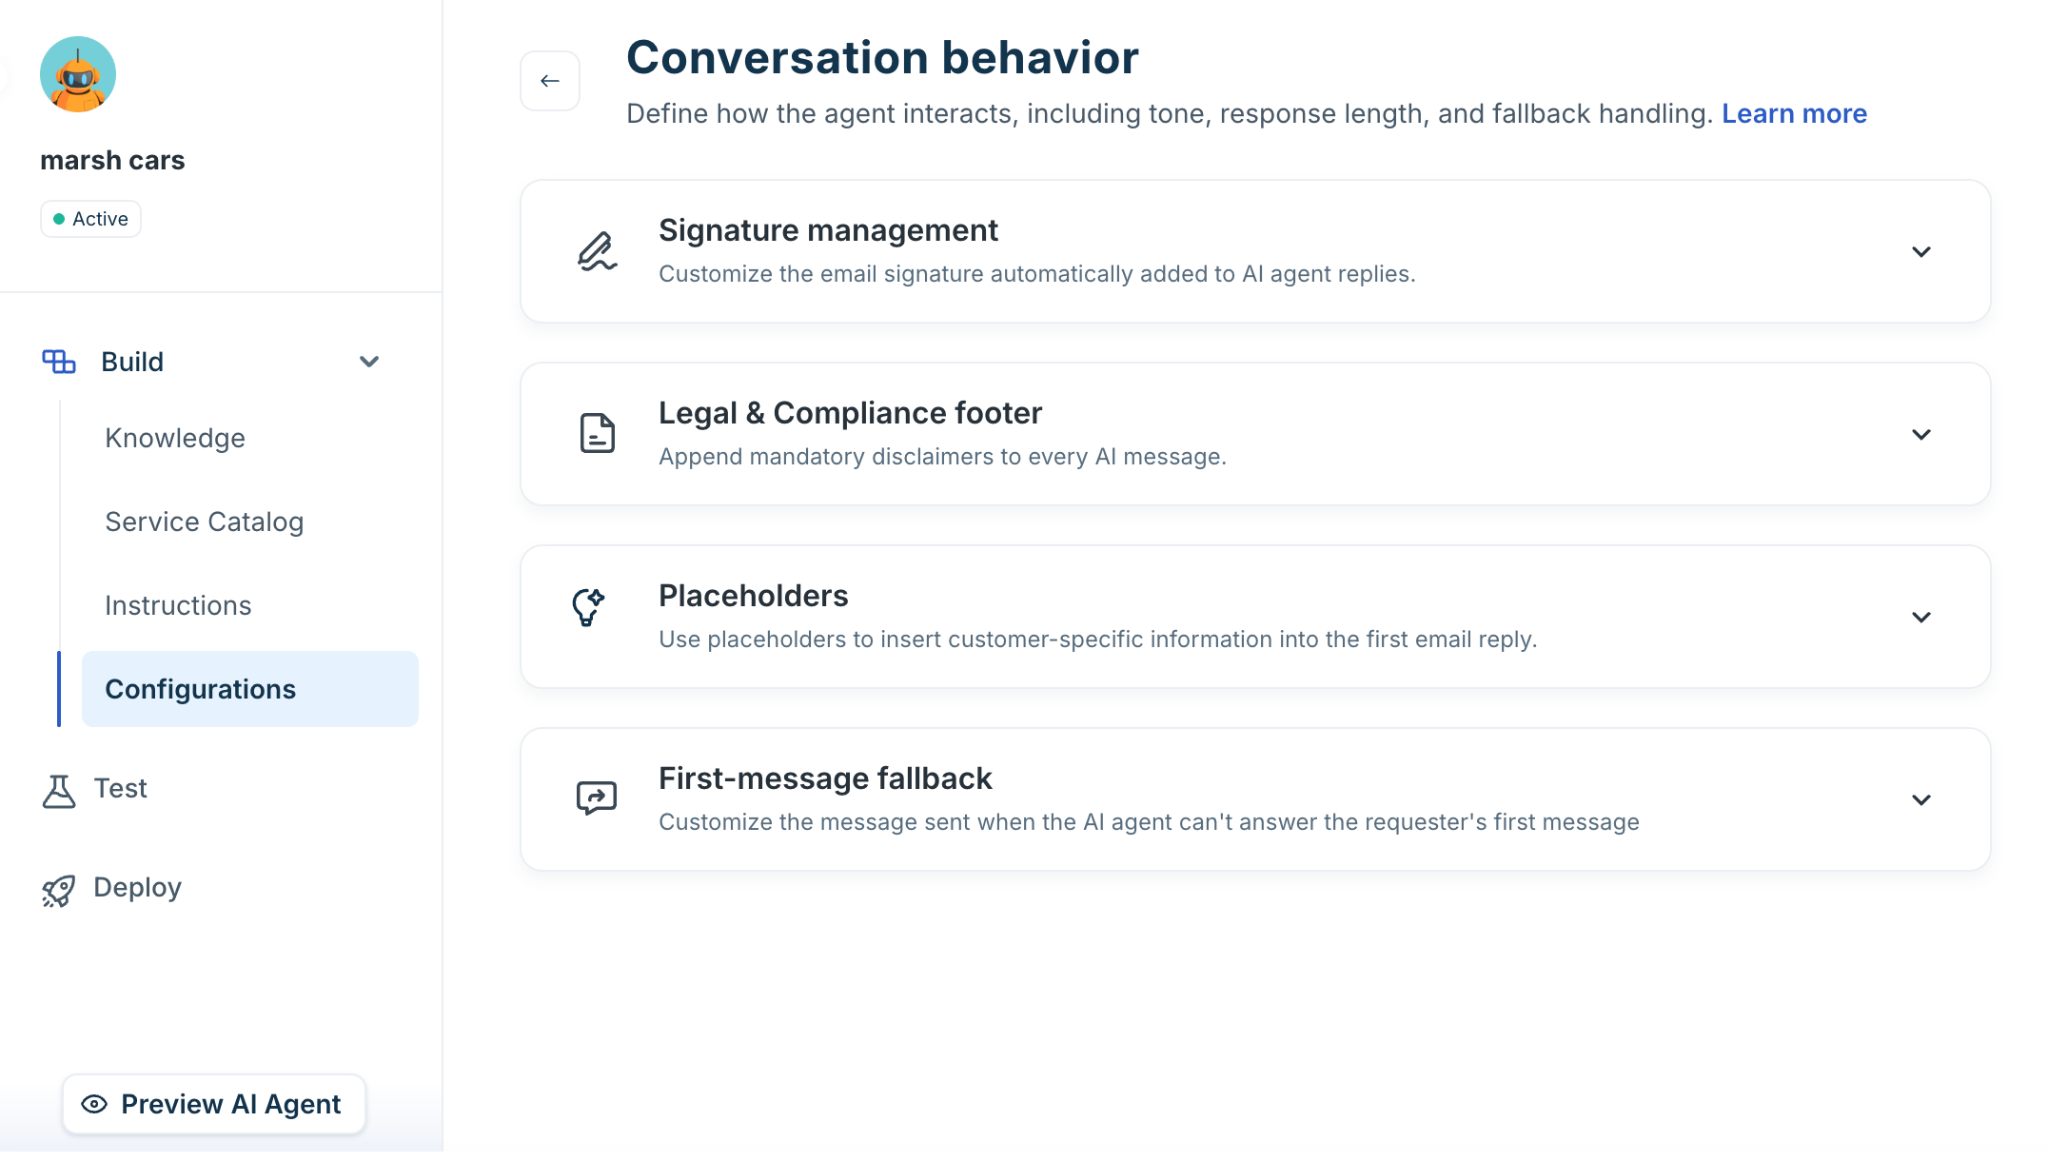
Conversation behavior settings control the structure and guardrails of every AI email reply. Navigate to Build > Configurations > Conversation behavior.
Signature management: The sign-off block is appended to every AI reply. Configure dynamic placeholders (agent name, team, contact details) and set language-specific variants to match the response language.
Legal & compliance footer: A mandatory disclaimer on every AI reply. Configure per-language variants required for GDPR, CCPA, and industry-specific compliance.
Placeholder: Use placeholders to insert customer-specific information into the first email reply.
First-message fallback: The message sent when the AI cannot generate even an initial response. Configure the copy to set expectations and guide the customer to an alternate support path.
Set up human handover
Handover settings control when and how the agent converts a conversation into a support ticket for a human agent to handle. This is the primary escalation path when the AI cannot resolve an issue on its own.
On the Configurations page, click Handover settings.
Select the following settings and configure based on your requirements:
Transfer to a human agent
Auto resolve time
Transfer outside business hours
Confidence Threshold
Daily Conversation Limits
Escalation Criteria
Click Save.
Note: Make sure your Freshservice ticket routing and assignment rules are configured before enabling handover. The AI agent creates the ticket, but your existing Freshservice workflows determine which team or agent receives it.
Transfer to a human agent
Use the Assign to group option to define how conversations are handled when the AI agent hands them over to your support team.
Go to AI Agent Studio > Deploy > Handover settings.
Expand Transfer to a human agent.
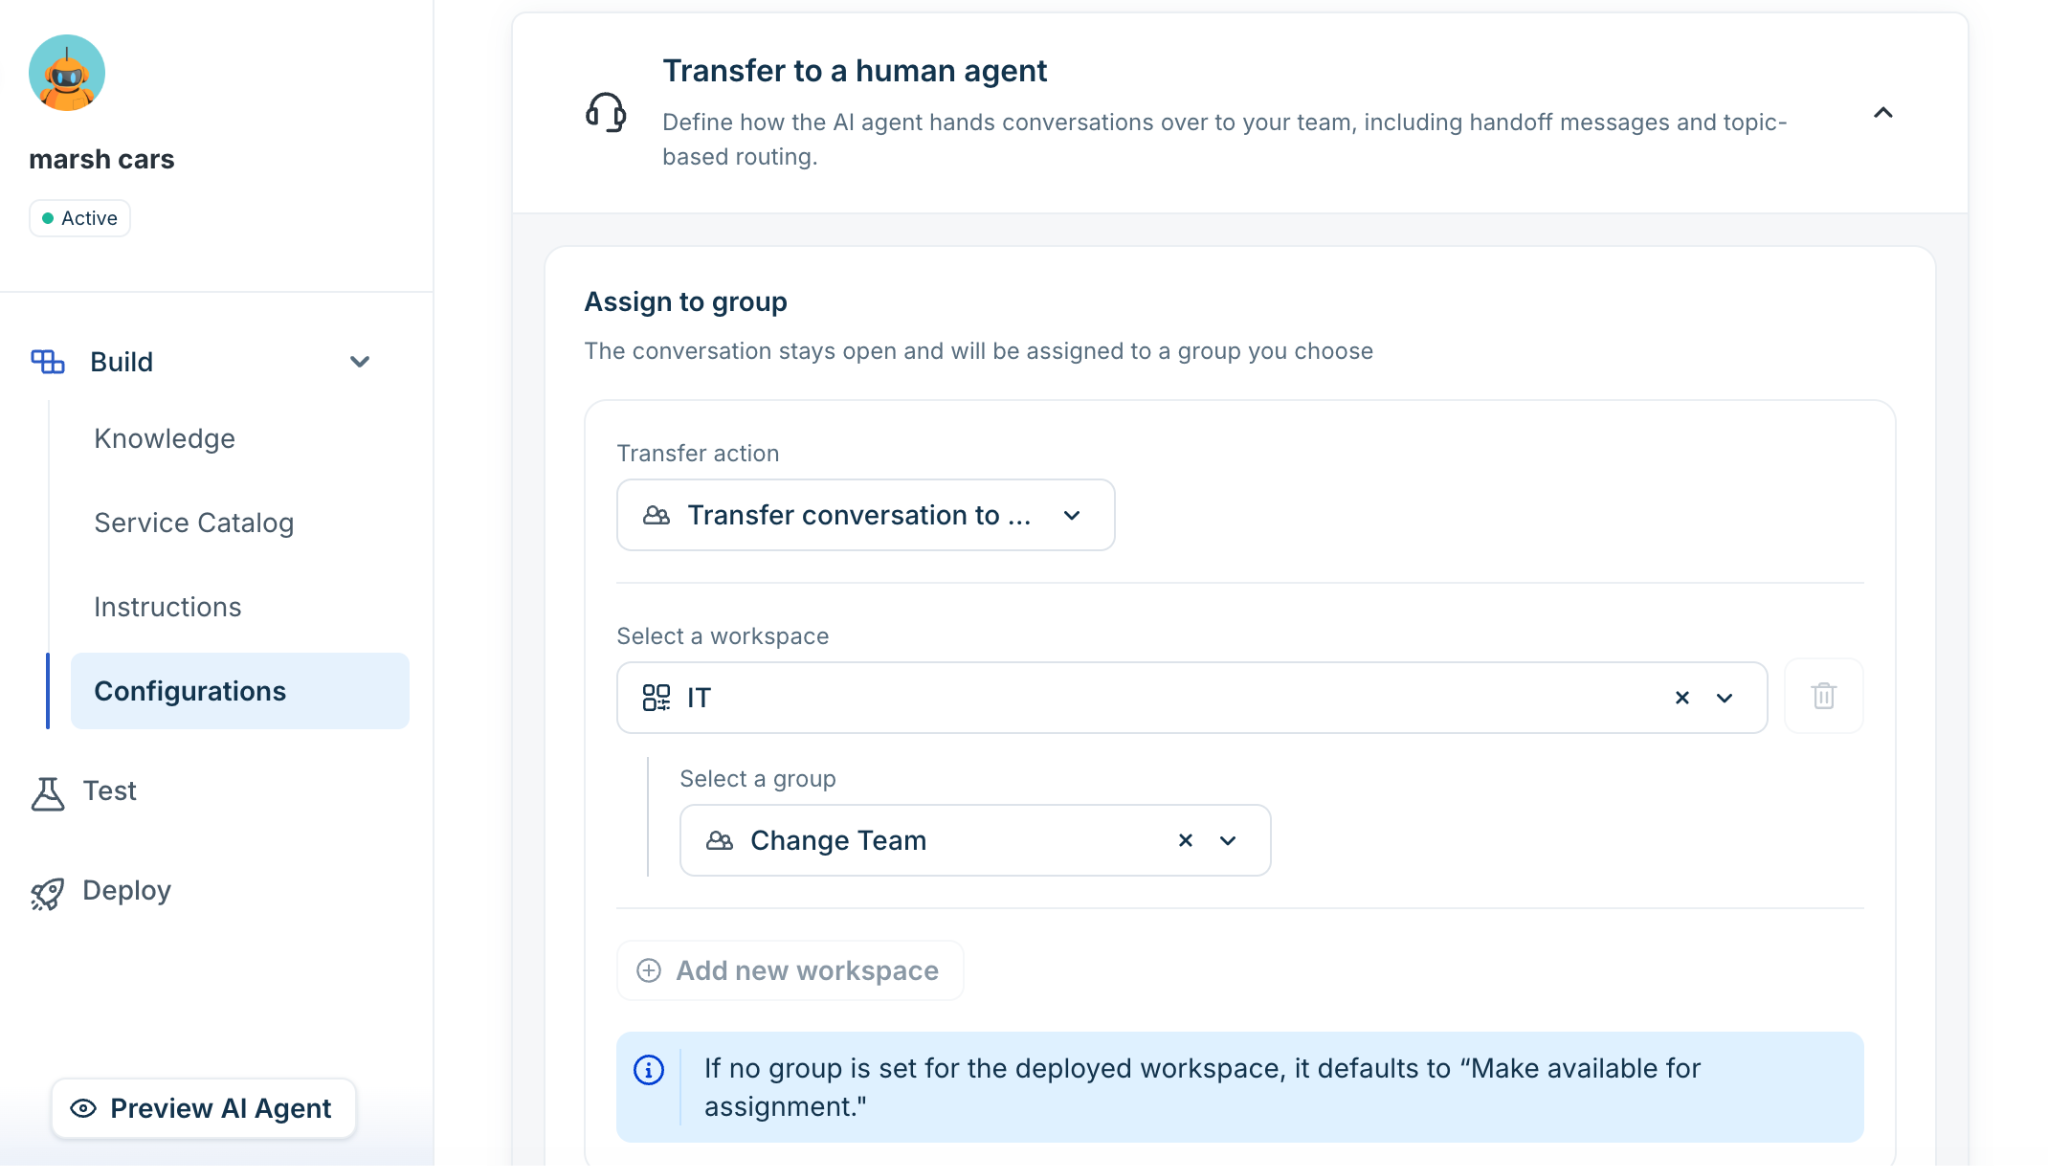
Under Assign to group, select one of the following Transfer action options:
Keep ticket open – Keeps the conversation open and makes it available for assignment based on your helpdesk workflow.
Transfer conversation to a group – Transfers the conversation directly to a specific group.
If you selected Transfer conversation to a group:
Select the workspace.
Select the group to receive conversations for that workspace.
(Optional) Click Add new workspace to configure additional workspace-to-group mappings.
(Optional) Enable Handoff message and customize the message displayed to the requester before the conversation is transferred.
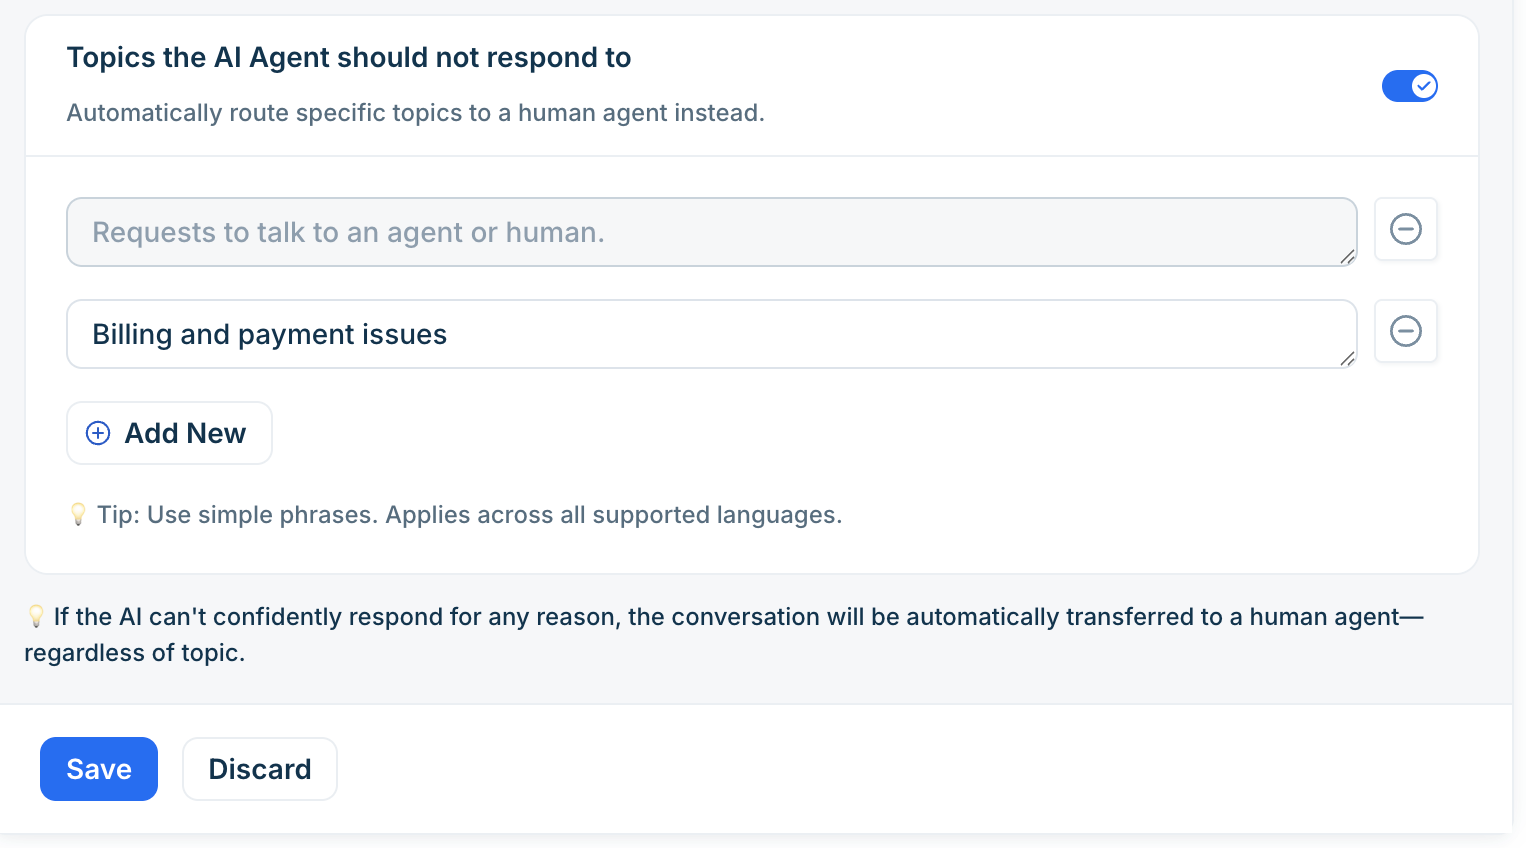
Enable Topics the AI Agent should not respond to define topics that should always route to a human agent. Matching tickets are automatically transferred to a human agent.
Best practice: Use this for legally sensitive, emotionally complex, or brand-critical topics where AI involvement is inappropriate.Save the changes.
Auto-resolve time
Auto-resolve closes tickets after a period of customer inactivity — keeping your queue clean without manual effort. Configure under Configurations > Handover settings.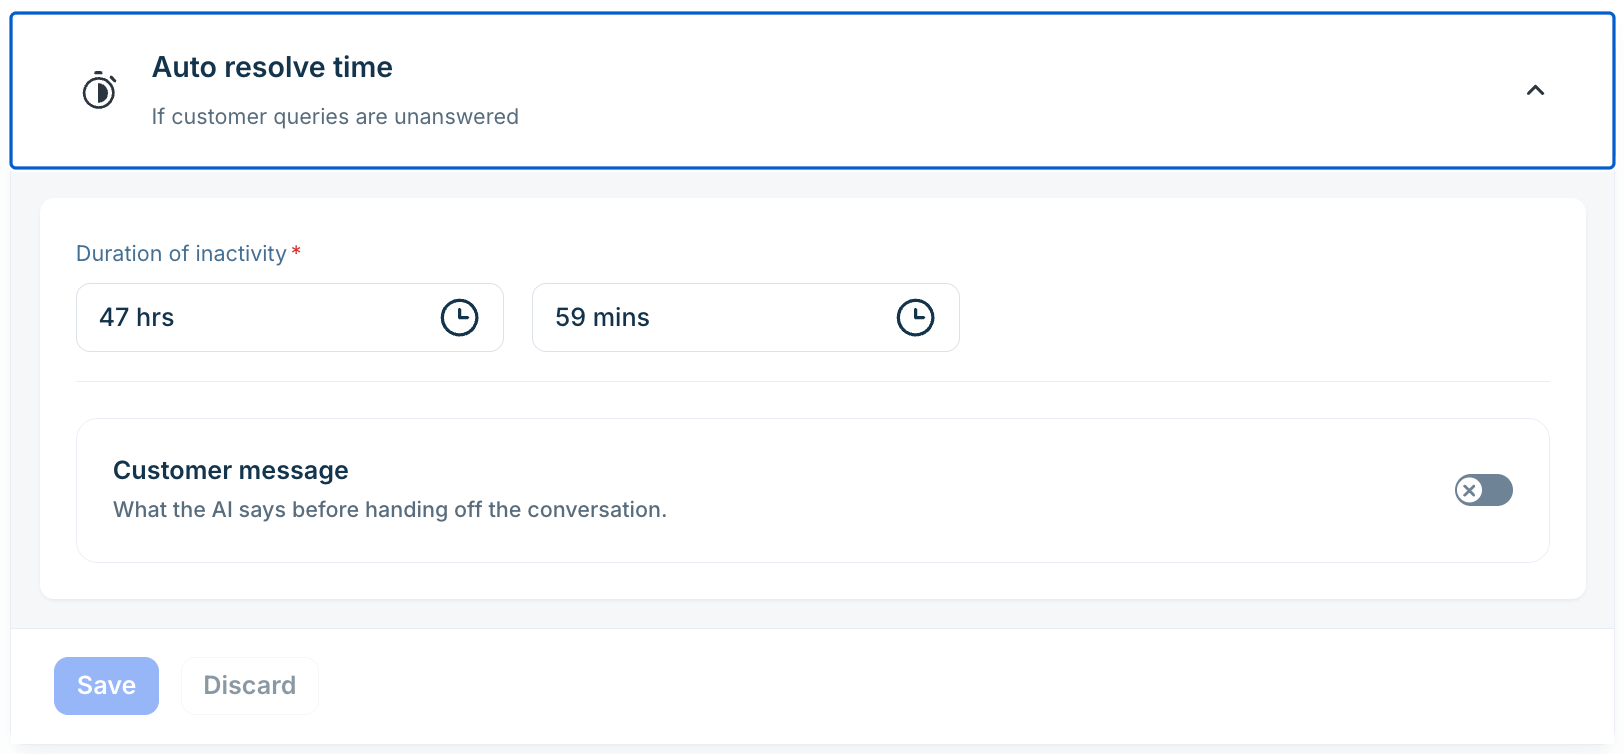
Scroll to Auto-resolve time setting.
Set the inactivity duration, hours after the last customer message before auto-resolve fires.
Optionally enable the customer message toggle and configure the message. For example: "We haven't heard from you. We're closing this ticket. Reply any time to reopen it."
Click Save.
If the customer replies before the timer expires, the timer resets. The auto-resolve timer starts only after the full configured inactivity duration has elapsed.
Transfer outside business hours
Configure a separate routing policy for conversations that are escalated when your support team is offline.
Go to AI Agent Studio > Deploy > Handover settings.
Expand Transfer outside business hours and select Enable Transfers outside business hours.
Under When outside business hours, select the action to perform:
Keep ticket open – Keep the ticket open for agents to pick up when they are available.
Transfer conversation to a group – Transfers the conversation to a designated support group.
Select the workspace.
Select the business hours to use for the selected workspace.
(Optional) Click Add new workspace to configure business hours for additional workspaces.
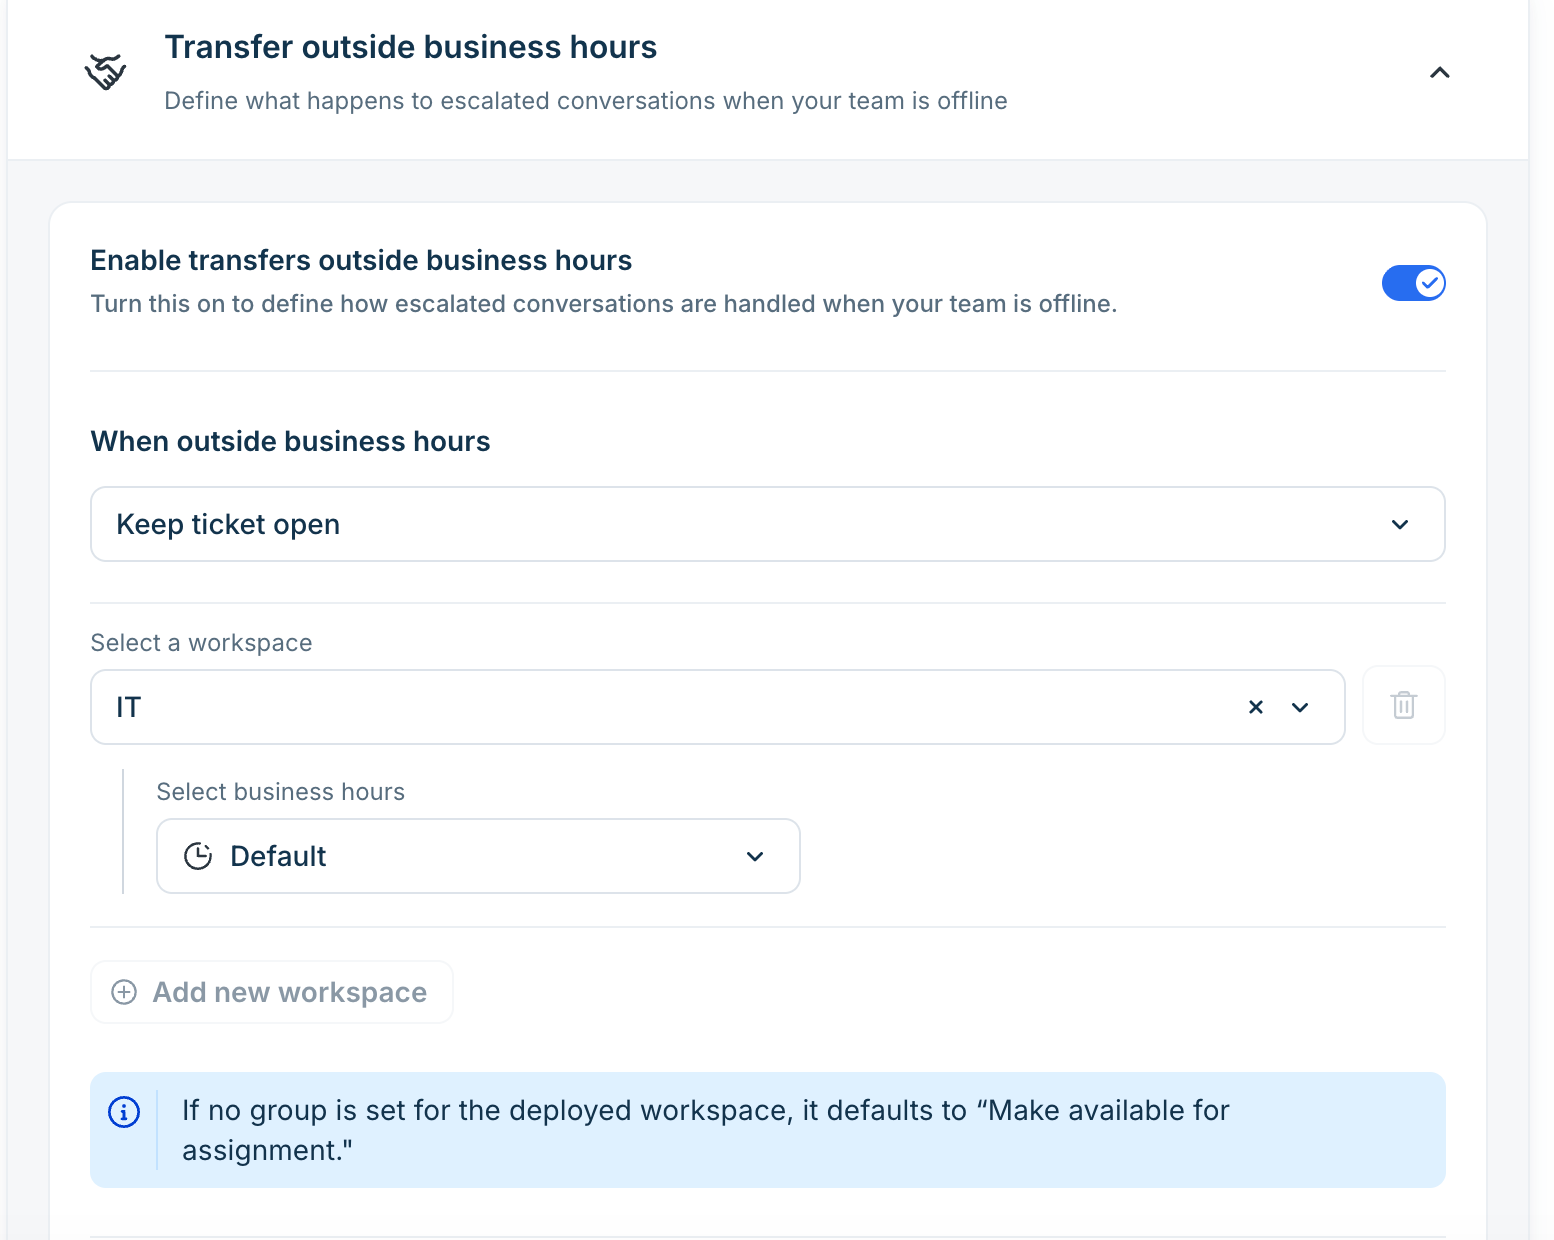
If you selected Transfer conversation to a group, select the destination group for the workspace.
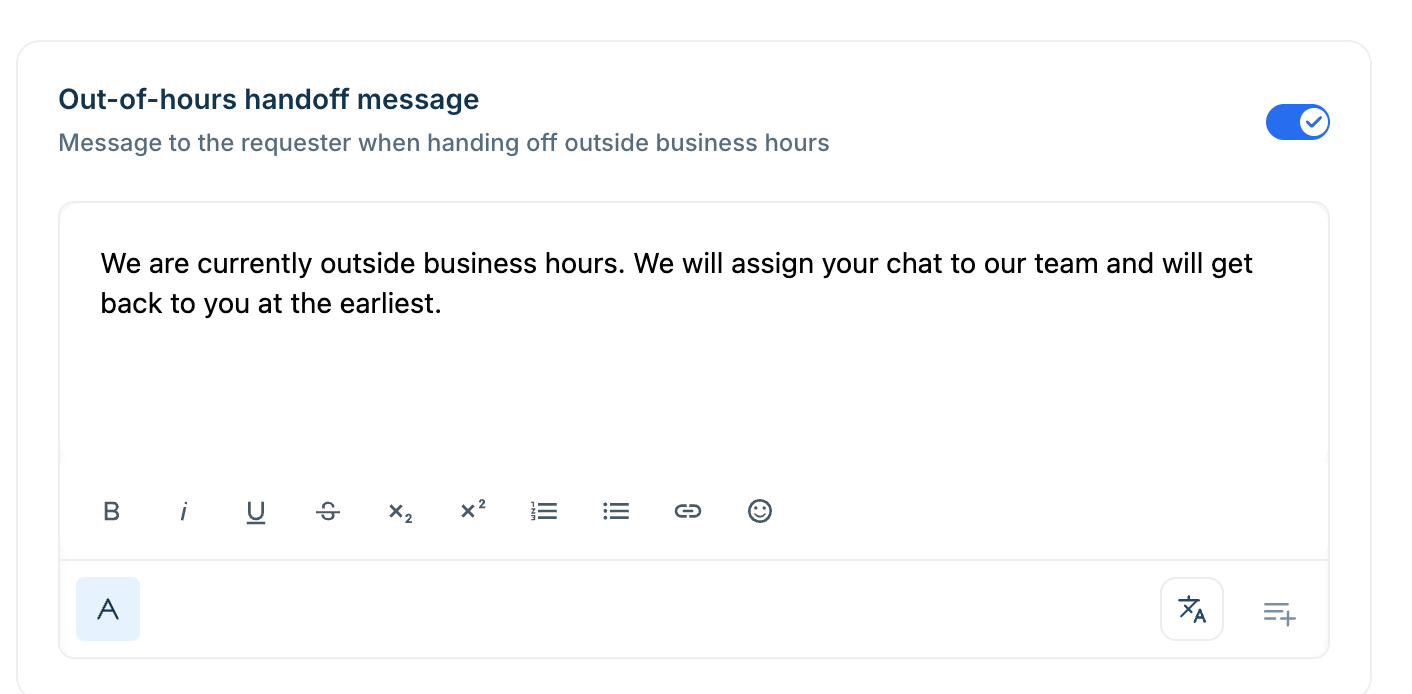
(Optional) Enable Out-of-hours handoff message and customize the message displayed to the requester when the conversation is handed over outside business hours.
Click Save the changes.
Notes:
Configure business hours for each workspace. If business hours are not configured for a workspace, the default business hours are used.
If no group is configured for a deployed workspace, the conversation defaults to Make available for assignment.
Confidence threshold
Confidence Threshold controls how carefully the AI agent replies. You can select when it should respond and when it should escalate to a human. The setting applies globally to this agent across all mailboxes and portals it is deployed to.
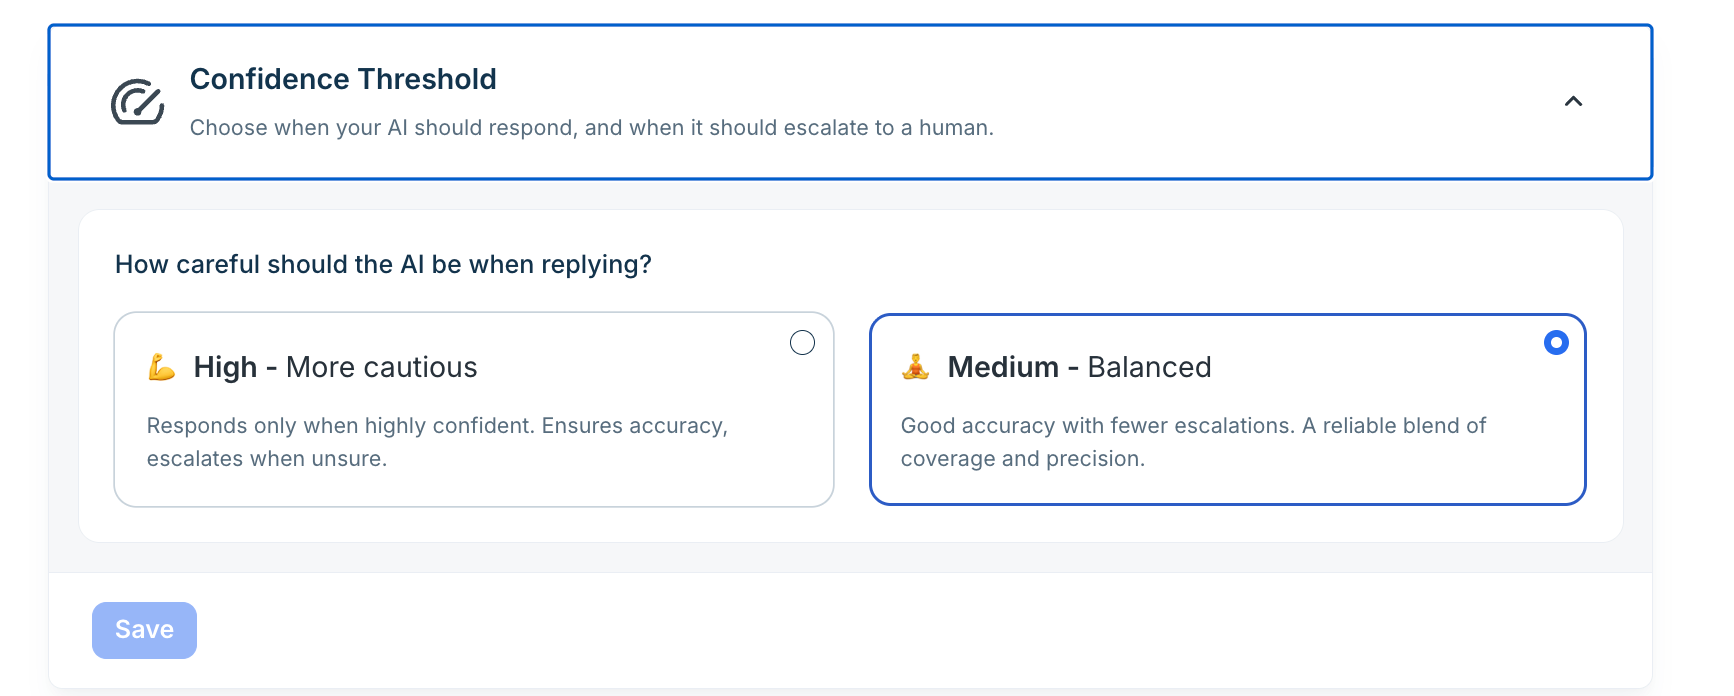
Expand Confidence Threshold.
Under How careful should the AI be when replying?, select High or Medium.
High - More cautious: Responds only when highly confident. Ensures accuracy, escalates when unsure. Use for regulated industries, billing queries, sensitive account changes, or any domain where an incorrect AI response causes significant customer harm.
Medium - Balanced: Good accuracy with fewer escalations — a reliable blend of coverage and precision. Use for general customer support with a well-curated knowledge base where higher self-service deflection is the priority.
Select Save
The confidence threshold is global per agent — there is no per-topic or per-mailbox setting.
Best practice: Start with High during initial deployment to ensure quality. After reviewing your deflection rate and escalation patterns in the Analyze tab for 2–4 weeks, switch to Medium if the escalation rate is higher than your team can handle and your knowledge sources are comprehensive.
Daily conversation limits
Daily Conversation Limits lets you cap the total number of conversations the AI agent can consume per day, useful to control costs, manage a staged rollout, or protect against unexpected volume spikes during early deployment.
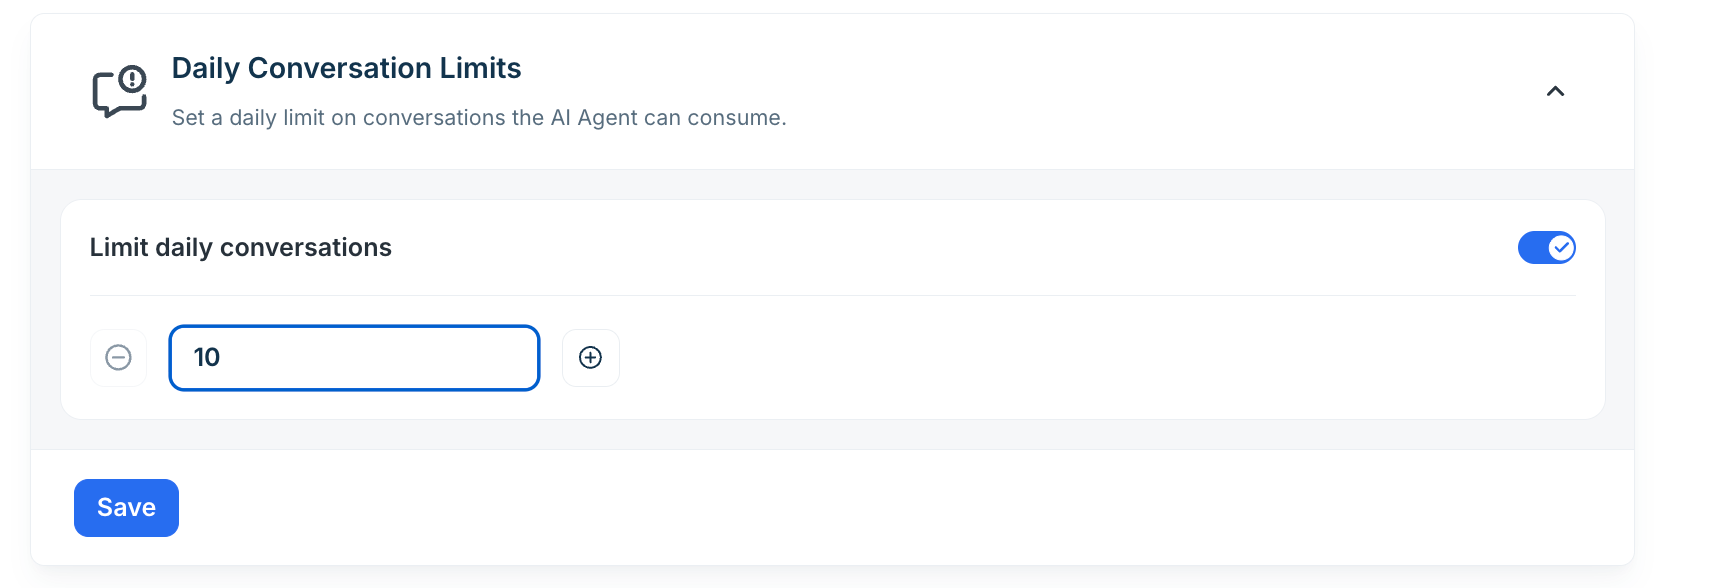
Expand Daily Conversation Limits.
Enable the Limit daily conversations toggle.
Use the stepper to enter the maximum number of conversations per day. The minimum permitted value is 10.
Select Save.
When the limit is reached, the AI agent stops handling new conversations for the remainder of that calendar day. New tickets continue to arrive and are visible in the inbox, but the AI does not process or reply to them until the limit resets at midnight. Human agents can take over any ticket manually during this period. To begin with, you can follow the below roll-out strategy,
Controlled pilot rollout — small team validating quality: 10–25 conversations per day to limit exposure while testing.
Mid-scale deployment with active monitoring: 100–300 conversations per day, adjusted weekly based on volume data.
Full production rollout: Disable the Limit daily conversations toggle to remove the ceiling entirely.
`
Escalation criteria
Escalation Criteria sets the maximum number of back-and-forth exchanges — called Max Conversation Turns — the AI agent engages in before automatically escalating to a human agent. A turn is counted each time the AI sends a reply, and the customer responds.
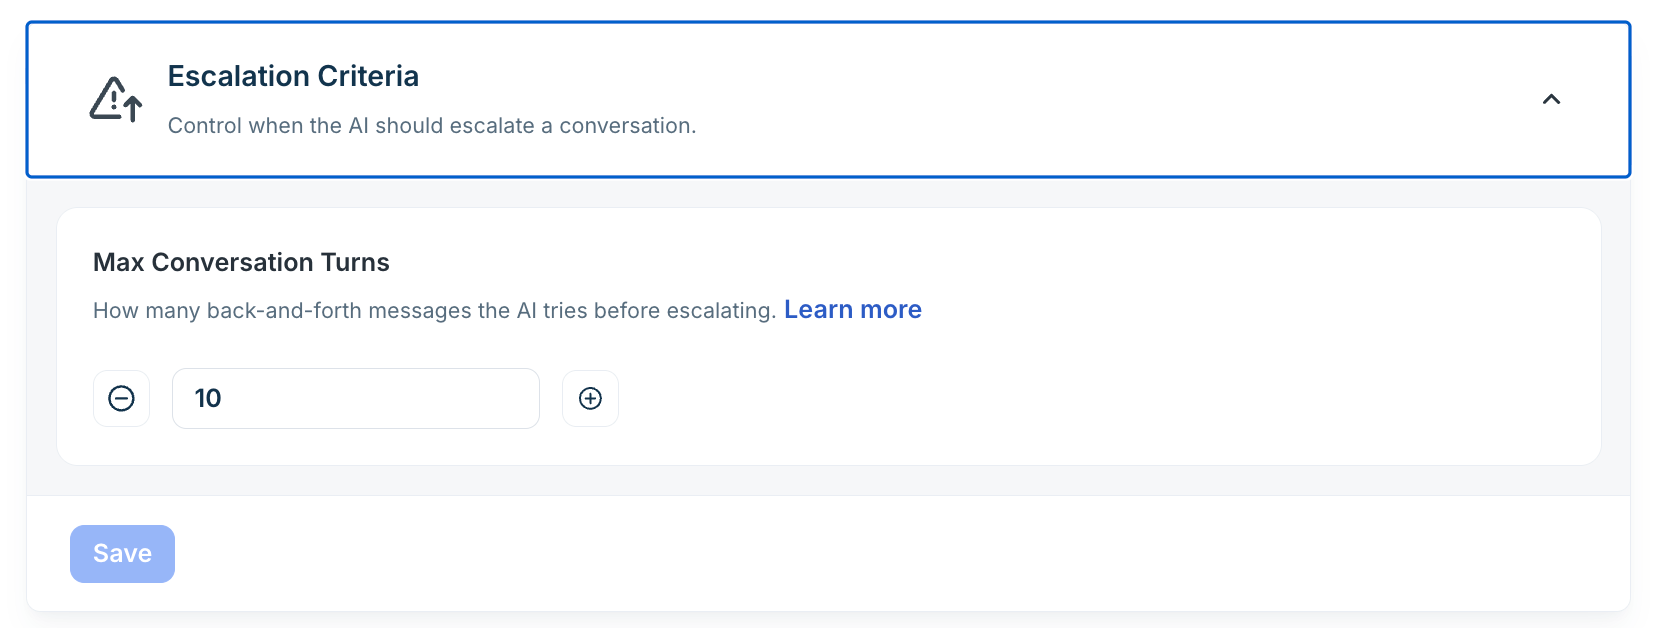
Expand Escalation Criteria.
Use the Max Conversation Turns stepper to set the threshold. The minimum permitted value is 10.
10 turns (minimum): High-volume, transactional support where quick deflection or escalation is preferred.
15 turns: General-purpose support — balances resolution rate with escalation containment.
25+ turns: Complex, multi-step support scenarios where longer AI-assisted resolution is valuable.
Select Save. The threshold applies to all new conversations from this point forward.
When the configured turn count is reached, the agent escalates using the routing defined in Handover settings. The escalation fires exactly at the threshold — not before, not after. Conversations already in progress continue with the count accumulated before the threshold change.
Best practice: Monitor your escalation rate in the Analyze tab. If many conversations escalate at the exact configured threshold rather than naturally resolving, it may indicate the threshold is too low or that knowledge source coverage is incomplete for common query types.
Spam settings
Spam settings under Configurations let the agent automatically close non-actionable emails — such as out-of-office replies, bounce notifications, and payment receipts without consuming human review time.
Freddy AI evaluates incoming emails to determine whether they require agent action.
If the email is confidently identified as non-actionable, Freddy automatically closes it.
If Freddy is uncertain, the email is routed for agent review instead of being auto-closed.
The configuration is divided into two parts:
Define which email types should be auto-closed.
Define where uncertain emails should be routed for review.
Auto-close non-actionable emails
Use the Auto-close these emails section to set categories of emails that Freddy will automatically close. Typical examples include out-of-office replies, delivery failure notifications, and spam or promotional emails. You can add multiple email categories depending on your support workflow.
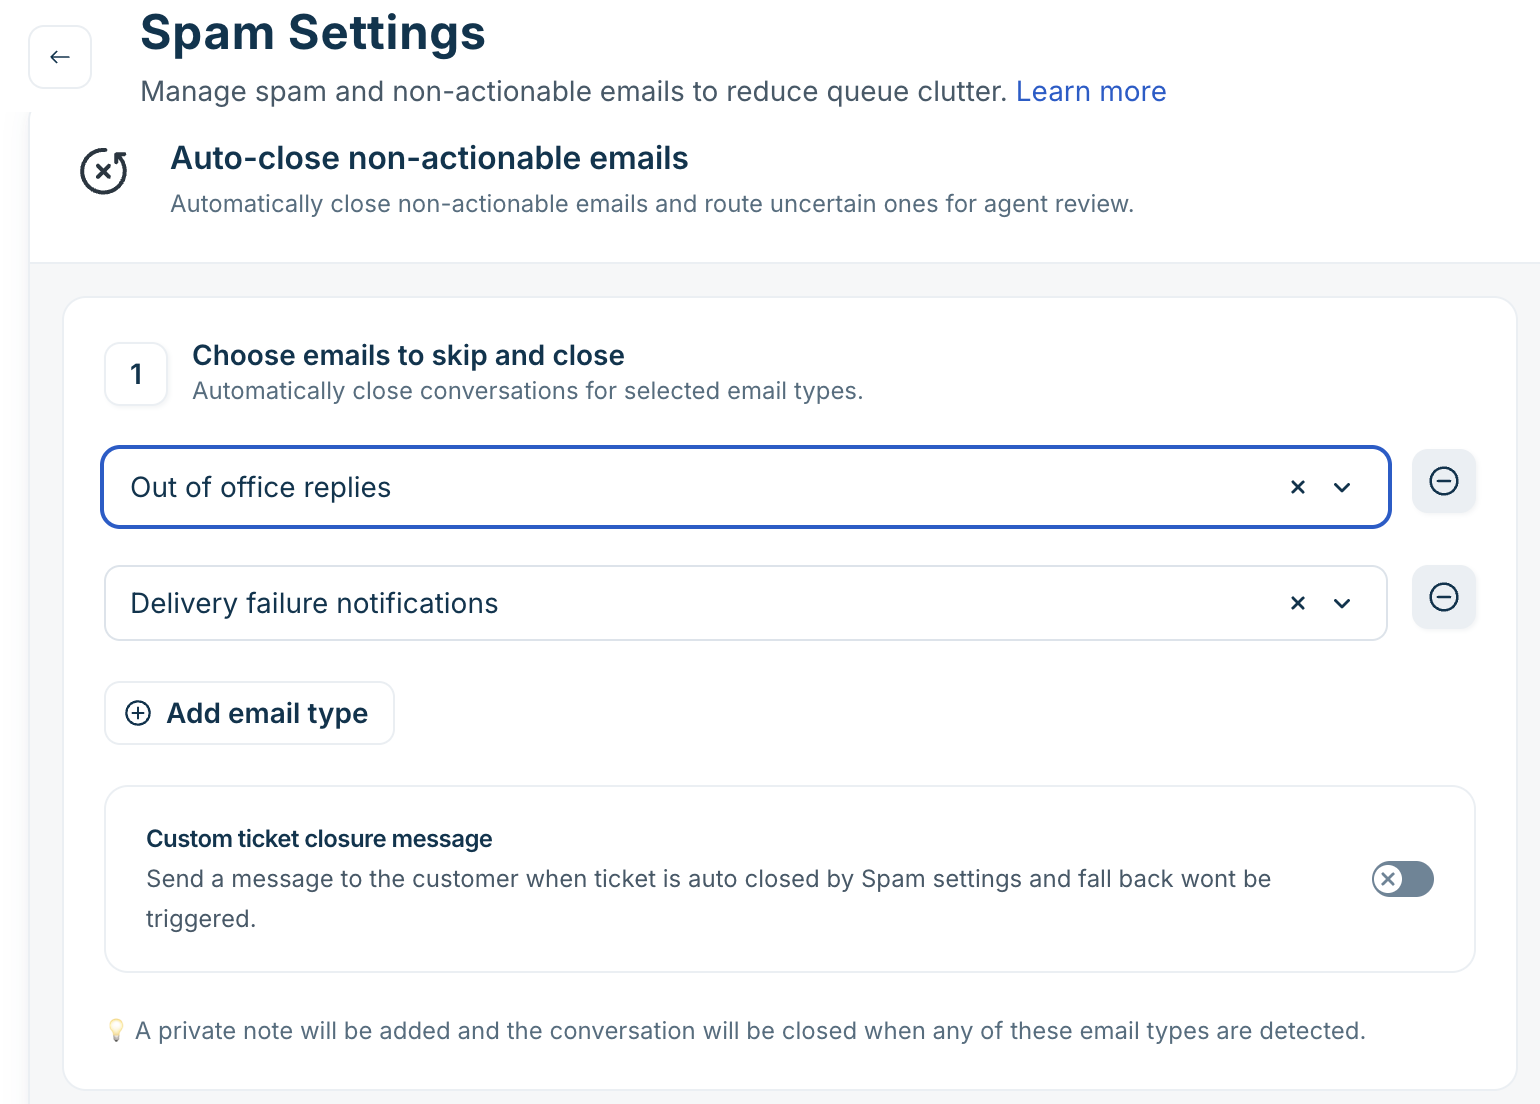
When Freddy AI detects one of these email types, it adds a private note to the ticket and closes the email automatically.
To add an email type for auto-close, follow these steps.
Open Spam settings.
In the Auto-close these emails section, click Add email type.
Select the email category to auto-close.
Select Save.
To remove a configured category, locate the email type in the list, click the remove icon beside it, and save the changes.
Review routing for uncertain emails
Some emails may not be clearly identifiable as spam or non-actionable. In such cases, Freddy AI routes the email for manual review instead of automatically closing it. Use the What should happen when review is needed? section to configure this behavior.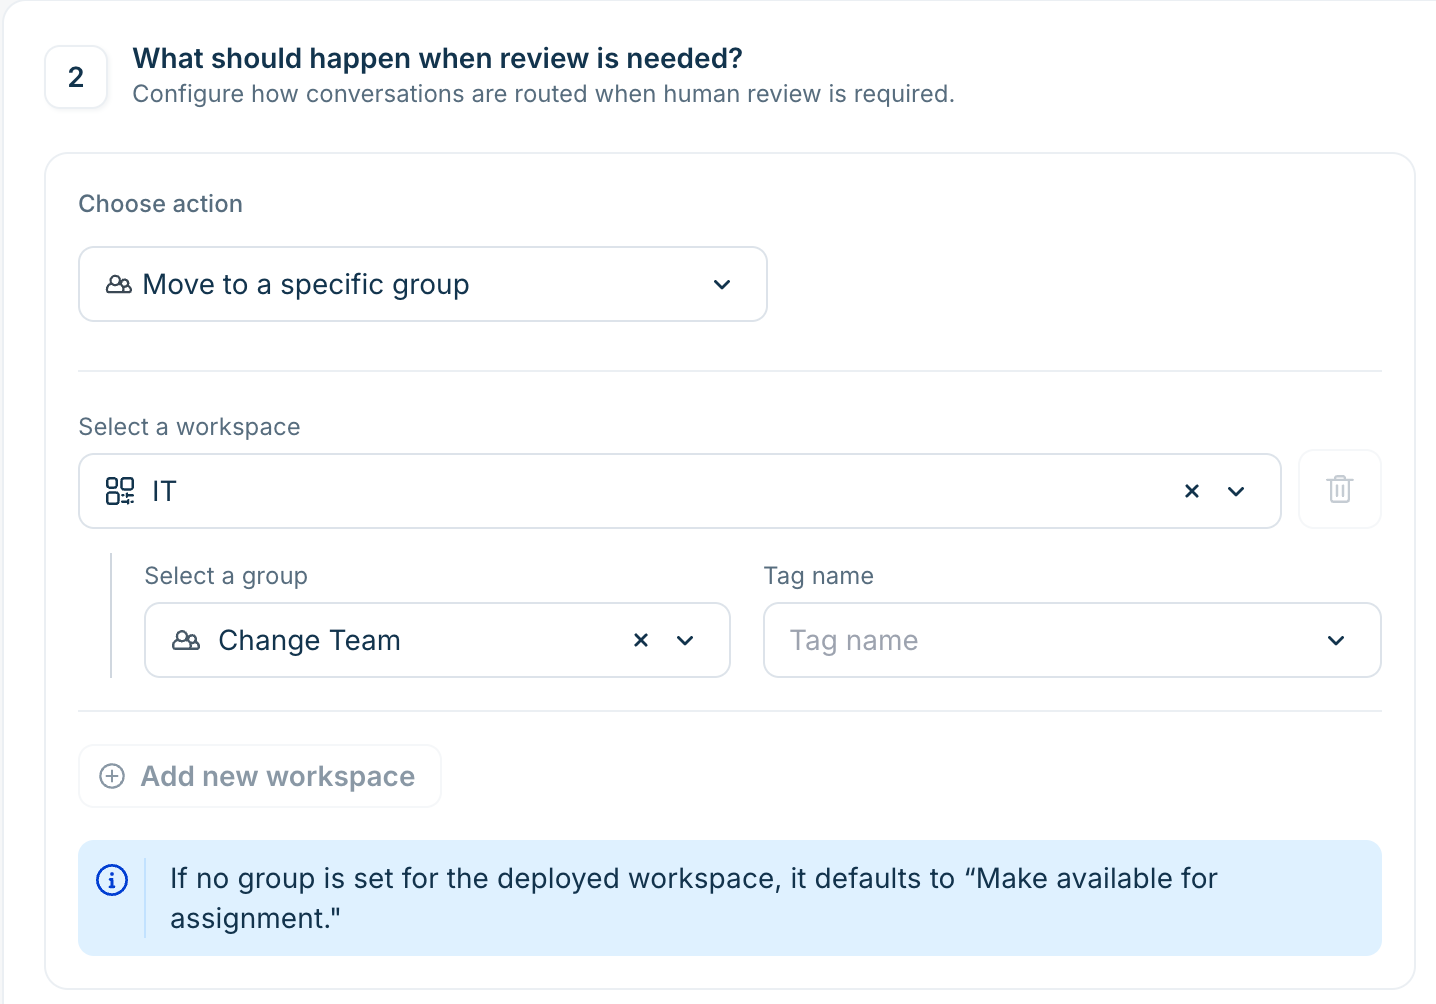
You can route uncertain emails to a specific workflow and group, a designated queue, or a workflow, depending on your account configuration. You can also apply tags automatically to help agents identify these emails quickly. For example: route to group no-need-to-answer and apply tag spam-tickets.
Customize your agent identity
Agent identity lets you set the name and avatar that employees see when they interact with the agent. A clear, recognizable identity helps users understand who they are talking to and reinforces your organization’s brand.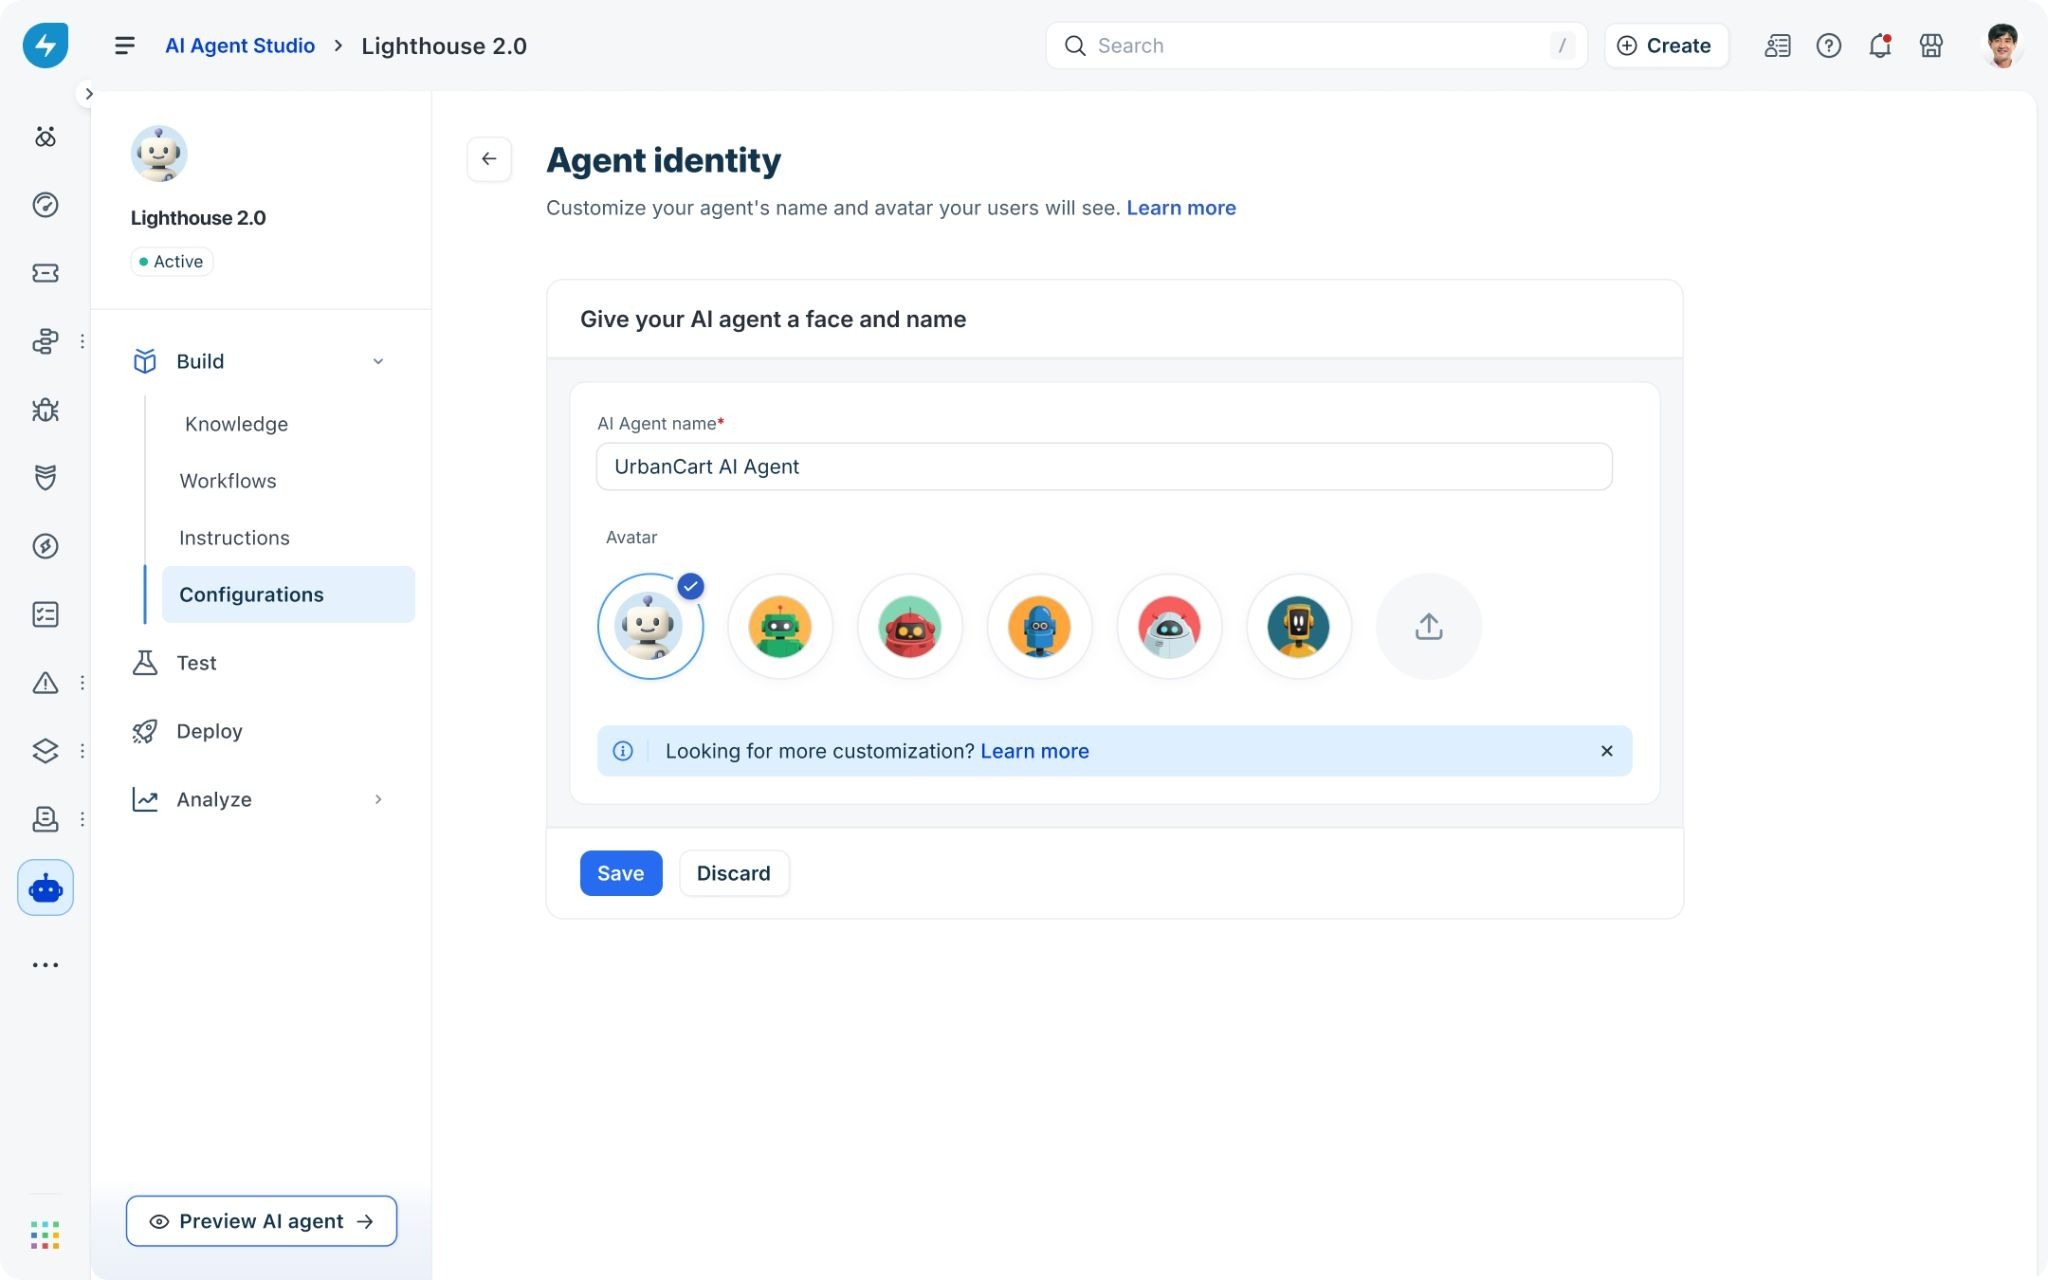
Set the agent name
On the Configurations page, click Agent identity.
In the name field, enter the name you want to display. Keep the name short and easy to recognize.
Click Save.
If your organization runs more than one AI agent — for example, one for IT and one for HR — give each a distinct name so employees can tell them apart.
Set the agent avatar
On the Configurations page, click Agent identity.
In the avatar section, select an image from the available options or upload your own branded image.
Click Save.
The name and avatar you set here appear in every channel where the agent is deployed, including the support portal, Microsoft Teams, and Slack.
Best practices
Start with the fallback message. Before going live, customize the fallback message to match your organization’s tone and point users to a clear next step. The default message is a starting point, not a final version.
Enable feedback collection from day one. Turning on Collect feedback from the start gives you data immediately. Use the Yes and No response rates to identify where the agent performs well and where knowledge gaps exist.
Add languages based on actual need. Add a language when you have employees who regularly write support requests in it, and when you have knowledge content in that language to back it up. Adding languages without supporting knowledge can produce lower-quality responses.
Test after every configuration change. Use Preview AI agent to simulate conversations after saving any configuration. Verify that the fallback message, feedback prompt, and language detection all behave as expected before changes reach employees.
Keep agent identity consistent. Use the same name and avatar across all channels. If you change the agent’s name or avatar after deployment, communicate the change to employees so they are not confused.