TABLE OF CONTENTS
- Overview
- Prerequisites
- Create a requester portal
- Customize the portal
- Configure portal settings
- Sandbox behavior
- Portal deletion impact
- Workspace deletion impact on portals
- Freshchat behavior
- API behavior
Supported plans and account modes
Plans
Freshservice Pro and Enterprise
Freshservice for Business Teams Pro
Note: If you downgrade to a plan that does not support multiple portals, all secondary portals are deleted, leaving only the default portal. Review your portal setup before you change plans.
Account modes
The details regarding multiple requester portals in this article apply exclusively to accounts in 'Employee Support (ESM)' mode (that is, accounts with workspaces enabled). While accounts in 'Managed Services (MSP)' mode also have access to multiple portals, their rules and behavior may differ, and users must switch their account mode to Employee Support to utilize the specific capabilities described here.
Overview
Use multiple requester portals to provide separate support experiences for different audiences while managing them from a single Freshservice account.
You can customize each portal by assigning specific workspaces and users, configuring authentication methods, and applying unique branding.
Portal mappings determine what users can access:
Workspace mapping controls the tickets, services, and solutions available through a portal.
User mapping controls which users can sign in to a portal.
After a portal is published, all portal-related changes are recorded in the audit log.
Note: If you are on the Enterprise plan, you can also test portal configurations in a sandbox environment before applying them in production. However, sandbox-to-production synchronization is currently not supported.
Prerequisites
To create and manage support portals, you must have the Play God with Super Admin controls at the account level to create, edit, or delete portals. Workspace admins can't perform these actions.
Before creating a portal, verify that your account has not reached its portal limit:
Create a requester portal
Use the portal setup wizard to create a new requester portal. Creating a portal establishes its identity. You can configure workspace mappings, user access, branding, and login policies after the portal is created.
Before you begin, verify that your account has not reached its portal limit.
To create a portal, follow these steps:
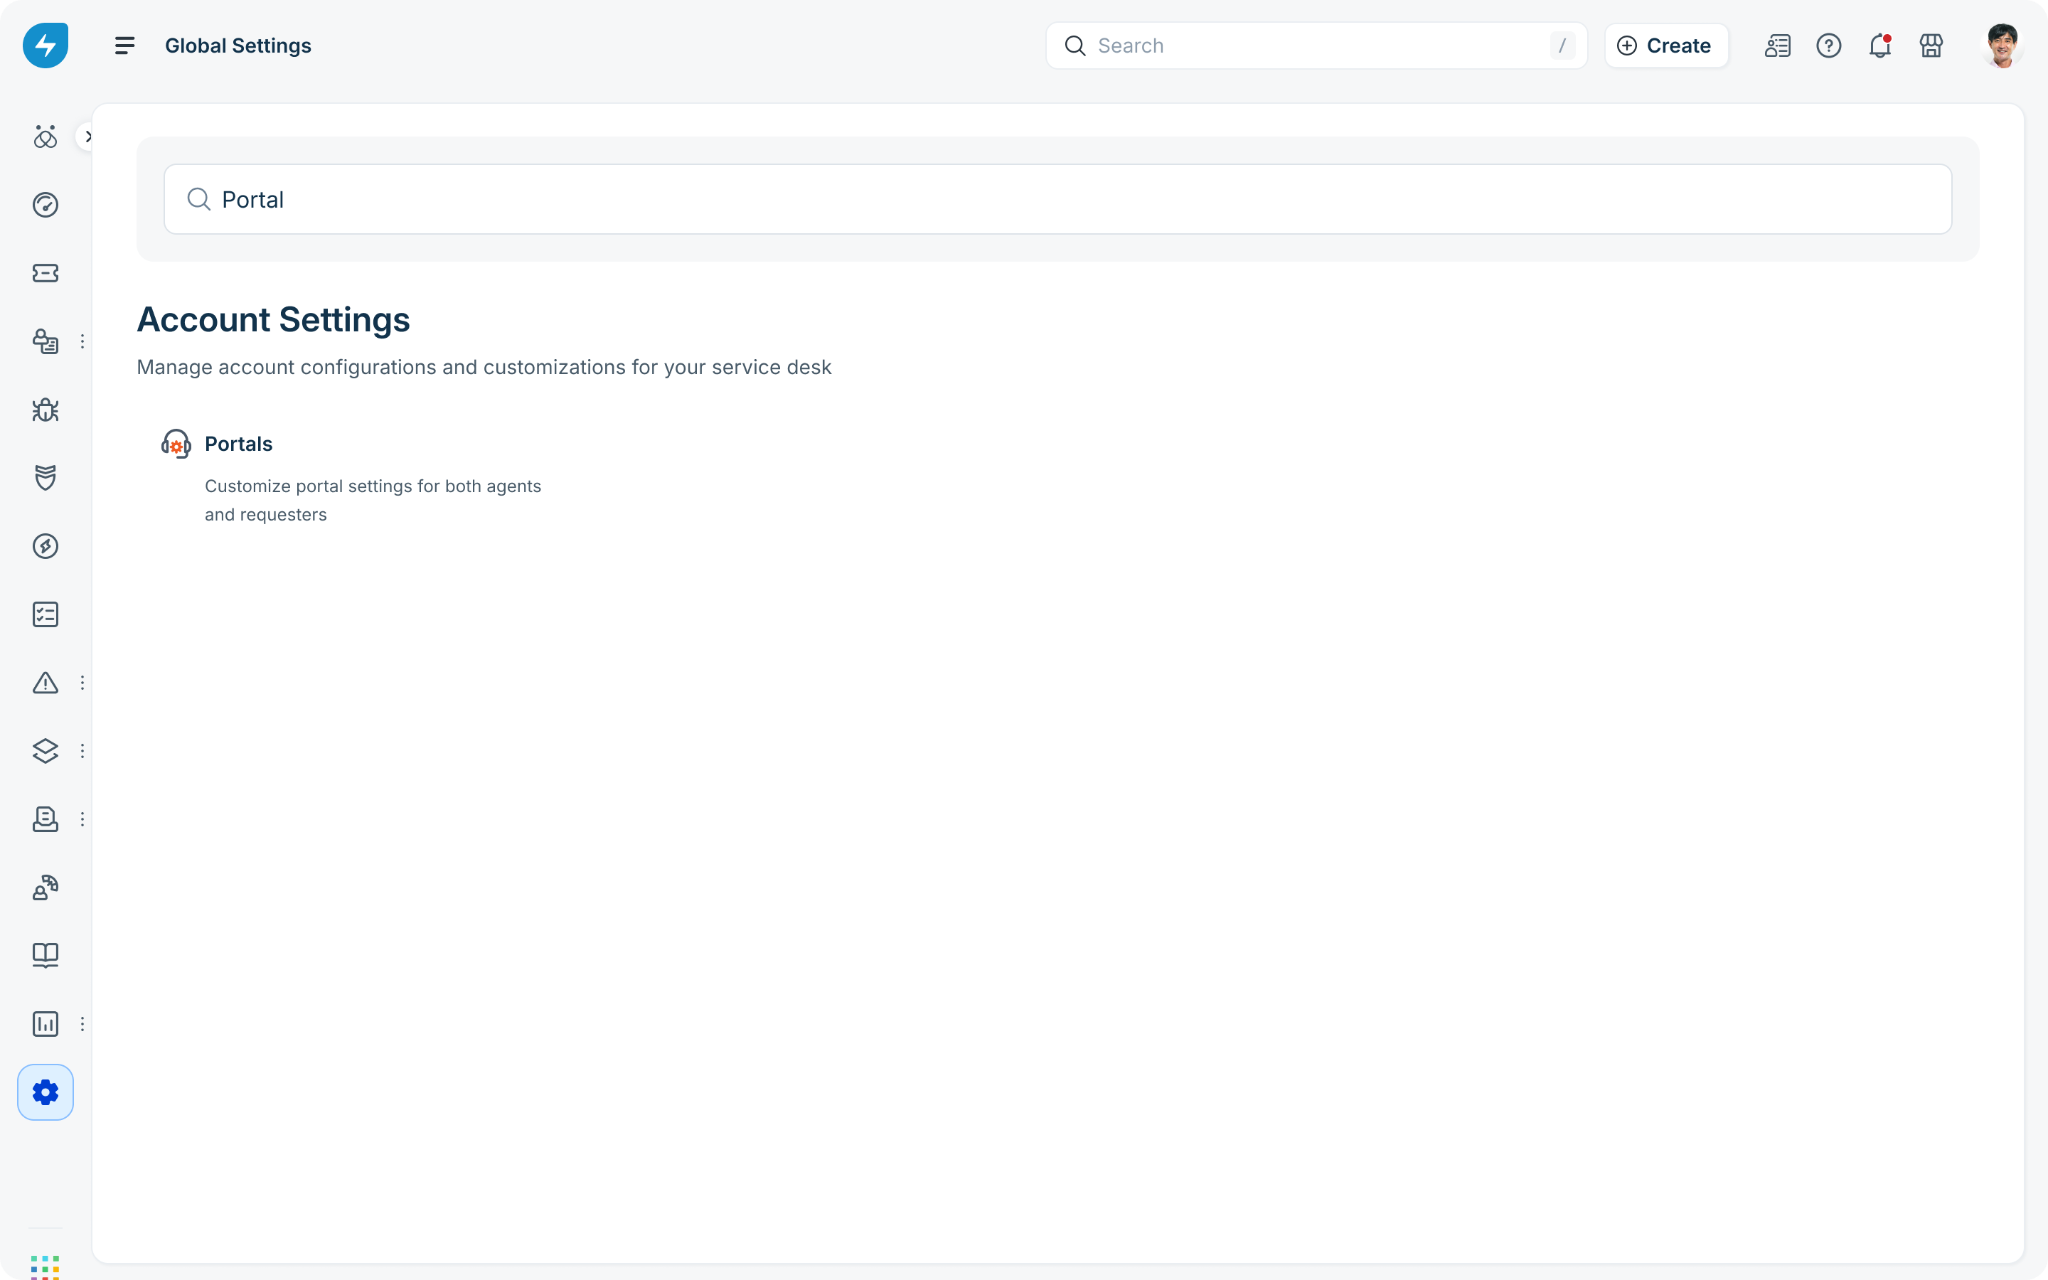
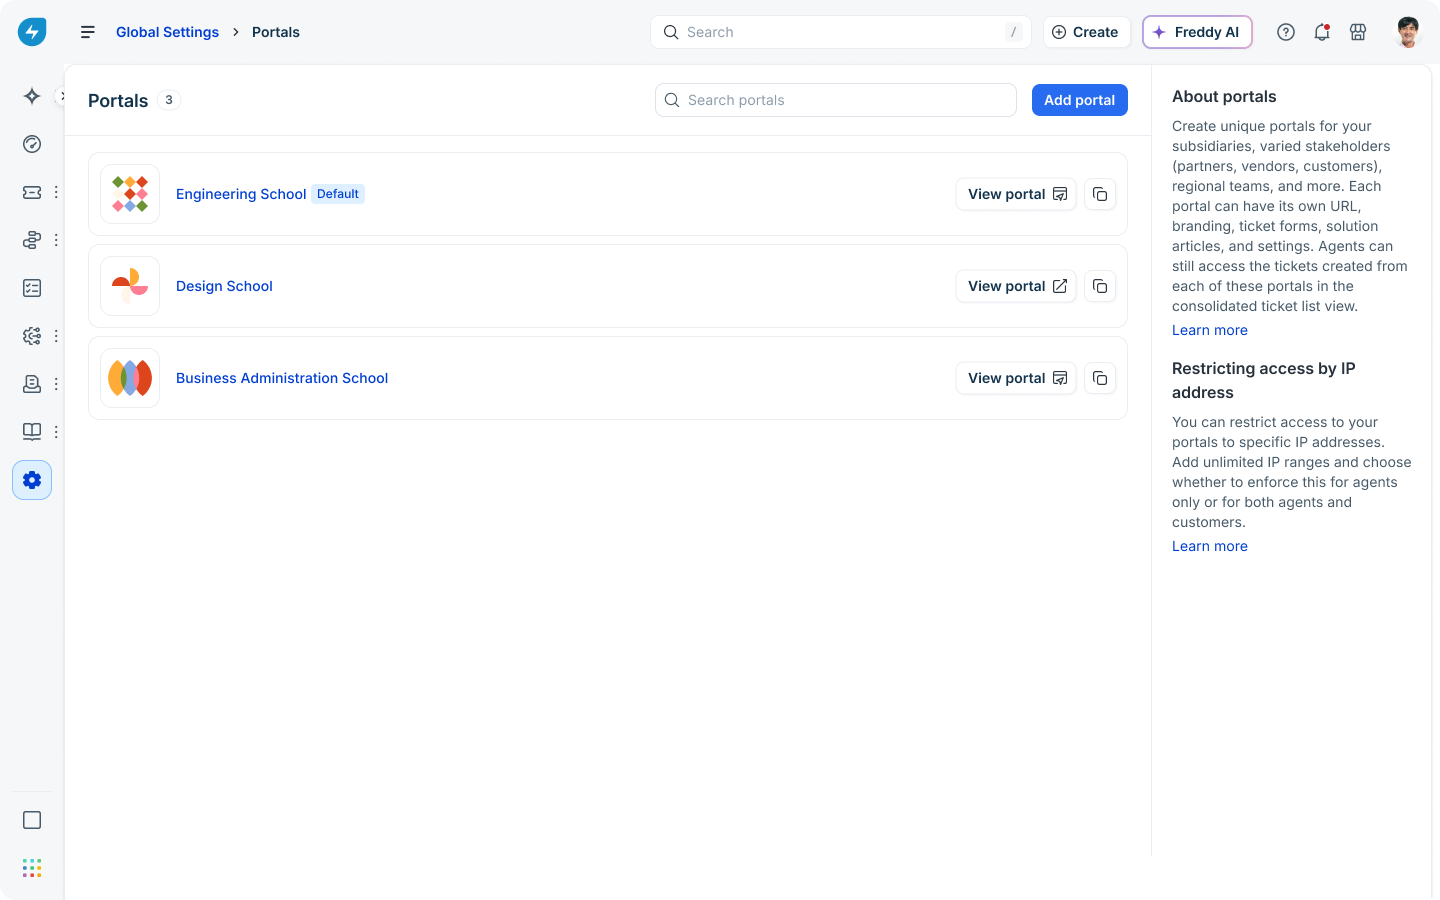
Go to Admin > Global Settings > Account Settings > Portals.
Click Add portal.
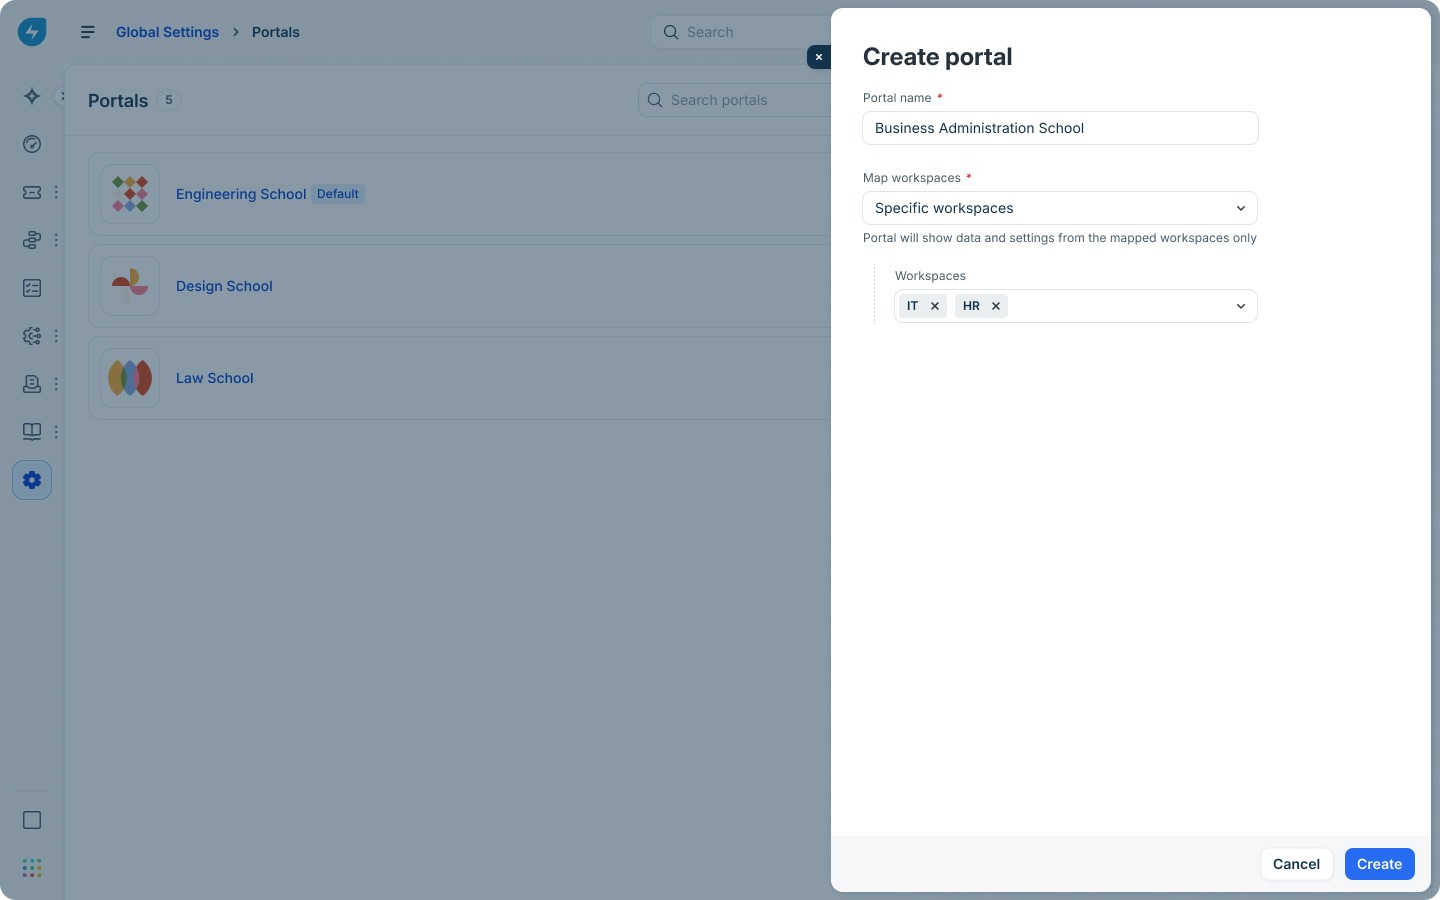
Enter a Portal name (up to 50 characters).
Use the Map workspaces drop-down menu to choose the workspace(s) for the support portal.
Click Create.
After the portal is created, you are redirected to the portal configuration page.
The portal configuration page contains two tabs:
Clone a portal
Admins can create a new portal by cloning an existing portal from the portal list page. Cloning copies the portal settings but does not copy portal customizations.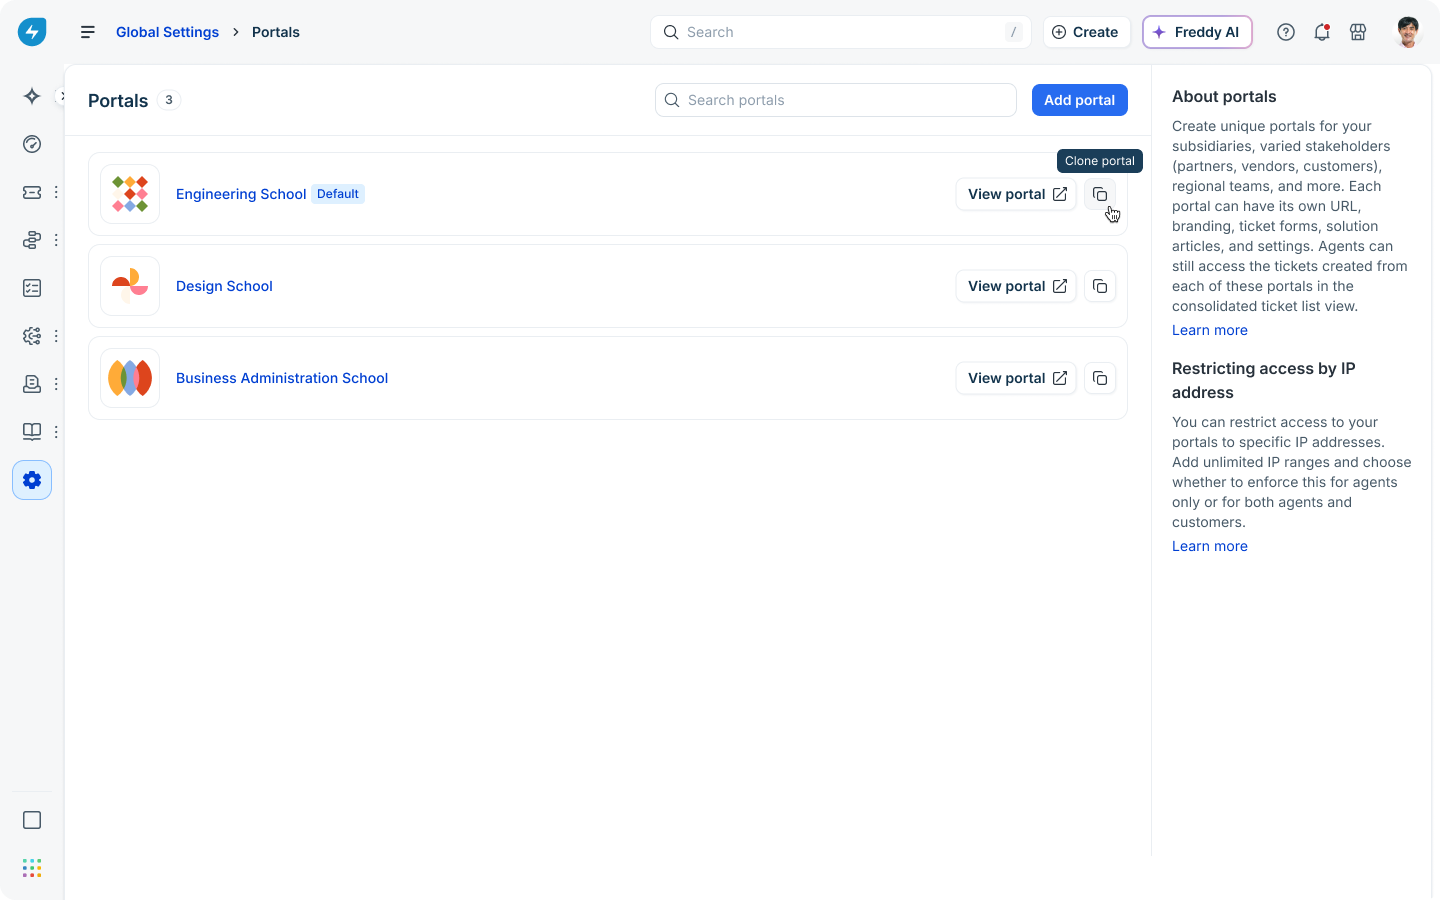
Note: The first portal created in an account becomes the default portal. The default portal cannot be deleted, and another portal cannot be designated as the default. Some system functions, such as public API calls and the Slack and Microsoft Teams service bots, always use the default portal URL.
Customize the portal
Use Homepage Designer to customize the requester-facing experience. You can configure the portal's appearance, branding, and homepage layout. Changes made in Portal customization apply only to the requester-facing experience.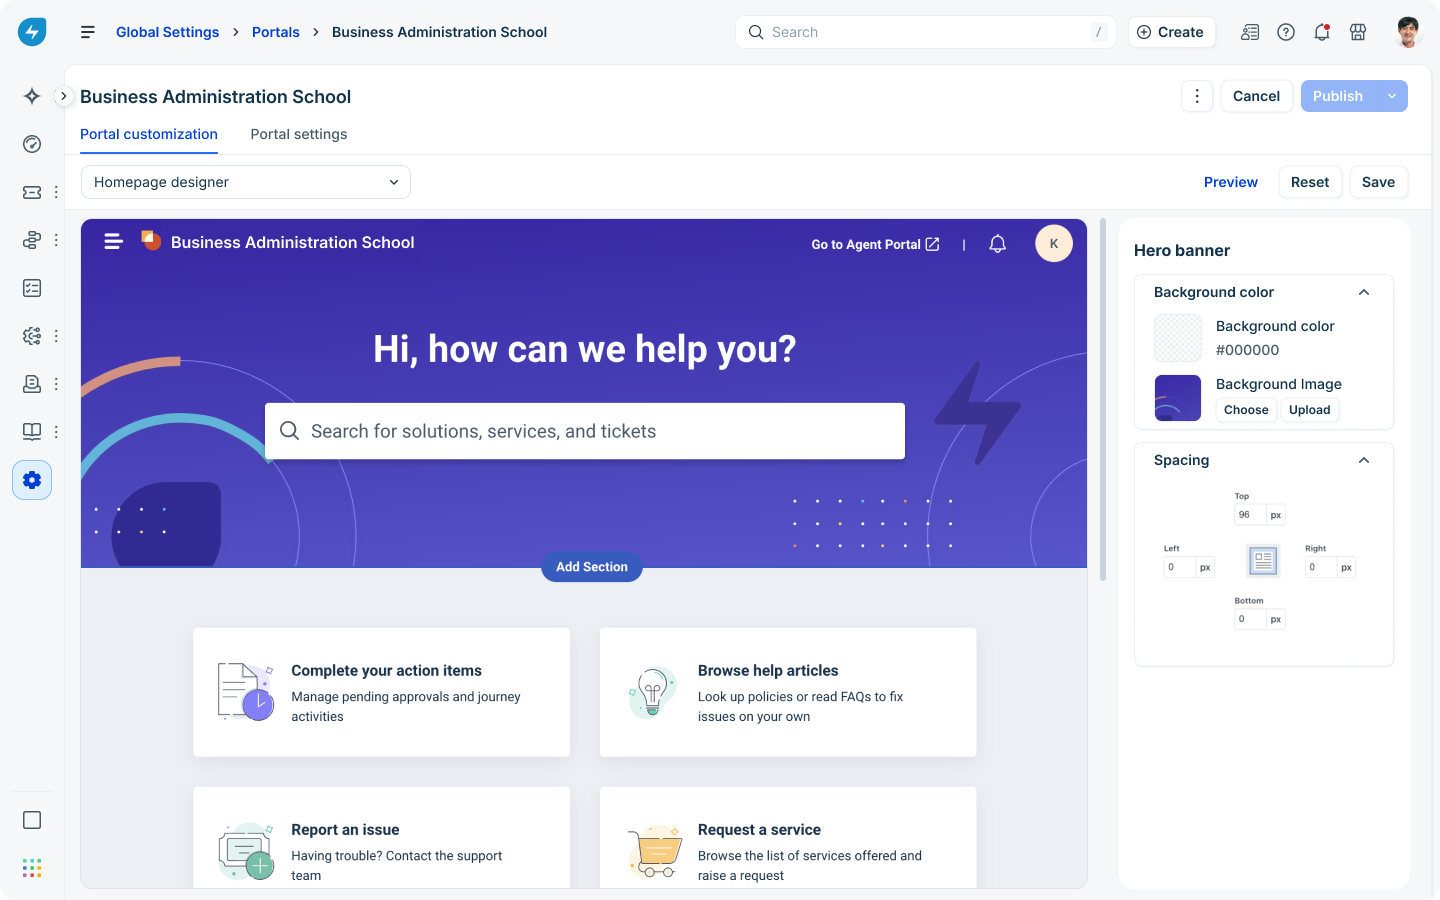
Configure portal settings
Portal settings are organized into the following sections:
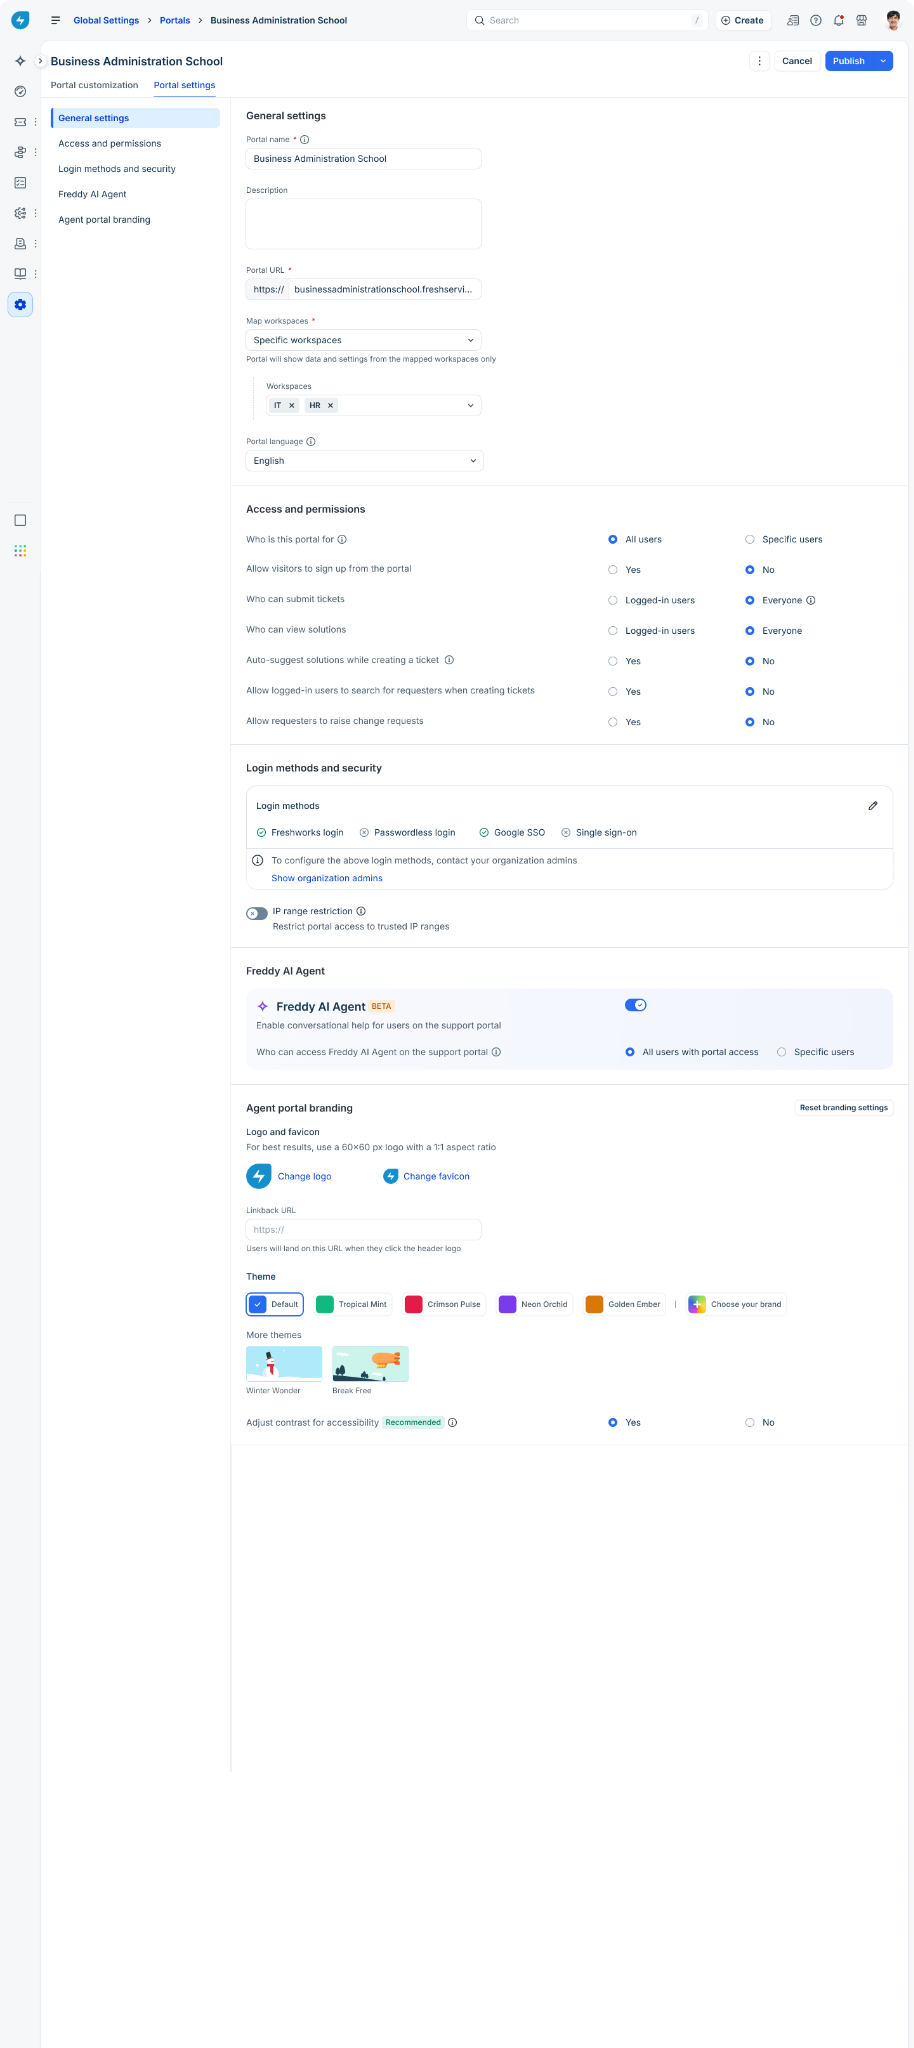
General settings
General settings cover the portal's identity and which workspaces it serves.
Portal name: Enter or update the name (50 characters maximum).
Description: Add a short description that explains the portal's purpose. This helps other admins understand its purpose at a glance. This description is shown only on the portal list page and is not exposed to requesters.

Portal URL:
Default URL: Freshservice provides a default URL on the freshservice.com subdomain (for example, https://acme.freshservice.com) to help you experiment with portals. This URL can't be customized while retaining the freshservice.com domain.
Custom domain: You can use your own branded URL (for example, https://help.acme.com).
Map workspaces: Choose All workspaces or Specific workspaces to control which settings and data the portal exposes. A portal can be mapped to all workspaces or a specific subset, and a workspace can be mapped to more than one portal.
Note: Mapping or unmapping workspaces may affect the ticket forms displayed on the portal.
Portal language: Select the default language for this portal to determine the language in which all portal content will be rendered.
Contact number: Enter the contact number requesters can use to report issues to your service desk team. If you're using the latest no-code version of the support portal, add the contact number from the 'Portal customization' tab. The number entered in 'General settings' is used only when the phone number in portal customization is empty, and only for placeholders used in your portal's custom CSS. The number in portal customization always takes priority and is the only number displayed to requesters. However, if you're on the legacy version, the number entered here will be shown to requesters on the portal as there's no separate contact number field in the portal customization tab.
Access and permissions
Access and permissions determine who can sign in to a portal and what actions they can perform within it.
Configure 'portal to user' mapping
Under Who is this portal for, choose one of:
All users: All active users on your account can access this portal.
Specific users: Only users who match the conditions you define can log into the portal.
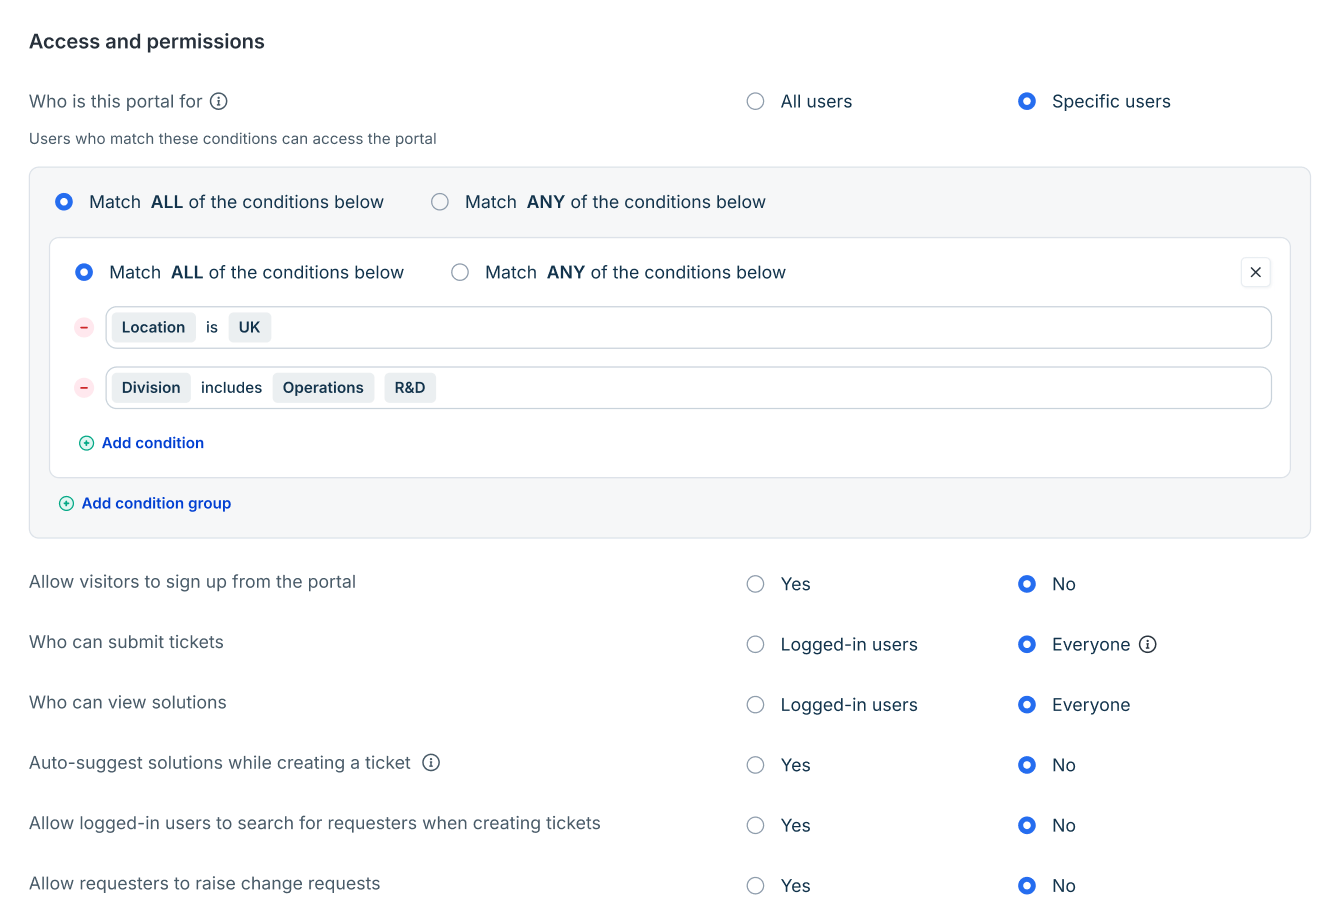
If you chose Specific users, define the access conditions:
Select Add condition to define user access criteria (for example, Location = UK).
This section supports user profile fields, including default user fields and custom user fields of the Text and Dropdown types.
If you use the Email domain field, enter the value in the format domainname.com.
Select Add condition group to combine groups of conditions for more complex logic. You can add up to 5 condition groups.
Note:
By default, agents are included in all portals. This condition group cannot currently be removed.
Users who are not mapped to a portal cannot sign in to it. If access is removed from a user, they are automatically signed out of that portal.
Why user-to-portal mapping matters
Configuring user to portal mapping is especially important for the following reasons:
Controls user access: Only users who are mapped to a portal can sign in to it.
Ensures correct portal links in email notifications: Consider a workspace that is mapped to multiple portals. When a user submits a ticket to that workspace, the email notifications they receive often contain links back to the requester portal. The system determines which portal link to include based on the user-to-portal mapping. Therefore, it is important to grant users access only to the portals that are relevant to them.
Note: For more information about how portal links are determined in notifications, see Email notifications in multiple requester portals.
Important considerations
Mapping users to a portal does not mean that unmapped users cannot contact the underlying workspaces. Users are not being mapped directly to workspaces through this configuration. User-to-portal mapping only controls portal access and determines the appropriate portal for user redirection in email notifications. As a result, users who are not mapped to a portal can still interact with the underlying workspaces through channels such as email and servicebot. However, they will not be able to sign in to or access the portals to which they are not mapped, and therefore track their tickets.
This mapping also does not affect user visibility or user selection for agents. User dropdowns within workspaces will continue to display all account users, as they do today.
Access changes can take a few minutes to apply once the settings are published (approximately 15 minutes).
Login sessions are currently maintained at a portal level but if a user logs out, they are logged out from all the portals today as it's maintained at an account level. Therefore, if a user is unmapped and their sessions gets invalidated, they will be logged out of all existing portals and will be prompted to log in again.
If a user field or value used in a portal mapping condition is deleted, the condition will break, but users currently mapped to the portal will not be unmapped automatically. Administrators should review and fix the affected conditions, then republish the portal.
The email domain restriction configured in Service Desk Settings continues to apply at the account level and is evaluated alongside portal-specific access controls. Email domain restriction applies only to non-users
It is important to understand the distinction between the two:
Email domain restrictions apply only to users who do not already exist in the account. They determine whether a user profile can be created and are enforced when users sign up through a portal or when an unknown user sends an email directly to the service desk.
Portal access conditions are evaluated for both new and existing users and determine whether a user can access a particular portal. These conditions can also include email domain-based criteria.
In summary, email domain restrictions control user creation, while portal access conditions control user creation via portal as well as portal access.
Configure other permissions
Allow visitors to sign up from the portal: Choose Yes or No to enable or disable self-service sign-up.
If Yes is selected, anyone with access to the portal URL can attempt to sign up. However, if access to the portal is restricted through user-mapping conditions or email domain restrictions, Freshservice validates the user's sign-up information against both the portal access criteria (discussed above) and any email domain restrictions configured globally in Service Desk Settings. A user profile is created only if all applicable conditions are satisfied, after which the user can sign in to the portal.
To minimize sign-up issues on open portals, we recommend one of the following approaches:
Approach 1: Use simple portal access conditions that can be evaluated using information available during sign-up, such as email domain-based conditions.
Approach 2: Ensure that all user fields referenced in the portal access criteria are also displayed on the sign-up form. This allows Freshservice to collect the information required to evaluate portal access during the sign-up process. To do this, navigate to User Fields, open the relevant field, and enable the option to display it on the sign-up form wherever supported.
Note: User field visibility on the sign-up form is configured globally. As a result, any fields will appear on the sign-up forms of all portals in the account.
Who can submit tickets: Choose Logged-in users or Everyone. If 'Everyone' is selected, Freshservice prompts users who are not logged in to provide their email address before submitting a ticket. For new users, a user profile is created using the provided email address. Before creating the profile, Freshservice validates whether the user is eligible to access the portal based on that email address. If the portal is mapped to specific users using conditions beyond simple email-domain validation (for example, attributes such as location, department, or other user properties), ticket submission will fail for new users because Freshservice does not yet have those user attributes available at the time the profile is created. Therefore, carefully review your portal access configuration before enabling ticket submission for everyone.
Who can view solutions: Choose Logged-in users or Everyone. If Everyone is selected, all the solution articles will be visible without requiring users to log in.
Auto-suggest solutions while creating a ticket: Recommends relevant knowledge base articles to help deflect ticket creation.
Allow logged-in users to search for requesters when creating tickets: If ‘Yes’ is selected, users will be able to search for other users in the ‘Requester’/’Request For’ fields.
In the Requester field, only users who are mapped to the portal will be available for selection.
Allow requesters to raise change requests: Choose Yes or No to enable change request submission from this portal. This option is disabled if IT workspaces aren't mapped to the portal.
Agent portal branding
Branding allows you to customize the portal’s visual identity and defines much of the agent portal experience. This is separate from the requester portal experience, which is configured under ‘Portal Customization’.
Logo: Select ‘Change logo’ to upload a custom logo. For best results, use an image that is 80 × 80 pixels with a 1:1 aspect ratio. By default, this logo is displayed only on the agent-facing portal. It is separate from the logo configured under ‘Portal customization’, which applies only to the requester portal.
Favicon: A favicon is the small icon displayed on your browser tab. The favicon configured here is used across both the requester and agent portals.
Linkback URL: Enter the URL that agents will be sent to when they click on your logo.
Pick a Theme:

Choose from prebuilt themes. Each theme card shows a live thumbnail preview so you can see how the portal will look before applying it.
To use your own brand colors, select Choose your brand and create a custom theme with your primary color, accent color, and background.
Adjust contrast for accessibility: Choose Yes to make sure text and UI elements meet WCAG contrast guidelines.
Login methods and security
Use this section to choose how users sign in and to limit access to trusted networks.
Under Login methods, select the authentication methods you want to enable:
Freshworks login
Passwordless login
Google SSO
Single sign-on (enterprise SSO)

SSO configuration and per-portal login policies are managed by organization admins in the Neo Admin Center. From there, org admins can apply different login policies (for example, SSO-only for one portal, password + SSO for another) to each support portal individually. Use the Show Organization Admins link in this section to identify the appropriate contacts. This link is displayed only to admins who do not have access to the Neo Admin Center. Learn more
IP range restriction: Turn this on to limit portal access to specific IP ranges. Then:
Select ‘Add new’ to enter an IP range.
Choose who the restriction applies to: Agents only, or Agents and requesters.
Enter the Start IP and End IP for each range.
Select ‘Add more’ to include additional ranges.
Freddy AI Agent
Freddy AI Agent provides conversational AI assistance directly within a requester portal. You can enable Freddy AI Agent only the default portal in the account.
To enable Freddy AI Agent:
Under Portal settings, toggle Freddy AI agent to 'On to enable it.
Under Who can access Freddy AI agent on the support portal, choose All users with portal access or Specific users depending on your requirement.

Sandbox behavior
Use a sandbox environment to test portal configurations without affecting your production account.
You can use a sandbox to validate portal behavior, branding, mappings, and deletion scenarios before making changes in production.
Supported sandbox activities
Create new portals
Configure portal-to-workspace mappings
Configure portal-to-user mappings
Test branding changes, including logos, favicons, themes, and homepage layouts
Validate portal and workspace deletion scenarios
Sandbox limitations
Portal configurations cannot be synchronized from the sandbox to production or vice-versa.
After testing, manually recreate the final configuration in your production account.
Use sandbox environments for validation and testing only.
Review portal activity in the audit log
The audit log records the following portal-related activities:
Portal creation, updates, and deletion.
Updates to portal settings, except login policy updates for individual portals
Portal deletion impact
A portal can be deleted only if all of its mapped workspaces remain mapped to at least one other portal. This requirement prevents workspaces from being left without a portal.
If deleting a portal would leave a workspace without a portal:
The deletion is blocked.
An error message is displayed.
You must first map the affected workspace to another portal.
After the workspace is mapped elsewhere, you can retry the deletion.
Note: Portal deletion is permanent and cannot be reversed. Deleted portals cannot be restored by Freshservice Support.
Workspace deletion impact on portals
Deleting a workspace does not delete any portals mapped to that workspace. If a portal no longer has any mapped workspaces:
The portal remains available.
Users who sign in see an empty state.
Administrators are prompted to map the portal to a workspace before making additional changes.
Freshchat behavior
If Freshchat is enabled, it is automatically available across all portals within that account. User sessions are currently maintained at the account level, so when the same user accesses Freshchat from different portals, they will continue to see conversations and chat history from the other portals they have used within the account.
API behavior
Freshservice REST APIs are available only through the default portal’s Freshservice URL.
Keep the following considerations in mind when integrating with Freshservice APIs:
Default portal’s custom URL and Secondary portal URLs should not be used in API requests.
API requests succeed as long as the API key belongs to an active agent.
Actions are controlled by the permissions associated with the user in the account.
Example: Consider an account with the following portals:
School of Engineering (default portal)
School of Medicine
School of Sciences
An agent who has access only to the School of Medicine portal must still use the School of Engineering URL when making API requests. This behavior exists because the default portal’s freshservice URL acts as the primary account address for all API operations.
Agent access is governed by permissions, not by the portal used to sign in. As long as the API key can authenticate the user, the API request succeeds regardless of the portal associated with the agent.
