The Looping feature enables you to automate repetitive tasks within your workflows by iterating through data sets or executing actions based on specific conditions. This powerful feature allows for intelligent workflow automation without requiring multiple manual configurations.
Availability: This feature is available for Pro and Enterprise Plans.
Modules: Ticket, Change, Problem, Release, and Tasks.
In this article:
- Common use cases
- Get started with Looping
- Loop types
- Reader node behaviour in Loops
- Approvals inside Loops
- Looping with Subflows
- Sync with Sandbox
- Activity log
- Delete and restore workflow configurations having loops
- Plan downgrades and retention periods
- Key callouts
- Best practices and tips
- Troubleshooting
Common use cases
Act on each multi-select field choices: Handle bulk operations for ticket/service request/incident/task creation intelligently.
Iterate over multiple matching records in custom objects: Automate complex business logic using custom data structures.
Iterate over JSON response arrays and act on each element: Process and filter data from external systems at scale.
Parallel Approval workflows: Simultaneously trigger approvals to multiple stakeholders for 40-50% faster processing.
Loop through associated tickets or multiple service items: Accelerate incident resolution by iterating through associated tickets or service items.
Bulk Asset and CI associations: Iterate over multiple assets simultaneously for updates, compliance, and lifecycle management.
Smart notification and escalation: Repetitive monitoring and escalation until resolution - zero tickets missed.
CSAT response automation: Retrieve and act on each CSAT survey response.
Employee onboarding and offboarding: Iterate over employee records fetched from third-party apps using API or Orchestration, and automate flows for onboarding/offboarding.
Get started with Looping
Add a Loop node to your workflow
You can add a Loop node to your workflow both during the creation and update processes:
During workflow creation: Drag and drop the "Loop" node from the left-hand panel onto your workflow canvas. A configuration overlay will appear where you can set up your loop parameters.
During workflow update: Add a Loop node between any two existing nodes, or position it as the final node in your workflow. The drag-and-drop experience works seamlessly with your existing workflow nodes.
Important configuration aspects
When configuring Loop nodes, ensure to follow these rules:
Event nodes cannot be placed immediately next to a Loop node.
Loop nodes cannot be inserted between two nodes when the node on the right side is an Event node.
The last node inside a loop cannot be a Condition node.
If an Approval is the last node inside a loop with no approved/rejected path afterward, the workflow will proceed to the next set of nodes outside the loop without waiting for approvals.
Subflows can be used inside loop nodes.

Operational limits
To ensure optimal performance and stability, the following limits apply to Loop nodes.
Maximum nodes inside a single loop: 25
Maximum subflows inside a single loop: 5
Maximum loop nodes per workflow branch or path: 3
Maximum iterations per loop (‘for each’ loop) and maximum retry attempts (‘do while’ loop): 50
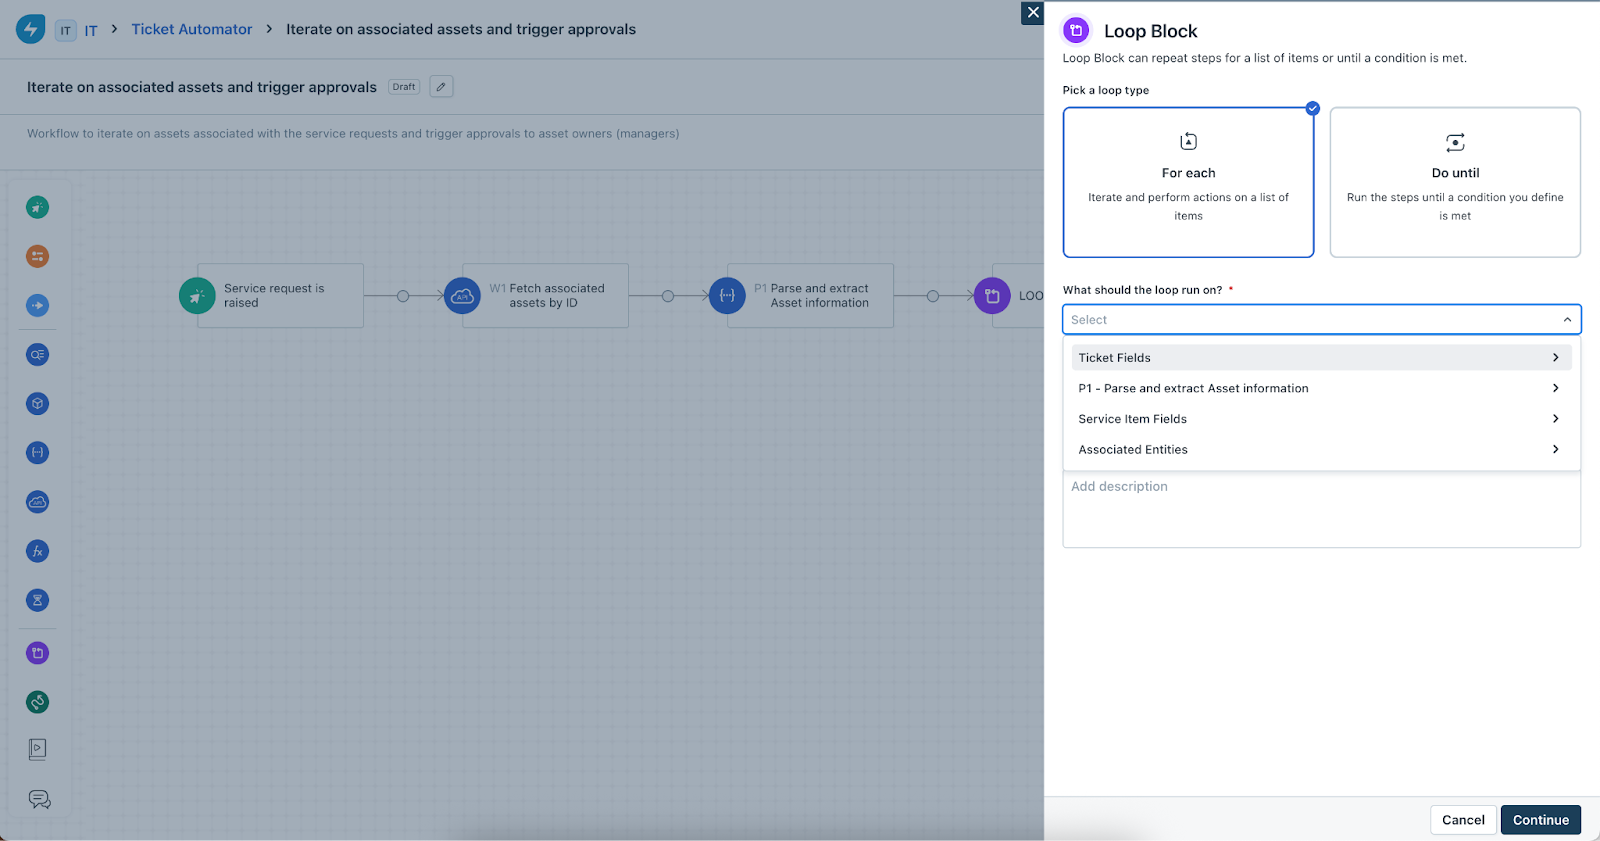
Loop types
‘For Each’ Loop
The ‘For Each’ loop allows you to iterate through a collection of data, and execute the same set of actions for each item.
Select a data source
When you create a For Each loop, you must specify the data source to iterate over. Supported data sources include:
JSON Parser Output
Select the specific array or variable from your JSON Parser output. For example, select "Asset Display ID" from an "Assets" array to iterate through each asset's display ID. The iteration variable represents each individual value or object in the array.
Multi-Select and Lookup Fields
Choose a specific multi-select or lookup field from your ticket or change. For example, select a multi-select field containing requested items to iterate through each selection.
Note: Lookup fields do not apply to Problem, Release, Task, or Software User workflows. Only multi-select fields apply to most workflows, with limitations for Software User workflows.
Associated Entities
Iterate through associated entities such as Assets out of the box. For other associated entities, leverage the Web Request/API to fetch the data and parse it using JSON Parser.
Custom Object records
Iterate over multiple matching records from a custom object, pulled into the workflow via the Reader node.
Configure actions inside For Each loops
Use iteration variables in Actions
Once you set your data source, you can configure a variety of actions that will execute for each iteration.
Add Task: Create a separate task for each iteration based on the current iteration's data.
Send Email: Send emails with dynamic content that changes for each iteration.
Add Note: Add notes specific to each iteration's data.
Property Updates: Update properties of related records for each iteration.
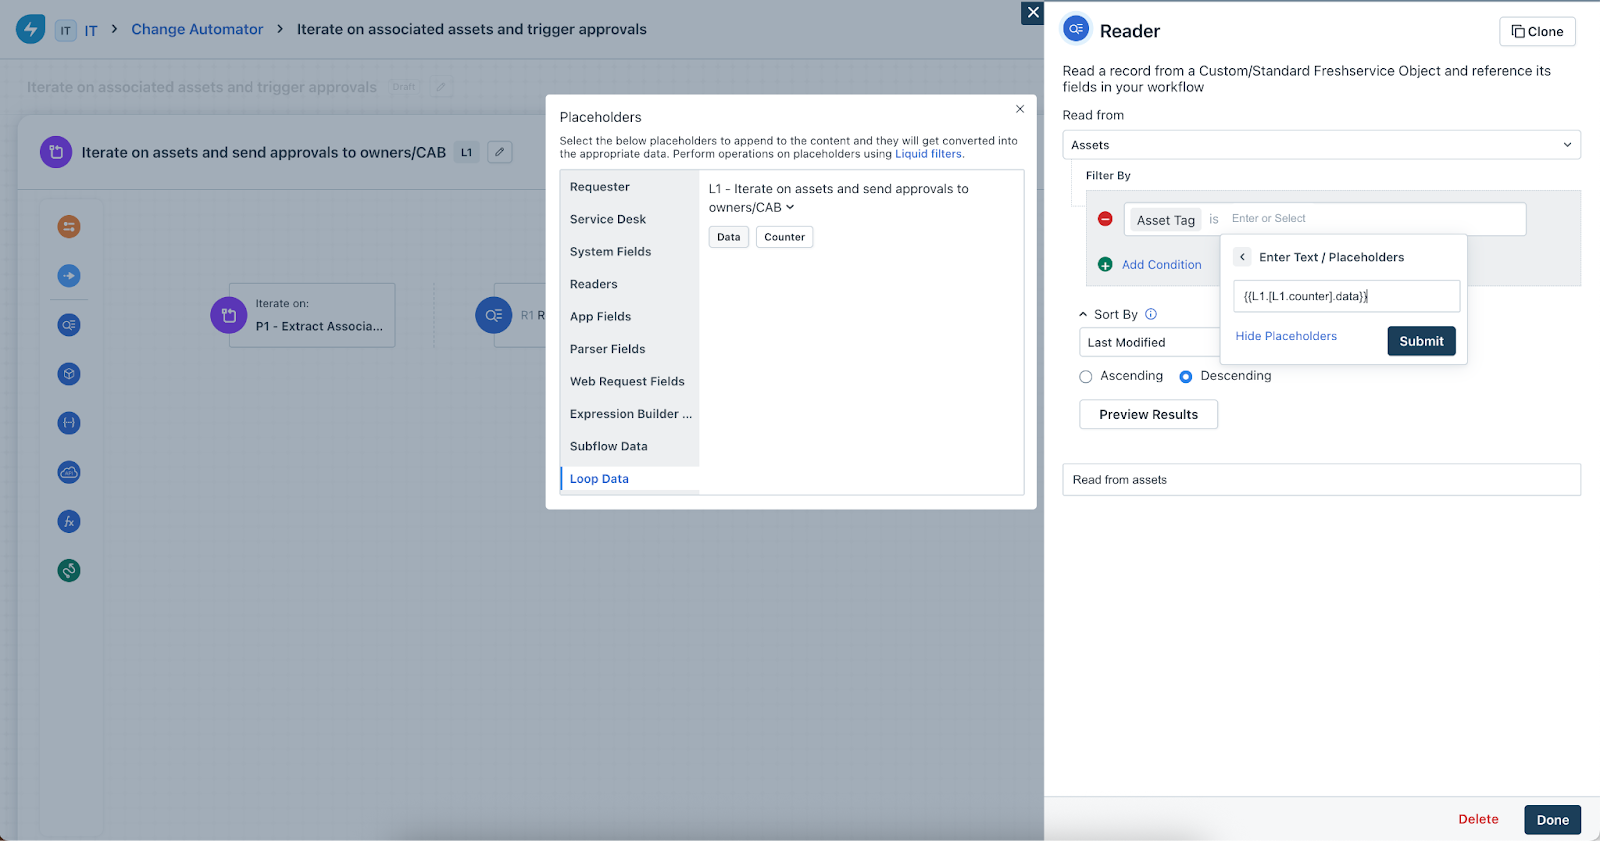
Placeholder convention
Use the following placeholder format to reference iteration data within your actions: {{L1.[L1.counter].data}}
where, L1 represents your Loop node identifier. The iteration indexing starts from zero.
Condition nodes in For Each loops
When adding a Condition node inside a For Each loop, fields from your entity object (such as Ticket or Change) are available for condition evaluation.
You can also use placeholders from subflow inputs (when a subflow is used inside the loop), subflow outputs (when a subflow is positioned before the loop in the workflow), and standard and custom object fields. For condition node, the placeholder from the loop iteration will be “L1.Data”.

Array handling in Conditions
For arrays of strings or numbers, such as an array of strings like ["ram@freshservice.com", " diana@freshservice.com"], the loop iterates through each string value. Configure conditions using the iteration index or loop variable to evaluate based on the current iteration.
Output limitation: Output from readers returning multiple records cannot be used directly in condition nodes. They can only be used as data sources. This is because of duplication.
Condition paths
If no nodes exist in either the "Yes" or "No" path of a condition, the workflow proceeds directly to the next iteration.
Event and Timer Nodes in For Each loops
Event nodes are not applicable within For Each loops. Timer nodes are not applicable within For Each loops.
Subflows in For Each loops
You can integrate subflows within your For Each loops.
Input configuration: Provide values using iteration data placeholders. Also use standard subflow placeholders from your main workflow.
Output usage: Subflow outputs can be referenced in subsequent nodes within the loop using the format: S1.Key (where, S1 is your subflow identifier).
Subflow restrictions
Subflows containing timer nodes cannot be used in scheduled workflows. For scheduled workflows, subflows with both approval and timer nodes cannot be added to loops. If you encounter a restriction message ("Subflows with timer node can't be used in scheduled workflows"), clone the subflow, create a new version, and remove the node which is causing the validation to fail.

Additional node support in For Each loops
Expression nodes
Support placeholders from your workflow's standard object, include the loop's iteration index variable, and reference subflow placeholders as needed.
Reader nodes
Only single-record output configurations can be used inside loops. Multi-record Reader outputs cannot be directly used within For Each loops.
Orchestration and Web Request nodes
Support all the standard workflow object placeholders, include the loop's iteration index variable, and reference subflow placeholders.
JSON Parser nodes
Support the loop's iteration index variable and include subflow placeholders (arrays of strings, arrays of numbers, and object arrays).
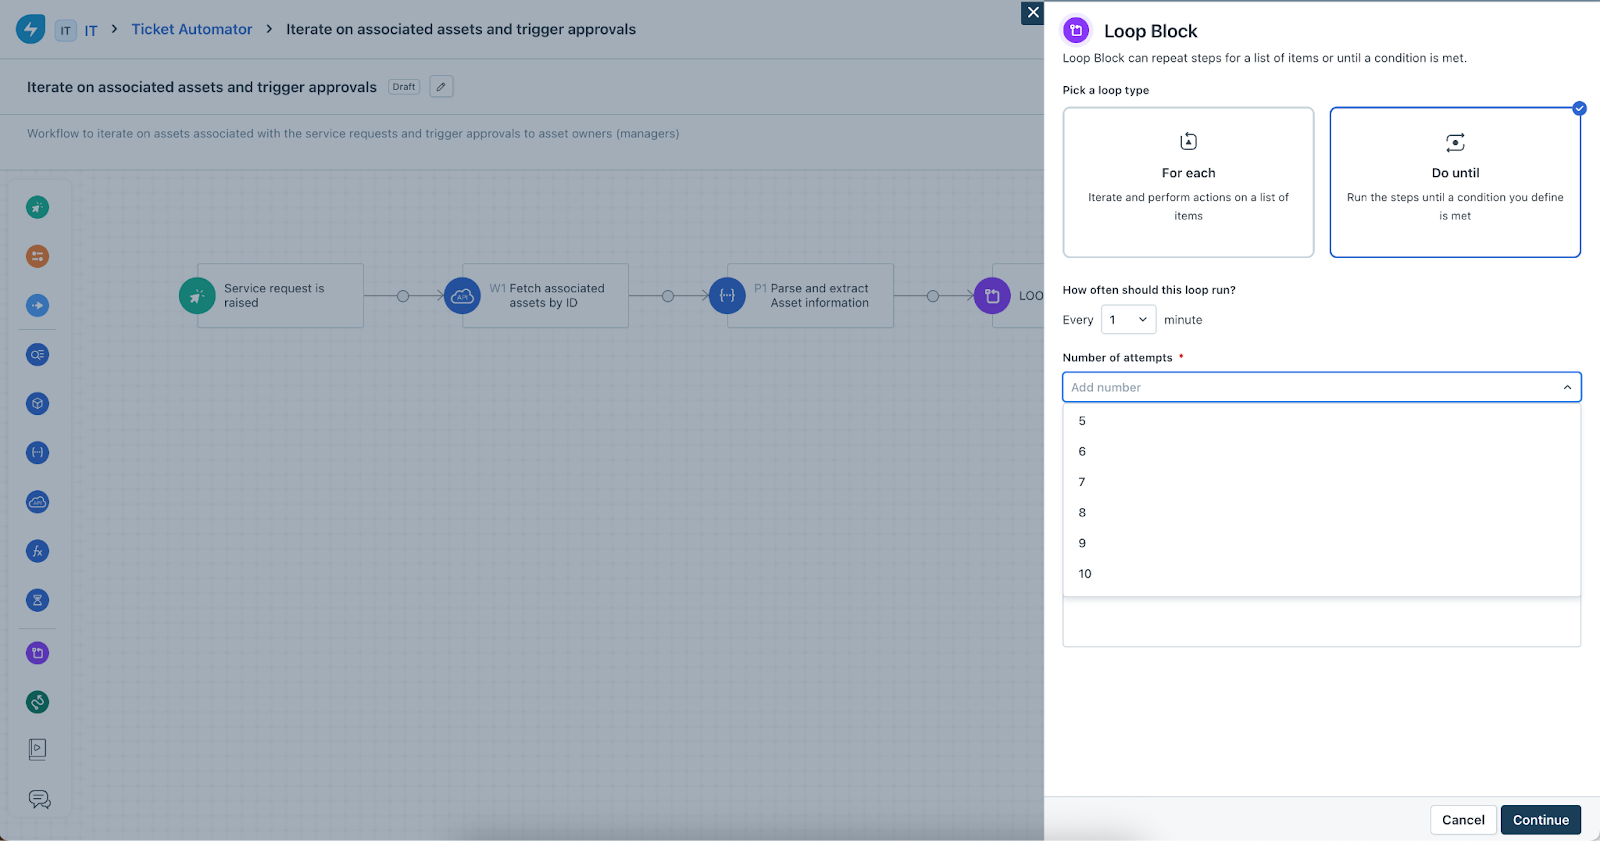
‘Do While’ Loop
The ‘Do While’ loop executes a set of actions repeatedly until a specified exit condition is met.
Core configuration
When setting up a Do While loop:
Exit condition: Define the condition that (when true) will terminate the loop.
Interval: Specify the time interval between loop iterations (measured in minutes). Minimum duration is 1 minute and maximum duration is 15 minutes.
Actions: Configure actions to repeat during each iteration.

Execution behavior
First iteration: The loop always executes at least once on the first iteration.
Condition checking: After each iteration completes, the exit condition is evaluated. If true, the loop terminates. If false, the system waits for the specified interval, then executes the next iteration.
Node support in Do While loops
Condition nodes
Configure exit conditions similar to standard condition nodes in workflows. Support placeholders from subflow inputs (when used inside the loop) and subflow outputs (when positioned before the loop).
Action nodes
Execute the same actions repeatedly until the exit condition is met. Repeat actions based on the defined time interval. Support placeholders from standard workflow objects and subflows.
Event and Timer nodes
Event nodes are not applicable within Do While loops. The Interval Node replaces the standard timer node and defines the frequency between executions.
Expression nodes
Support standard workflow object placeholders and reference subflow placeholders.
Reader nodes
Only single-record output configurations work inside Do While loops.
Orchestration and Web Request nodes
Support all the standard workflow object placeholders and reference subflow placeholders.
JSON Parser nodes
Support subflow placeholder conventions.
Subflows in Do While loops
Input configuration: Use standard subflow value placeholders from your workflow. Reference other node placeholders from inside the loop.
Output usage: Subflow outputs can be used in subsequent nodes using S1.Key format.
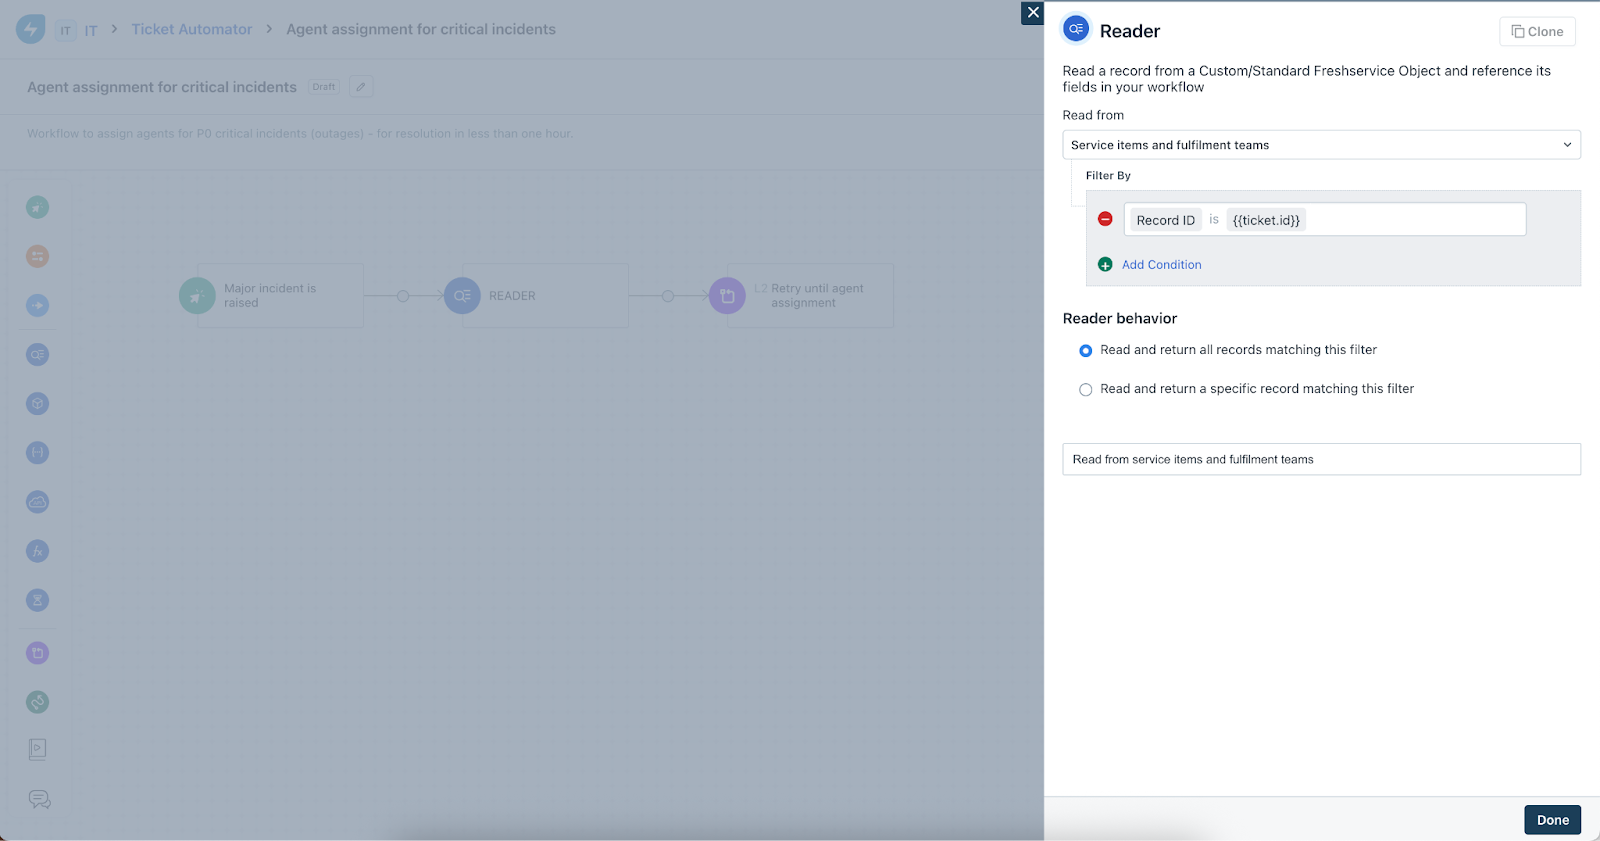
Reader node behaviour in Loops
Reader nodes can serve as data sources for ‘For Each’ loops, allowing you to iterate over multiple records returned by a Reader query.
Configure Readers for loop iteration
To use a Reader as a loop data source:
Enable Multi-Record Output: Configure your Reader to return more than one matching record from the custom object.
Selection: Only Readers configured to return multiple records will appear in the list of available data sources for loops.
Default Sorting: Records are returned sorted by most recently updated or modified in descending order by default.
Display: The Reader label (for example, "R1.Reader Label") is displayed in the data source selection dropdown.
Configuration options
When opening a Reader node for configuration, a new UI displays your multi-record setting. The corresponding radio button is pre-selected based on your current configuration. By default, the option for "Single record return only" is selected.
Backward compatibility
Existing Reader configurations: Continue to work as before without any changes needed.
New Reader configurations: If set to return multiple records, the Reader appears as a loop data source. If set to return a single record only, it does not appear as a loop data source (uses current Reader execution).
Edge cases and limitations
JSON Parser Placeholders: Only apply to string outputs from Readers.
Multi-Record Output Limitation: Output from Readers configured for multiple records cannot be used directly in Condition nodes.
Existing Execution: Configurations remain unchanged and continue to work as previously configured.
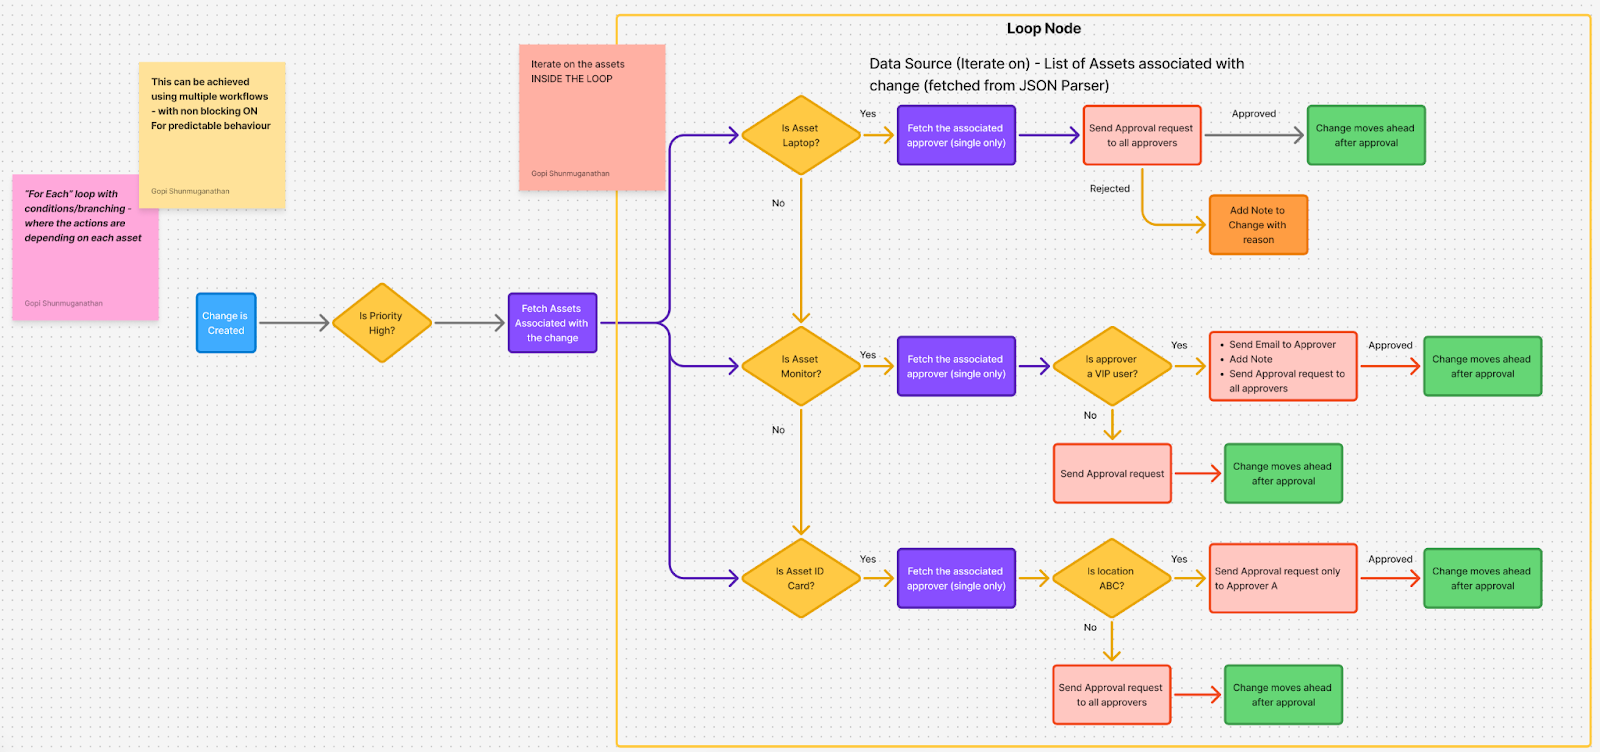
Approvals inside Loops
Approval configuration
Use case and configuration:

You can implement approvals in loops for two different scenarios.
Scenario 1: Consistent Approvals Across All Iterations
The same approval action executes for every loop iteration. For example, a loop iterates through impacted services or assets in a change record. For each service or asset, an associated owner or CAB must approve. An approval is triggered for each owner or CAB automatically.
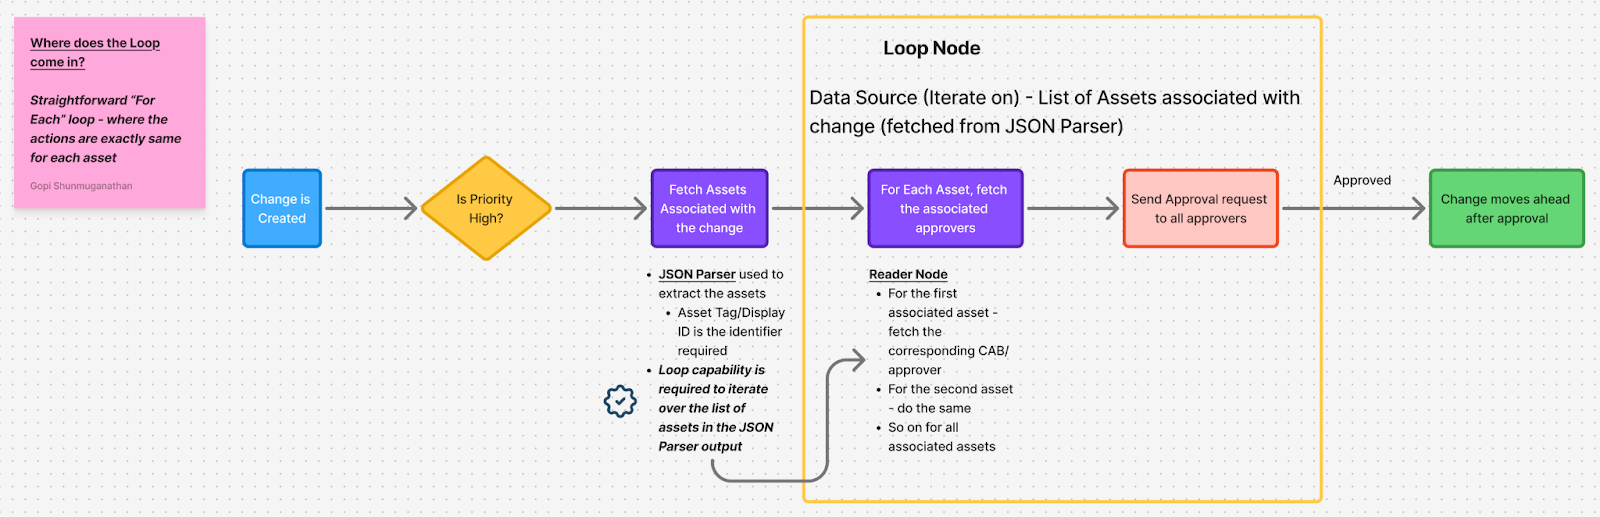
Scenario 2: Conditional Approvals
Approval actions vary depending on the iteration data. For example, after retrieving different asset owners in each iteration, different approval paths are triggered based on the asset type, owner, location or other conditions. Each iteration may route to different approvers.
Approval Execution Modes
The approval execution behavior depends on your Workflow Automator settings in Global Settings, specifically when non-blocking approvals are enabled. (For more information on non-blocking execution for approvals, refer to this article).
Non-blocking Approvals Enabled
When non-blocking approvals are turned on:
Each iteration creates an approval that fires immediately.
Multiple approval groups are created, one for each iteration (if the new approval groups capability is enabled).
Without the new approval groups capability, all approvals are merged into a single set.
The loop pauses and waits for all approval groups to be approved or rejected before advancing.
After all approvals are completed, the workflow proceeds to the next step.
Non-blocking Approvals Disabled
When non-blocking approvals are turned off:
Each iteration fires an approval sequentially.
The loop waits for the current iteration's approval to be completed (approved or rejected) before moving to the next iteration.
Hence, customers are strongly recommended to move to the new approvals capability and enable the non-blocking workflow execution for the most optimal automation loop.
In case of parallel approvals, the same approval rule will apply for each approval group created as part of each iteration.
Looping with Subflows
Subflows provide modular workflow logic that can be reused and combined within loops. By configuring subflows within loops, customers can re-use the loop block itself across multiple workflows.
Subflows within ‘For Each’ loop
Pass iteration data as subflow inputs. Reference subflow outputs in subsequent loop nodes. Restrictions apply to subflows with timers or certain approval configurations.
Subflows within ‘Do While’ loop
Input by passing standard workflow placeholders and loop node placeholders. Output using S1.Key format to reference subflow results in subsequent iterations.
Sync with Sandbox
Automatic Loop Creation: When creating a Sandbox, if production workflows contain Loop nodes, they are automatically created in the Sandbox environment.
No Separate Configuration: Loop nodes do not require a separate configuration set item.
Source-to-Target sync
When syncing workflows containing Loop nodes from source to target instances:
Node sync: Loop nodes are treated like any other workflow node and are synced accordingly.
Dependencies: All required fields and entities used within the loop or its subflows must exist in the target instance.
Subflow handling: Linked subflows are also synced following the same process as subflows.
Sync scenarios
Positive: Standard workflow sync behavior supported.
Negative or error cases: Same as current workflow sync, including handling of name conflicts in the target environment's trash workflows.
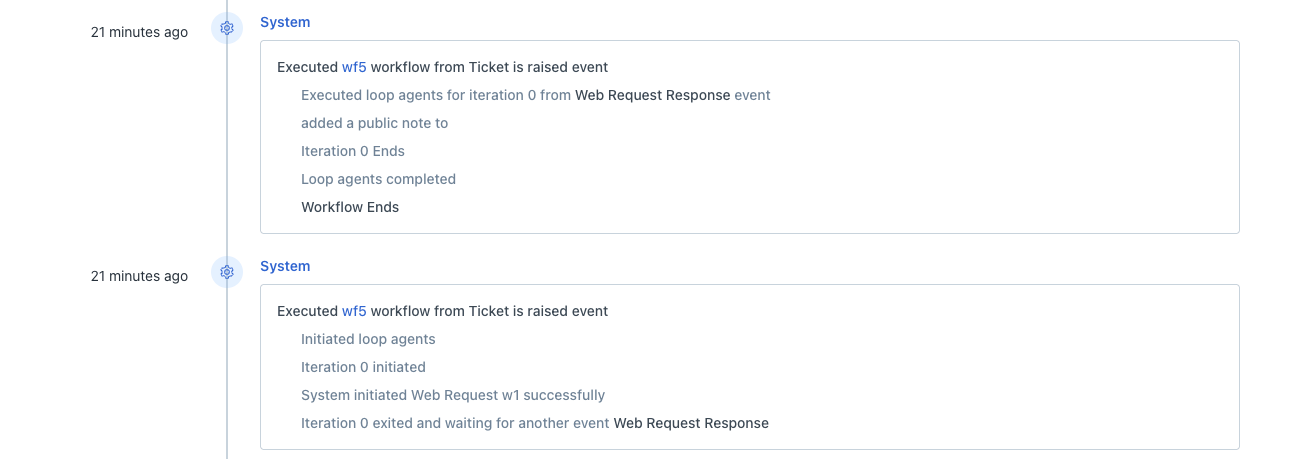
Activity log
Activity log for loop being executed:

Activity log when loop waits for web request response and then resumes:
Delete and restore workflow configurations having loops
Deletion behavior
When you delete a workflow containing Loop nodes:
The workflow is moved to the trash.
State transitions follow standard behavior (Active becomes Inactive; Inactive and Draft states remain unchanged).
Subflows linked to the workflow remain in their original/source location.
Loop nodes are treated as standard workflow nodes.
Restoration process (restoring a workflow from trash)
General restoration
If a workflow with the same name and state was created during the deletion period, a rename request is shown. Workflows are restored in Inactive or Draft state. Workflow execution resumes only after activation and only for new matching events.
‘For Each’ Loop restoration
If a workflow was deleted mid-iteration (for example, at the 5th iteration of 10 records), the loop does not stop at that point.The expected number of iterations (depending on the number of records) will be completed.
After restoration and reactivation, the loop restarts from the beginning (index 0) for the corresponding event/trigger.
‘Do While’ Loop restoration
When a workflow containing a loop is deleted, if there is no approval event inside the loop, it will run and complete the execution till the end.
During restoration, there will not be any execution (same as the usual workflow delete and restore operations). After restoration on trigger, the workflow will start executing.
If a workflow was deleted after multiple iterations but before the exit condition was met - upon restoration and reactivation, the loop executes at least once.
The exit condition is re-evaluated from the start.
Plan downgrades and retention periods
When customers downgrade their plan to Growth or Starter:
Customers are first notified that the loop nodes configured inside workflows will be deleted after 30 days from the date of plan downgrade.
During the grace period (for 30 days after downgrade), workflows with Loop nodes continue to execute normally.
During the 30-day grace period
Workflows execute normally with Loop nodes active.
Loop node configurations become read-only.
Loop nodes can only be deleted (not modified or cloned).
After the 30-day grace period
Workflows having Loop nodes are automatically deactivated.
Loop nodes display the message: "Loop node has been modified due to plan downgrade. Please modify the workflow for proper execution." These nodes can only be deleted.
If the admin attempts to activate a workflow with Loop nodes, the message appears: "Cannot activate workflow due to account plan downgrade and loop nodes. Remove those and try again."
Upgrade during the grace period
If customers again upgrade to Pro Plan or higher within the 30-day grace period, everything resumes to normal operation. No additional action is required.
Upgrade after the 30-day period
If customers upgrade after the 30-day grace period, the data in the loop nodes would have been removed by then - so the only option is to delete the loop node and recreate the same.
Key callouts
Loop inside subflows is not supported.
Loop inside loop is not supported.
Naming convention:
A loop node’s label cannot be reused in the same workflow.
Subflows or other workflows can have the same name as the loop node.
Editing a loop configuration would have the below experience:
When the workflow is opened in “edit” mode > open the loop node and click edit > this will enable editing for the loop.
Opening the workflow normally as read only > when the loop node is opened > only the read only view is supported.
Cloning:
Not supported for Loops, since the details such as data source need to be updated and this causes duplication.
If the loop encounters an error during execution (including empty values being returned from the data source or the placeholder being resolved wrongly) - only that particular workflow will be disrupted (subsequent iterations will also not resume); subsequent workflows will not be impacted and will be executed as usual.
If the timer is the last node in the workflow, and it is configured immediately after a loop:
If the loop fails due to no data source - the activity log will not print the “workflow ends” message as the workflow is stuck on the timer and the previous node is not executed.
When the loop (a particular iteration) is waiting for an event like web request/orchestration response or approval - after the response is received and the next iteration resumes, in activities it will be mentioned that the “loop has been initiated”. This is to ensure continuity of the loop being called out clearly.
When an approval node is configured as the last node inside a subflow, and that subflow is used as the last node inside a loop:
The “Loop Completed” activity cannot be logged after the final iteration (in the new approvals process).
Recommendations:
Do not have approval as the last node inside a subflow.
Even if approval has to be the last node inside a subflow - do not have that subflow as the last node within a loop.
In the following scenarios, the “Workflow Ends” activity cannot be logged.
Approval within a Loop Node:
When an Approval node is placed inside a Loop node, and that Loop node is the final node in the workflow.
Approval within a Subflow inside a Loop Node:
When an Approval node is inside a Subflow, and that Subflow is inside a Loop node, with the Loop node being the final node of the workflow.
Recommendations:
Do not have approval as the last node inside a loop when the loop is the final node in the workflow.
Do not have approval as the last node inside a subflow which is inside a loop - when the loop is the final node in the workflow.
Best practices and tips
Start simple: Begin with ‘For Each’ loops using a single data source and ‘Do While’ loops having the required level of retry attempts.
Test thoroughly: Always test your loop configurations in a sandbox environment before deploying to production.
Monitor iterations: Keep the number of iterations under 50 to ensure optimal performance.
Use meaningful names: Label your loop nodes clearly to make your workflows easier to maintain.
Define clear exit conditions for Do While loop: For optimal execution and performance with reliable outcomes.
Plan for approvals: We strongly recommend switching to the new approvals capability and non-blocking execution before configuring approvals in your loop. Otherwise, the loop will keep waiting for the approval decision, which is not ideal.
Subflow organization: Leverage subflows as much as possible within loops - to keep configurations modular and reusable across multiple loops (within the same or different workflows).
Document complex loops: Add descriptions to complex loops to help your team understand the automation logic.
Troubleshooting
Loop nodes are not appearing in my workflow: Verify whether your plan is Pro or Enterprise.
Data source not available for my loop: For Reader nodes, verify the Reader is configured to return multiple records. For multi-select fields, confirm the field exists and supports iteration.
Workflow with loop nodes is not executing as expected:
Check that all required fields referenced in the loop exist in your instance.
Verify subflows linked to the loop are active and have the correct input/output parameters mapped.
Ensure Event nodes are not positioned immediately after Loop nodes.
Subflow with a timer cannot be added to the loop node: Clone the subflow and remove the timer node. Create a new subflow version without the timer to use in your loop.