
 Community
 Video Library
 Agent Training
 Freshservice
 Freshdesk
 Freshchat
 Freshcaller
 Freshsales
 Freshteam
 Freshworks Neo
 Freshsurvey
 Freshservice for MSP
 TABLE OF CONTENTS
- Overview
- Connector app setup and prerequisites
- Azure DevOps permissions
- Create connections
- Manage connections
- Create recipes
- Manage recipes
- Customize recipes
Overview
The Azure DevOps Connector app enables seamless integration between Freshservice and Azure, allowing you to track work items, pull requests, and pipeline runs within your change management process.
Note: This article specifically focuses on the process of creating connections and recipes for the Azure DevOps Connector app.
Connector app setup and prerequisites
For information on the following topics, refer to the main article (Integrate Freshservice with DevOps Connector apps):
Prerequisites for the DevOps connector app integration
Installing the DevOps connector app
The DevOps connector app dashboard
Azure DevOps permissions
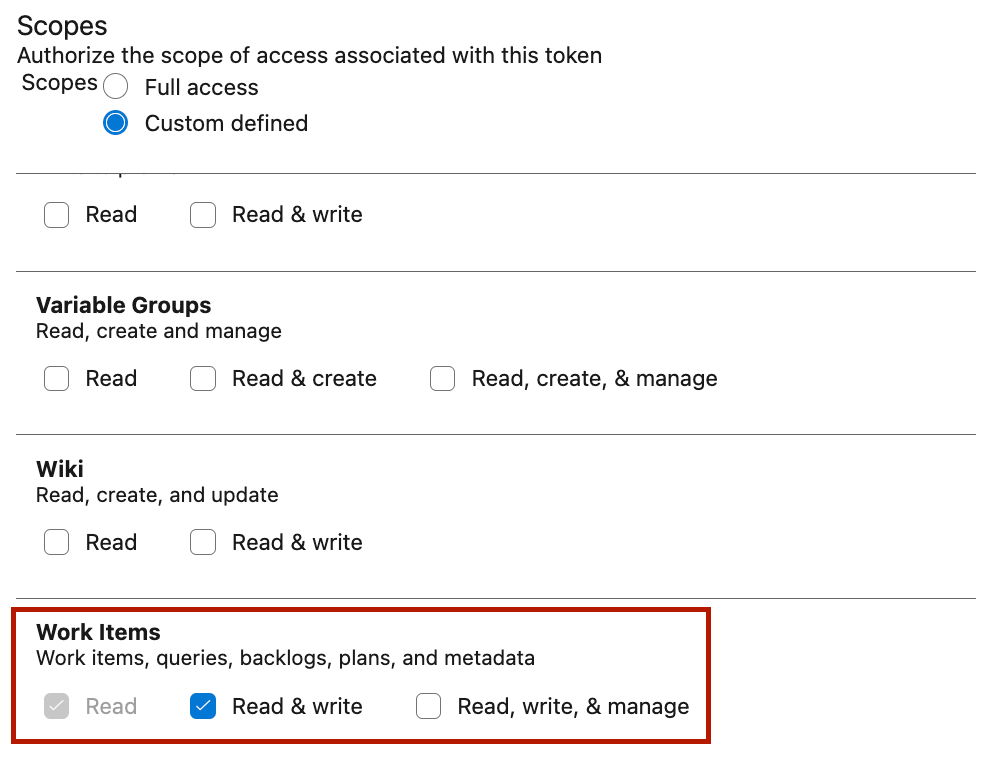
The following table provides information on the scope and permissions you need to enable while creating a personal access token (PAT). Make sure to copy the PAT token after you create it once you enable the following permissions.
The following screenshots illustrate the scope and permissions for creating a PAT.
Figure 1: Expiration date (important for admins to set and manage), Build, and Code scopes
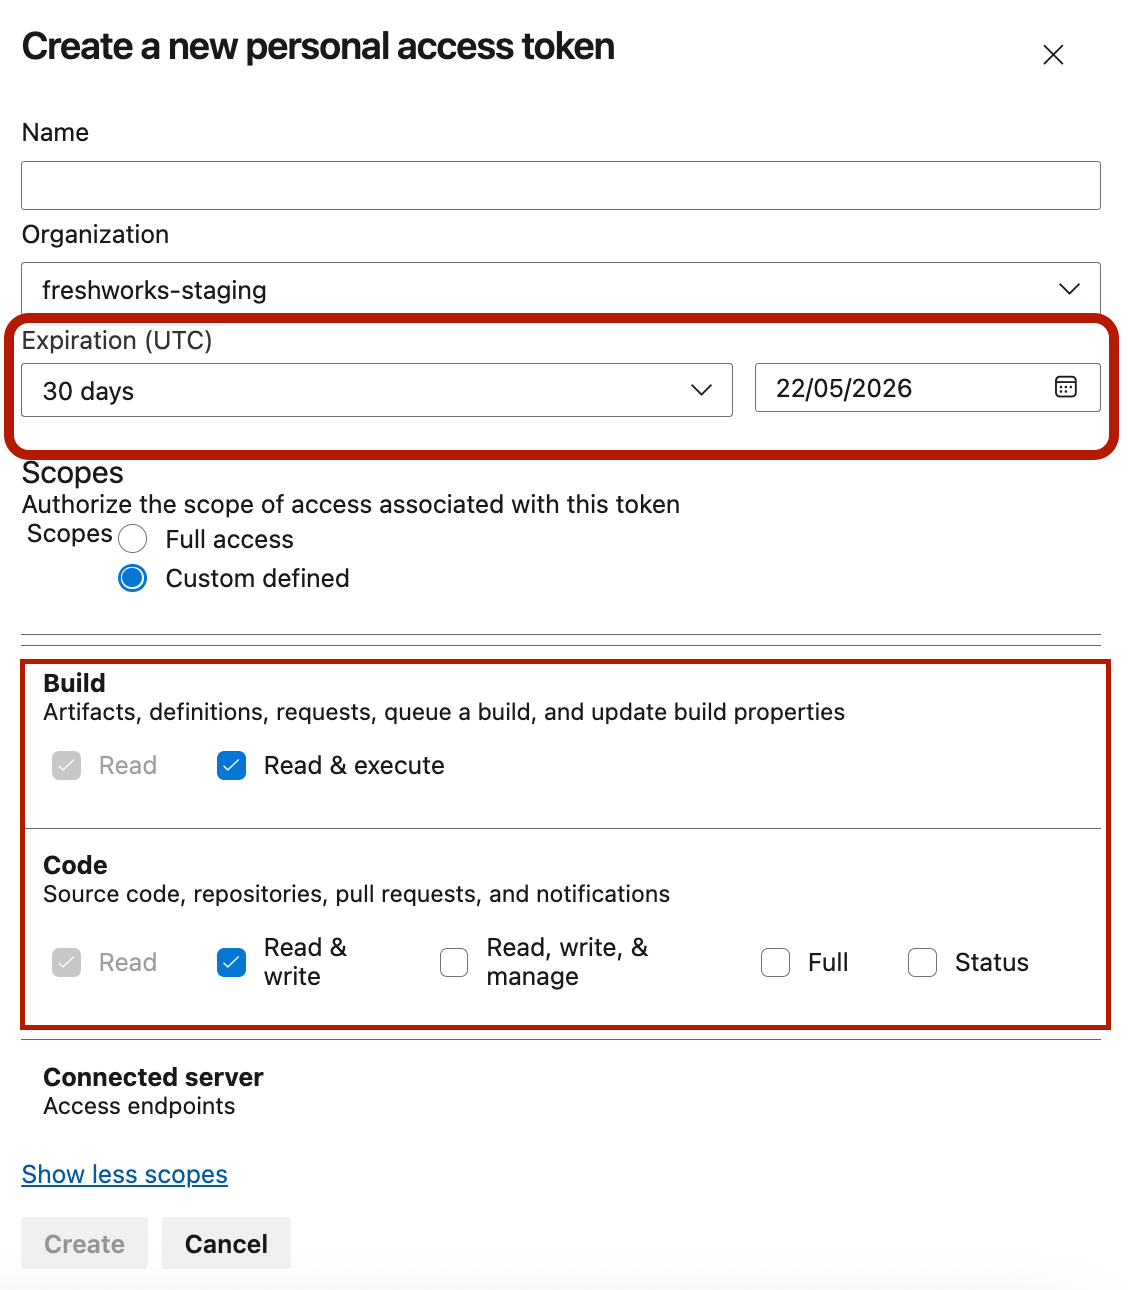
Figure 2: Packaging and Pull Request Threads scopes
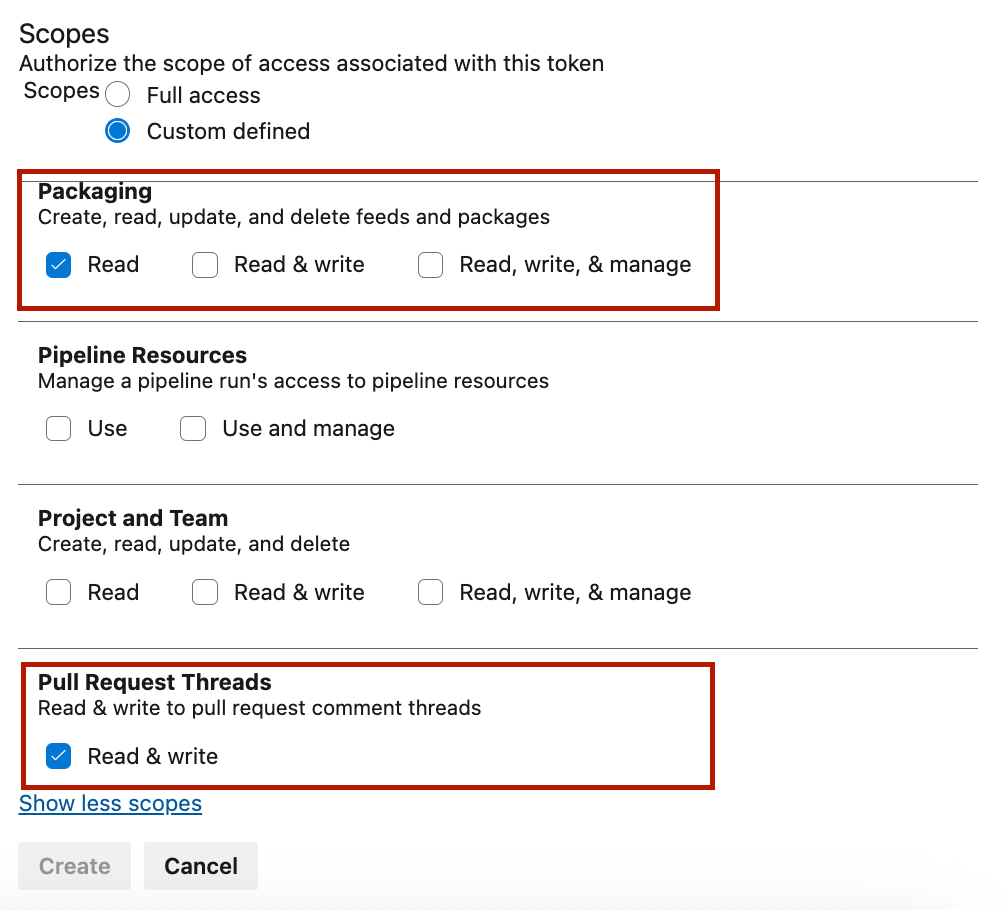
Figure 3: Release scope
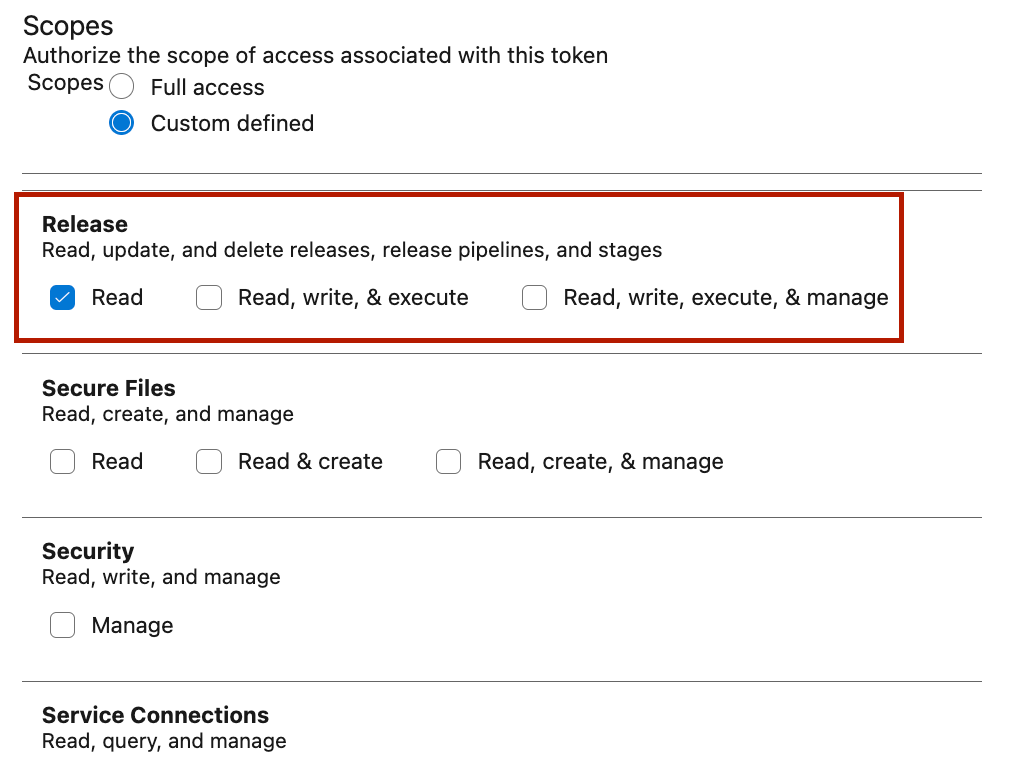
Figure 4: Test Management scope
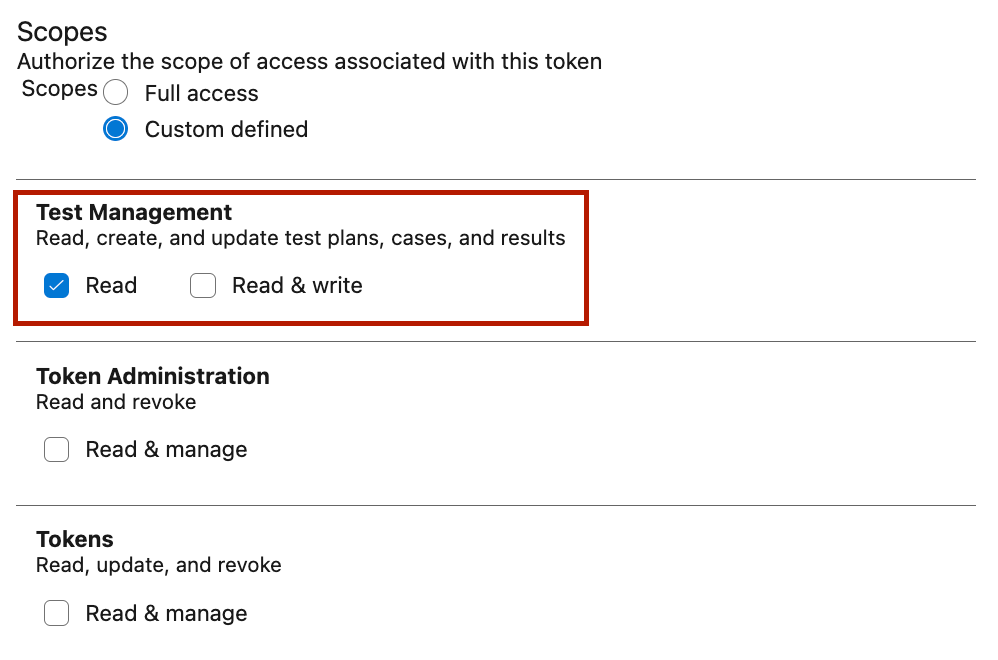
Figure 5: Work Items scope
Create connections
To share, update, and automate data, you need to connect the Azure DevOps Connector with Freshservice by creating connections.
Note: You can create a maximum of 10 connections per connector app.
To create connections:
Log in to your Freshservice account.
Go to Admin > DevOps Management > DevOps Tools.
Click Go to dashboard next to Azure DevOps Connector under the Installed apps section.
Click the Connections tab, then click Create connection.
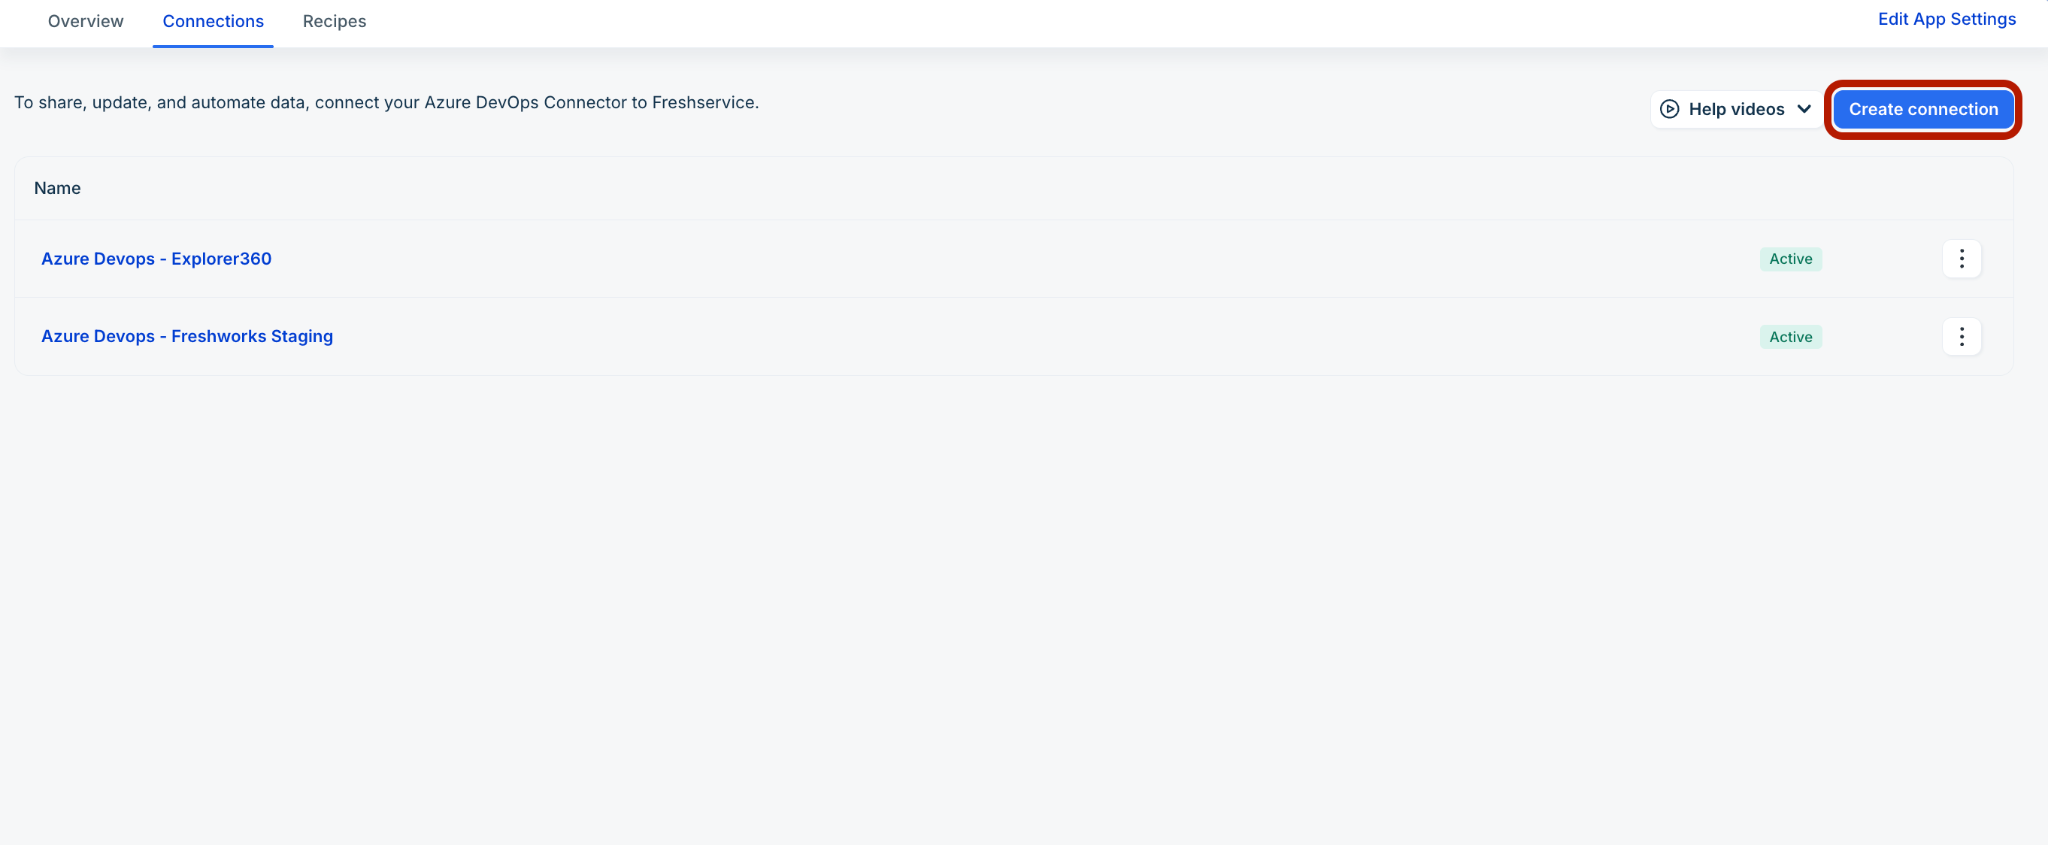
In the Create connection slider, select the relevant credential option (Add new credential or Select existing credential).
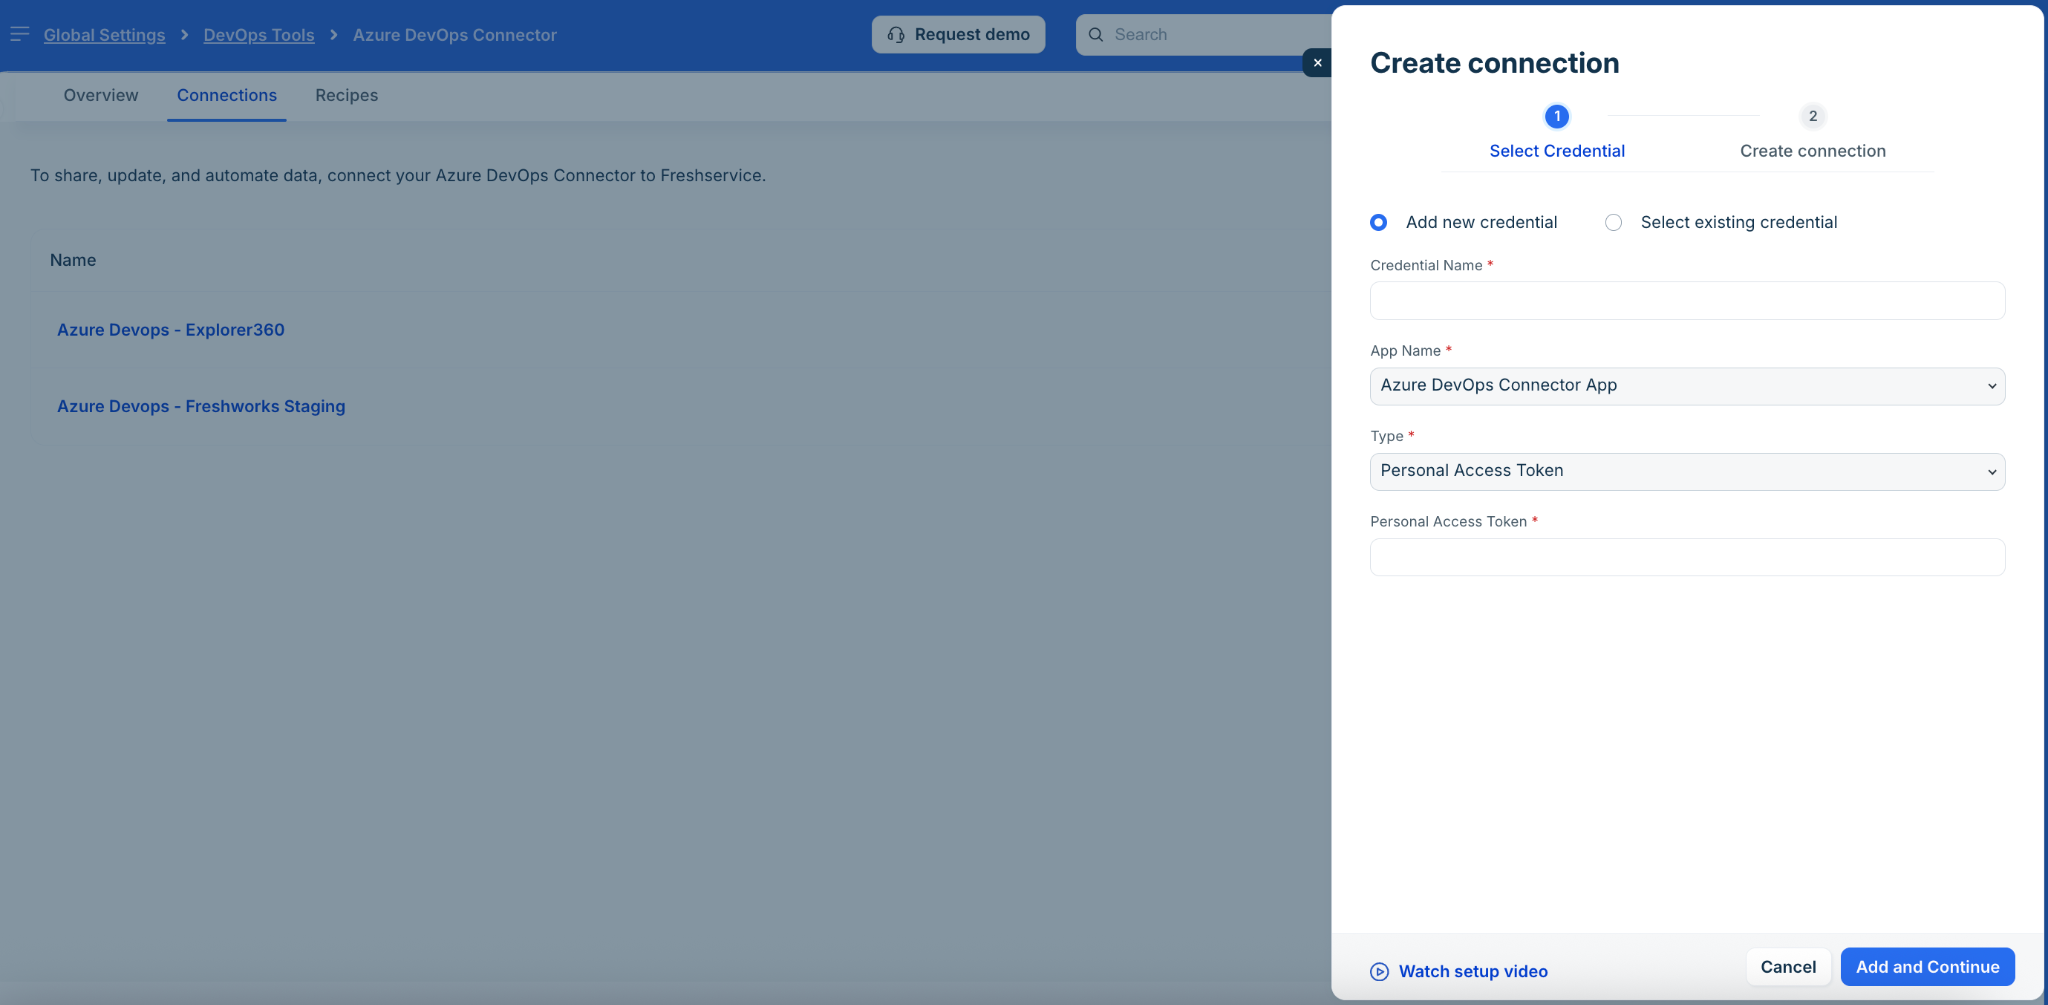
(To add a new credential) Enter a name in the Credential Name field.
Note: The App Name and Type fields are auto-populated.
Enter your Azure DevOps personal access token (PAT) details in the Personal Access Token field.
Note:
For information on creating, using, or modifying PAT, see Azure DevOps – Use personal access tokens documentation.
For information on the scope and permissions you need to enable while creating a personal access token, see the ‘Azure DevOps permissions’ section above.
Click Add and Continue.
Enter the relevant Organization Name.
Click Create connection.
Note: The new credential you create while creating a new connection is added to the Credentials module in Freshservice.
(To select an existing credential) Select a relevant credential from the Choose Credential dropdown, and click Continue.
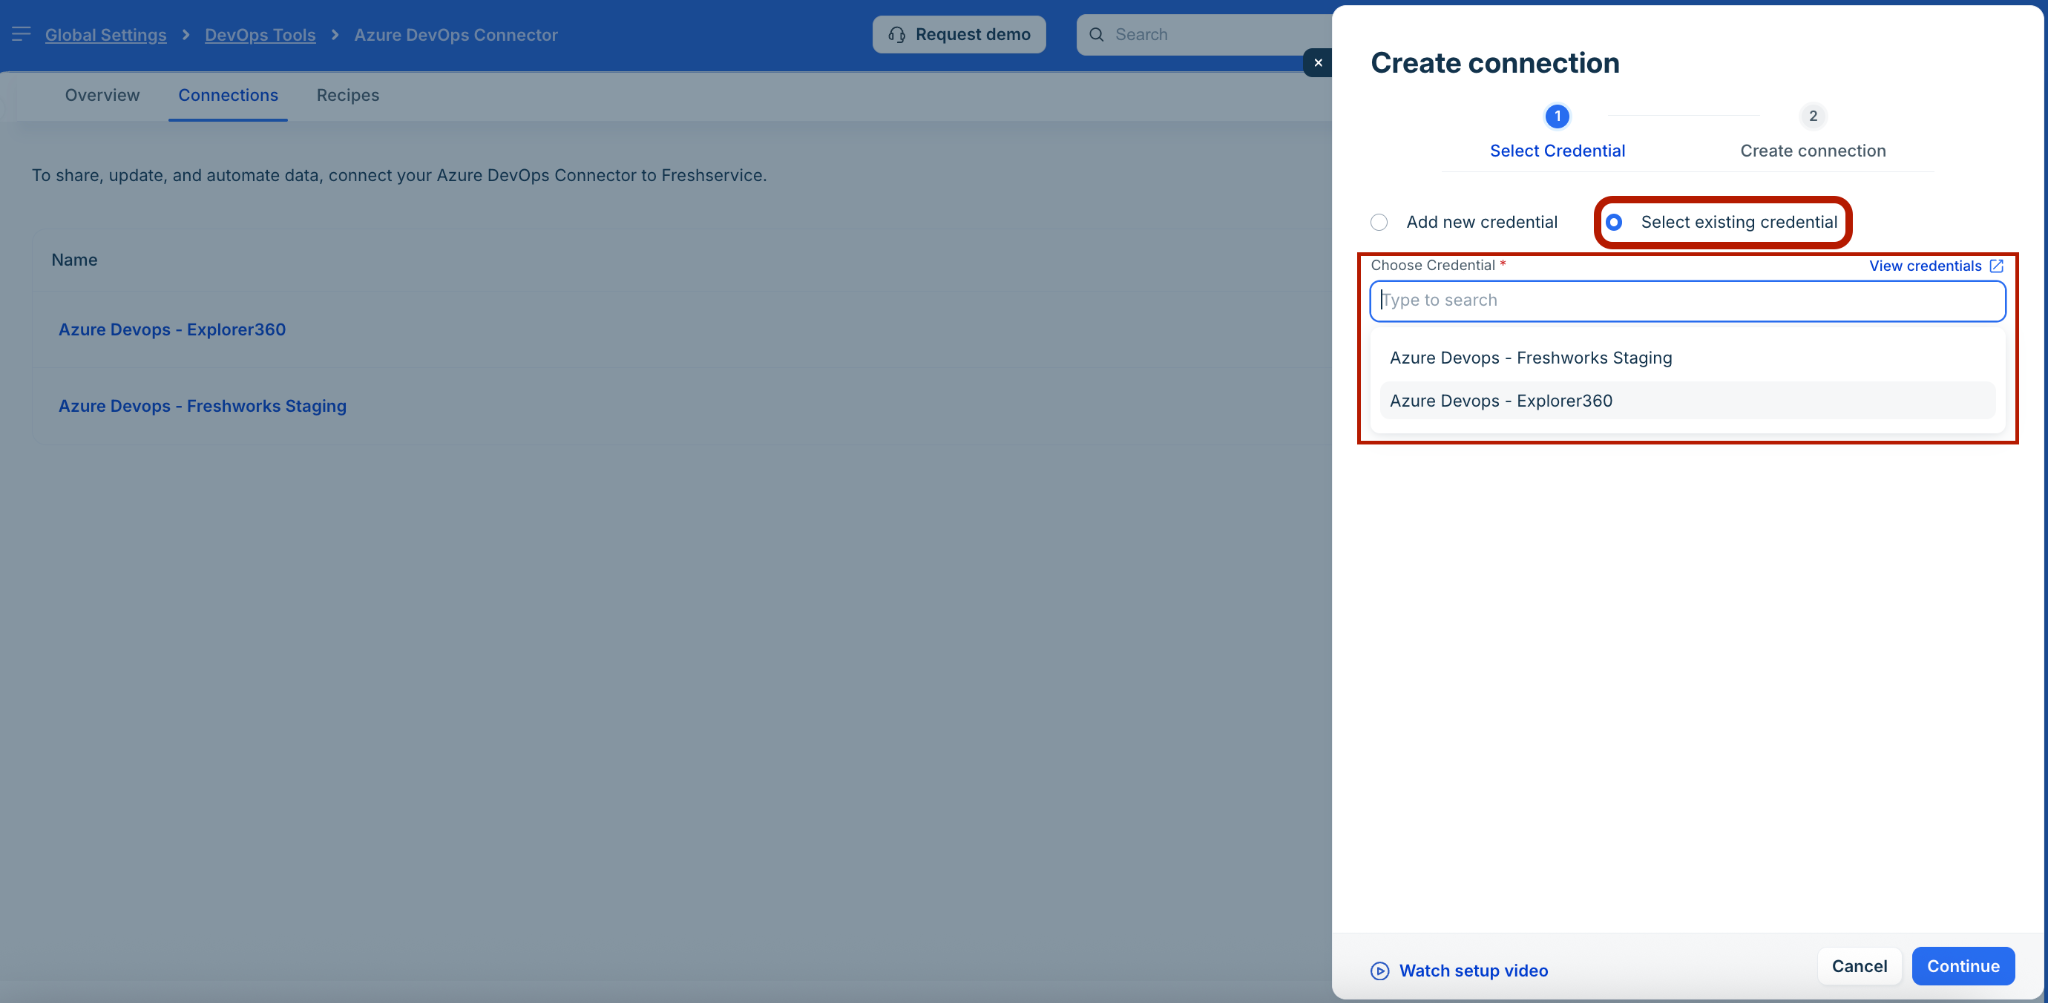
Note: For more information on existing credentials created in the Credentials module, see Centralized Credential Store.
Click Create connection.
Manage connections
To manage DevOps connector app connections, follow the procedure outlined in this section.
To manage connections:
Log in to your Freshservice account.
Go to Admin > DevOps Management > DevOps Tools.
Click Go to dashboard next to Azure DevOps Connector under the Installed apps section.
Click the Connections tab.
(To edit a connection) Click the ellipsis menu next to a connection name, and click Edit.
Make the necessary updates and save the changes.
Note: You can also click any connection name, and edit the connection.
(To delete a connection) Click the ellipsis menu next to a connection name, and click Delete.
Note: Deleting a connection will disable any workflows or recipes using that connection.
Create recipes
Recipes are essentially a series of steps that help automate business processes between a DevOps connector and Freshservice.
Note: By default, a few templates are readily available to create recipes for each DevOps connector app.
List of default templates for recipes
The following default templates for recipes are available with the Freshservice-Azure DevOps connector integration:
Resolve Incident when Work Item is Done
Auto-create Change for Deployment schedule
Create devops change on new work item
[Incident] Convert Incident to Bug in ADO
[Change] Resolve Change to Close ADO Work Items
Recipe creation
To create recipes:
Log in to your Freshservice account.
Go to Admin > DevOps Management > DevOps Tools.
Click Go to dashboard next to Azure DevOps Connector under the Installed apps section.
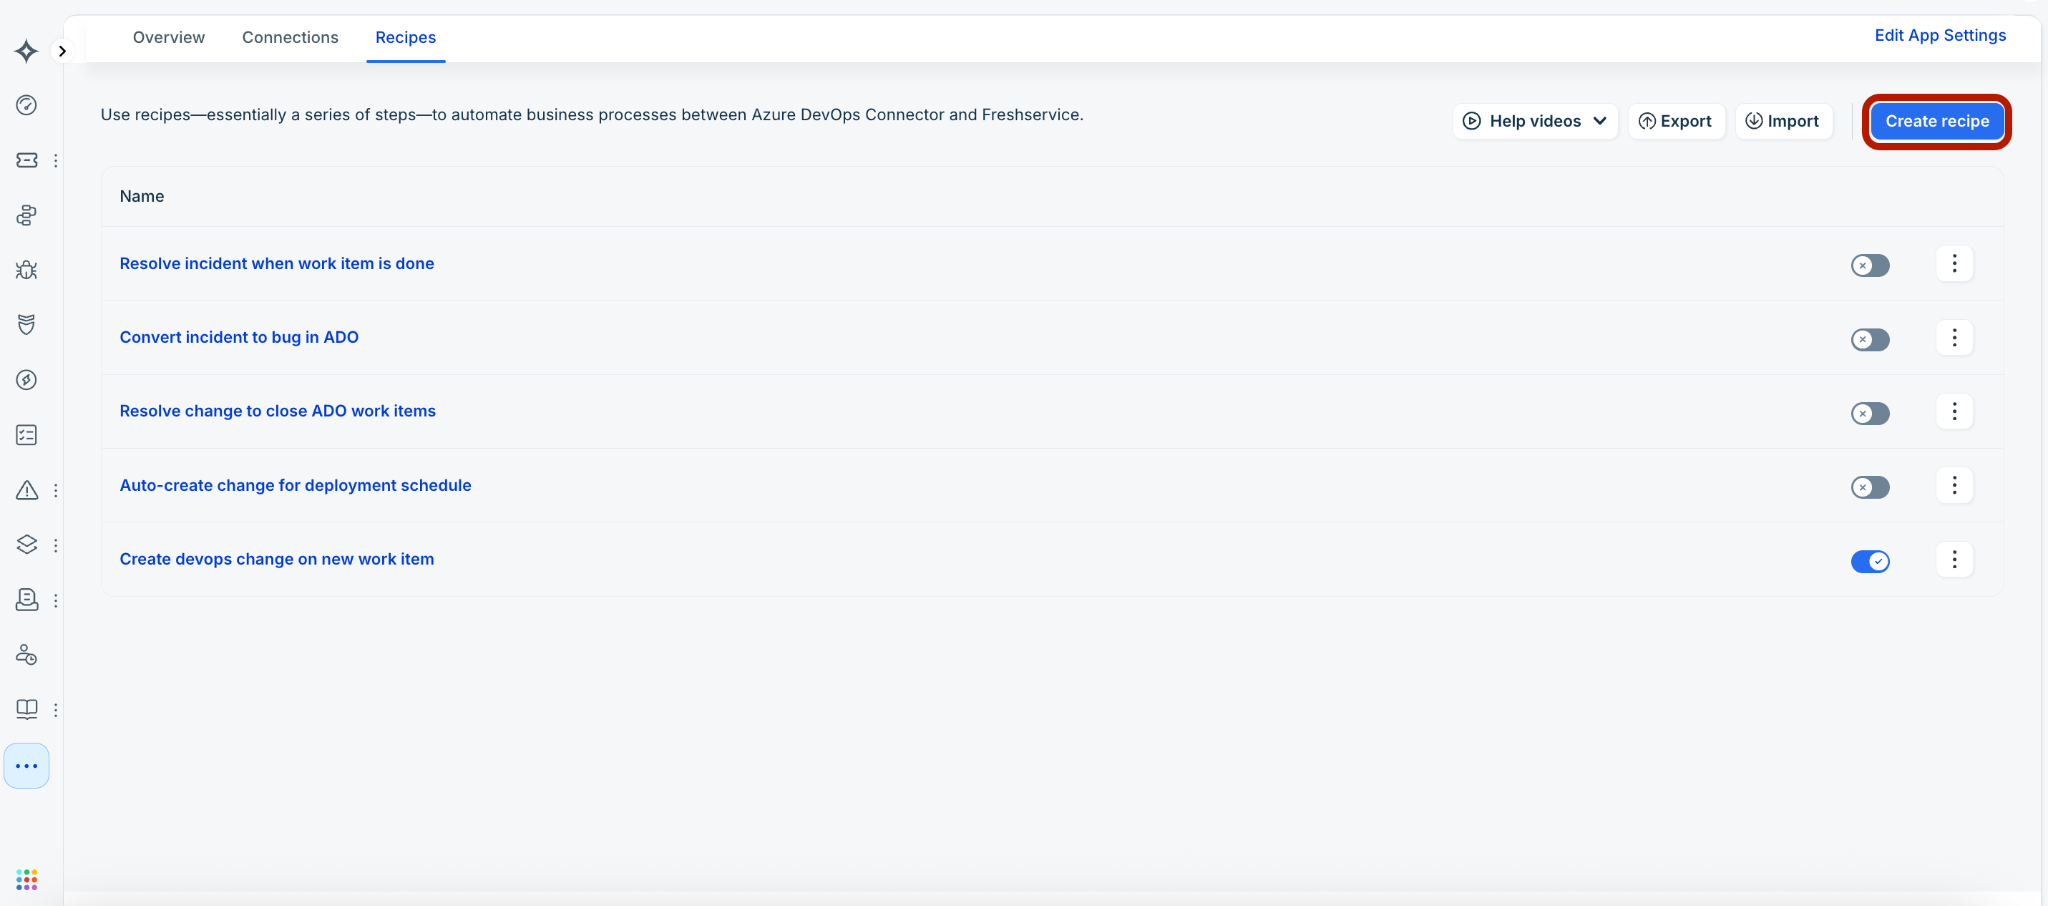
Click the Recipes tab, then click Create recipe.
In the Create recipe slider, select the relevant template from the Select template dropdown, or enter a name for the recipe in the Name field.
Note:
Selecting a template is not mandatory.
The Name field will be auto-populated if you select any template, however you can edit the name.
You can use the Import option on the Recipes page to import more recipes, and you can also export recipes with the Export option (see How to export or import recipes for DevOps integrations for more information).
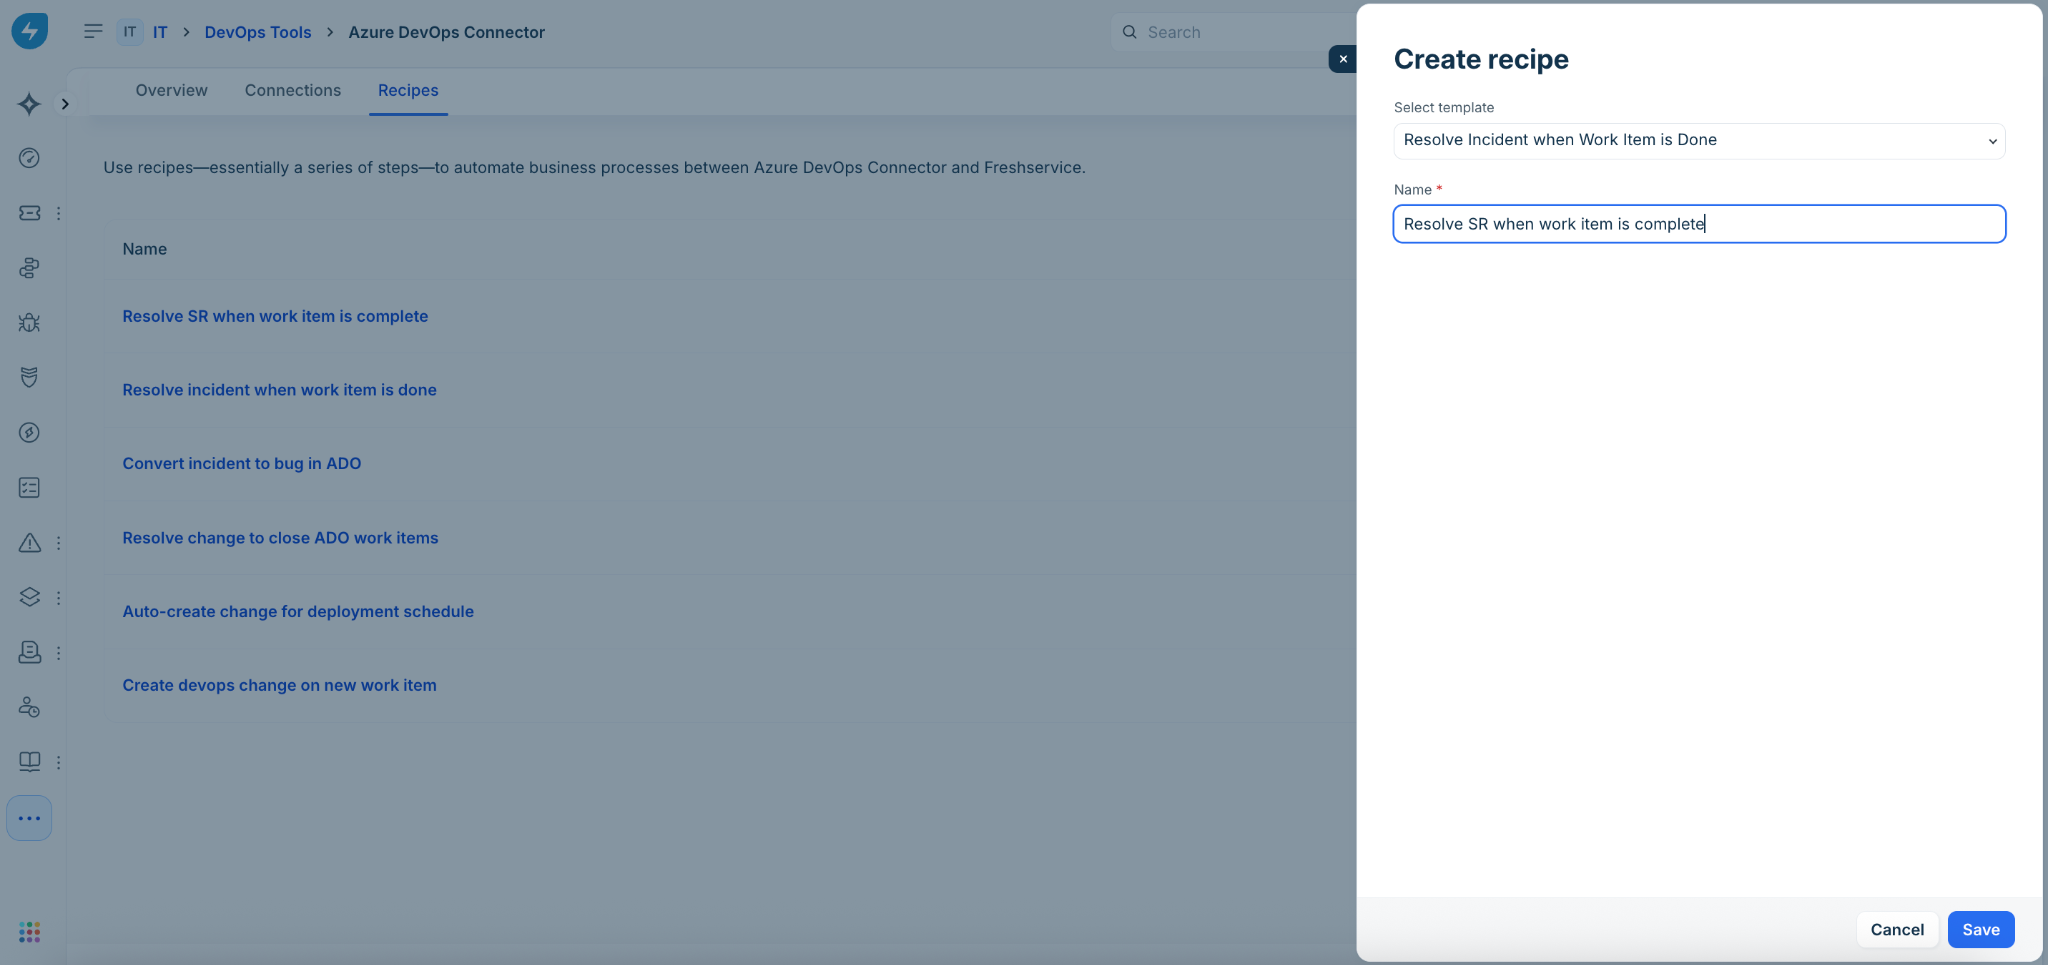
Click Save. The new recipe is added.
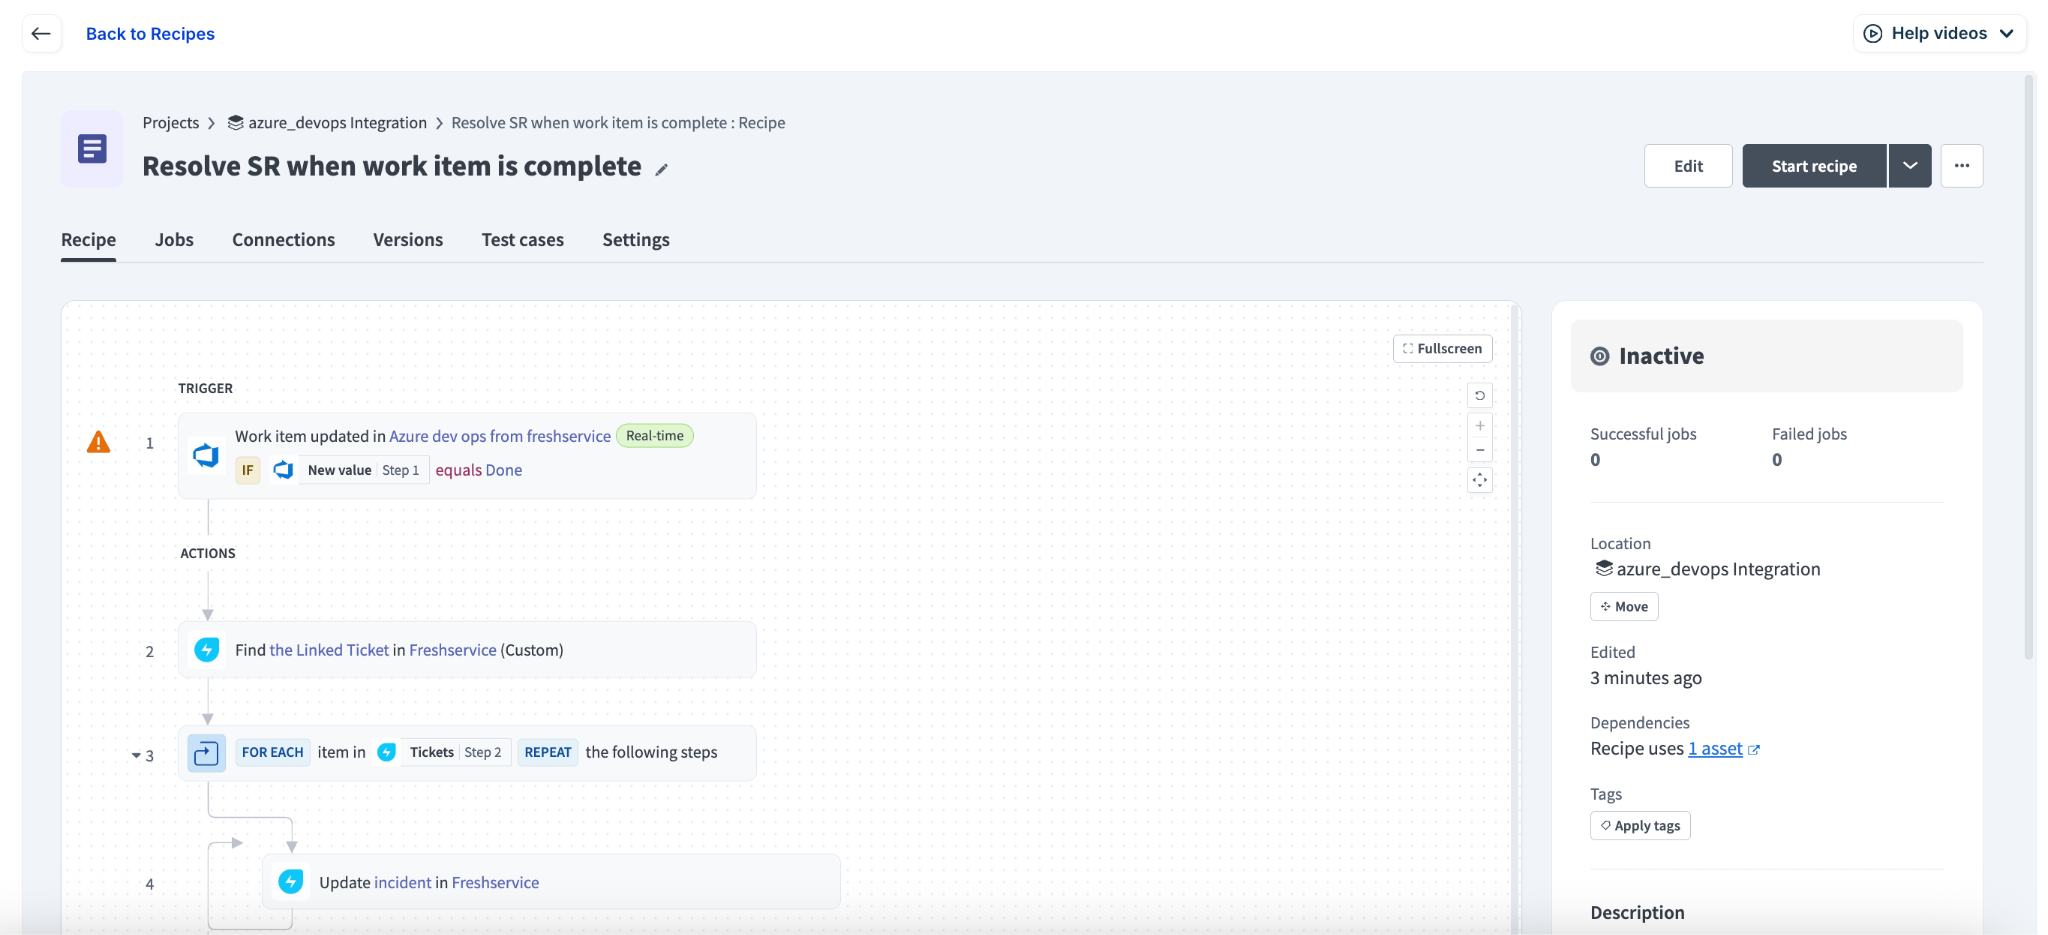
You can also create your own recipes from scratch without selecting a template. Just enter a name for the recipe and click Save, which will take you to the recipe creation page.
Start configuring a trigger and the relevant actions.
Created recipe page
On any specific recipe page, you can view the Recipe, Jobs, Connections, Versions, Test cases, and Settings tabs.
On the Recipe tab, you can view various steps with pre-configured triggers and actions.
Go to the Jobs tab to view all the jobs associated with this recipe.
Note: Use the Repeat job, Cancel job, Search jobs, All statuses, All types, and Period filters to modify or update the Jobs list.
Go to the Connections tab to view all the associated connections.
Go to the Versions tab to view all the associated versions.
Note: Use the Compare versions, Search version comments, All periods, All change types, and All collaborators filters to modify or update the Versions list.
Go to the Test cases tab to create a test case.
Go to the Settings tab to view the general settings (such as, usage metrics, dependencies, activity audit, and concurrency), and sharing settings (such as, private dependencies and sharing link).
Manage recipes
You can start, stop, edit, test, clone, or delete any recipe.
To manage recipes:
Log in to your Freshservice account.
Go to Admin > DevOps Management > DevOps Tools.
Click Go to dashboard next to Azure DevOps Connector under the Installed apps section.
Click the Recipes tab.
(To start any recipe) Enable the toggle next to a recipe name on the Recipes page.
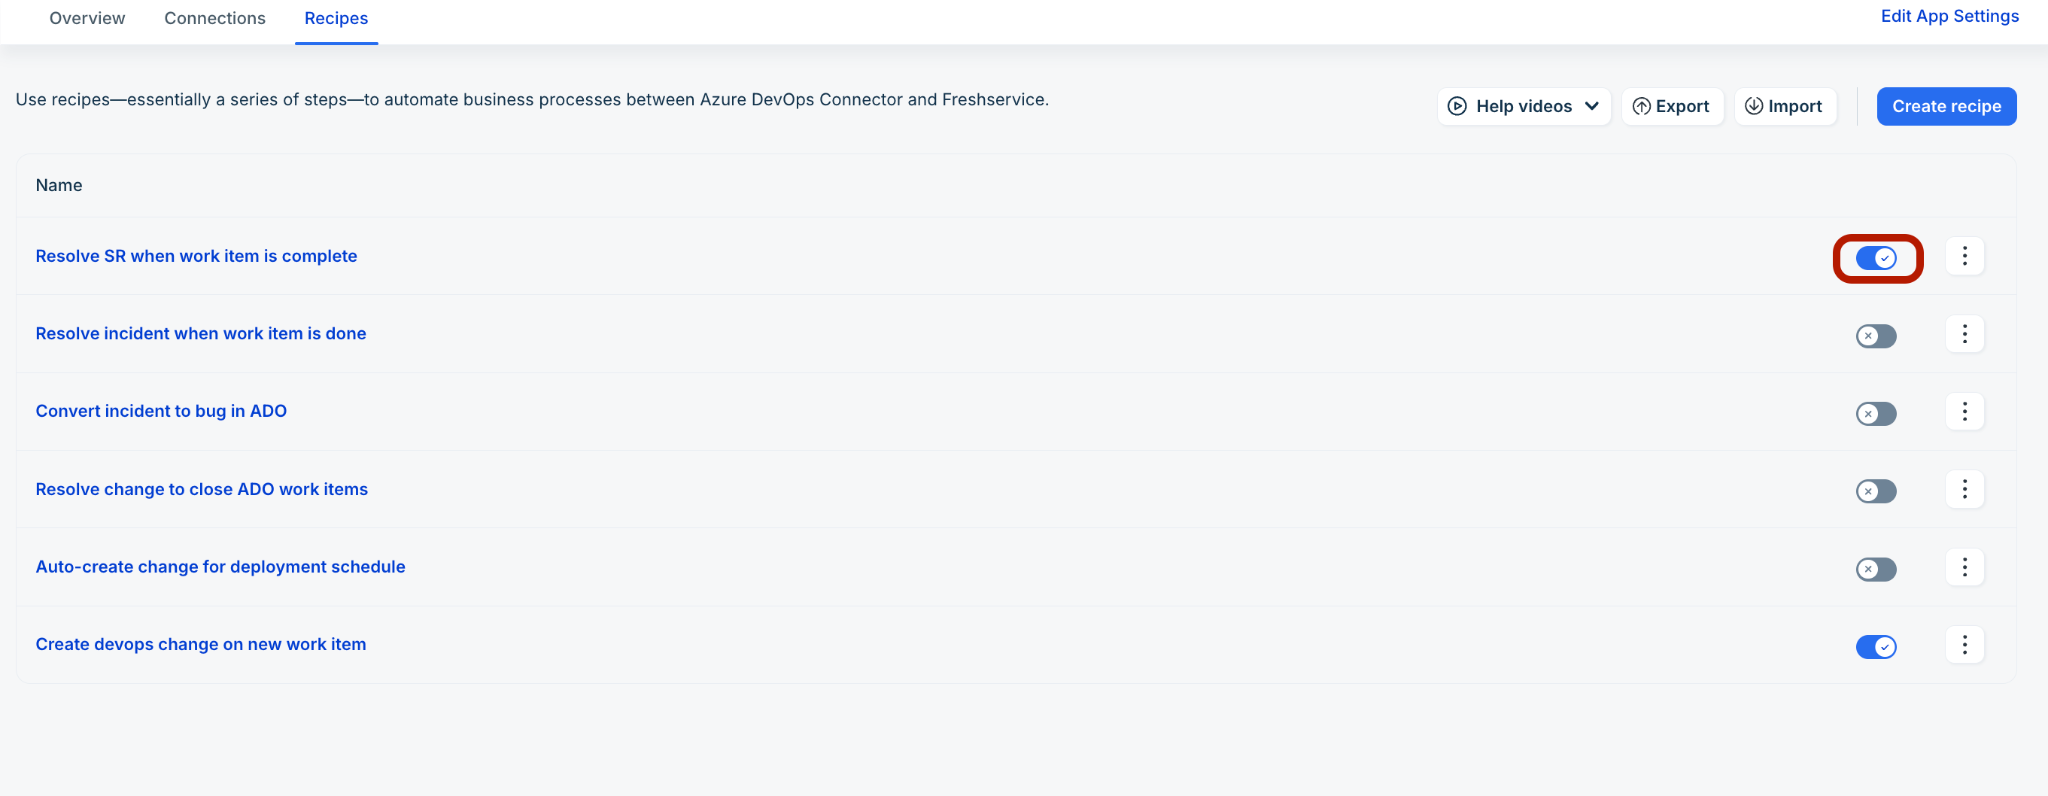
Or, click any recipe name on the Recipes page to go to the selected recipe page. Then, click Start recipe.
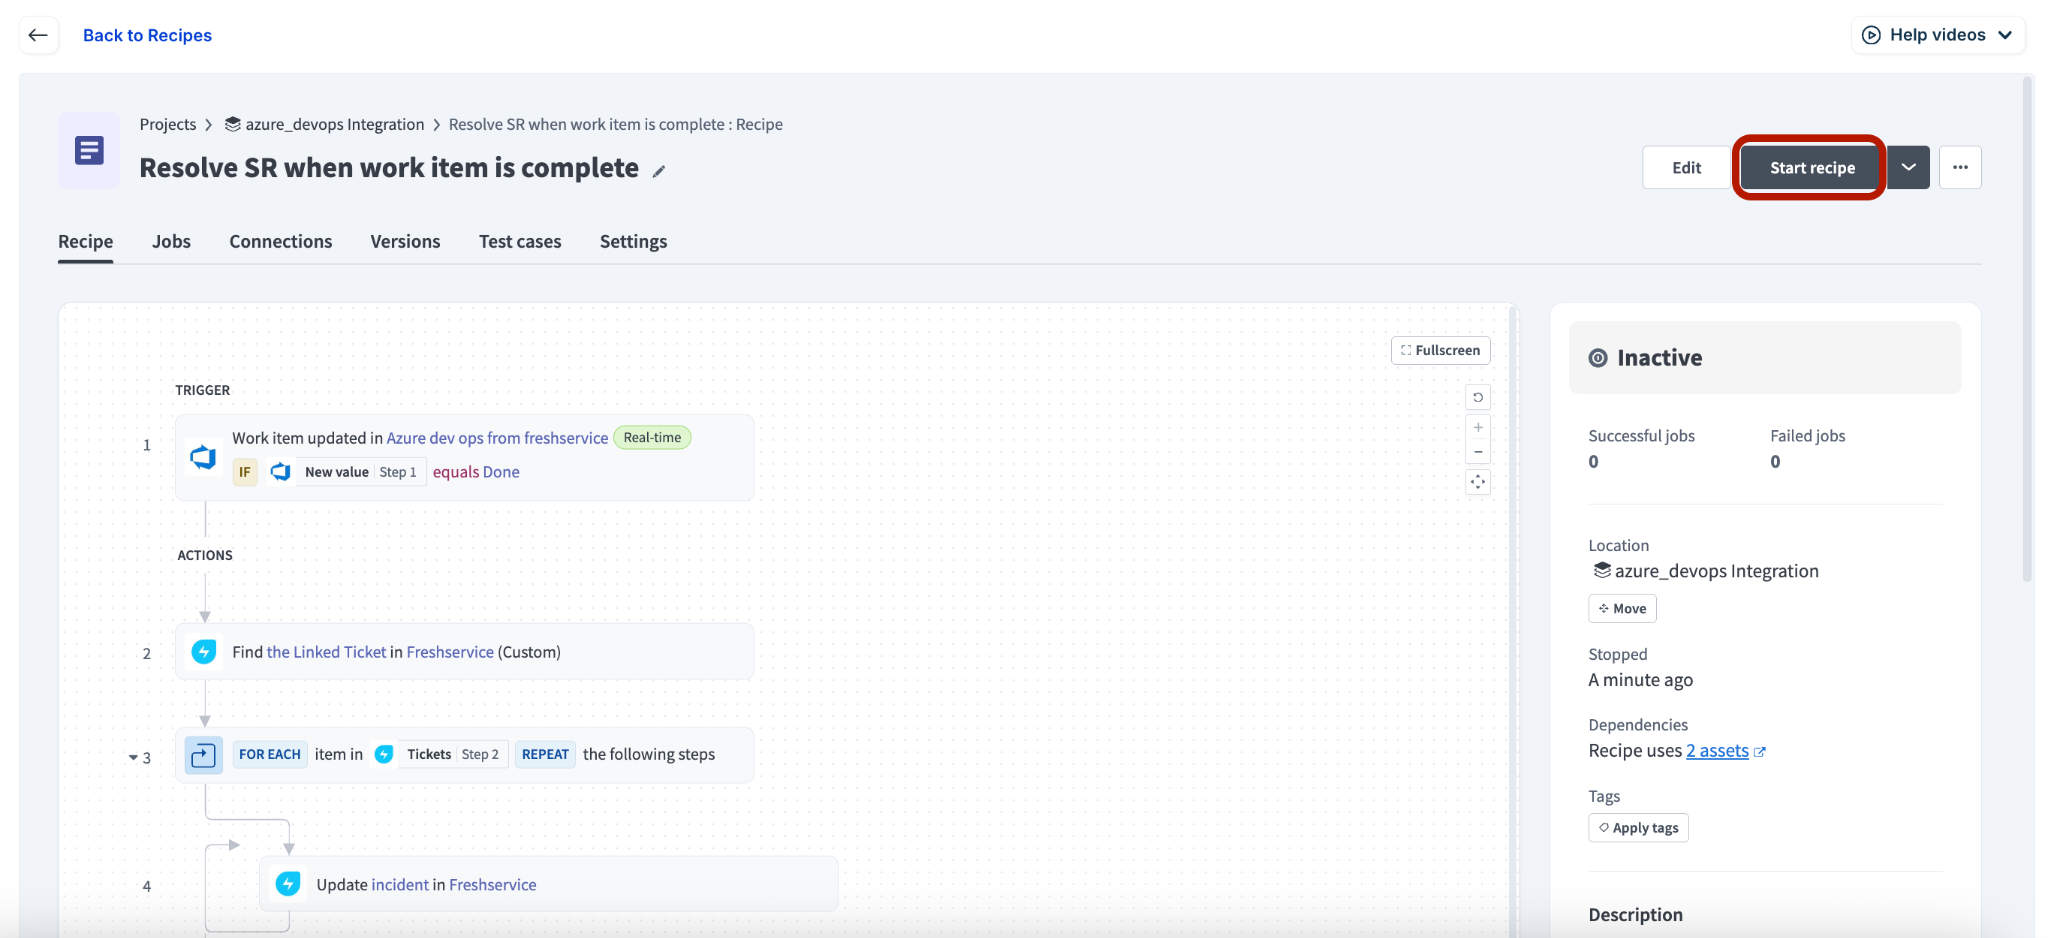
(To stop any recipe that is active) Disable the toggle next to a recipe name on the Recipes page.
Or, click any recipe name on the Recipes page. Then, click the Stop recipe option (on the right side of the page).
(To edit any recipe) Click the ellipsis menu next to a recipe name on the Recipes page, and click Edit.
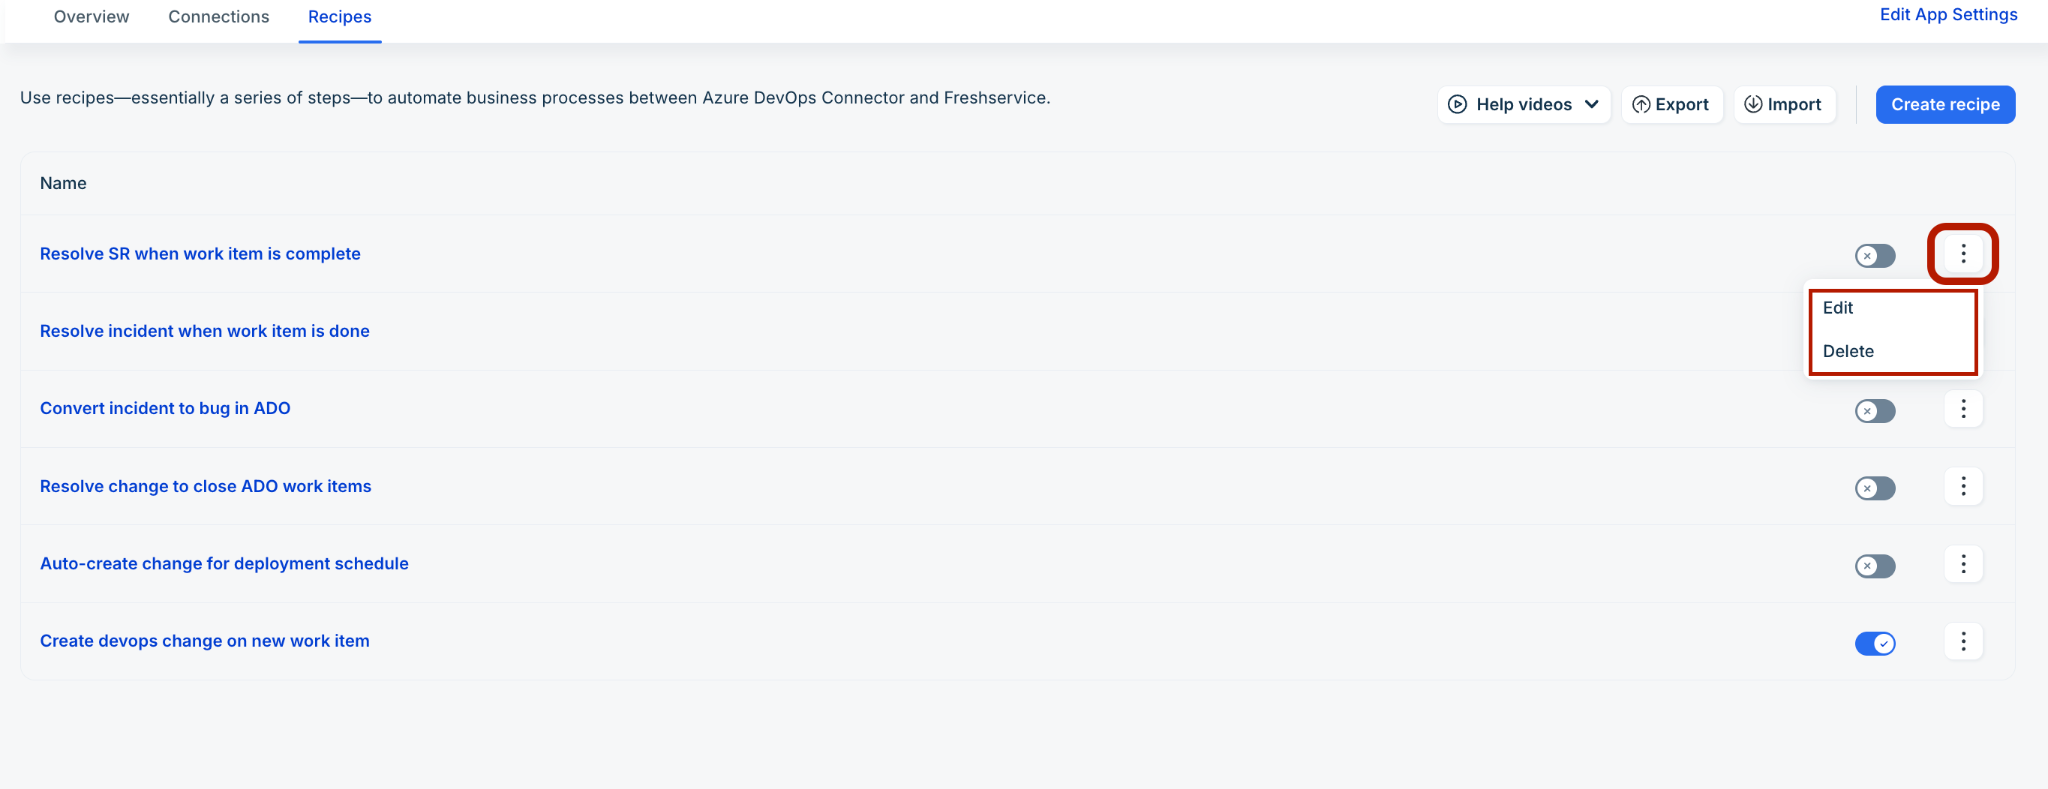
Or, click any recipe name on the Recipes page. Then, click the Edit option (on the right side of the page).
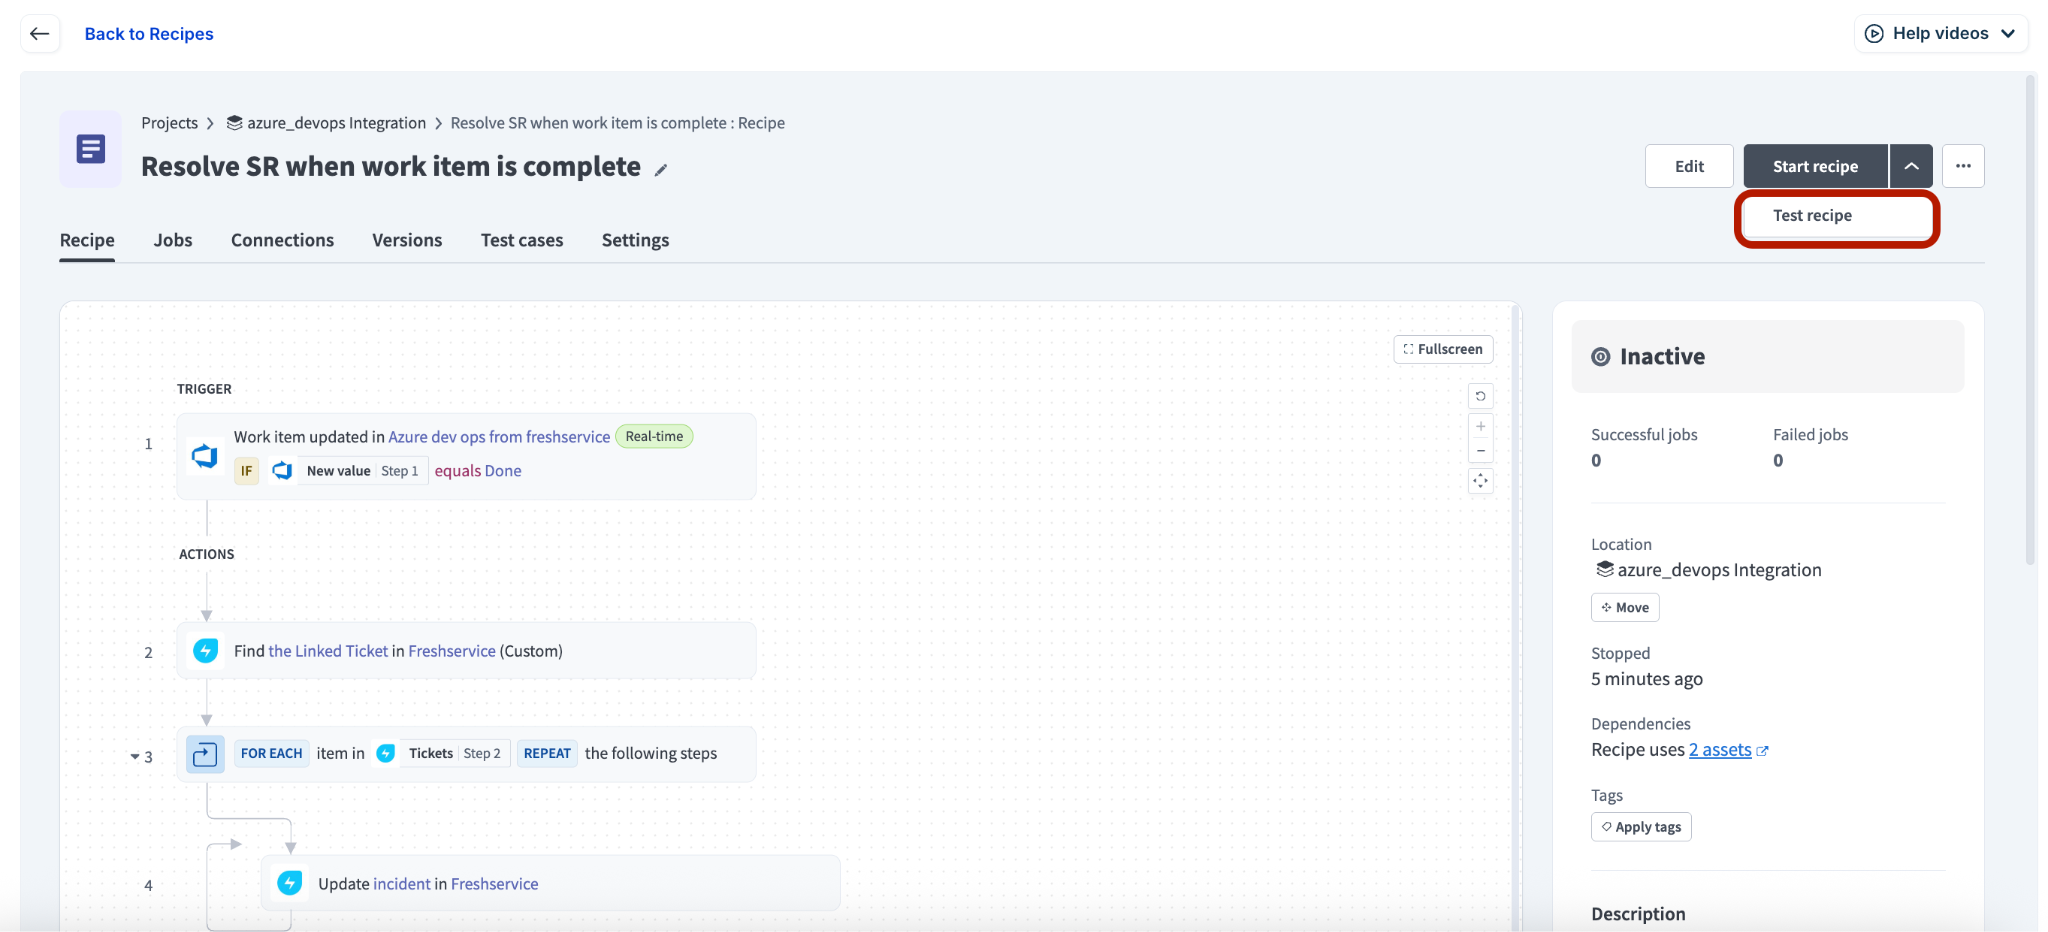
(To test any recipe) Click any recipe name on the Recipes page. If the recipe is active, click Stop recipe.
Then, select Test recipe from the Start recipe dropdown.
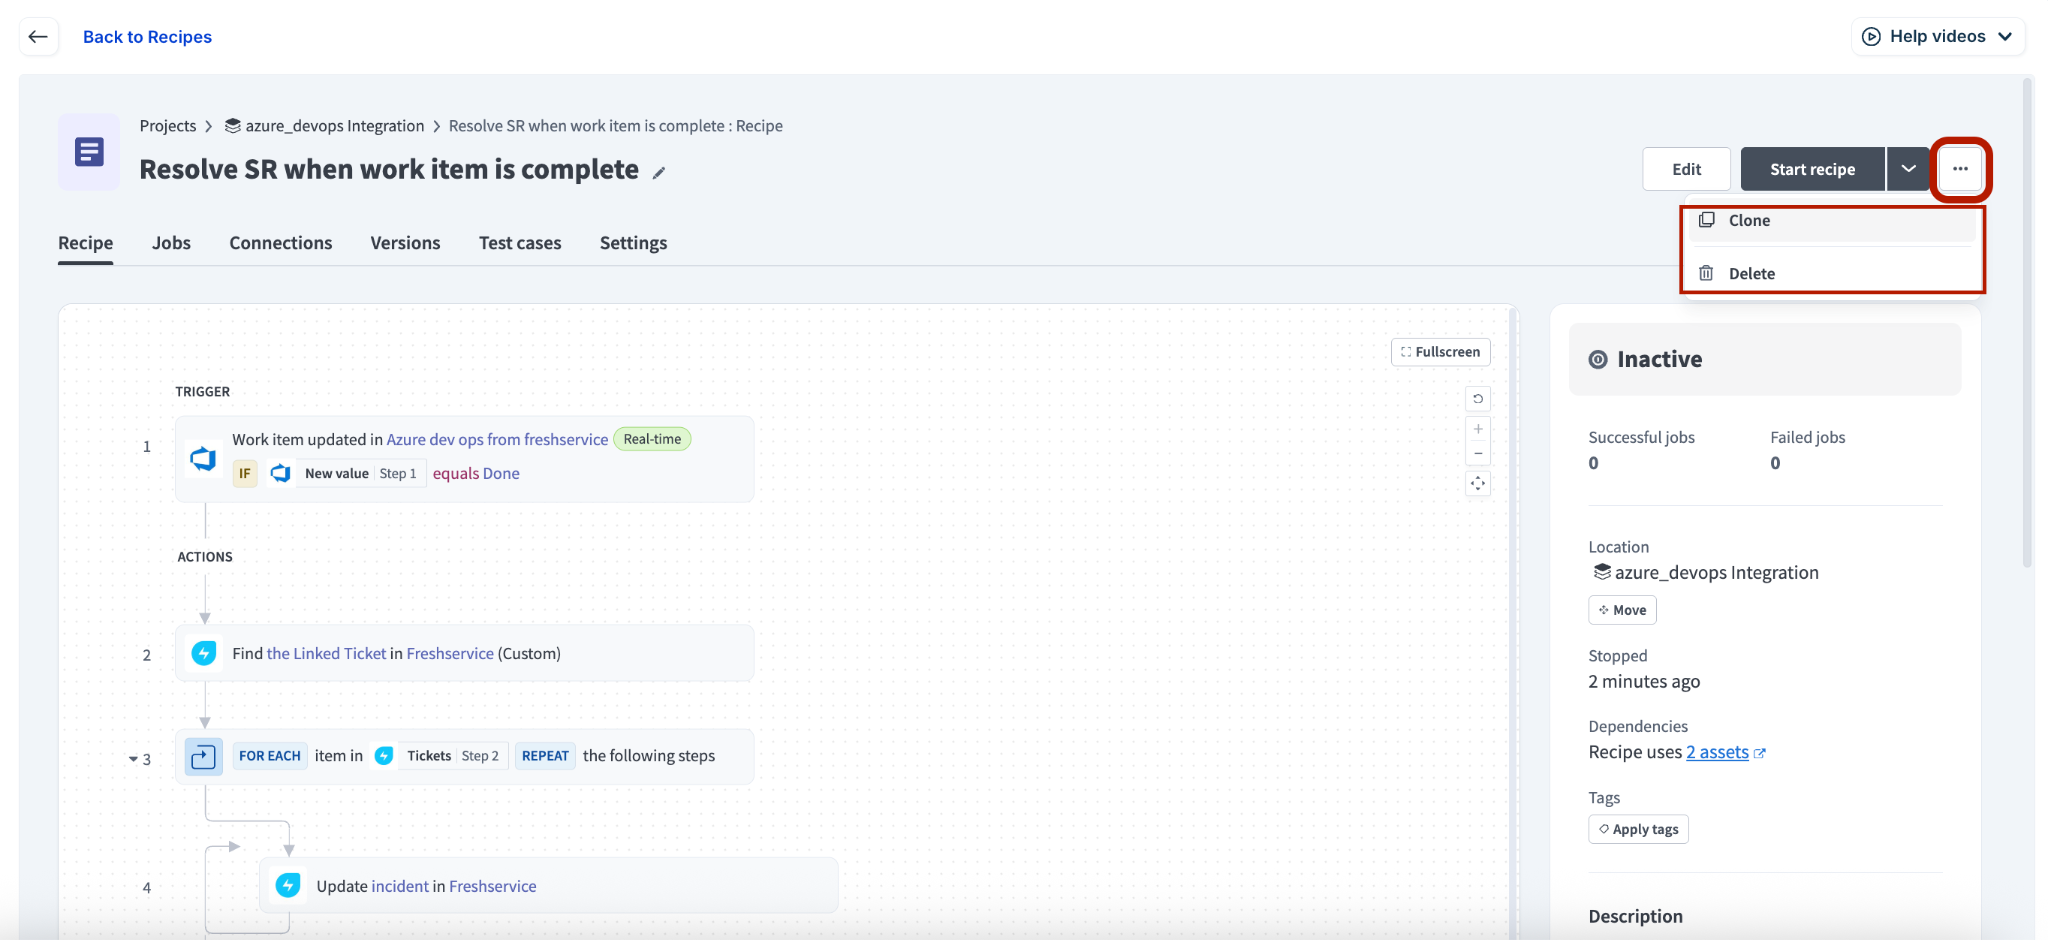
(To clone any recipe) Click any recipe name on the Recipes page. If the recipe is active, click Stop recipe.
Then, select Clone from the ellipsis menu next to Start recipe dropdown.
(To delete any recipe) Click the ellipsis menu next to a recipe name on the Recipes page, and click Delete.
Or, click any recipe name on the Recipes page. If the recipe is active, click Stop recipe.
Then, select Delete from the ellipsis menu next to Start recipe dropdown.
Additionally, you can customize recipes for each DevOps connector app depending on your specific requirements.
Customize recipes
Each recipe has the following primary components: Trigger and Action. You can customize any recipe depending on your specific requirements.
Let’s take a recipe with a default template as an example to customize it further.
Default template recipe: Resolve incident when work item is done
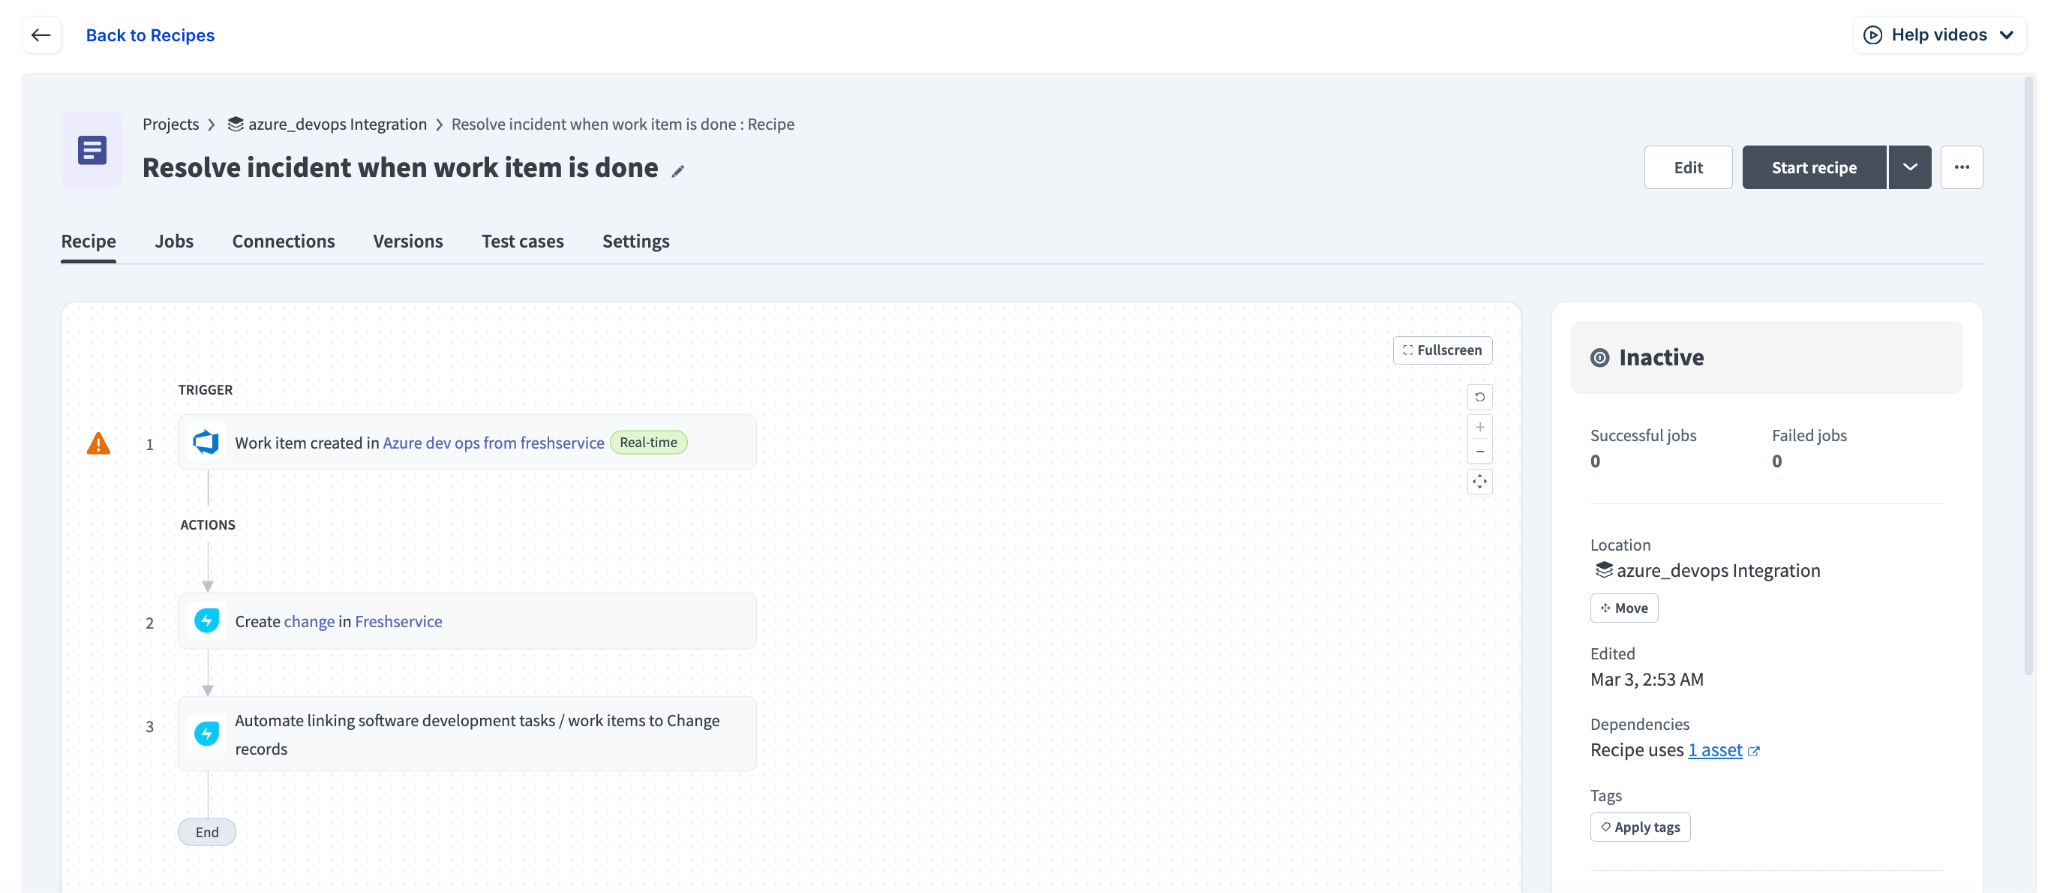
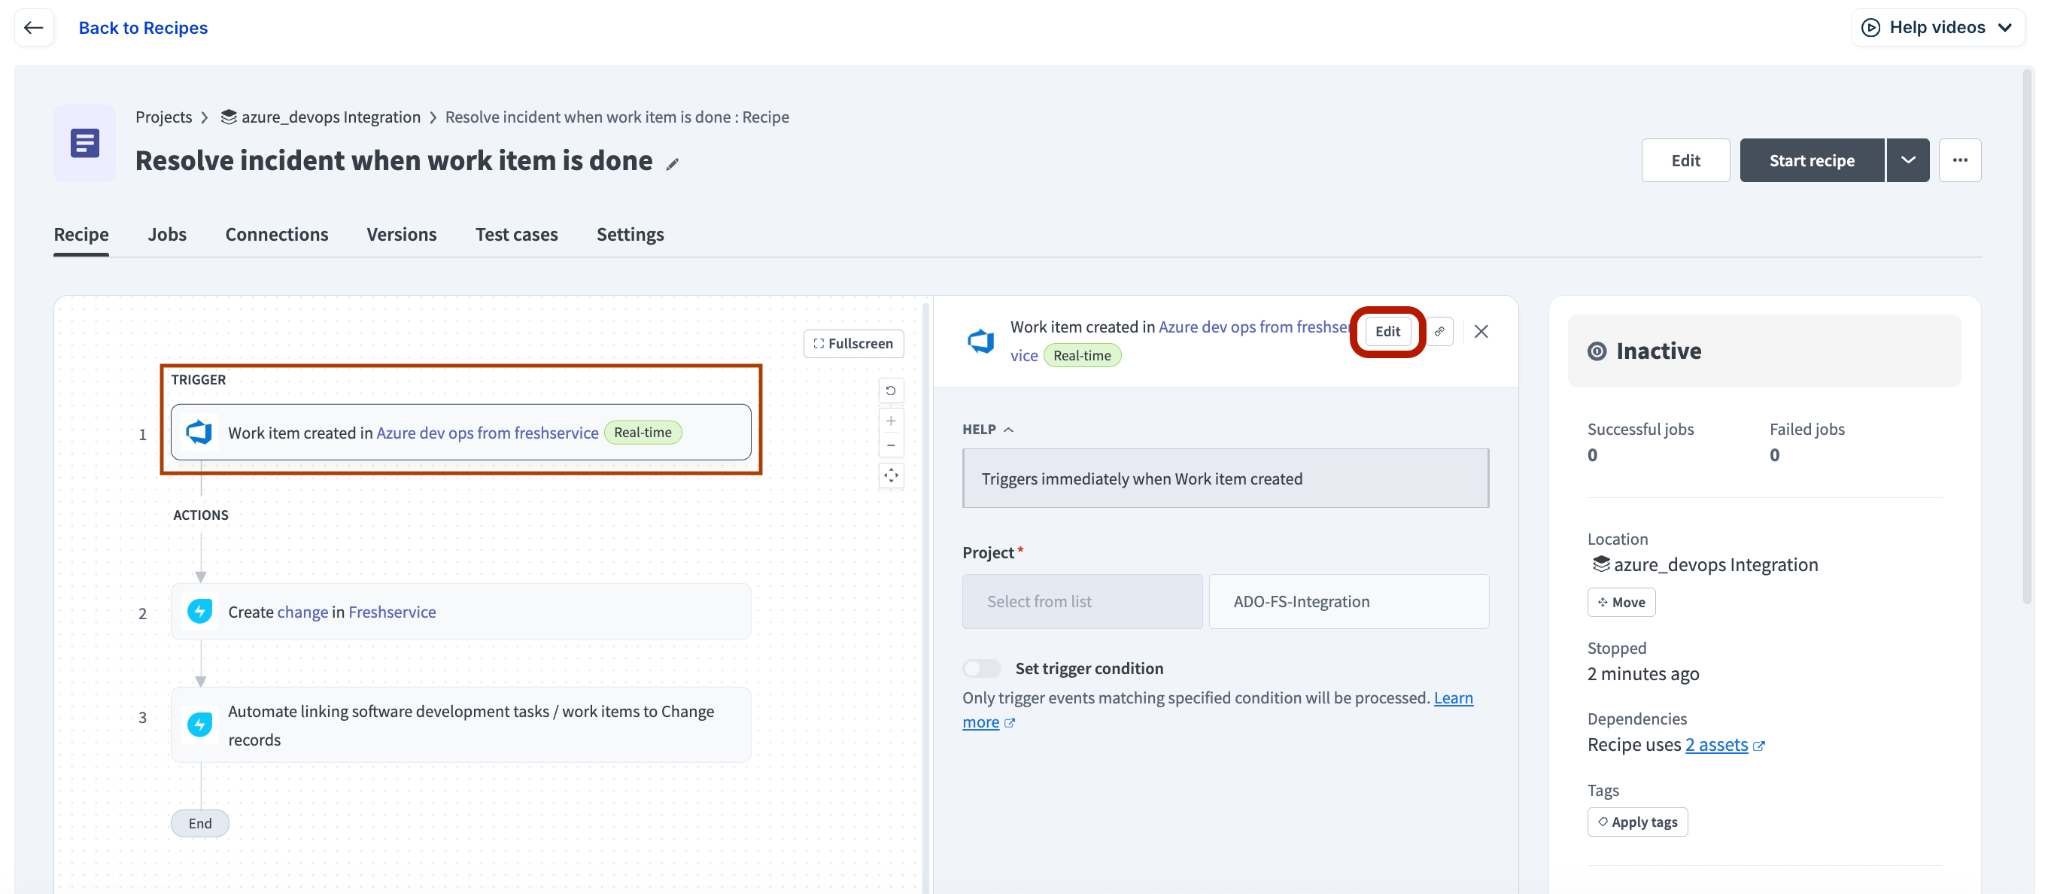
You can click any component, and use the Edit option associated with the component to customize or view more details. For example, the Edit option for the Trigger component (as shown in the following figure).
Trigger
This recipe component acts as the starting point for any recipe. For this recipe, the trigger is fetching a new work item from Azure DevOps and creating a change in Freshservice.
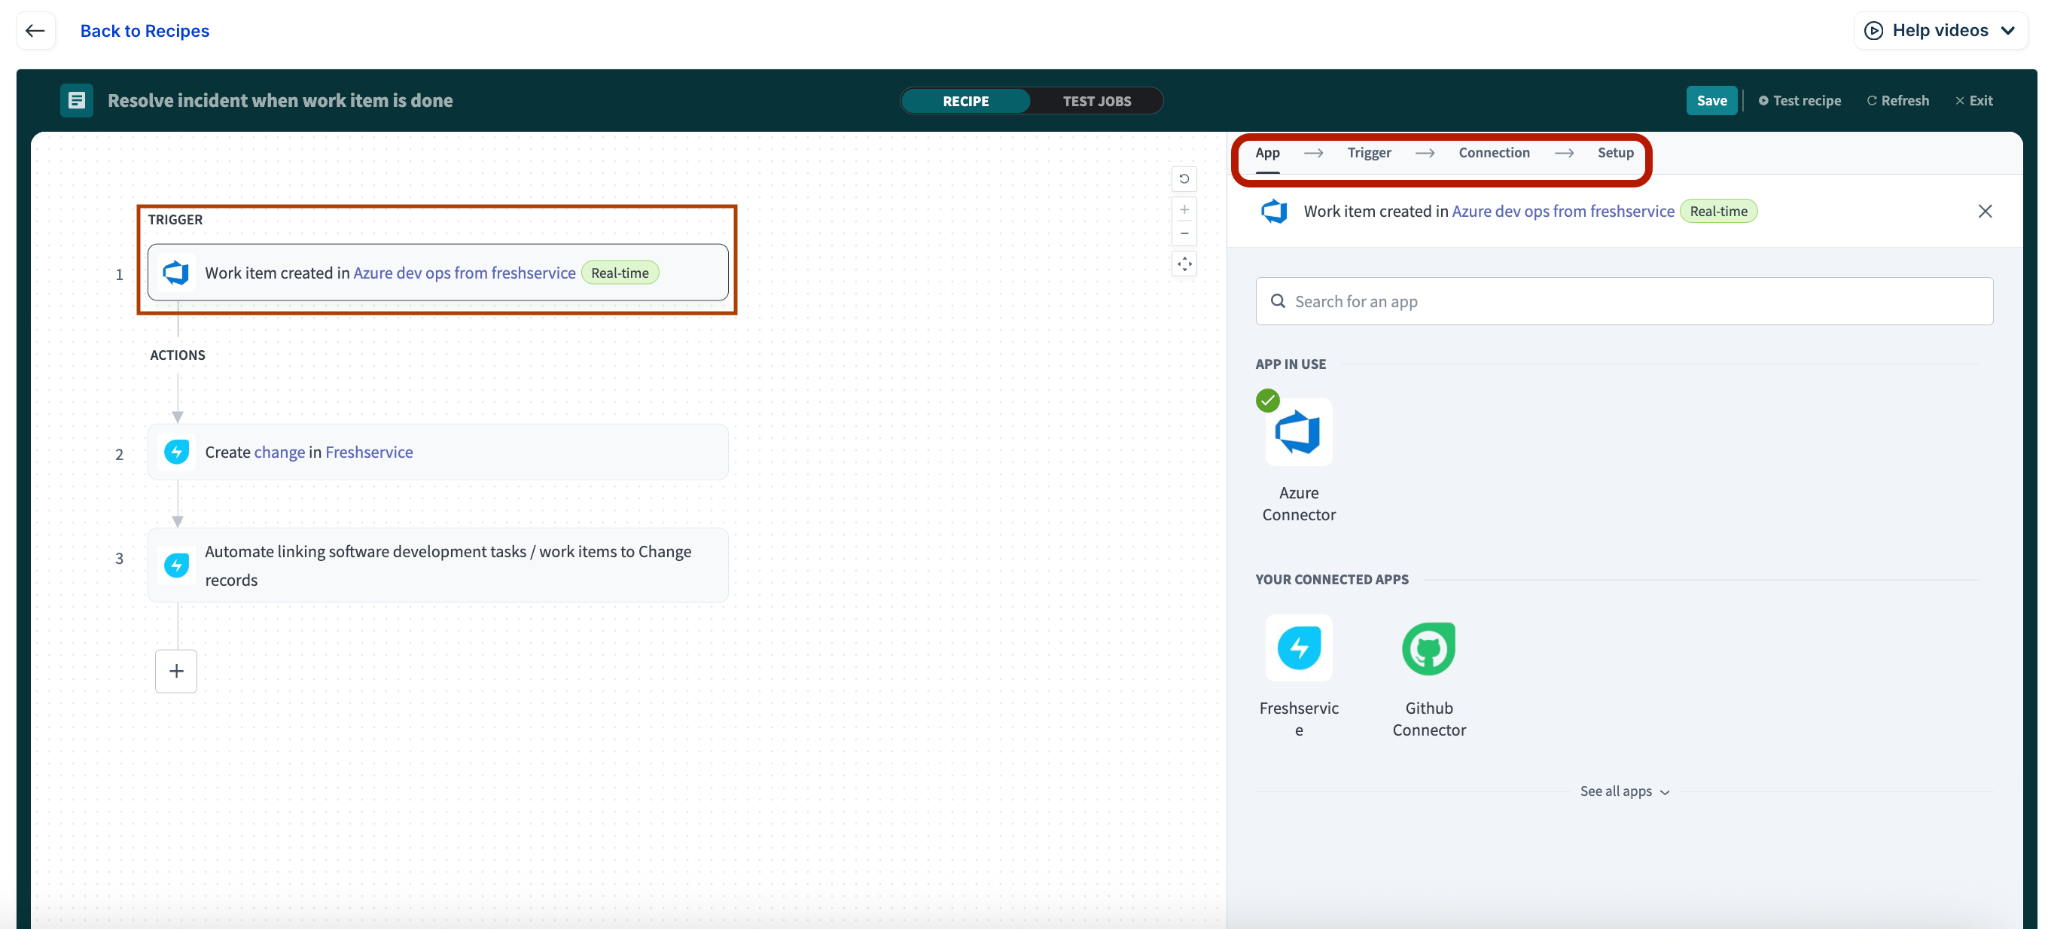
The Edit option for a Trigger component displays various trigger details and editing options in the following tabs:
App: Shows details of the app in use, your connected apps, and other apps.
Trigger: Shows details of the trigger in use, and the list of all triggers.
Connection: Shows details of the connection in use, and the option to switch connections.
Setup: Shows details of the project, and lets you set trigger conditions with trigger data (including recipe data properties) and with AND or OR conditions.
Action
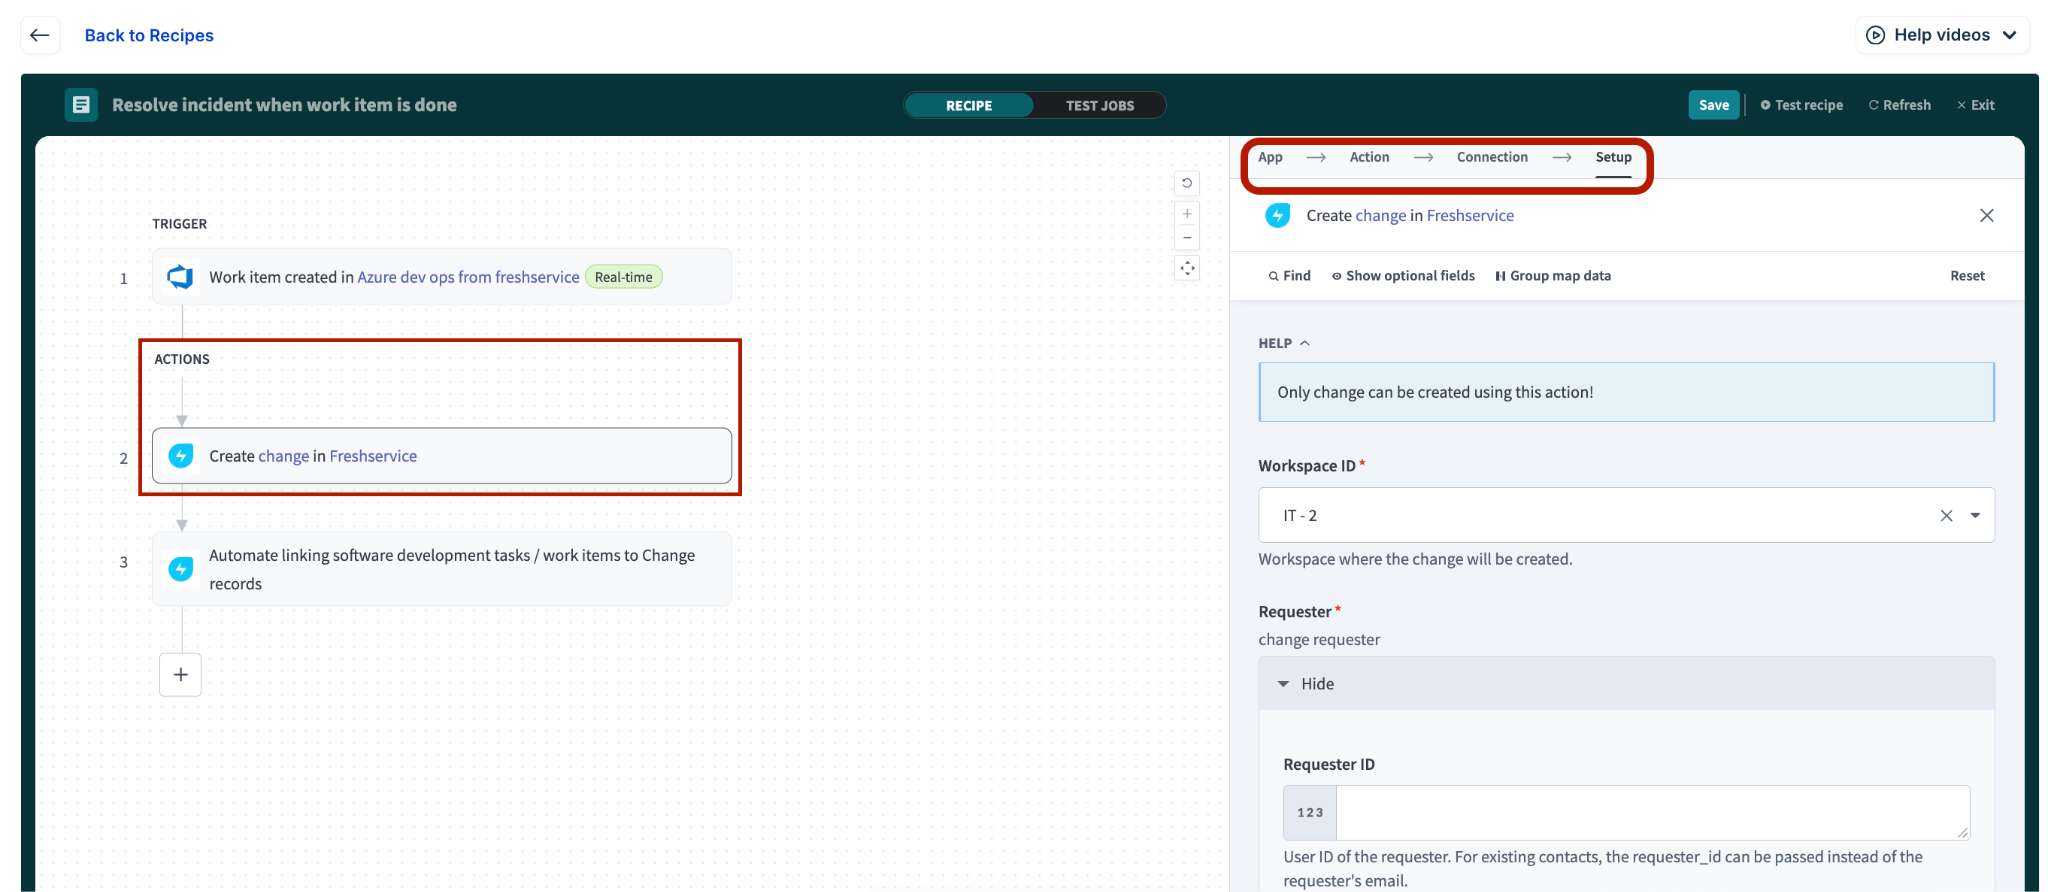
The recipe performs a specific set of actions based on the trigger. For example, the recipe creates a change in Freshservice for a new work item in Azure DevOps.
Note:
Each successful action in a recipe is counted as one task.
Tasks are not consumed when you only test the jobs in a recipe or test a recipe.
The Edit option for an Action component displays various action details and editing options in the following tabs:
App: Shows details of the app in use, your connected apps, and other apps.
Action: Shows details of the action in use, and the list of all actions. Also, lets you add custom actions using webhooks.
Connection: Shows details of the connection in use, and the option to switch connections.
Setup: Lets you configure various default fields (such as, Workspace ID, Requester, Subject, Change type, Status, Priority, Planned Dates, and so on), available optional fields, and map field group and data source.
After customizing a recipe, you can save or test it to ensure it's working correctly.