
 Community
 Video Library
 Agent Training
 Freshservice
 Freshdesk
 Freshchat
 Freshcaller
 Freshsales
 Freshteam
 Freshworks Neo
 Freshsurvey
 Freshservice for MSP
 TABLE OF CONTENTS
Use Sentiment analysis, an AI Copilot feature, to understand how the requester feels throughout a ticket and the factors that influence the sentiment. This article explains how admins configure and publish sentiment analysis, and how agents view and provide feedback on sentiment predictions.
Prerequisites
Before you use sentiment analysis, ensure that you have the following:
An active AI Copilot license assigned to you.
Sentiment analysis enabled by an admin in AI Agent Studio.
The Sentiment analysis permission enabled for your role under Admin > Roles.
Overview of sentiment analysis
Sentiment analysis uses Freddy AI to analyze the requester’s messages in a ticket and classify the sentiment as Negative, Neutral, or Positive. It also shows how the sentiment has changed since the ticket started and, when enabled, explains the factors that influenced the prediction.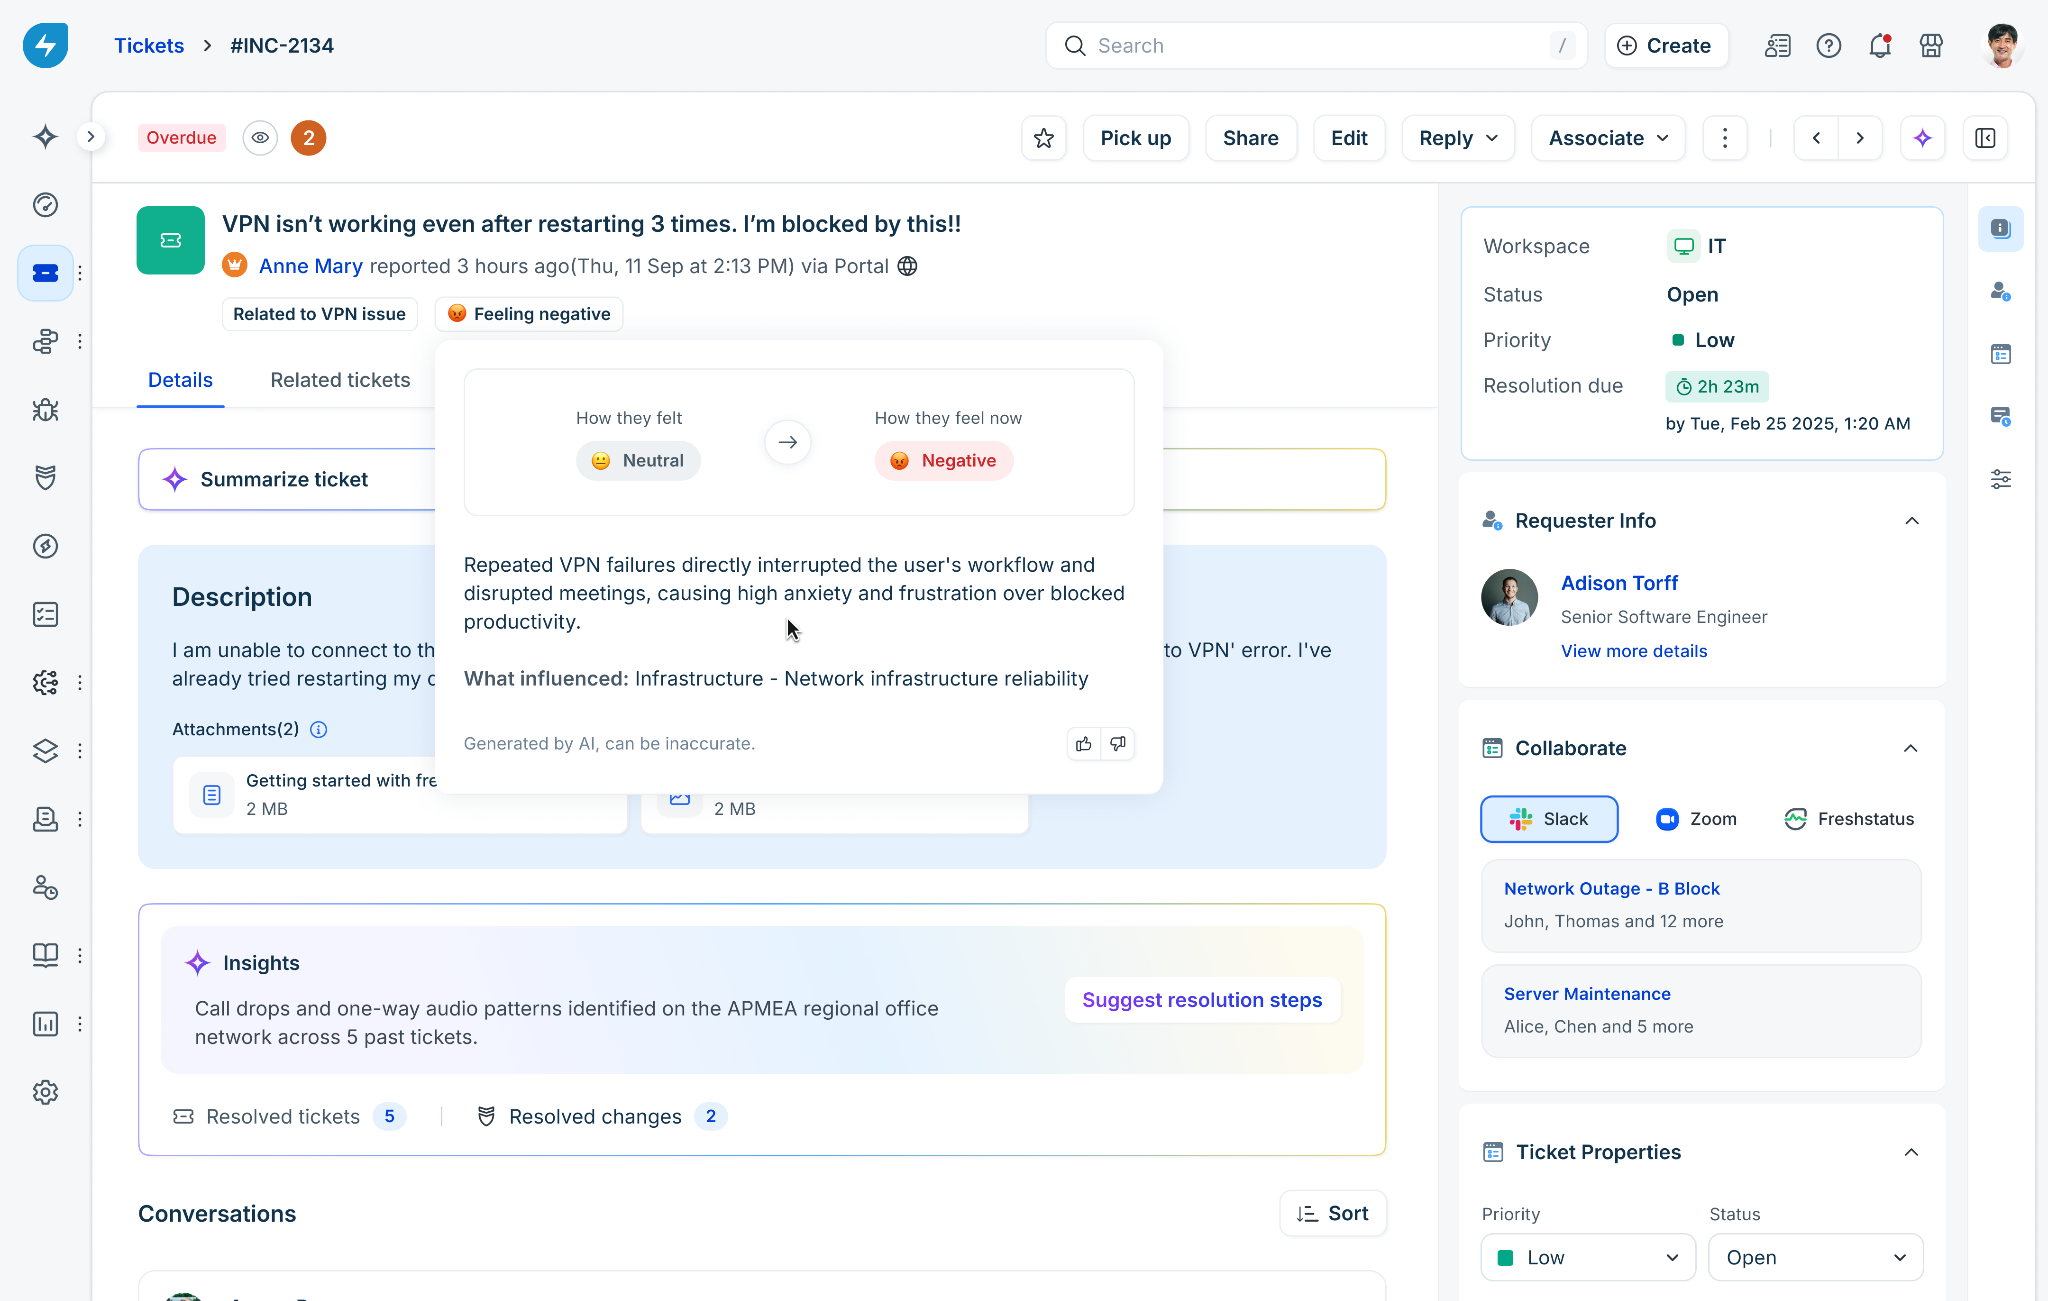
This helps you quickly identify changes in requester sentiment without reading the entire conversation to determine how the requester feels. You can use this information to prioritize tickets that may need attention and respond to changes in sentiment before the issue escalates.
Note: Sentiment is inferred from ticket text using AI, so predictions can occasionally be inaccurate.
Admin experience
Admins can configure, test, and publish sentiment analysis through AI Agent Studio > AI Copilot. You can also control which roles can view sentiment and its reasoning.
Configure sentiment analysis
Use the Configurations page to control how sentiment is analyzed and what information is used to generate sentiment reasoning.
To configure sentiment analysis, follow these steps:
Go to AI Agent Studio > AI Copilot > Sentiment Analysis > Configurations.
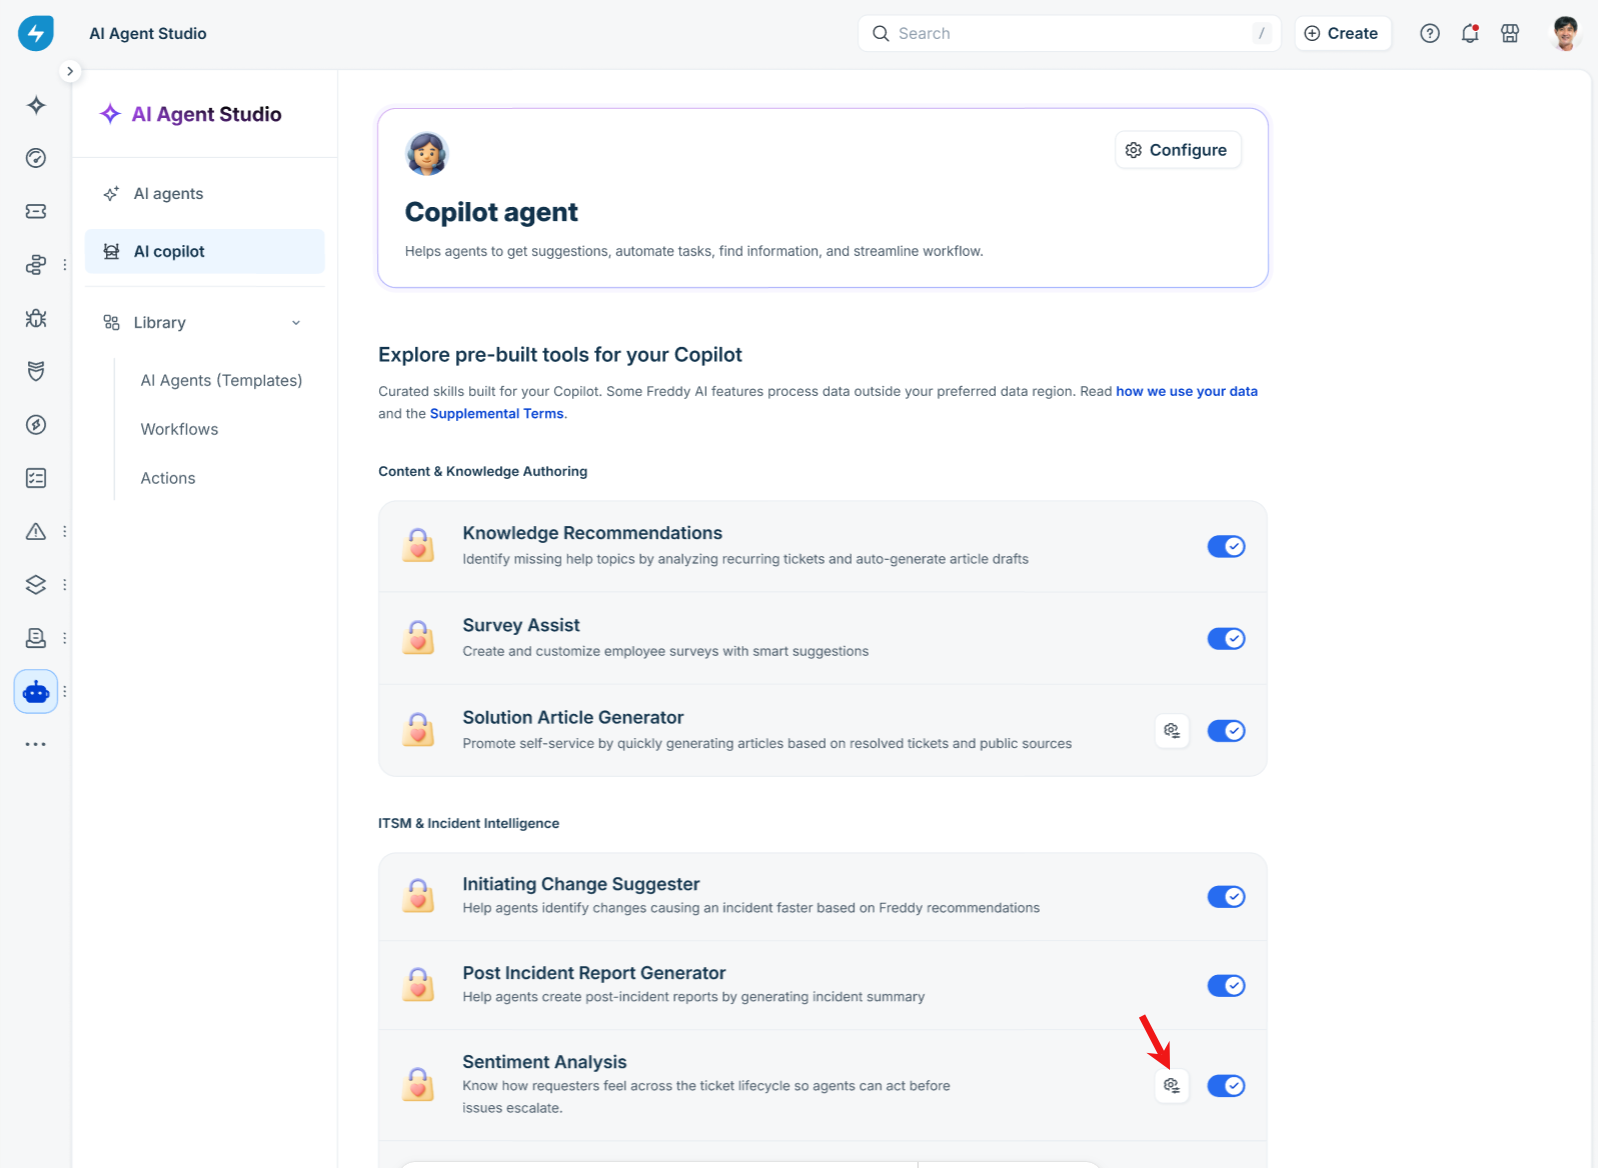
Under Sentiment details, turn on Reasoning for Sentiment to let agents see the AI's analysis of the conversation, service quality, and resolution alongside the sentiment label.
Under Ticket type, turn on Incidents and Service Requests as required. Sentiment analysis runs only on the ticket types that you enable.
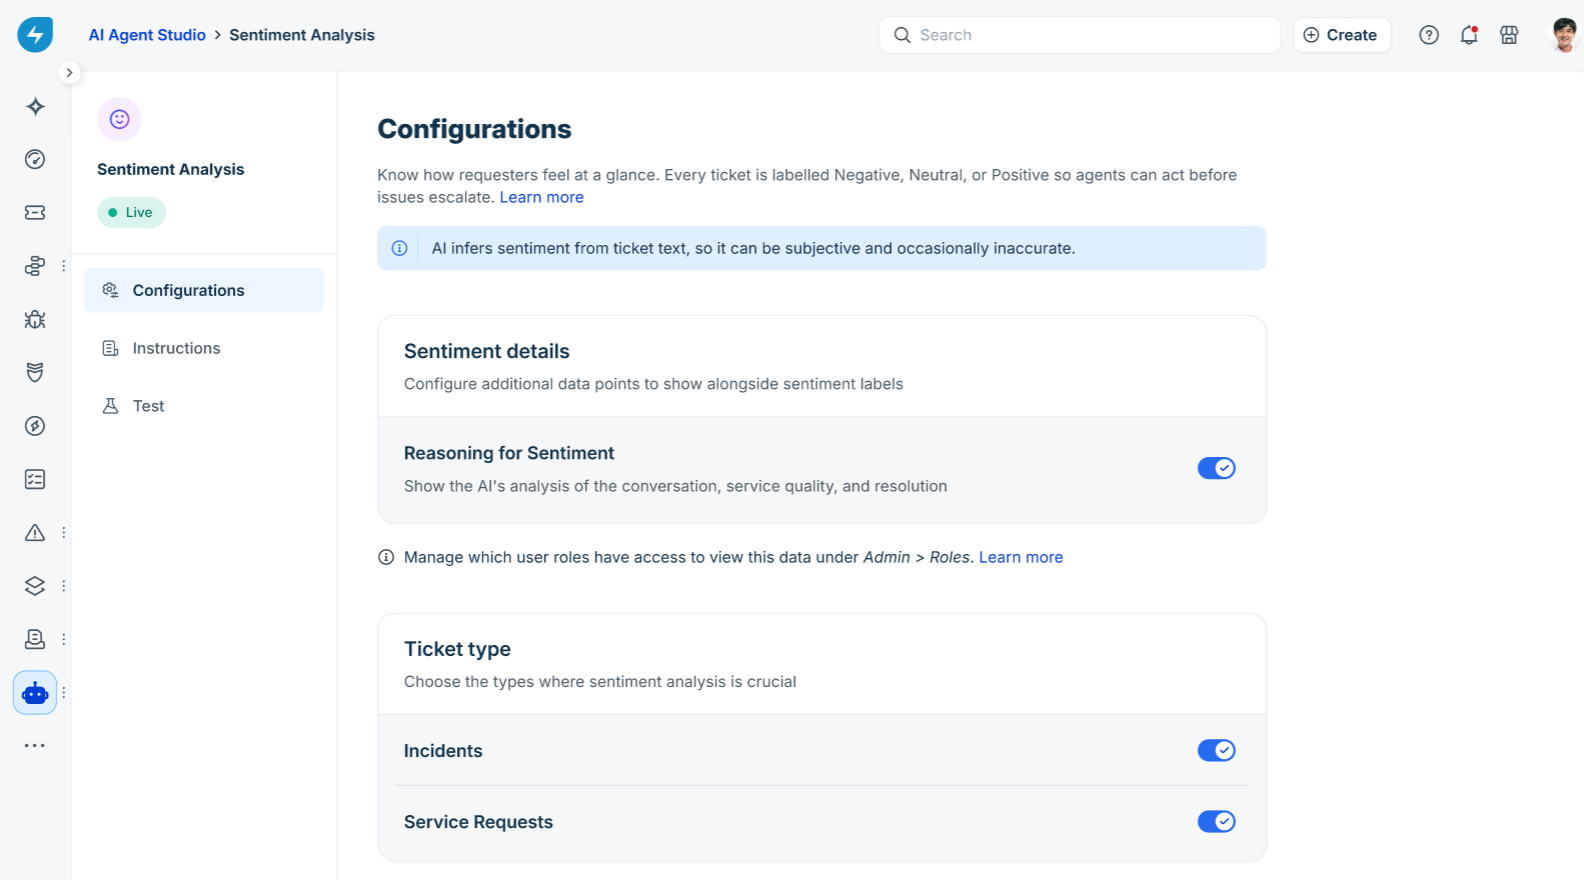
Under Start analysing from, select Ticket Creation to include the entire ticket from the beginning, or First Agent Response to start the analysis from the first agent response.
Under What to include, select Entire Thread to analyze the full conversation, or Last Few Responses to analyze only the most recent messages. If you select Last Few Responses, specify the number of messages to consider.
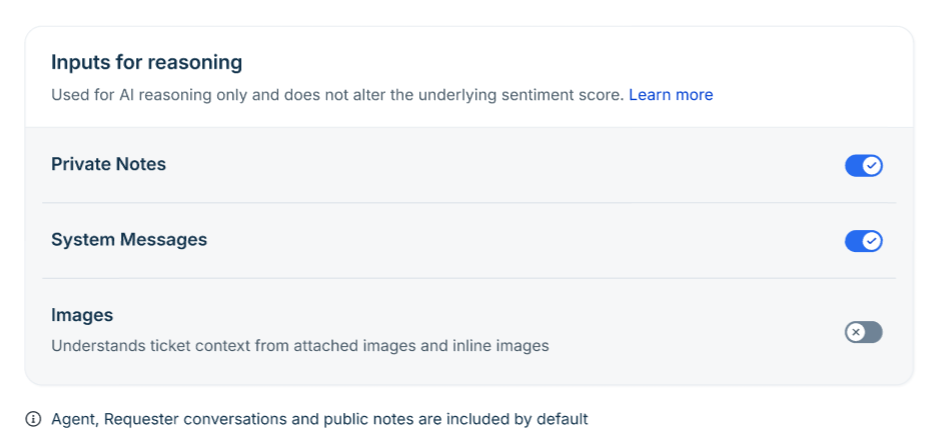
Under Inputs for reasoning, turn on Private Notes and System Messages if you want the AI to use them as context when generating its reasoning. Agent-requester conversations and public notes are included by default.
Click Save draft.
The settings under Inputs for reasoning affect only the reasoning generated for the prediction. They do not affect the underlying sentiment score.
Add instructions for sentiment analysis
Use the Instructions page to add business-specific rules that help the AI interpret terminology, tone, or exceptions correctly.
To add instructions, follow these steps:
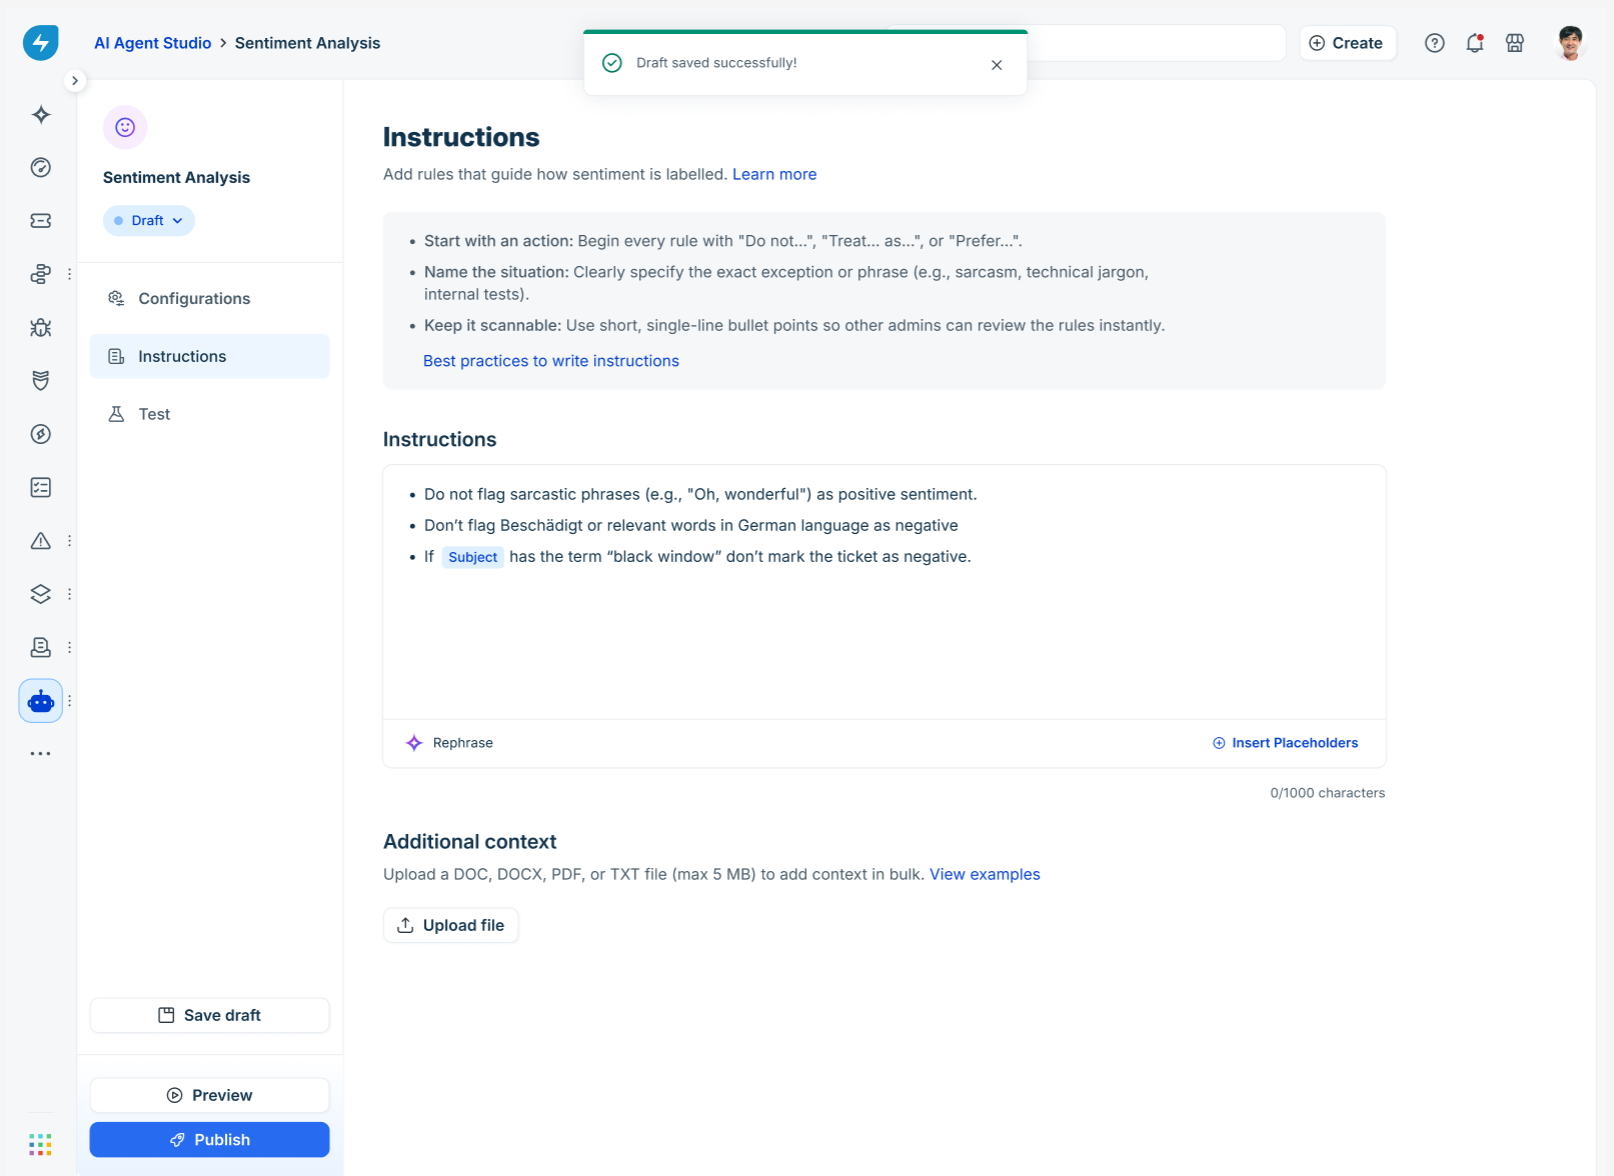
Go to AI Agent Studio > AI Copilot > Sentiment Analysis > Instructions.
In the Instructions box, add a rule for each exception. Start each rule with an action such as “Do not…”, “Treat…as…”, or “Prefer…”, and specify the phrase or situation that the rule applies to.
Click Insert Placeholders to reference ticket fields, such as Subject or Requester, in a rule.
Click Rephrase to refine the wording of a rule.
Under Additional context, click Upload file to add domain-level context, such as a glossary of terms. Supported file types are DOC, DOCX, PDF, and TXT, up to 5 MB.
Click Save draft.
Use Preview
Use Preview to test your configuration and instructions with a real ticket before making the changes available to agents.
To preview a sentiment for a ticket, follow these steps:
Go to AI Agent Studio > AI Copilot > Sentiment analysis
Click either the Configurations or Instructions tab.
Click Preview at the bottom-left of the page.
In the Preview panel, search for a ticket with its subject or ticket ID.
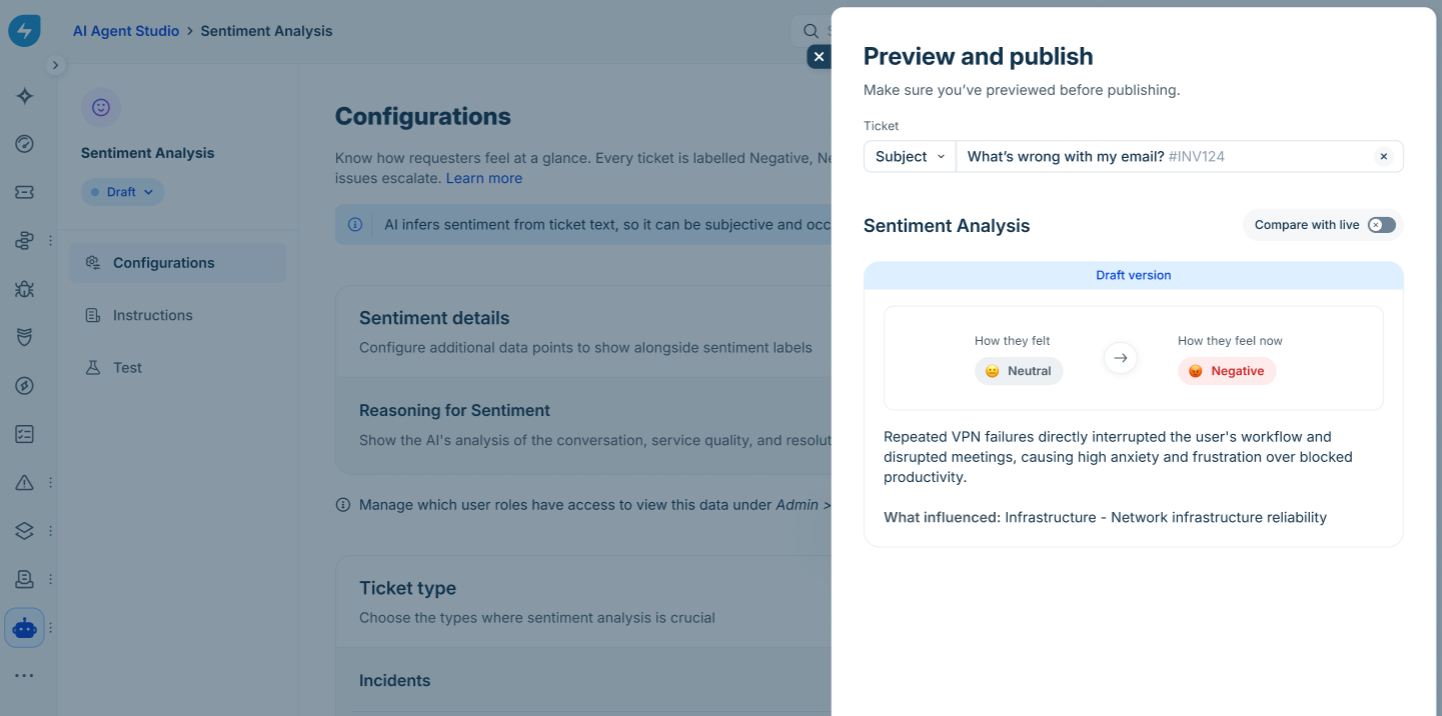
Review the sentiment analysis generated using your current configuration and instructions.
Use the Compare toggle to compare the sentiment analysis generated by the Draft version, which uses the configuration and instructions you are currently configuring and testing.
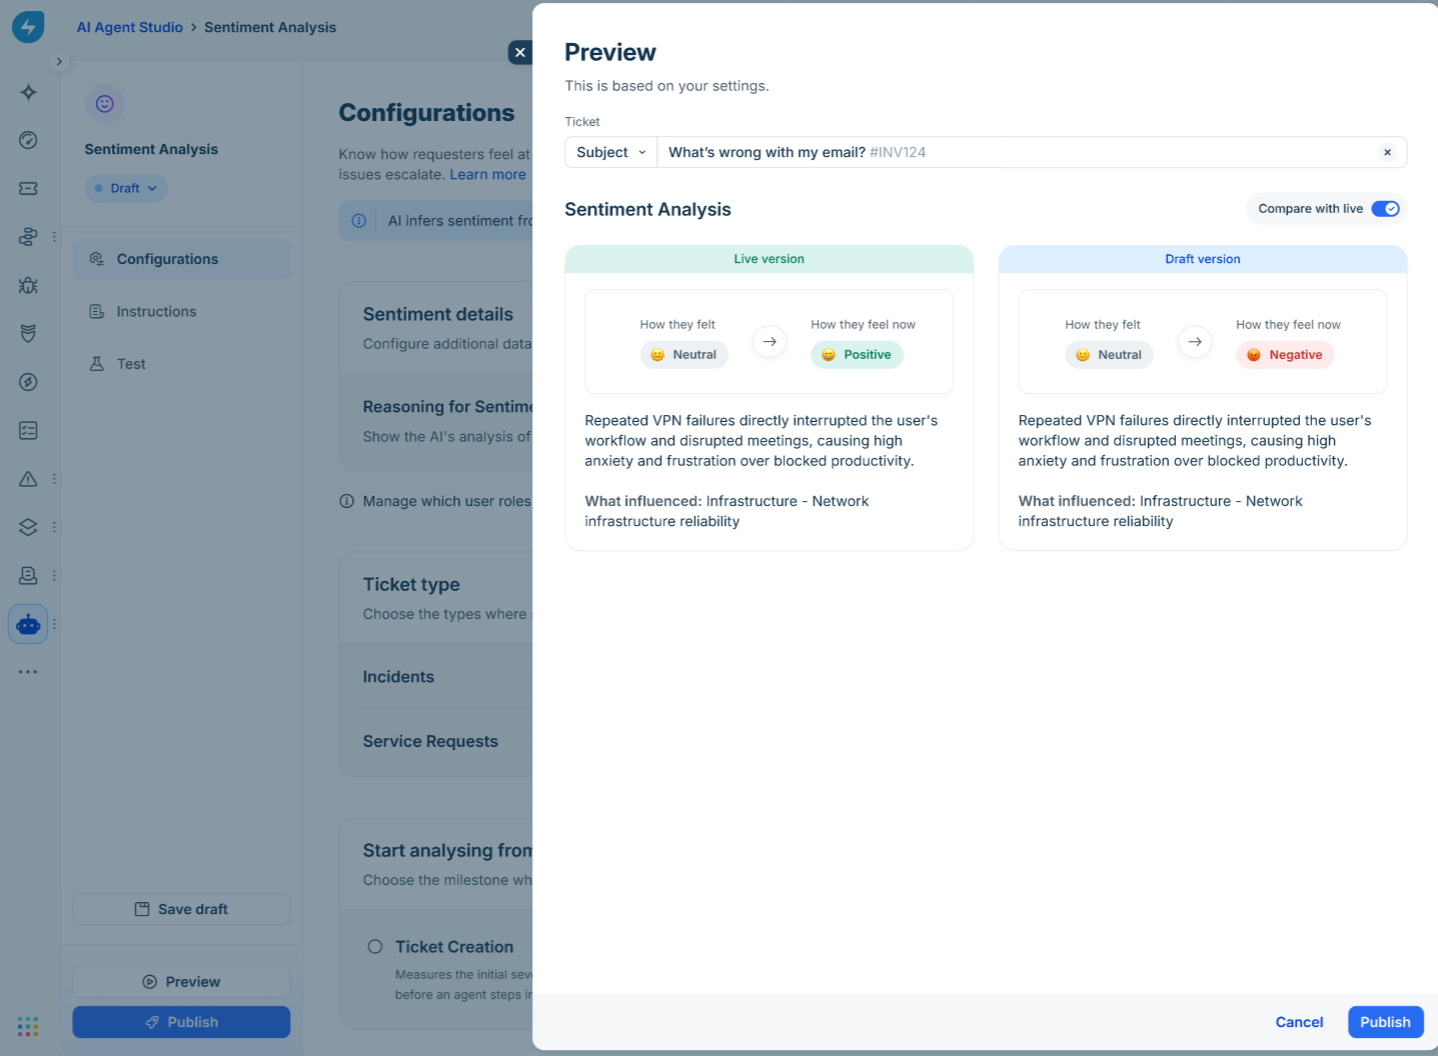
Note: The Live version uses the previously published configuration and instructions that are currently active.When you're satisfied with the configuration, select Save as draft to continue editing later or Publish to make the configuration live.
Bulk Test
Use the Test page to run a bulk test and validate your configuration against existing or sample tickets before publishing.
To test the configuration, follow these steps:
Go to AI Agent Studio > AI Copilot > Sentiment Analysis > Test.
Click Add tickets.
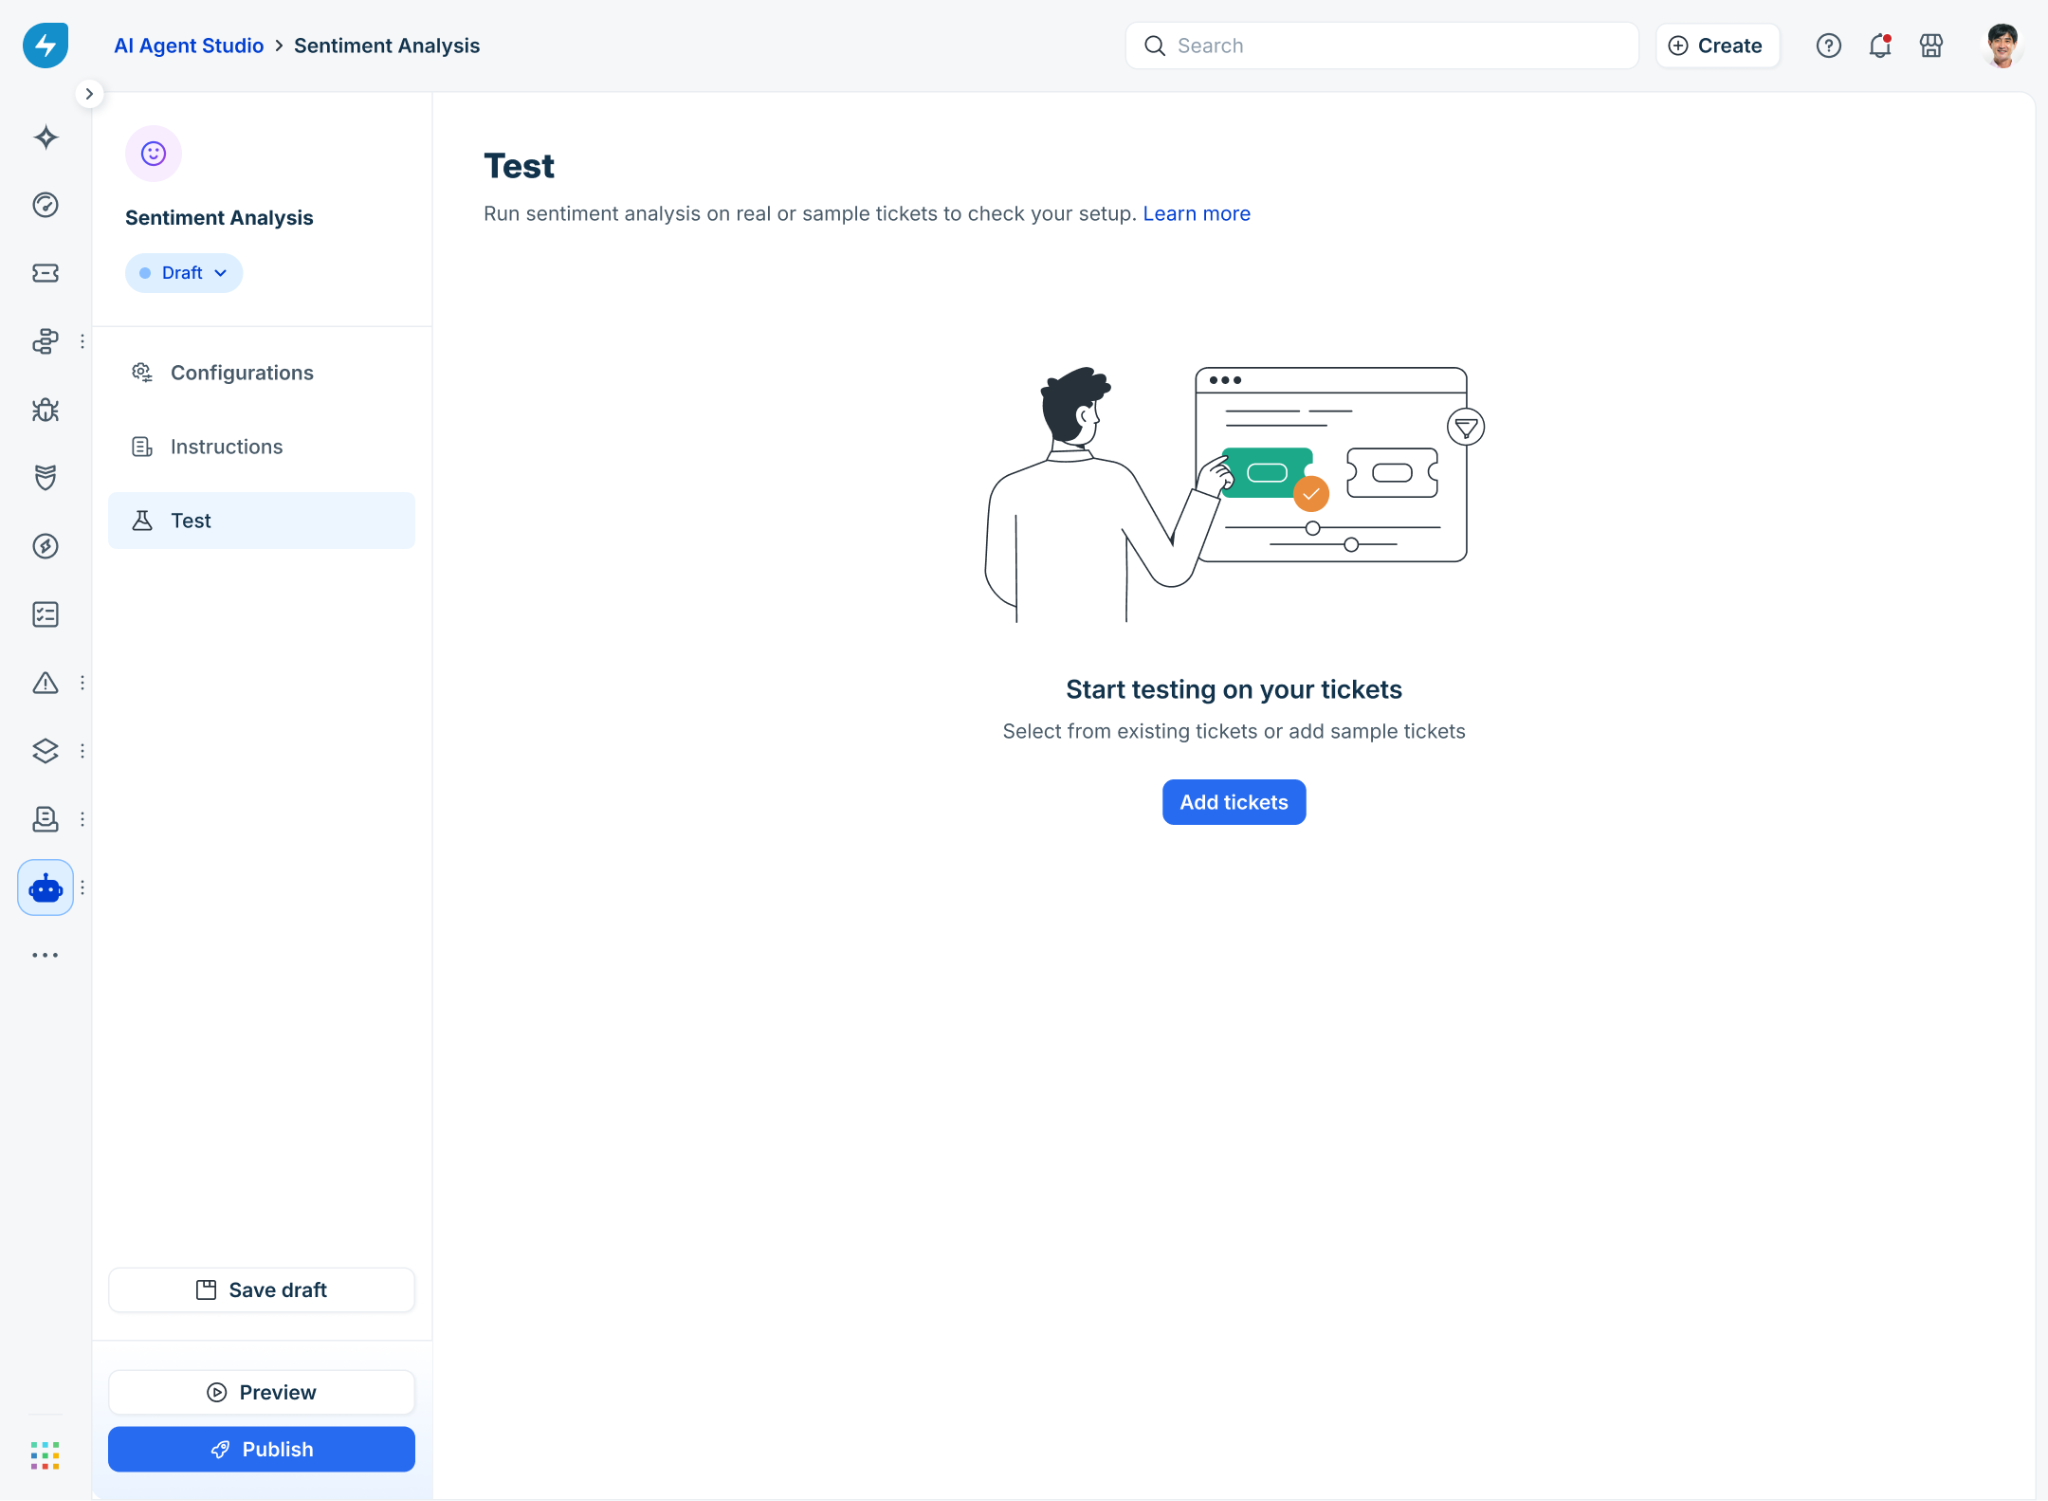
Select Existing tickets and search by subject or ID. Alternatively, select New sample ticket and enter a Subject and Description, or click Generate sample ticket to have Freddy AI create a sample ticket.
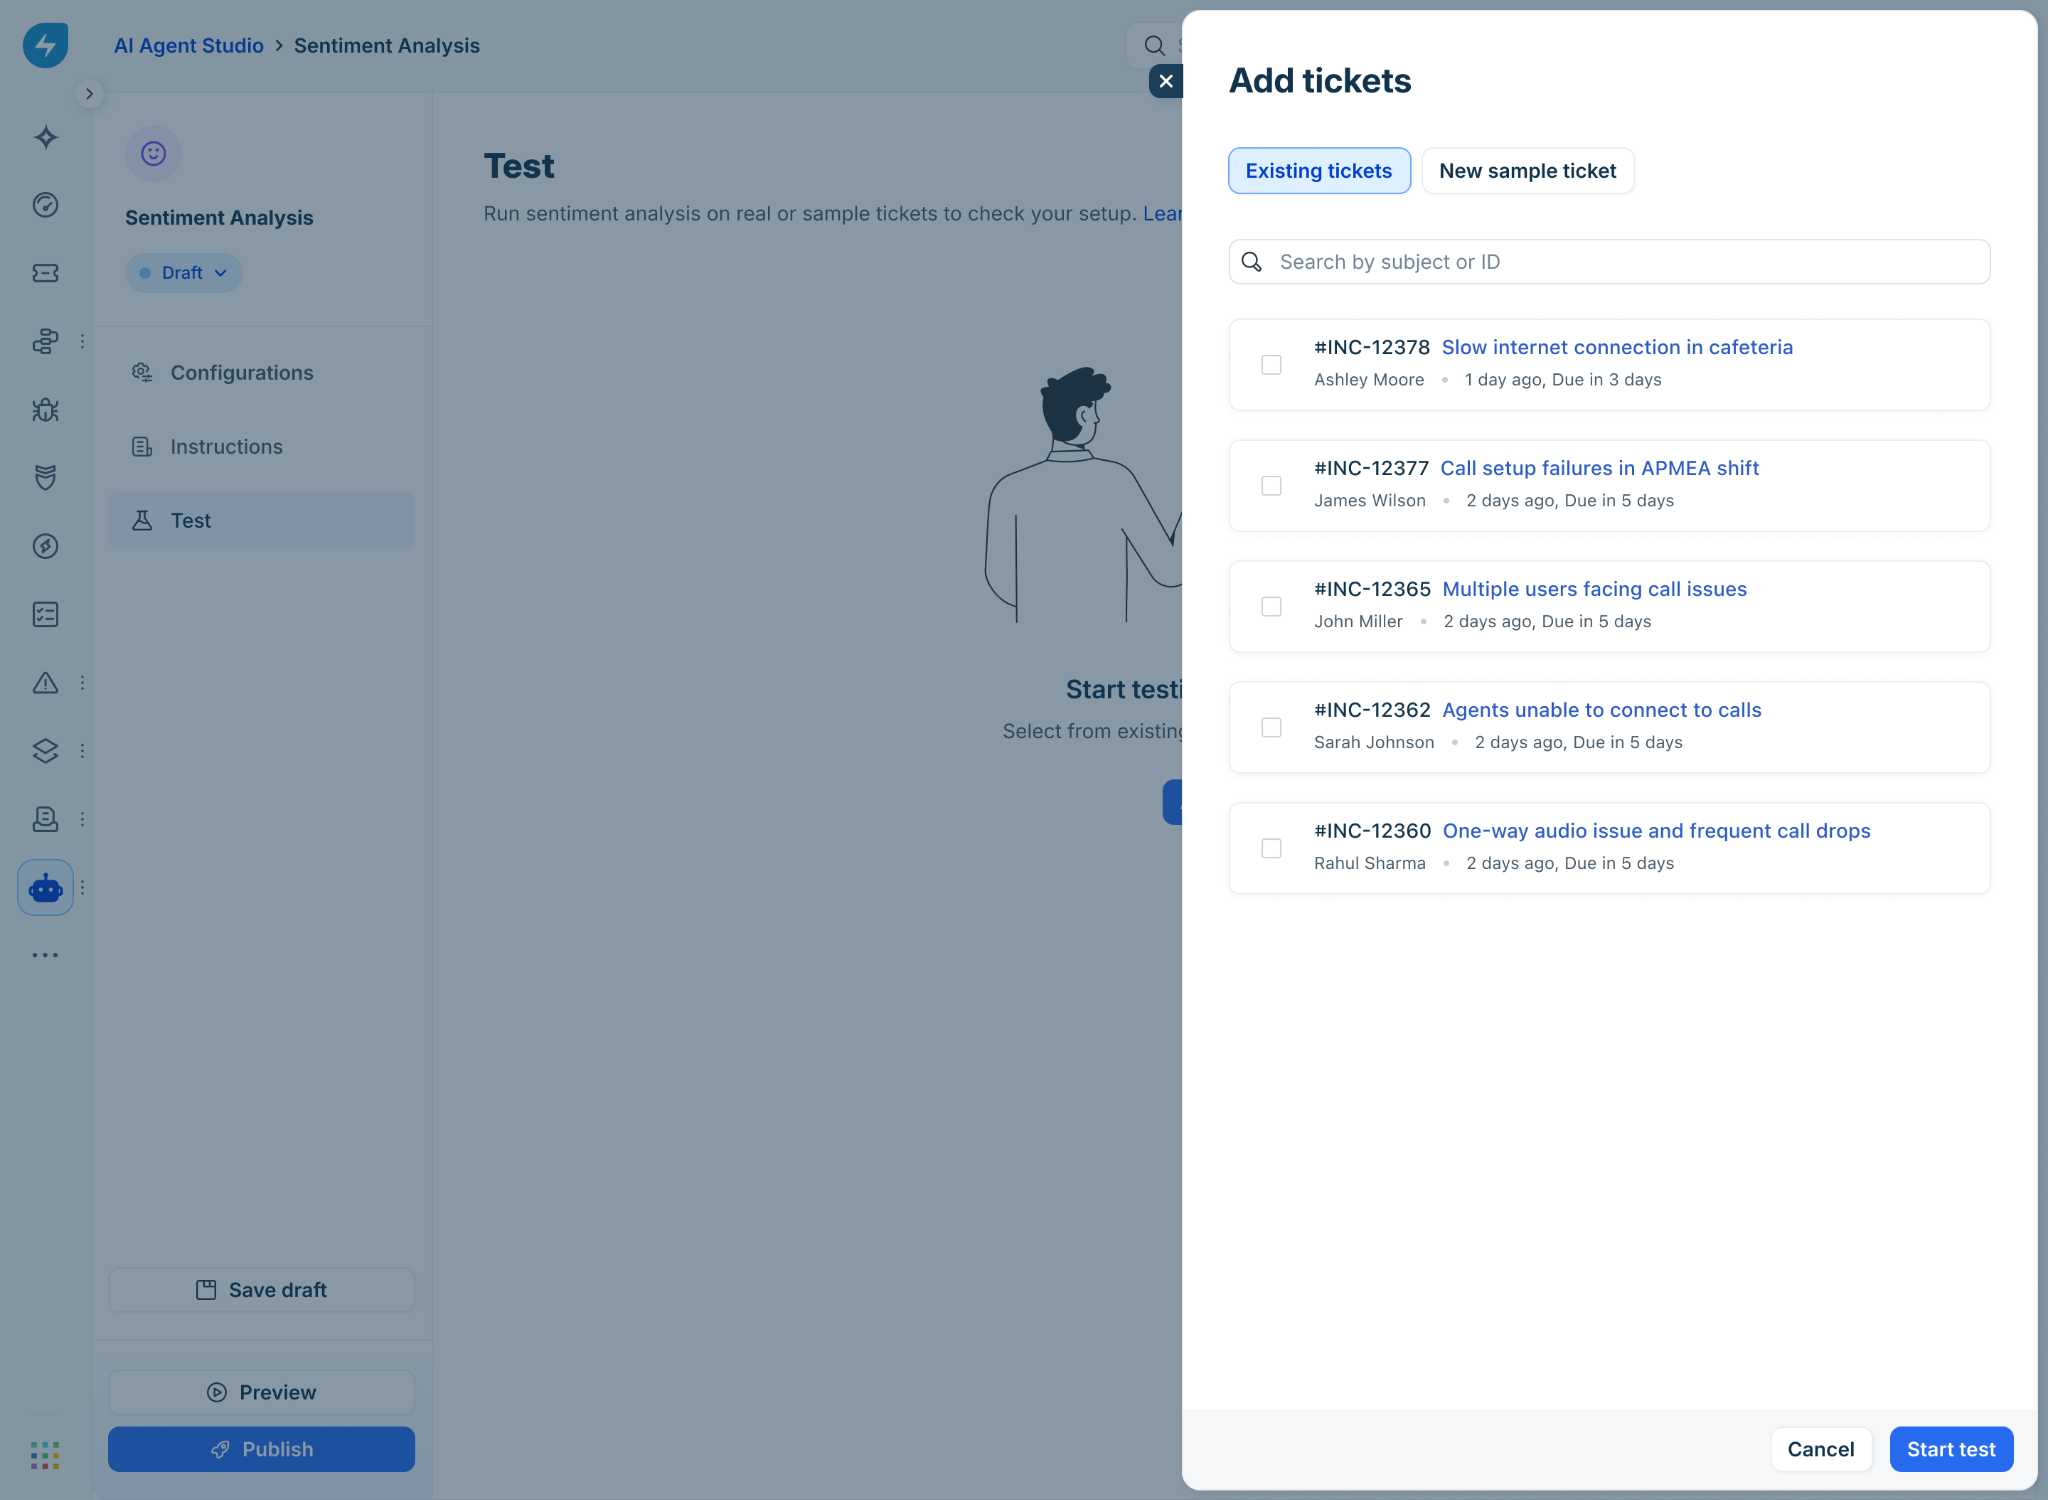
Click Start test.
Review the Sentiment and Reasoning generated for each ticket. Click View more to see the full reasoning.
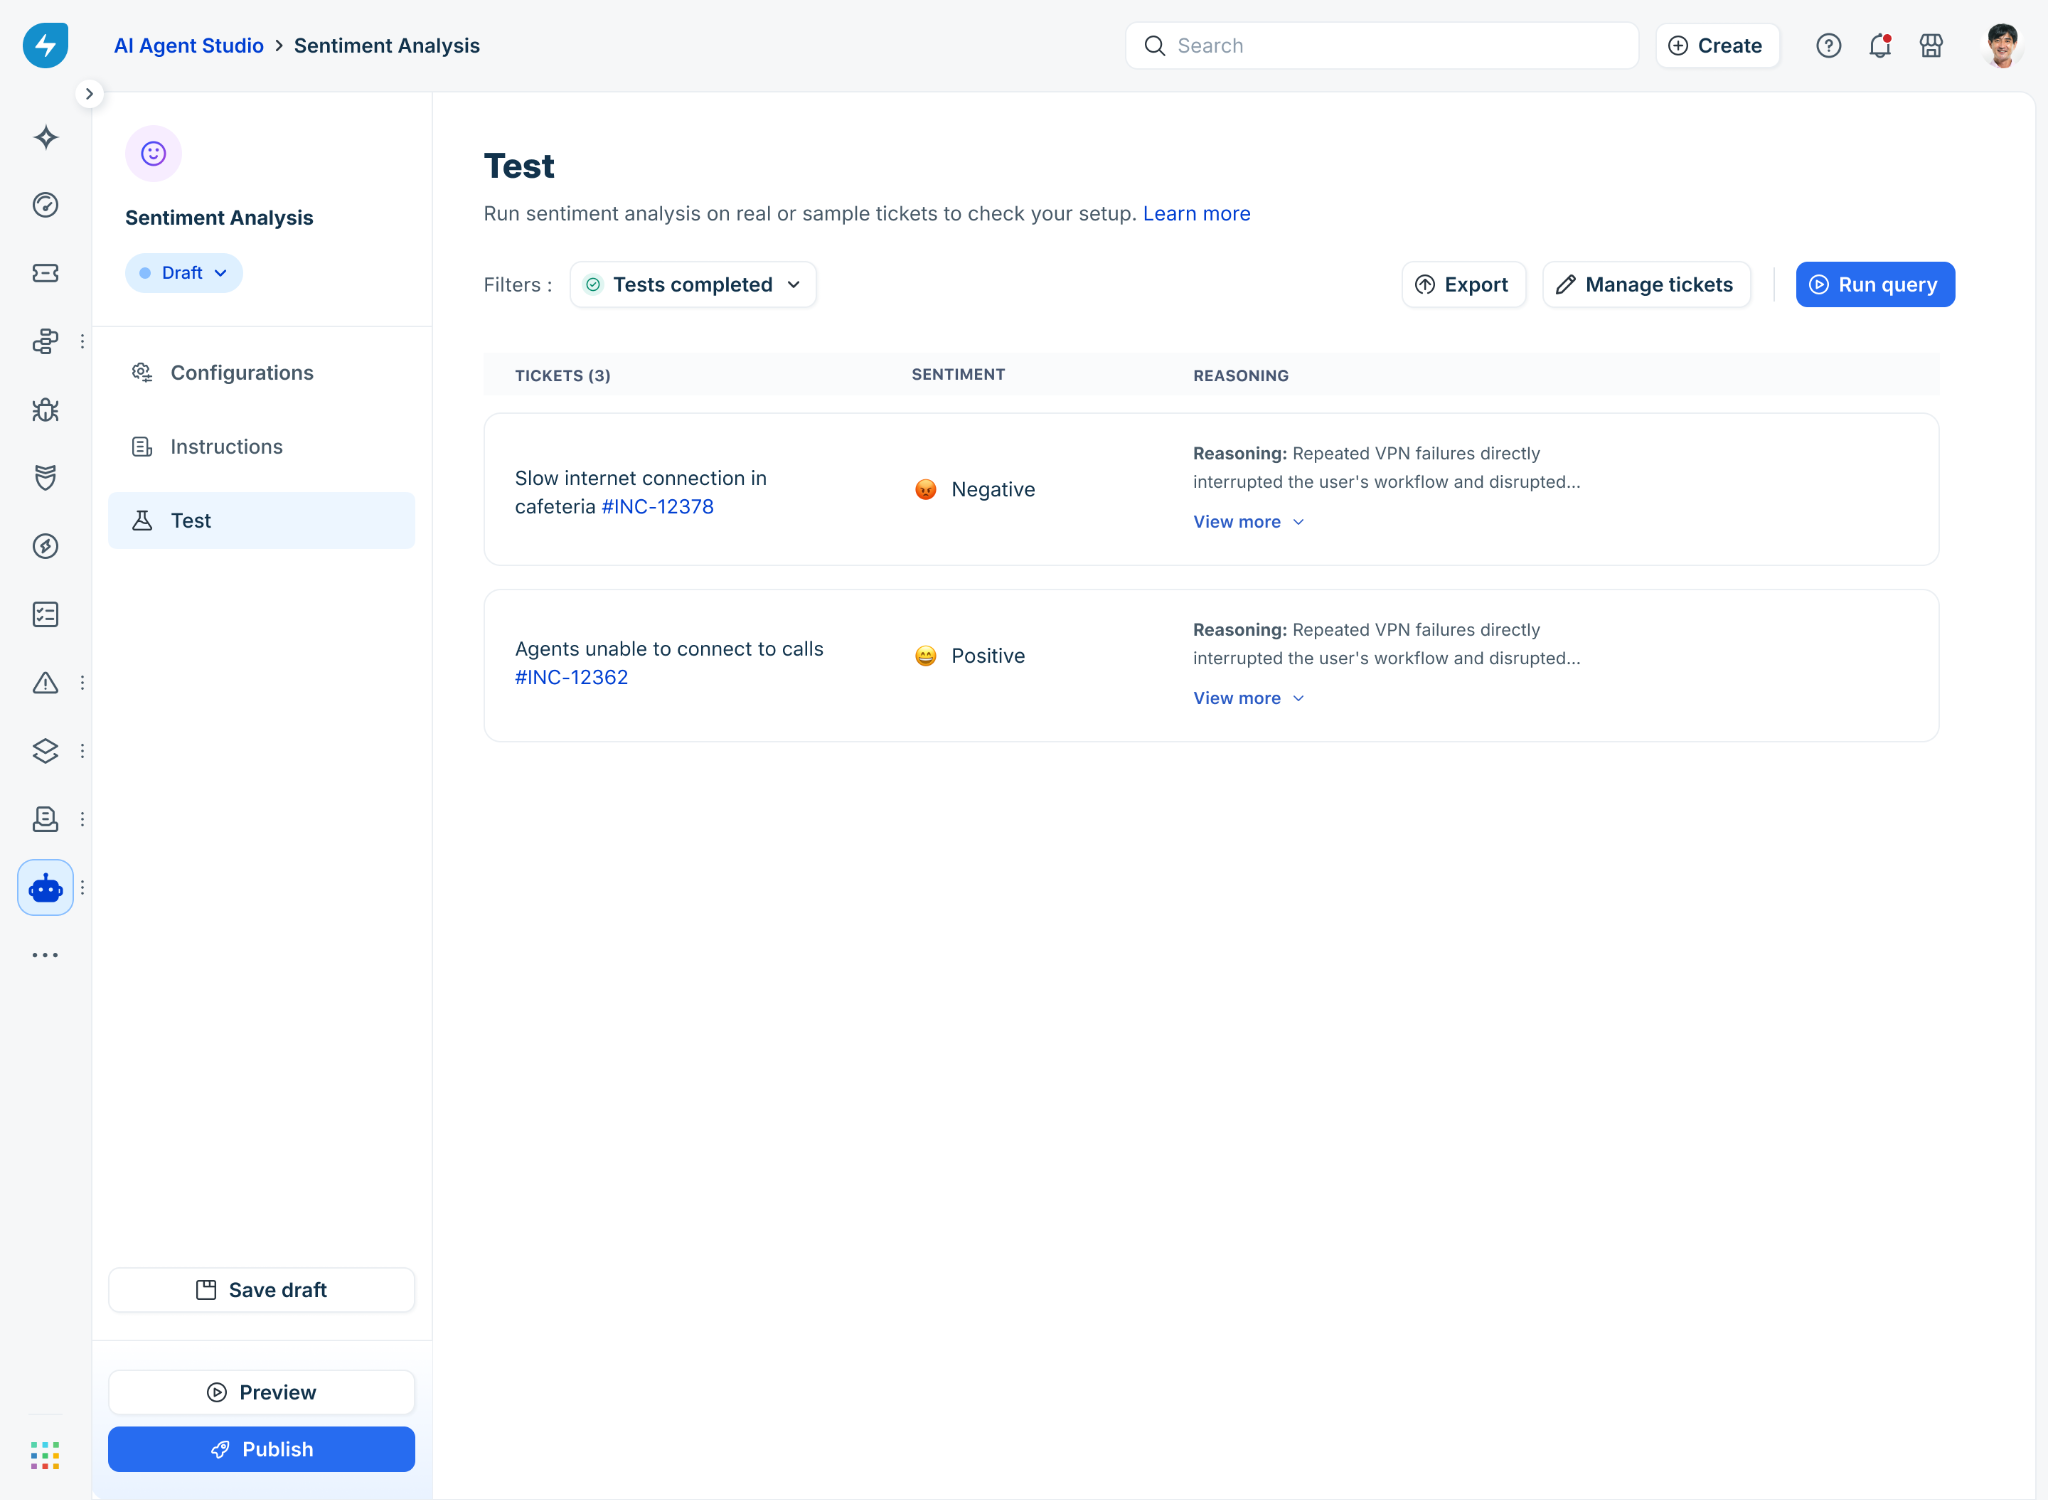
Click Export to download the results, or click Manage tickets to edit the test set.
Manage sentiment analysis permissions
You can control access to sentiment and sentiment reasoning independently for each role. For example, you can allow team leads to view the reasoning while allowing frontline agents to view only the sentiment label.
To manage sentiment analysis permissions for a role, follow these steps:
In the Global Settings, go to Admin > Roles.
Select the agent role that you want to update, and click Edit.
Under Permissions > Freddy AI, select Sentiment analysis to let agents with this role view sentiment on tickets.
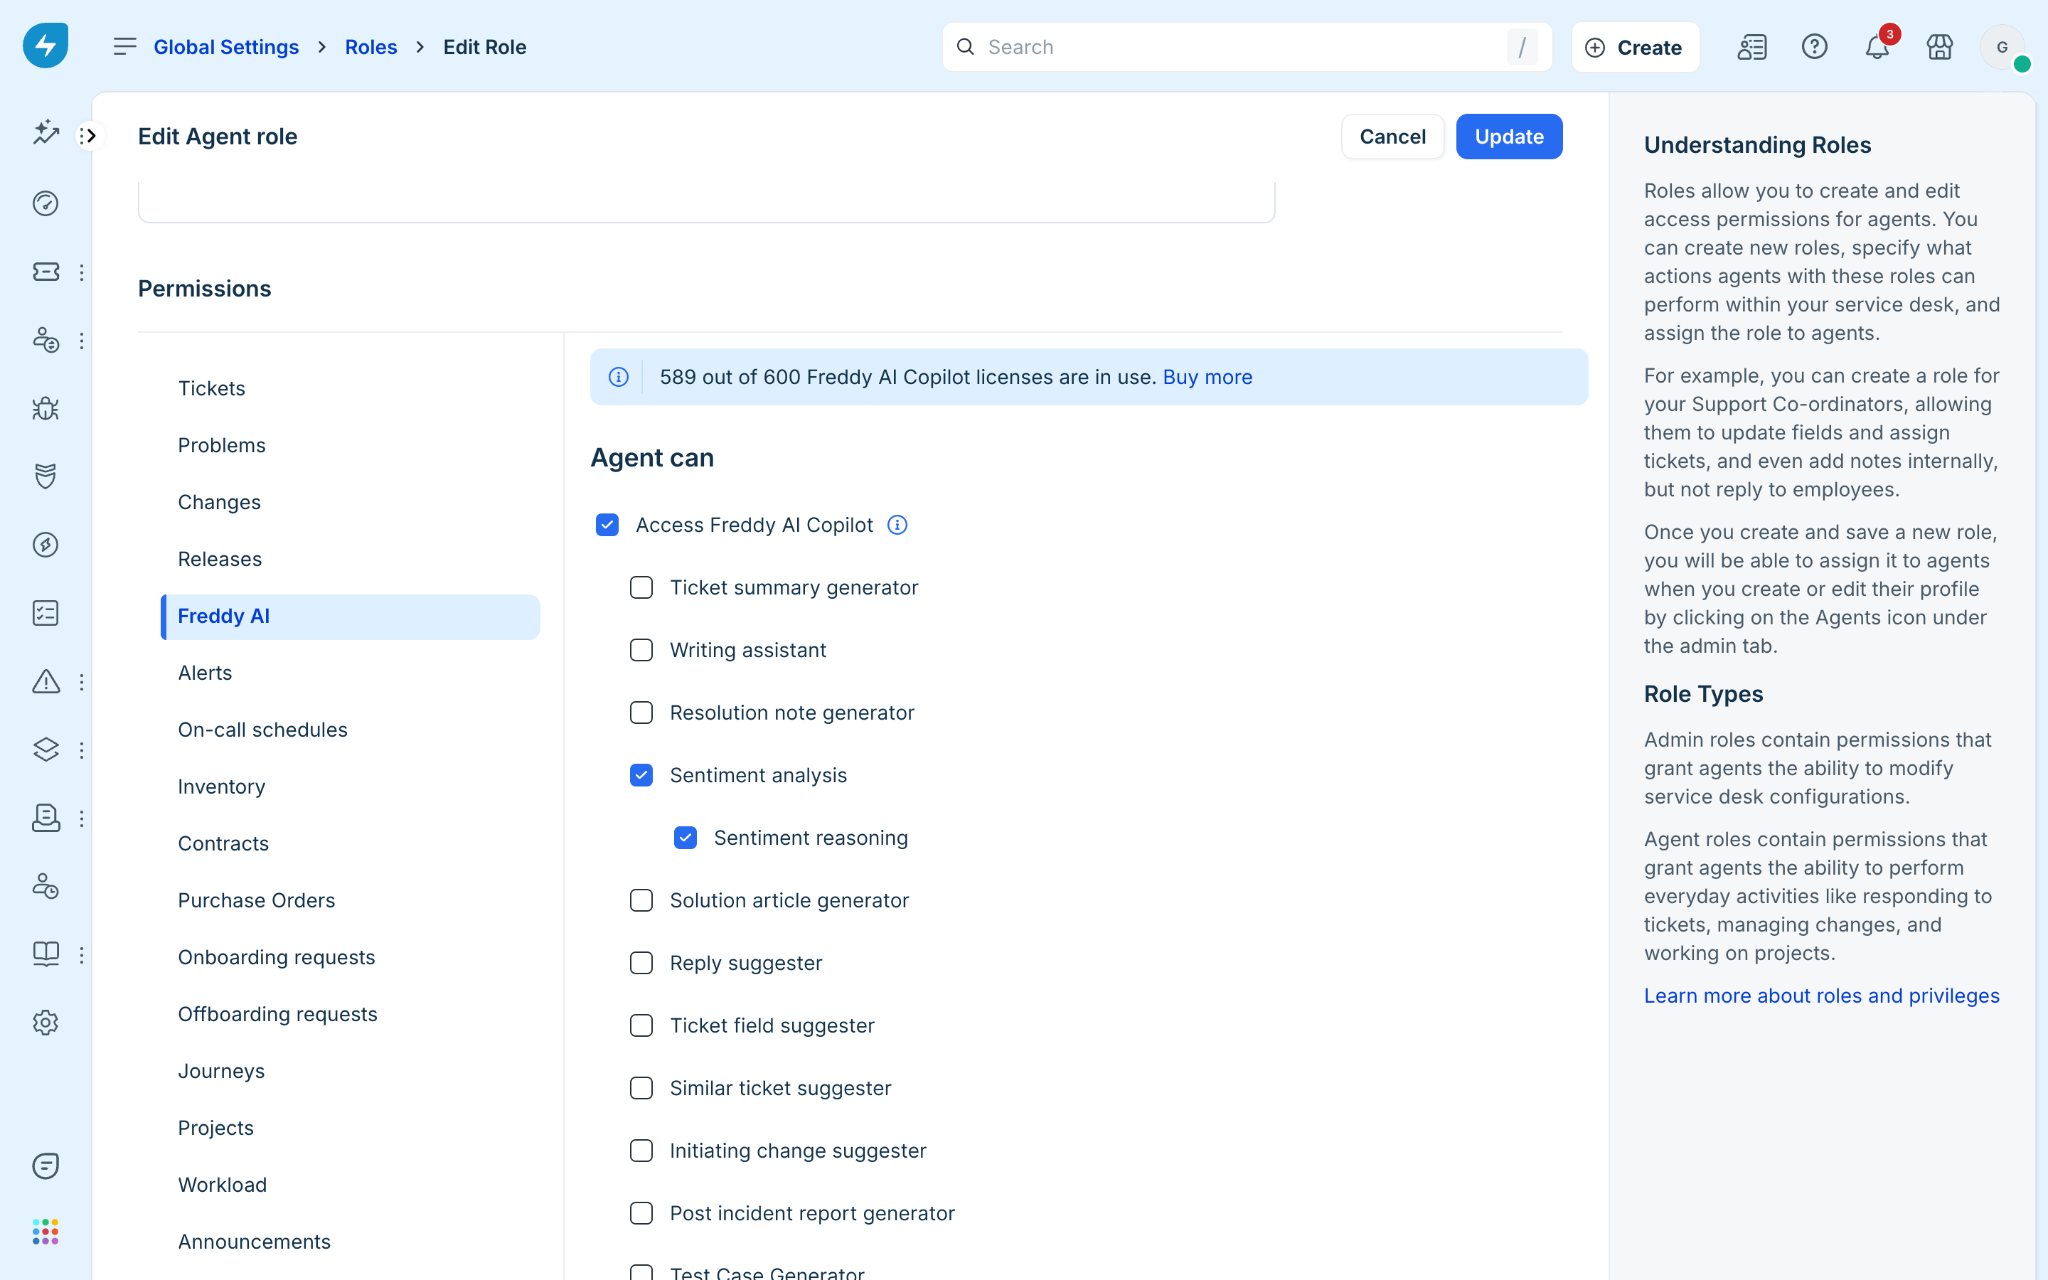
Select Sentiment reasoning to let agents with this role view the reasoning behind the sentiment score.
Click Update.
Agent experience
Agents can view sentiment directly on their tickets and provide feedback when a prediction is inaccurate.
View sentiment on a ticket
You can view sentiment in the following locations:
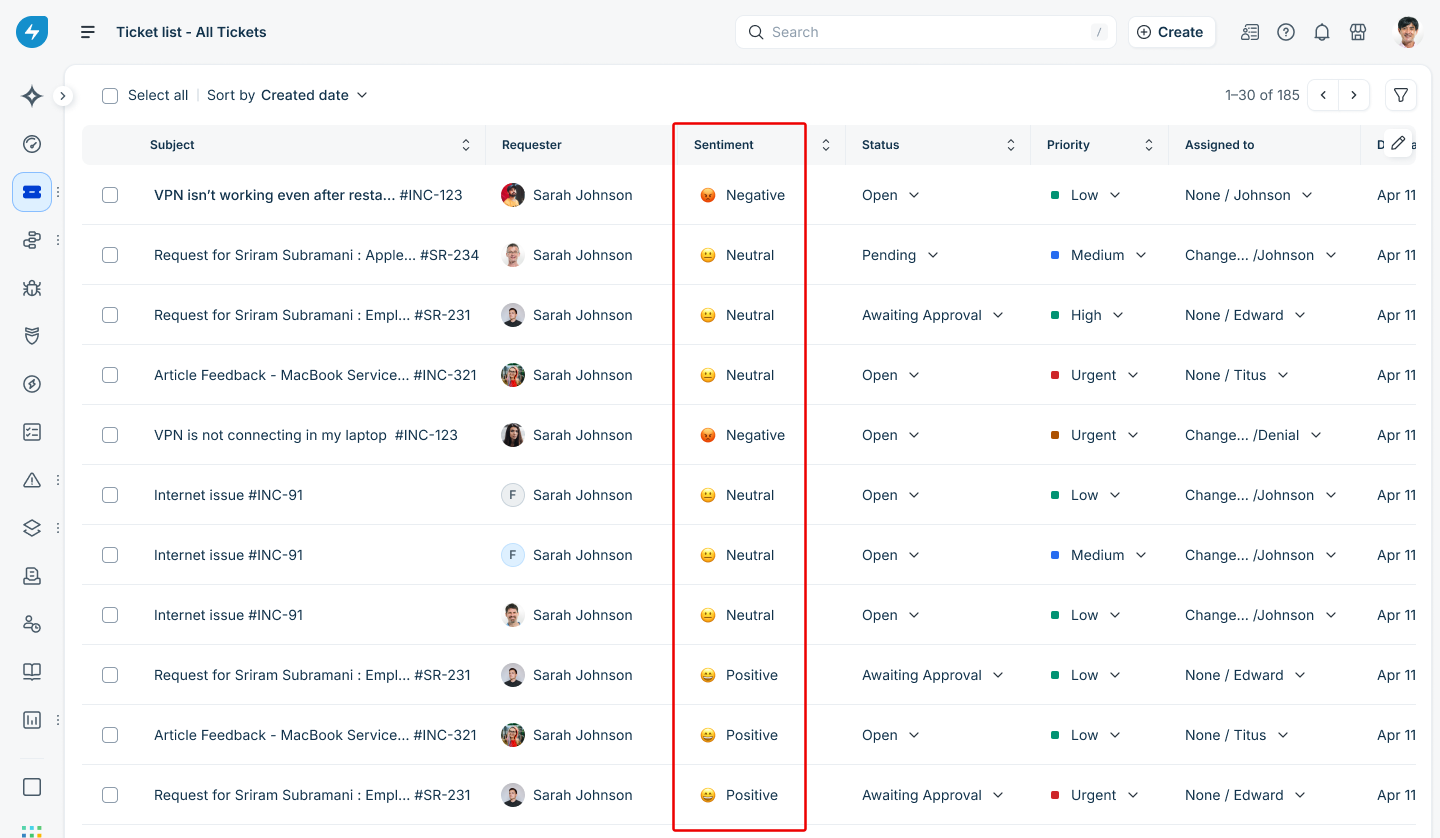
Ticket list view: The Sentiment column shows an emoji and label for each ticket. Hover over the label to see how the requester's sentiment has changed since the ticket started, including How they felt and How they feel now. If your role has access to reasoning, it is also displayed.
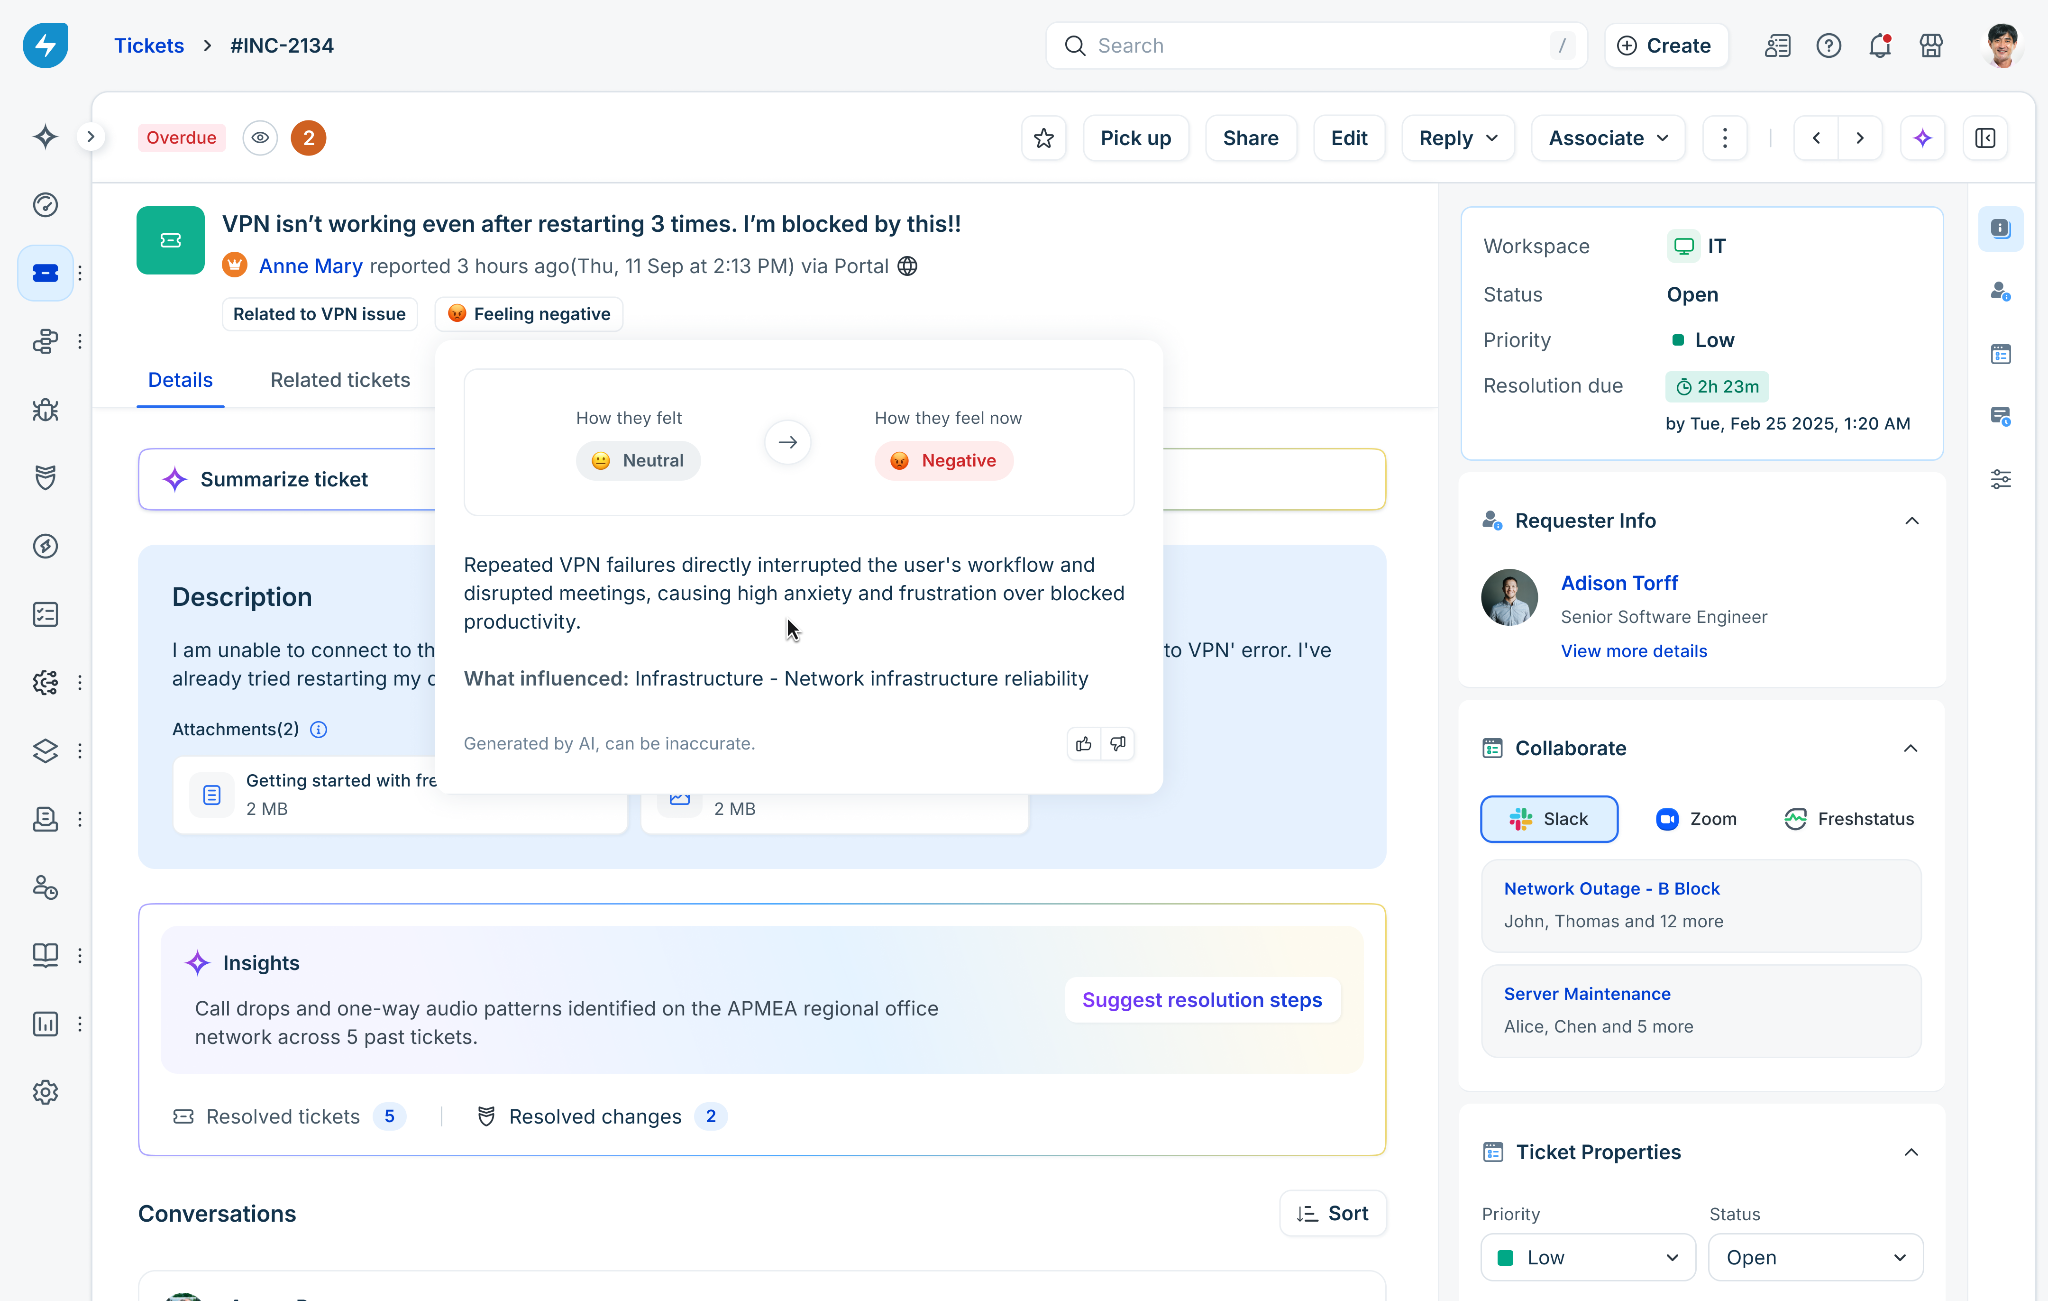
Ticket details page: A sentiment label appears next to the ticket subject, such as Feeling negative. Click the label to view the sentiment history and available reasoning.
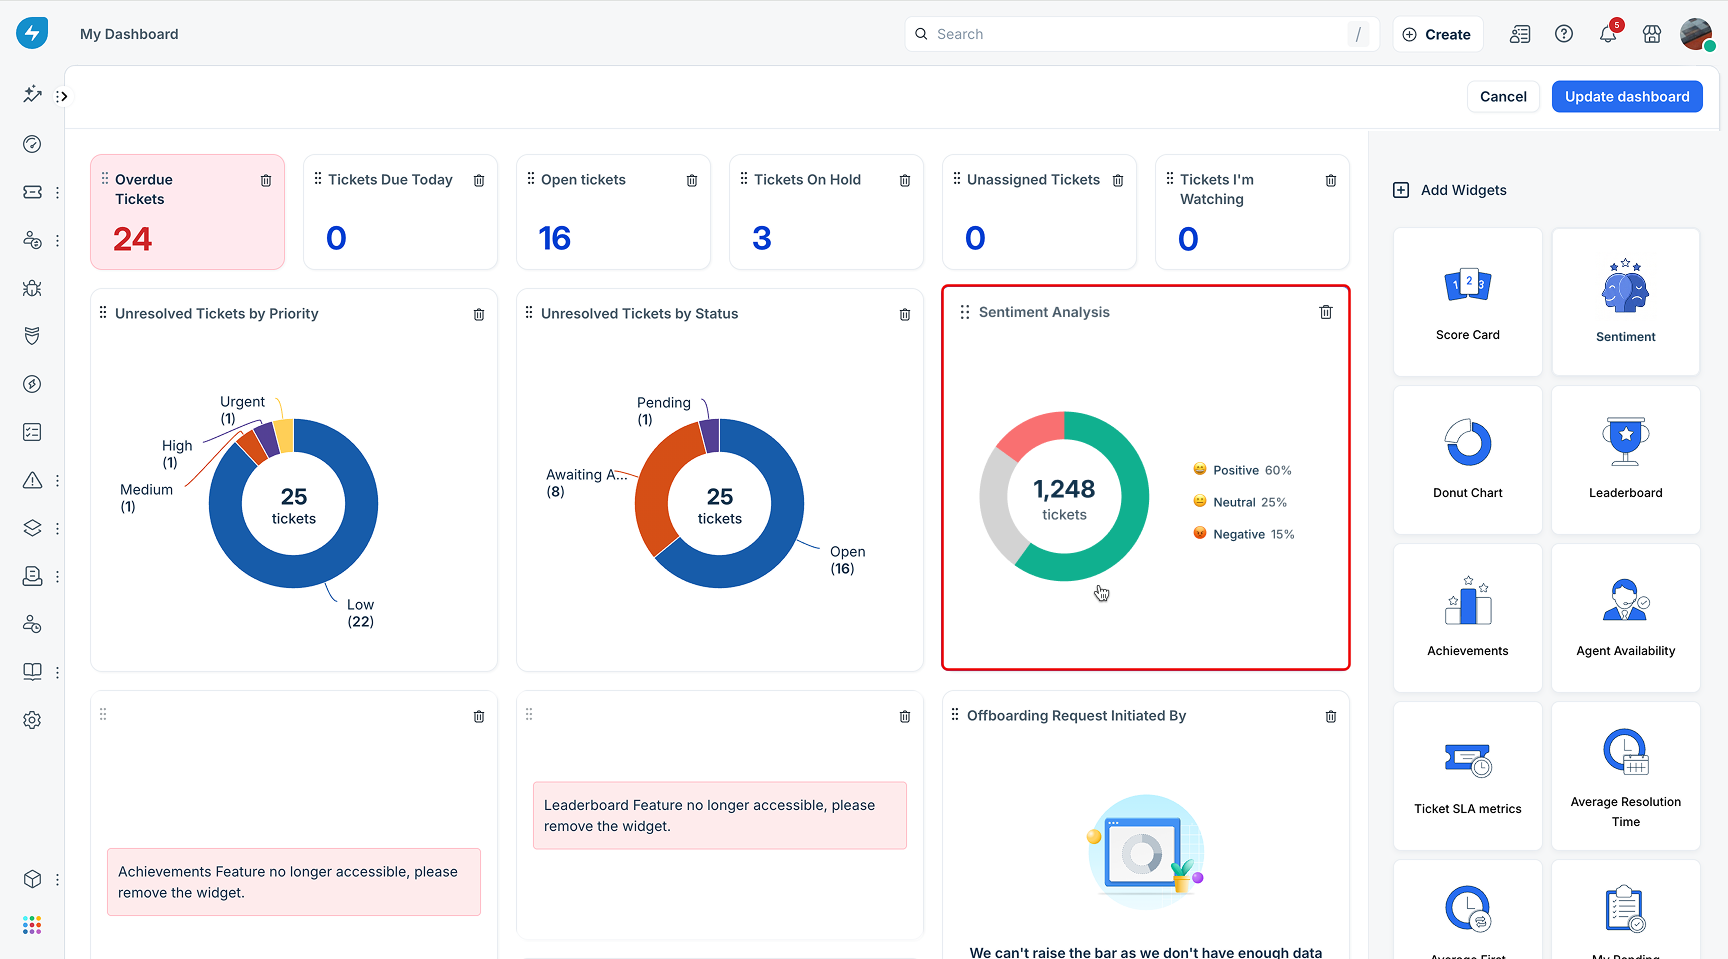
Dashboard: Add the Sentiment widget to a dashboard to view the distribution of Positive, Neutral, and Negative sentiment across your handled tickets.
If you do not have an AI Copilot license, sentiment does not appear on your tickets.
Provide feedback on a sentiment prediction
You can provide feedback on a sentiment prediction to help improve the accuracy of future predictions.
To mark a sentiment prediction as helpful, follow these steps:
On a ticket, click the sentiment label to open the sentiment details.
Click the thumbs-up icon.
To report an inaccurate sentiment prediction, follow these steps:
On a ticket, click the sentiment label to open the sentiment details.
Click the thumbs-down icon.
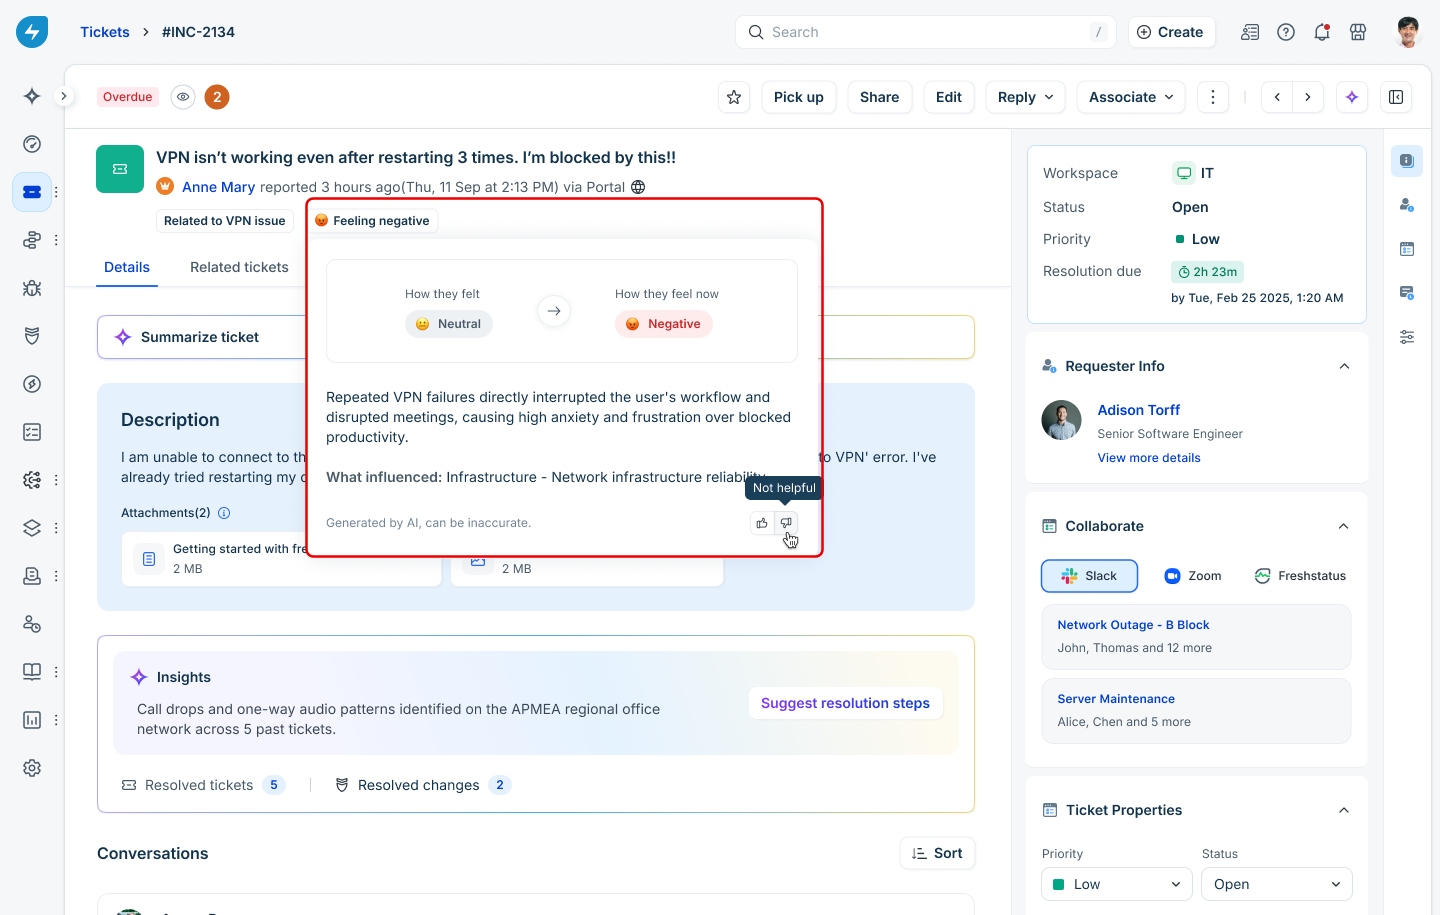
In the What didn’t work? dialog, select the reason that best describes the issue:
Incorrect sentiment
Poor reasoning
Wrong influencing factors
If required, enter additional details.
Click Submit.
Your feedback helps improve the accuracy of future predictions. It does not change the sentiment currently displayed on the ticket.
Frequently asked questions
1. Sentiment analysis marks a ticket as negative even though it does not seem negative.
Sentiment is inferred by an AI model that reads the ticket text, so it can occasionally misread tone, especially without account-specific context. Add a rule under Instructions to address a recurring misinterpretation, or provide feedback on the prediction to report a one-off error.
2. Agents cannot see sentiment on some ticket types.
Sentiment is available only for the ticket types that an admin has enabled under Configurations > Ticket type. If a ticket type, such as Service Requests, is disabled, sentiment is not calculated or displayed for those tickets.
3. Feedback does not change the sentiment currently displayed on a ticket.
Feedback is used to improve the accuracy of future predictions. It does not change the sentiment currently displayed on the ticket.
4. Sentiment is not available without an AI Copilot license.
You need an active AI Copilot license and the Sentiment analysis role permission to view sentiment. Without a license, the Sentiment column and sentiment label do not appear on your tickets.
5. Disabling Reasoning for Sentiment does not change the sentiment label.
The setting controls whether agents with access can view the AI's explanation for the label. It does not affect the underlying sentiment score.