
 Community
 Video Library
 Agent Training
 Freshservice
 Freshdesk
 Freshchat
 Freshcaller
 Freshsales
 Freshteam
 Freshworks Neo
 Freshsurvey
 Freshservice for MSP
 You can configure single sign-on (SSO) in Freshservice using Microsoft Entra ID (formerly Azure Active Directory). SSO allows users to sign in to Freshservice using their Microsoft Entra credentials.
The configuration involves two steps:
Configure Freshservice as an enterprise application in Microsoft Entra ID and configure SAML-based SSO.
Configure the SAML SSO settings in Freshservice using the information exchanged between Freshservice and Microsoft Entra ID.
TABLE OF CONTENTS
- Prerequisites
- Step 1: Configure Microsoft Entra ID
- Step 2: Configure SAML SSO in Freshservice
- Verify the SSO configuration
Prerequisites
Before you begin, make sure that:
You have administrator access to Microsoft Entra ID.
You have administrator access to Freshservice.
You have the Freshservice portal URL that you want to use for SSO.
The users who need access to Freshservice are available in Microsoft Entra ID.
Step 1: Configure Microsoft Entra ID
Add Freshservice as an enterprise application in Microsoft Entra ID and configure SAML-based SSO. Follow these steps:
Sign in to the Microsoft Entra admin center.
Go to Entra ID > Enterprise apps > All applications.
Select New application.
Search for Freshservice in the application gallery and add it to your tenant.
Open the Freshservice application and select Single sign-on > SAML.
Configure the SAML settings using the Freshservice service provider information.
For detailed instructions, see Quickstart: Add an enterprise application and Enable SAML single sign-on for an enterprise application.
Configure the SAML settings in Microsoft Entra ID
Before you move to Freshservice, complete the SAML configuration in Microsoft Entra ID and collect the information required to configure SSO in Freshservice.
In Basic SAML Configuration, enter the Reply URL (Assertion Consumer URL) and Identifier (Entity ID)provided by Freshservice.
Save the SAML configuration.
From the Set up <Application Name> section, copy the following values:
Microsoft Entra ID Identifier
Login URL
From the SAML Signing Certificate section, download the Certificate (Base64).
Note: You will enter these Microsoft Entra ID values in Freshservice in the next step. Keep the Microsoft Entra ID page open or have the values available before continuing.
Step 2: Configure SAML SSO in Freshservice
After configuring the Freshservice application in Microsoft Entra ID, configure the SAML settings in Freshservice.
Note: You need the Organization Admin role to update the login methods and security settings. To assign the role, go to Freshworks Switcher > User > Admin Center Roles > Organization Admins > Assign users, select the user, and click Assign.
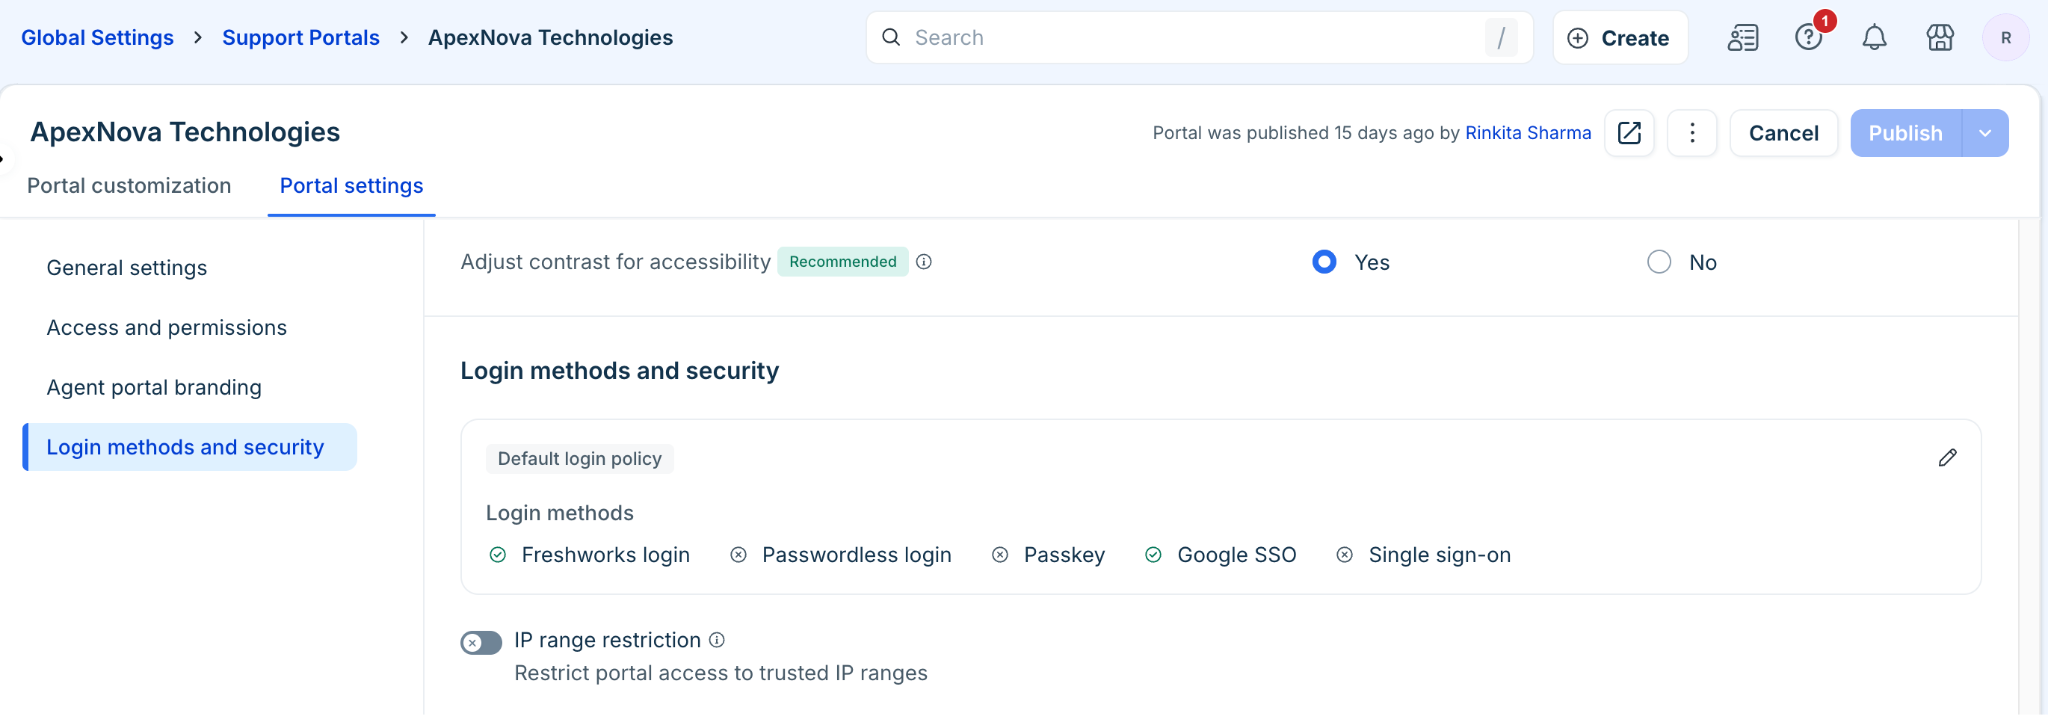
Go to Admin > Global Settings > Account Settings > Portal.
Click the required portal.
Go to Portal settings > Login methods and security.
Click the Edit icon to open the Security page.
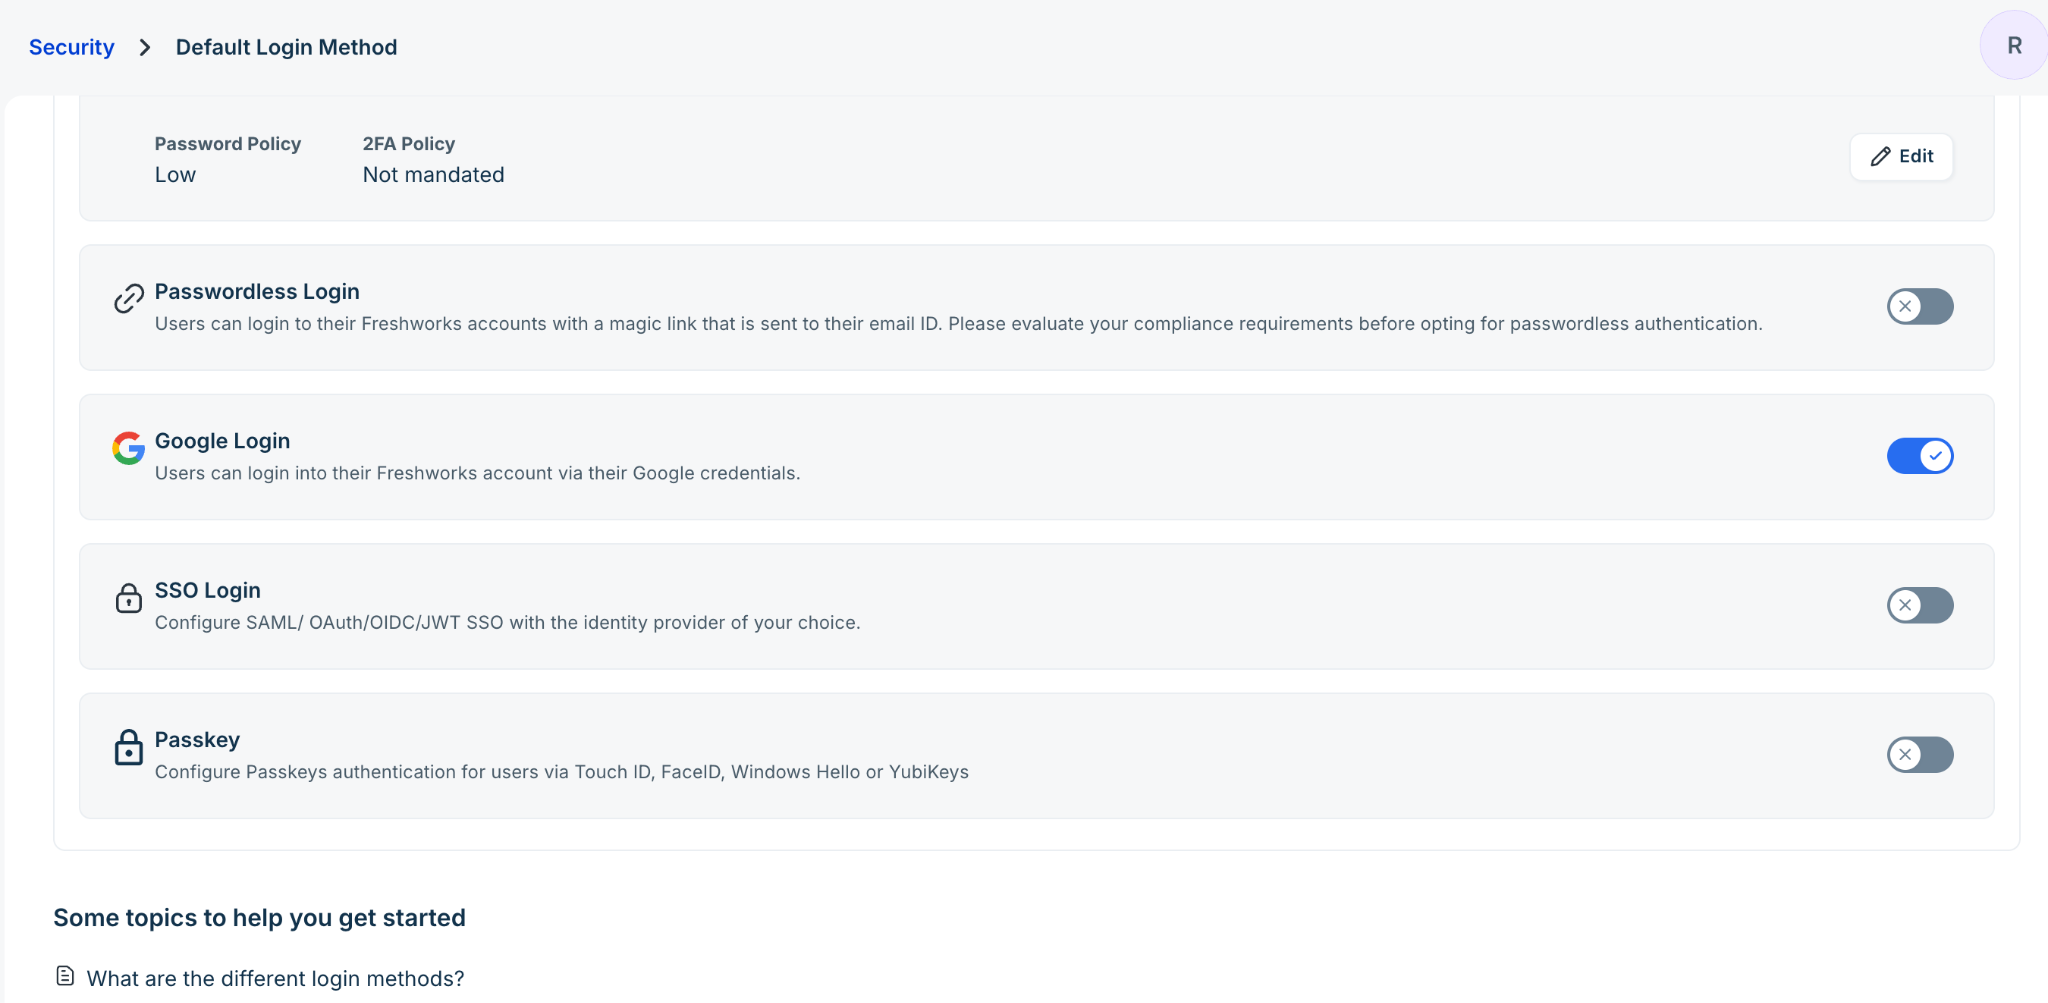
Enable SSO Login to configure SSO and click Azure ID using SAML.
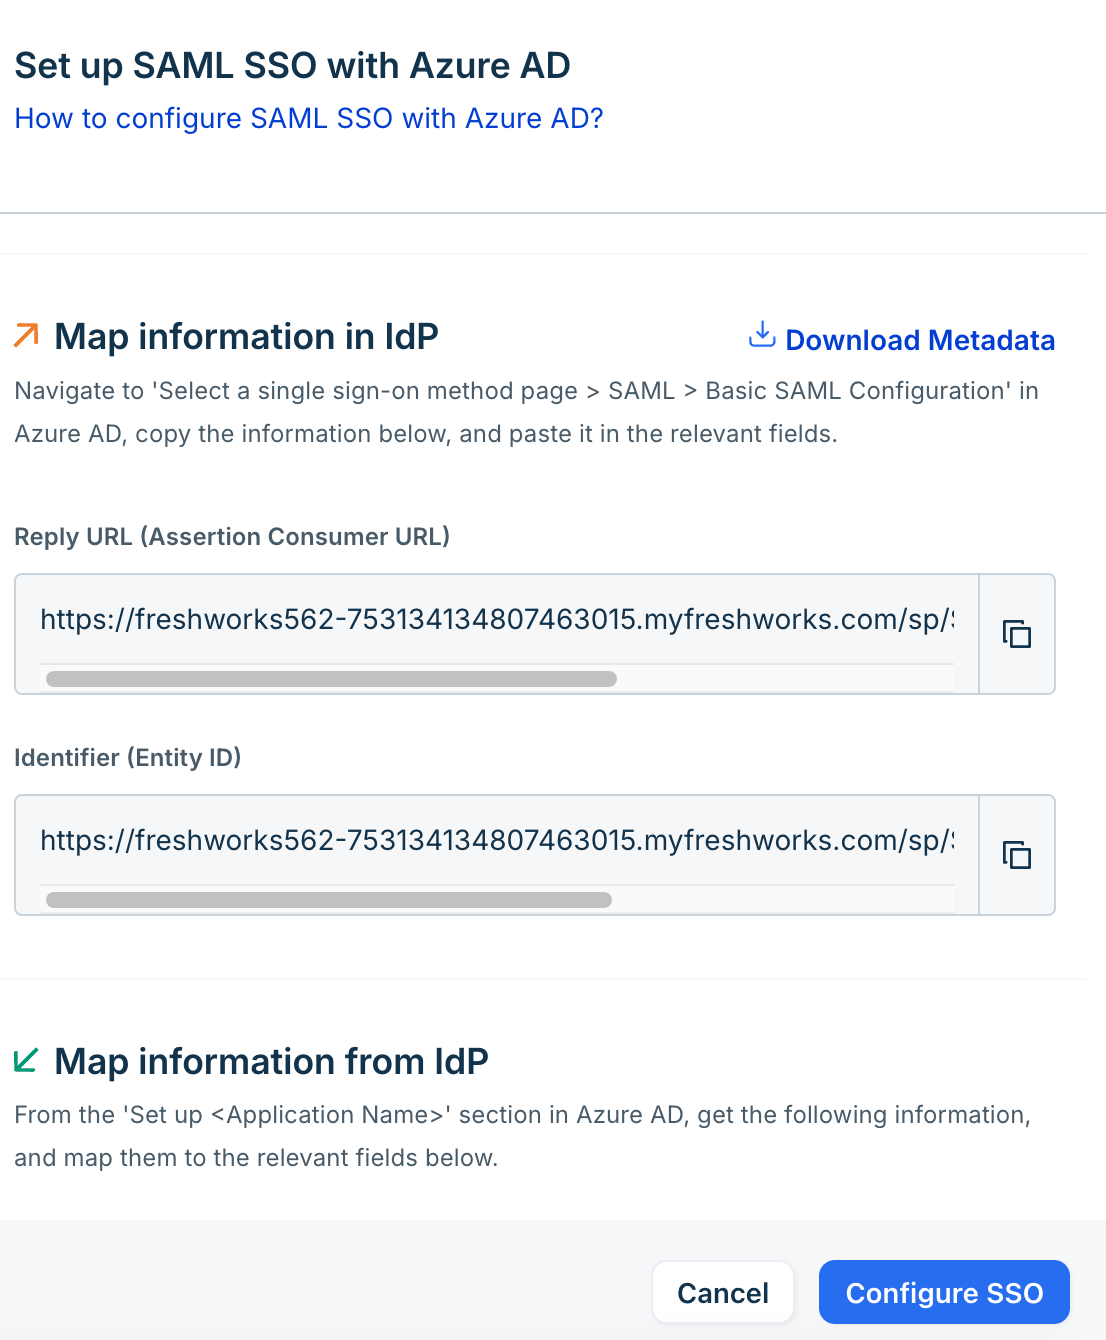
Under Map information in IdP, copy the following values:
Reply URL (Assertion Consumer URL)
Identifier (Entity ID)
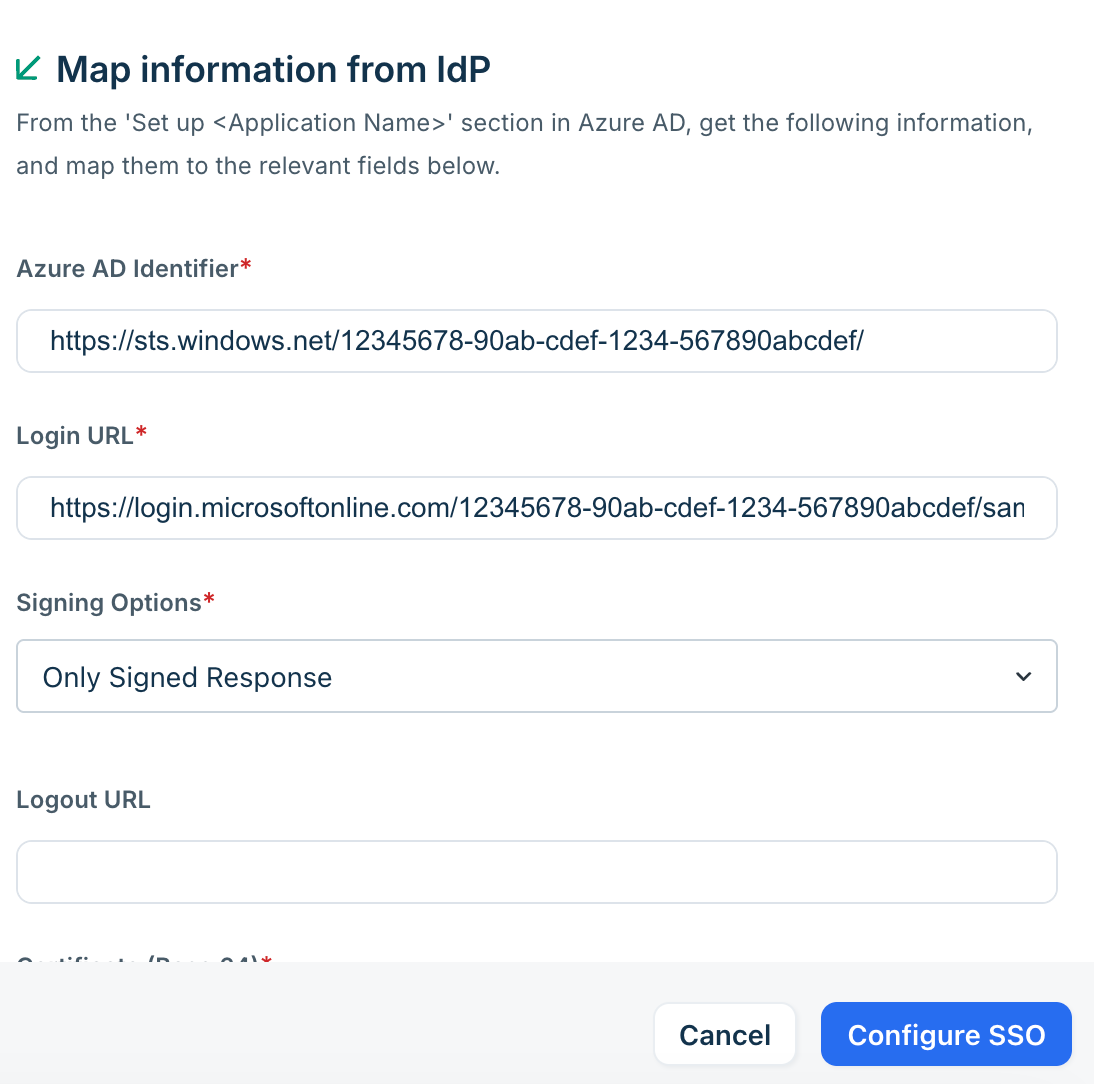
Under Map information from IdP, enter the following:
Azure AD Identifier: Enter the Microsoft Entra ID Identifier.
Login URL: Enter the Login URL from Microsoft Entra ID.
Signing Options: Select the signing option required for your SAML configuration.
Logout URL: Enter the logout URL from Microsoft Entra ID, if applicable.
Certificate (Base 64): Enter the Base64-encoded certificate downloaded from Microsoft Entra ID.
Click Configure SSO.
Note: Azure AD Identifier is the field label displayed in Freshservice. It refers to the Microsoft Entra ID Identifier provided by Microsoft Entra ID.
Tip: Click Download Metadata in Freshservice to download the service provider metadata. You can use this metadata when configuring the Freshservice application in Microsoft Entra ID.
Verify the SSO configuration
After configuring SSO:
Make sure that the required users or groups are assigned to the Freshservice application in Microsoft Entra ID.
Open your Freshservice login page.
Select Sign in with SSO.
Sign in using your Microsoft Entra credentials.
Verify that you are redirected to the Freshservice portal.
If the SSO configuration does not work, verify that the SAML values configured in Freshservice match those configured in Microsoft Entra ID and that the user is assigned to the Freshservice enterprise application.