
 Community
 Video Library
 Agent Training
 Freshservice
 Freshdesk
 Freshchat
 Freshcaller
 Freshsales
 Freshteam
 Freshworks Neo
 Freshsurvey
 Freshservice for MSP
 TABLE OF CONTENTS
- Prerequisites
- Overview
- Admin experience
- Agent experience
- Example instructions for common ticket fields
- Frequently asked questions
This article explains how to set up and use the Ticket Field Suggester, a Freddy AI Copilot feature that recommends values for ticket fields, including priority, category, group, and more. It covers how admins configure the feature in AI Agent Studio and how agents review, accept, or override the suggested values on a ticket.
Prerequisites
Before you set up or use the Ticket Field Suggester, ensure that you meet the requirements for your role:
For admins: You must have admin access to AI Agent Studio to configure the Ticket Field Suggester.
For agents: You must have the following:
An active Freddy Copilot license is assigned to you.
The Ticket Field Suggester is enabled and configured by an admin.
Access to the ticket that you want to review or update.
Overview
The Ticket Field Suggester uses AI Copilot to recommend values for ticket fields based on the information in the ticket. It supports default fields such as Priority, Urgency, Impact, Group, and Category, as well as Dropdown, Custom dropdown, and Dependent custom fields.
When a ticket is created, agents can use these suggestions to set field values instead of manually selecting them. This helps reduce the time required to update tickets and maintain consistent field values across the team.
The Ticket Field Suggester uses AI Copilot to analyze ticket information and recommend values for fields configured by an admin. It supports two models for generating suggestions:
Instructed model: Generates suggestions based on the instructions and field descriptions configured by an admin. Use this model when you can define clear rules for determining the appropriate field value, especially when your account does not have enough ticket data for the model to learn from, you are starting with a new account, or the field has a limited number of options that can be clearly defined by rules.
Self-learning model: Generates suggestions by learning from historical ticket data. Use this model when sufficient historical ticket data is available for the field.
The admin can choose either the Instructed model or the Self-learning model for each field. The Instructed model uses admin-defined instructions and field descriptions to generate suggestions, while the Self-learning model uses historical ticket data to identify patterns and recommend values.
Note: The Self-learning model continues to use historical ticket data for training so that its accuracy can be measured. When it performs better than the Instructed model, the system can automatically switch to the Self-learning model if automatic switching is enabled.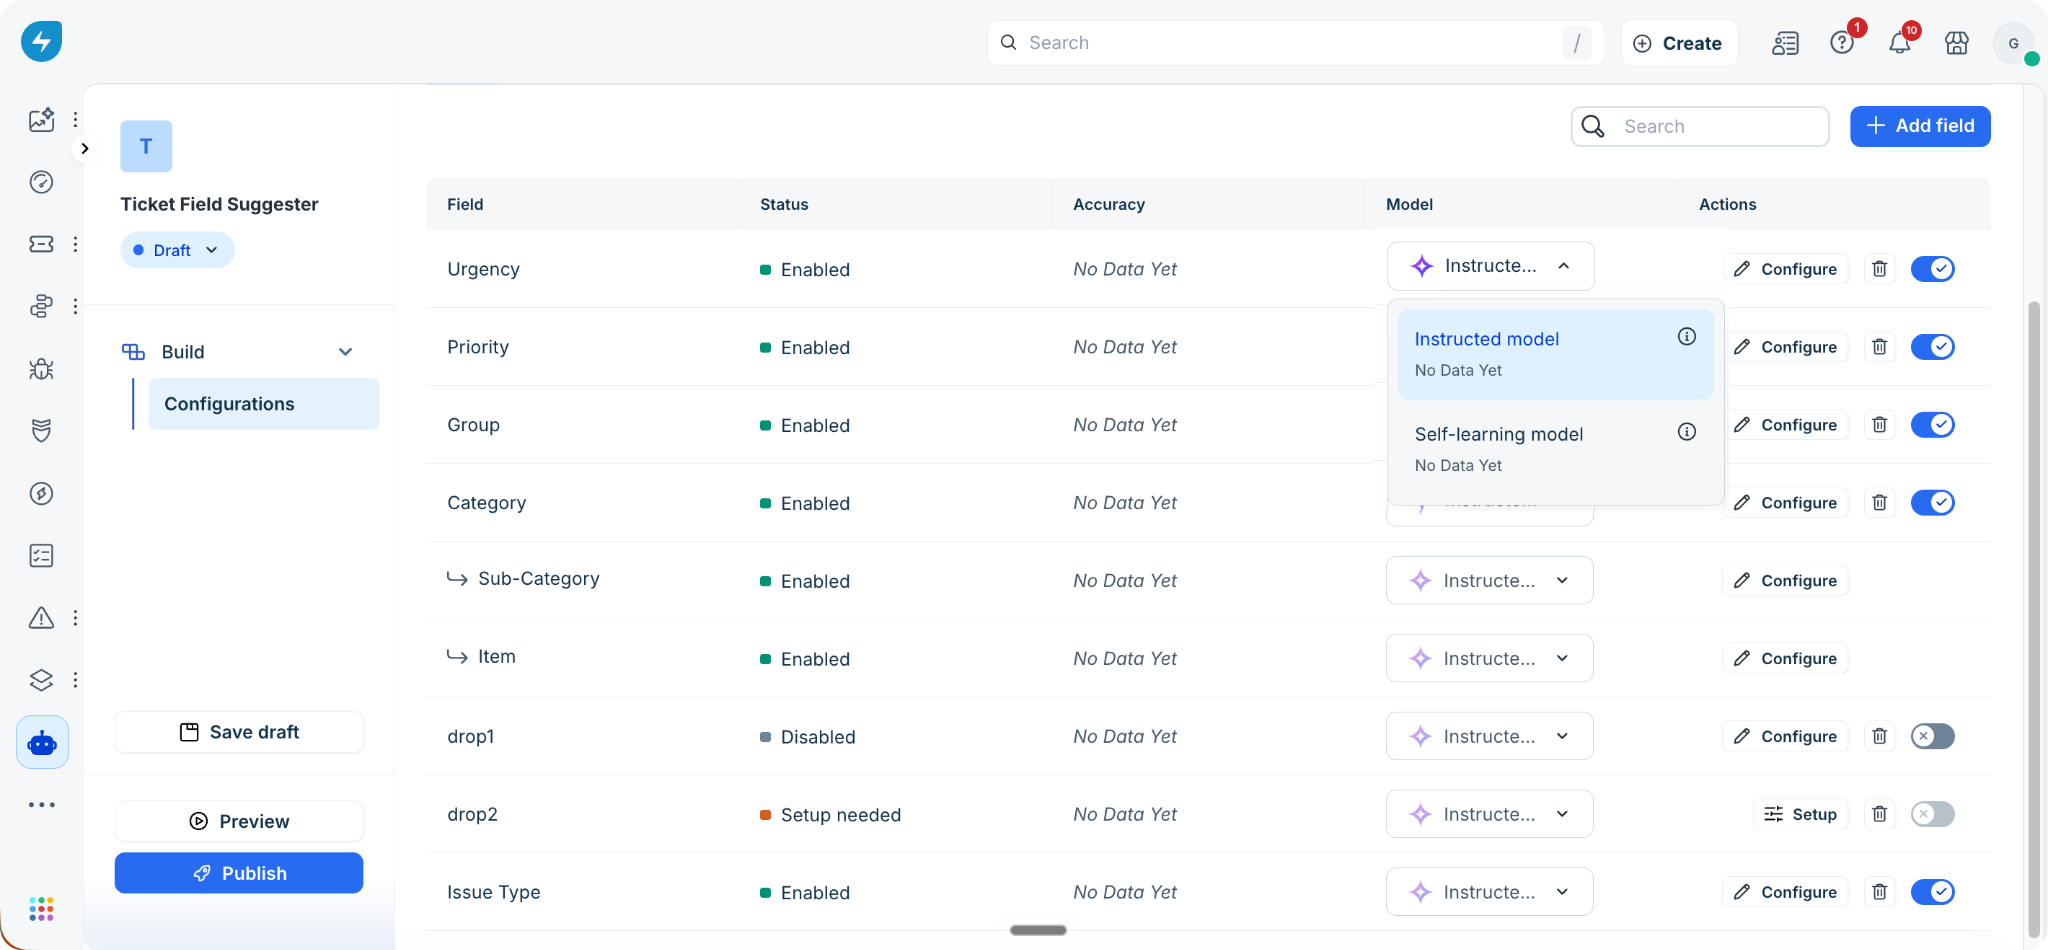
Admin experience
Admins can configure the Ticket Field Suggester from AI Agent Studio. You can add fields, configure the instructions used to generate suggestions, select the learning model for each field, preview suggestions, and publish the configuration.
Add fields for suggestions
To add ticket fields for AI Copilot to suggest values, follow these steps:
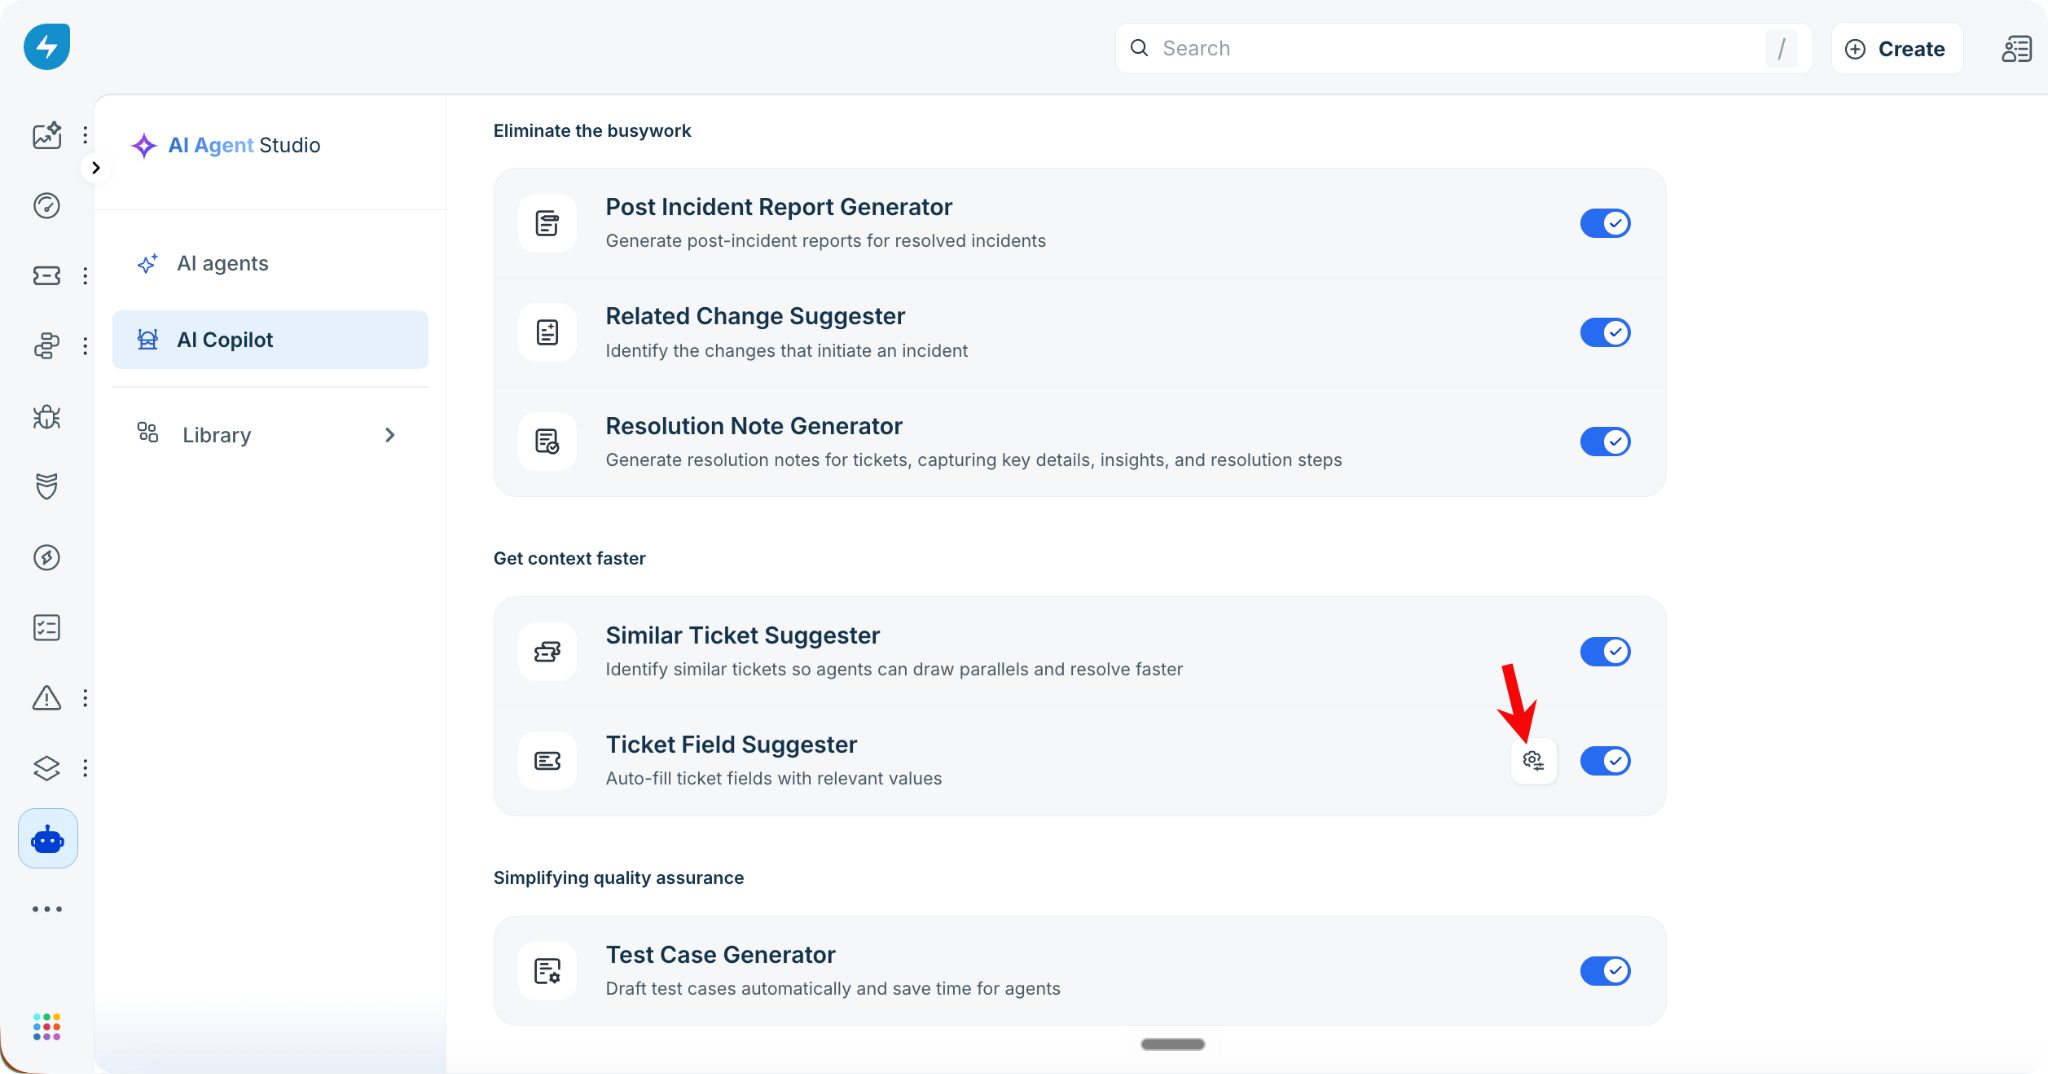
Go to AI Agent Studio > Copilot agent > Ticket Field Suggester.
Click the Configure icon for Ticket Field Suggester.
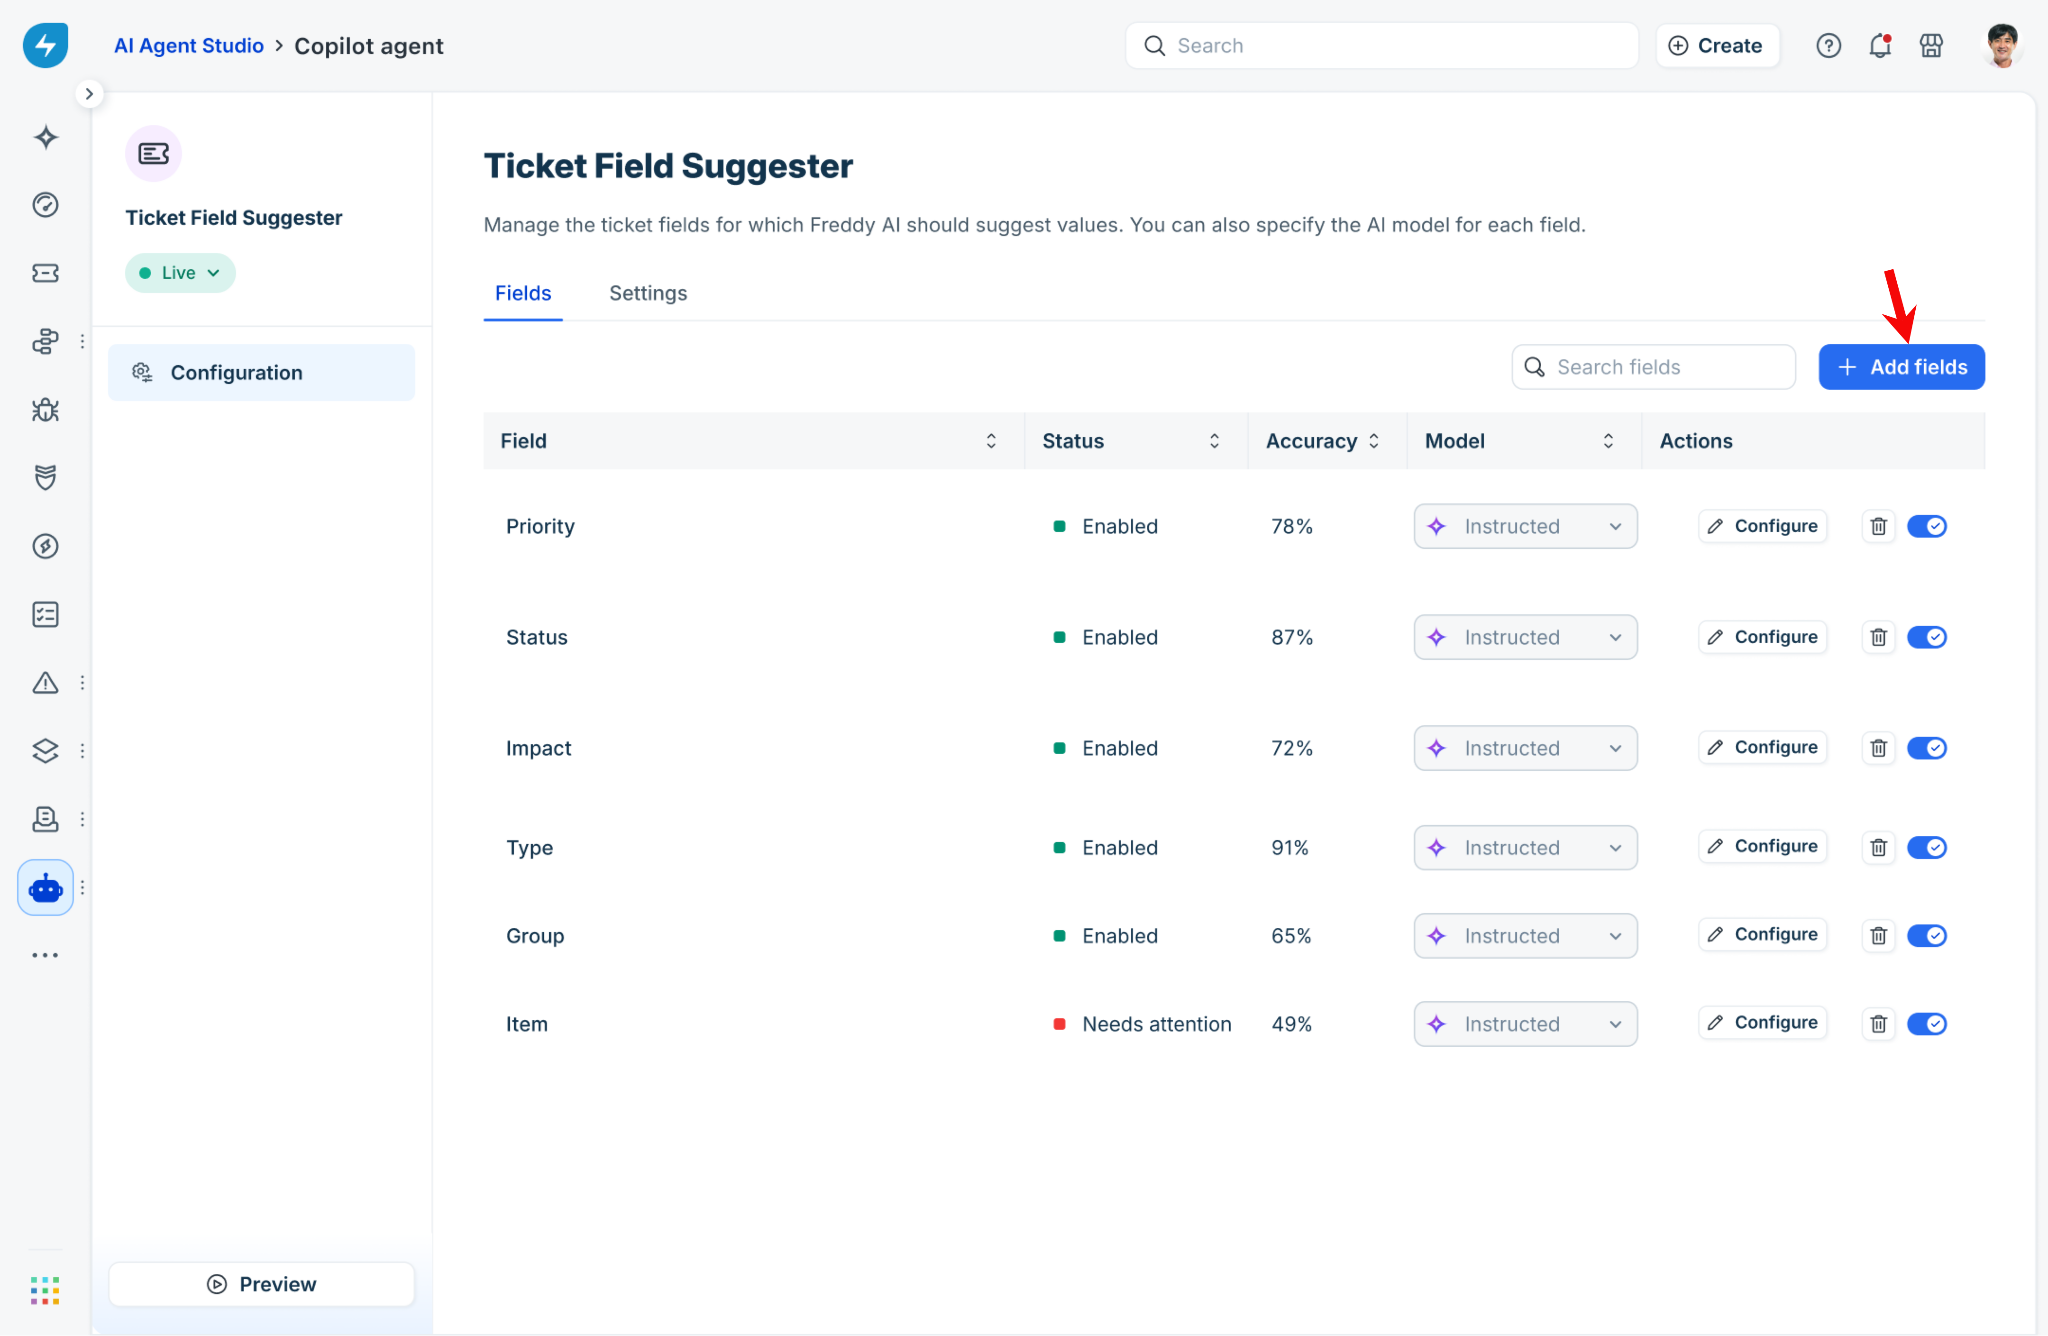
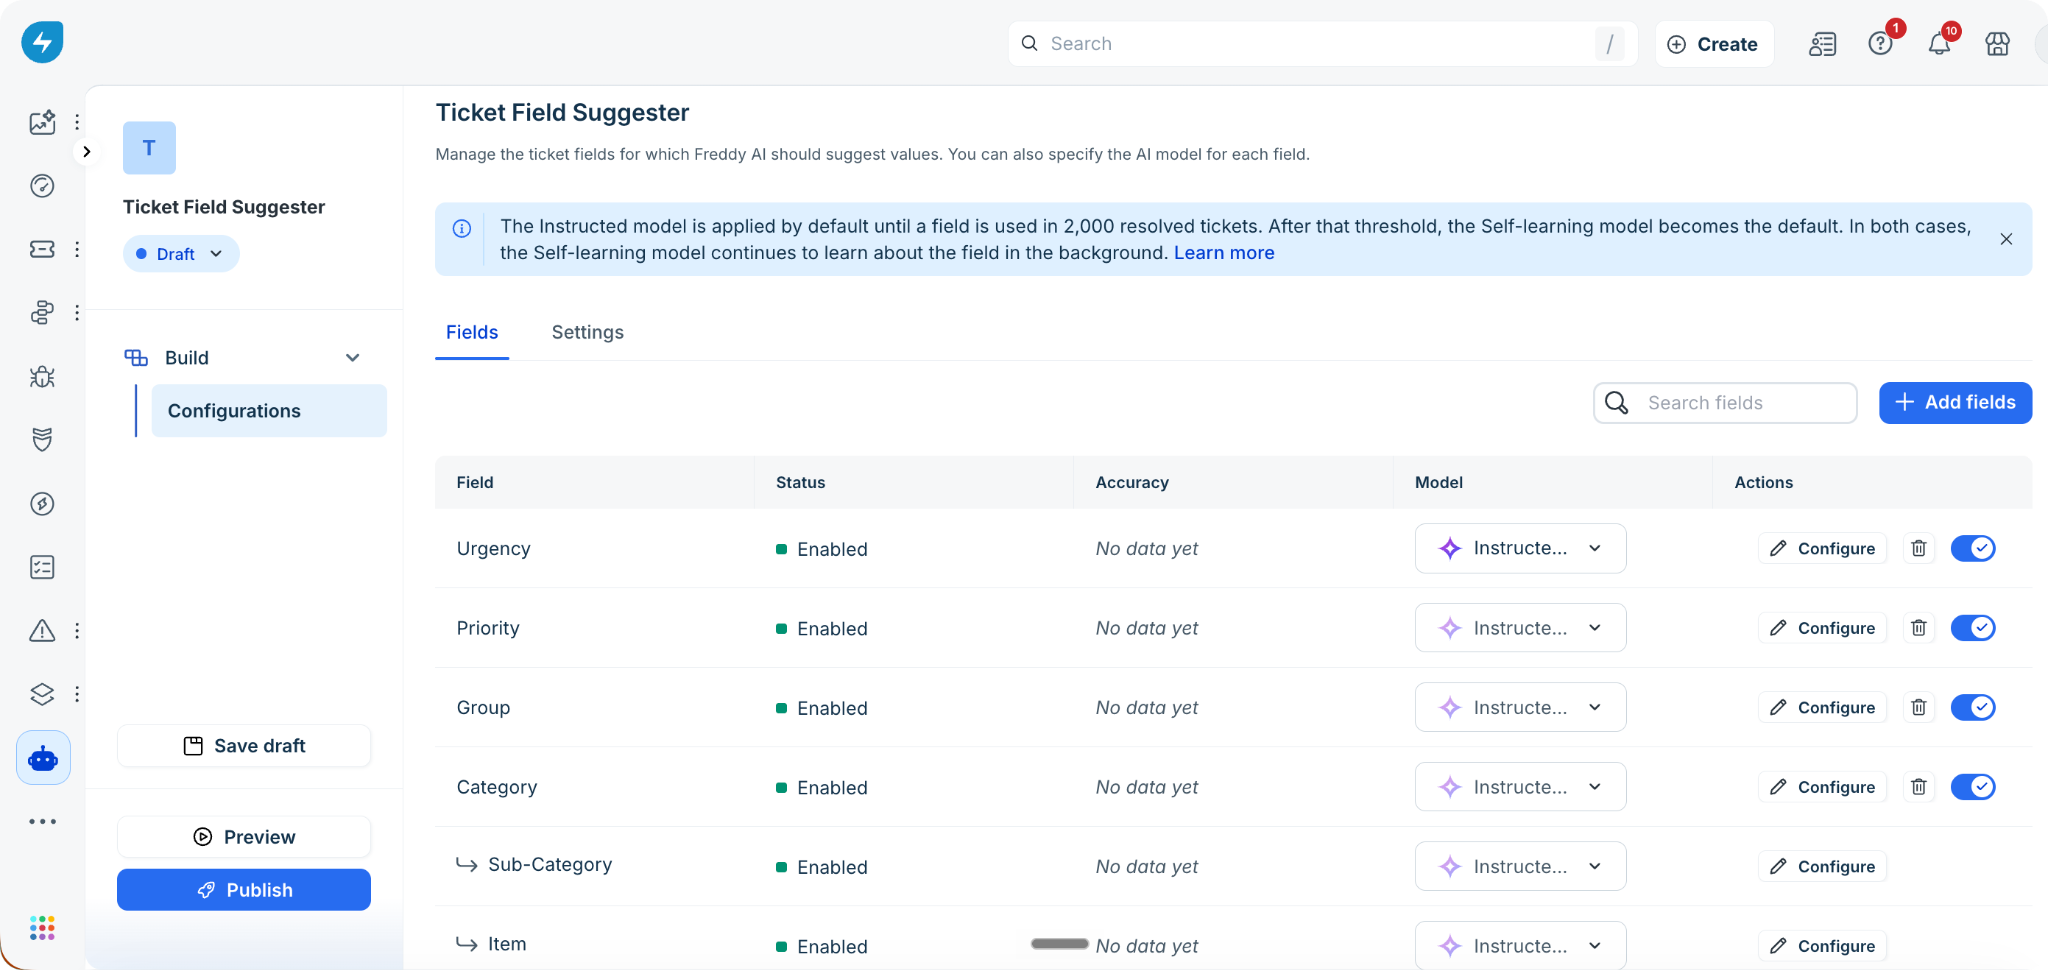
On the Fields tab, click + Add fields to add the ticket fields for which you want AI Copilot to generate suggestions.
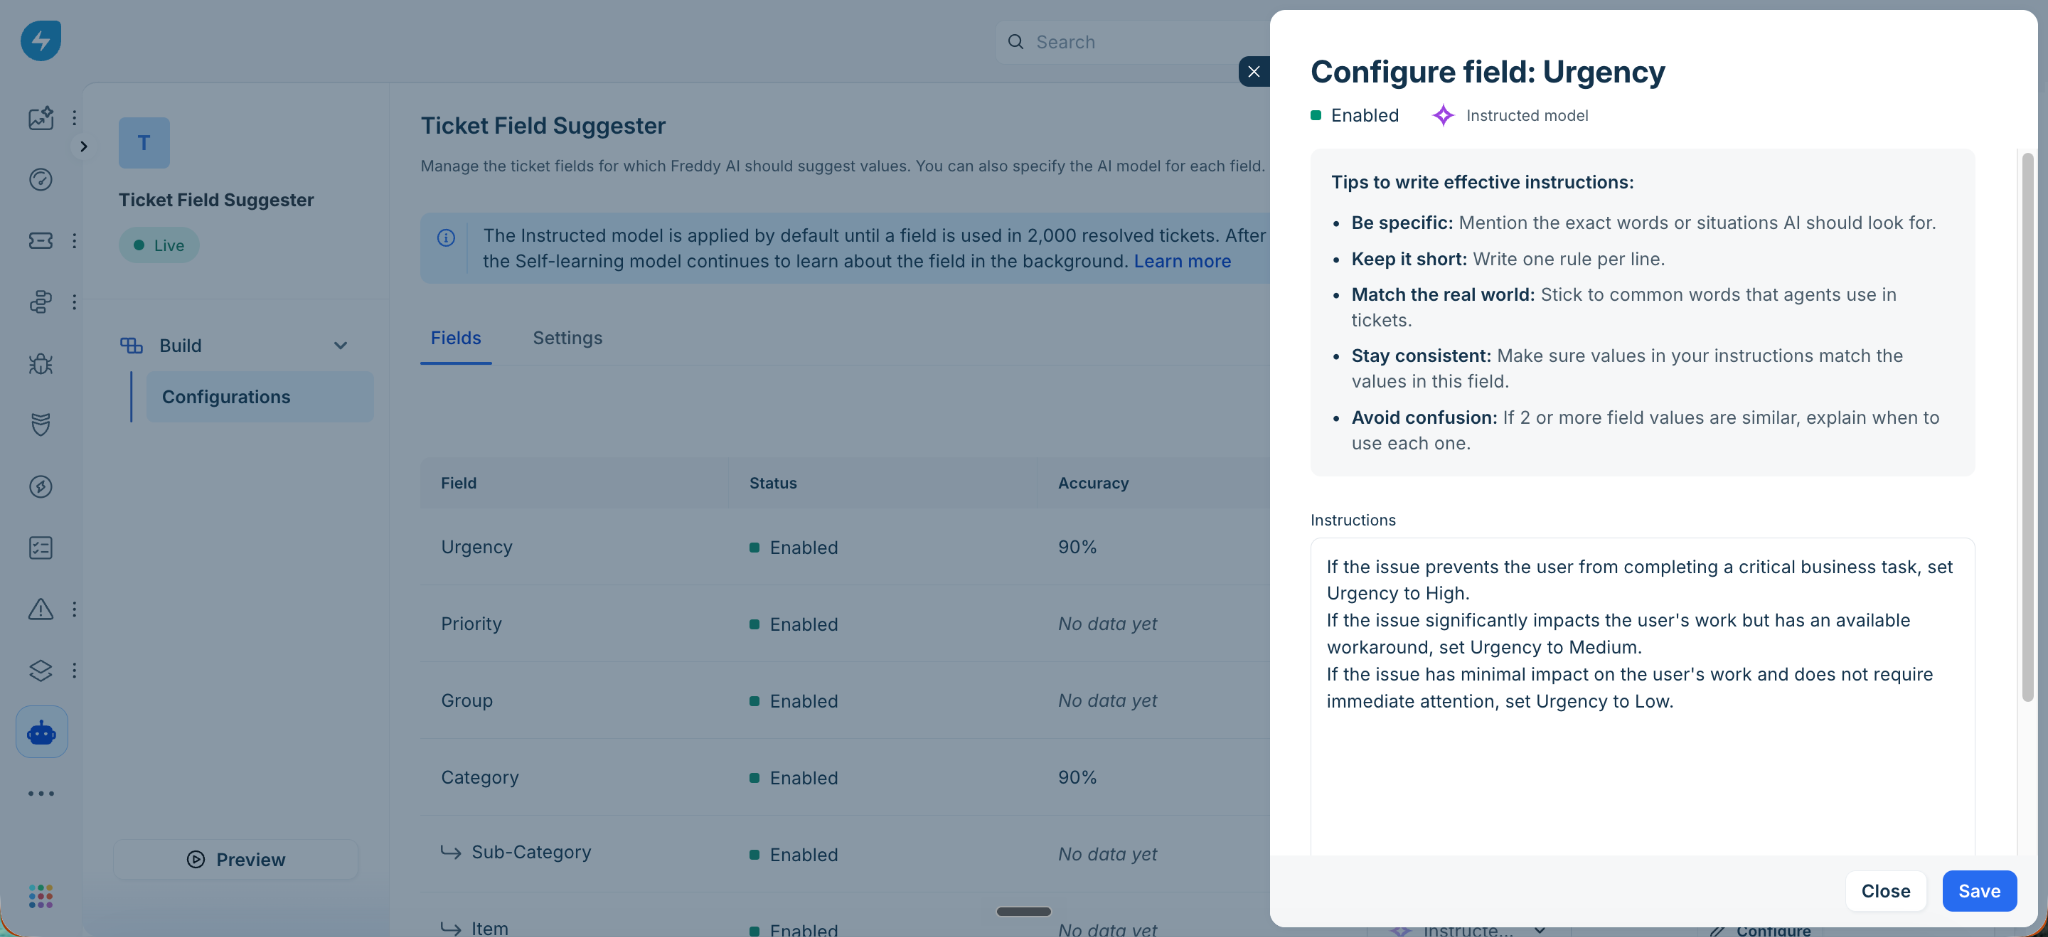
For each field, click Configure and define the instructions that AI Copilot use to generate suggestions. For examples, see Example instructions for common ticket fields.
Turn on the toggle next to the added field to enable suggestions for it.
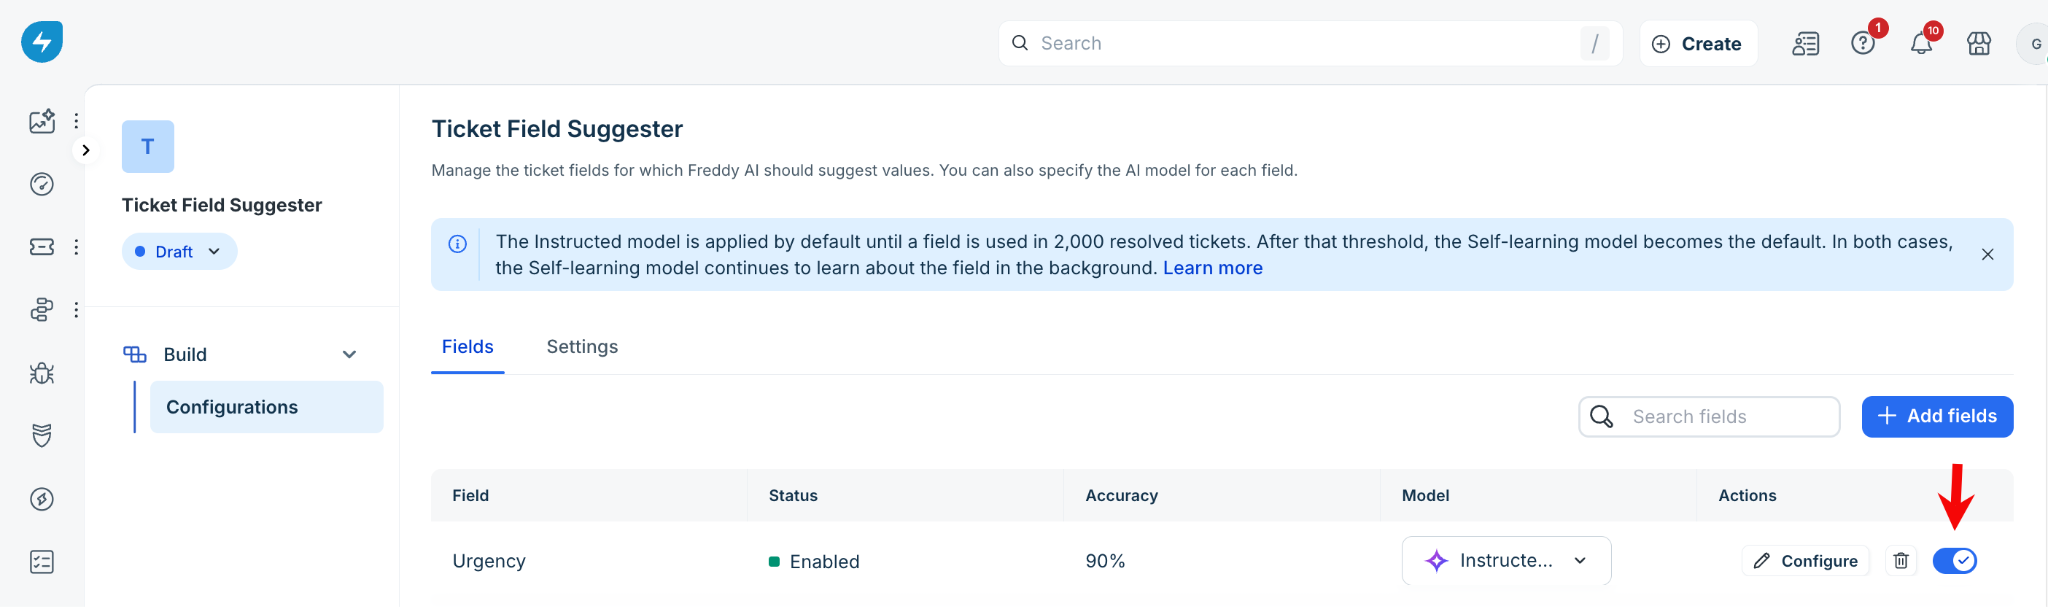
Under Model, select Instructed model or Self-learning model from the dropdown.
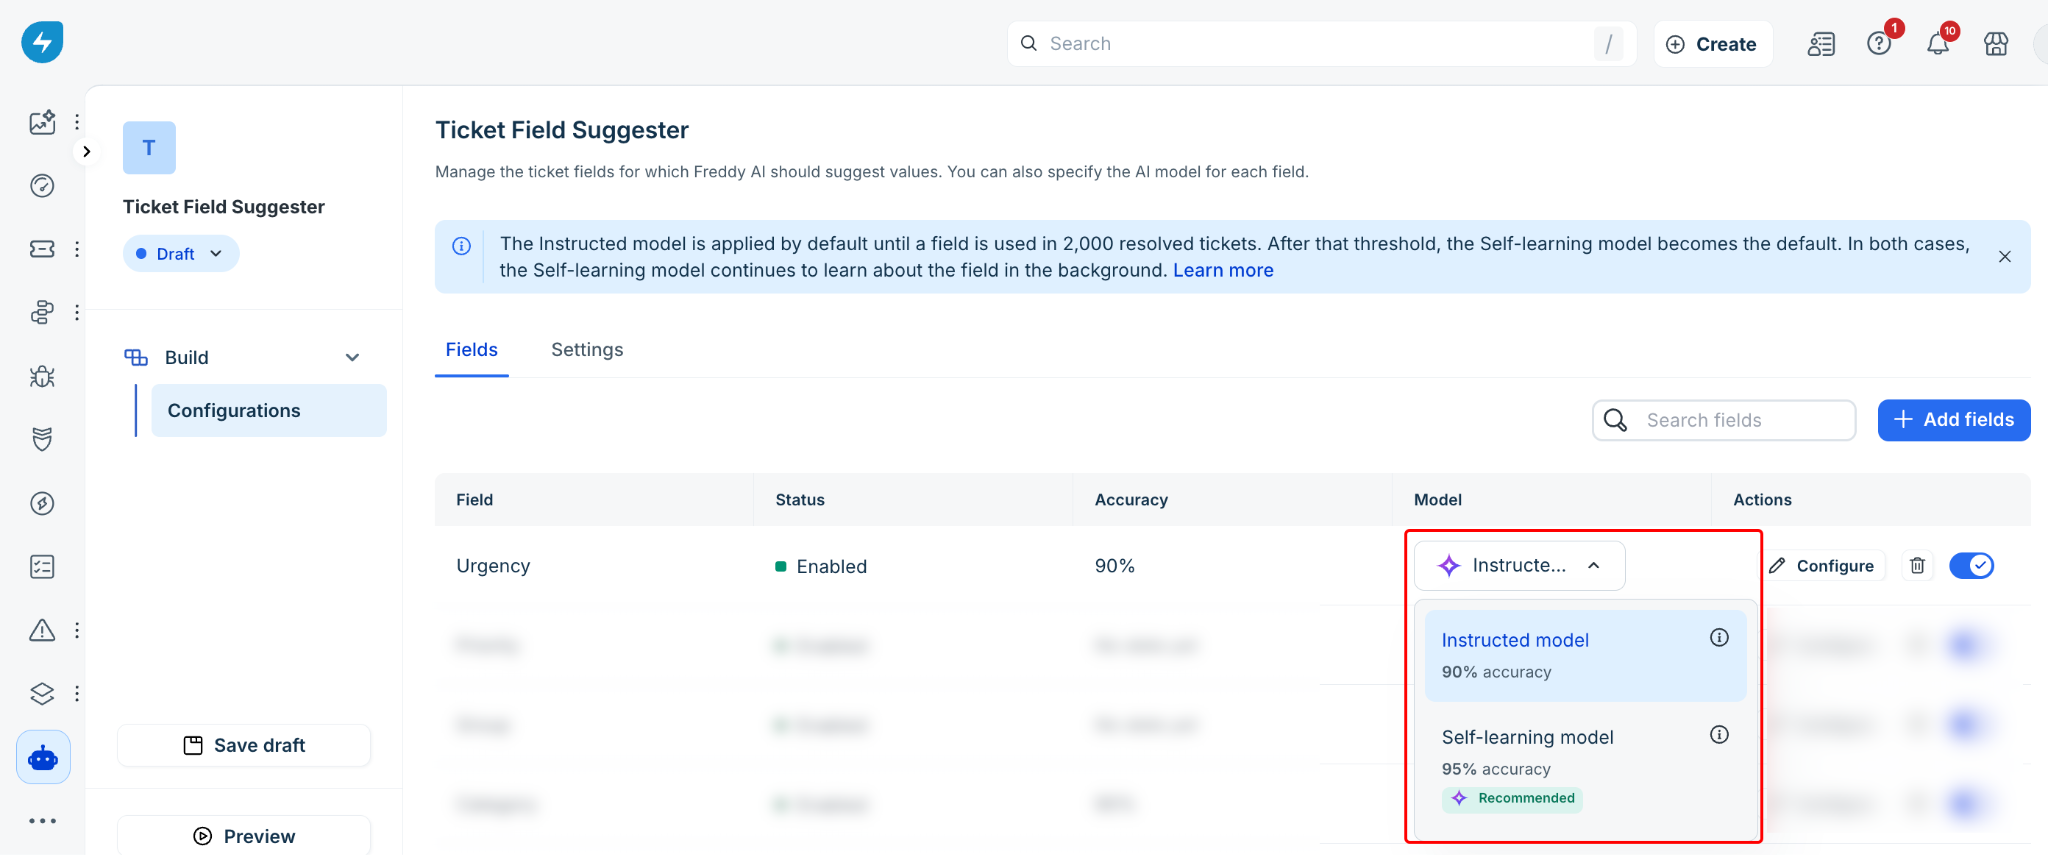
Review the Accuracy column to evaluate how reliably the model generates suggestions.
Fields with low accuracy are marked Needs attention. For fields marked "Needs attention," add or refine the instructions and test them in Preview to improve the accuracy of suggestions.
Note: If you have not added any fields, the Fields tab displays an empty state where you can add your first field.
Select the learning model for a field
After you enable a field, configure its learning model and review its current suggestion accuracy by following these steps:
On the Fields tab, locate the field that you want to configure the learning model.
Under Model, select Instructed model or Self-learning model from the dropdown.
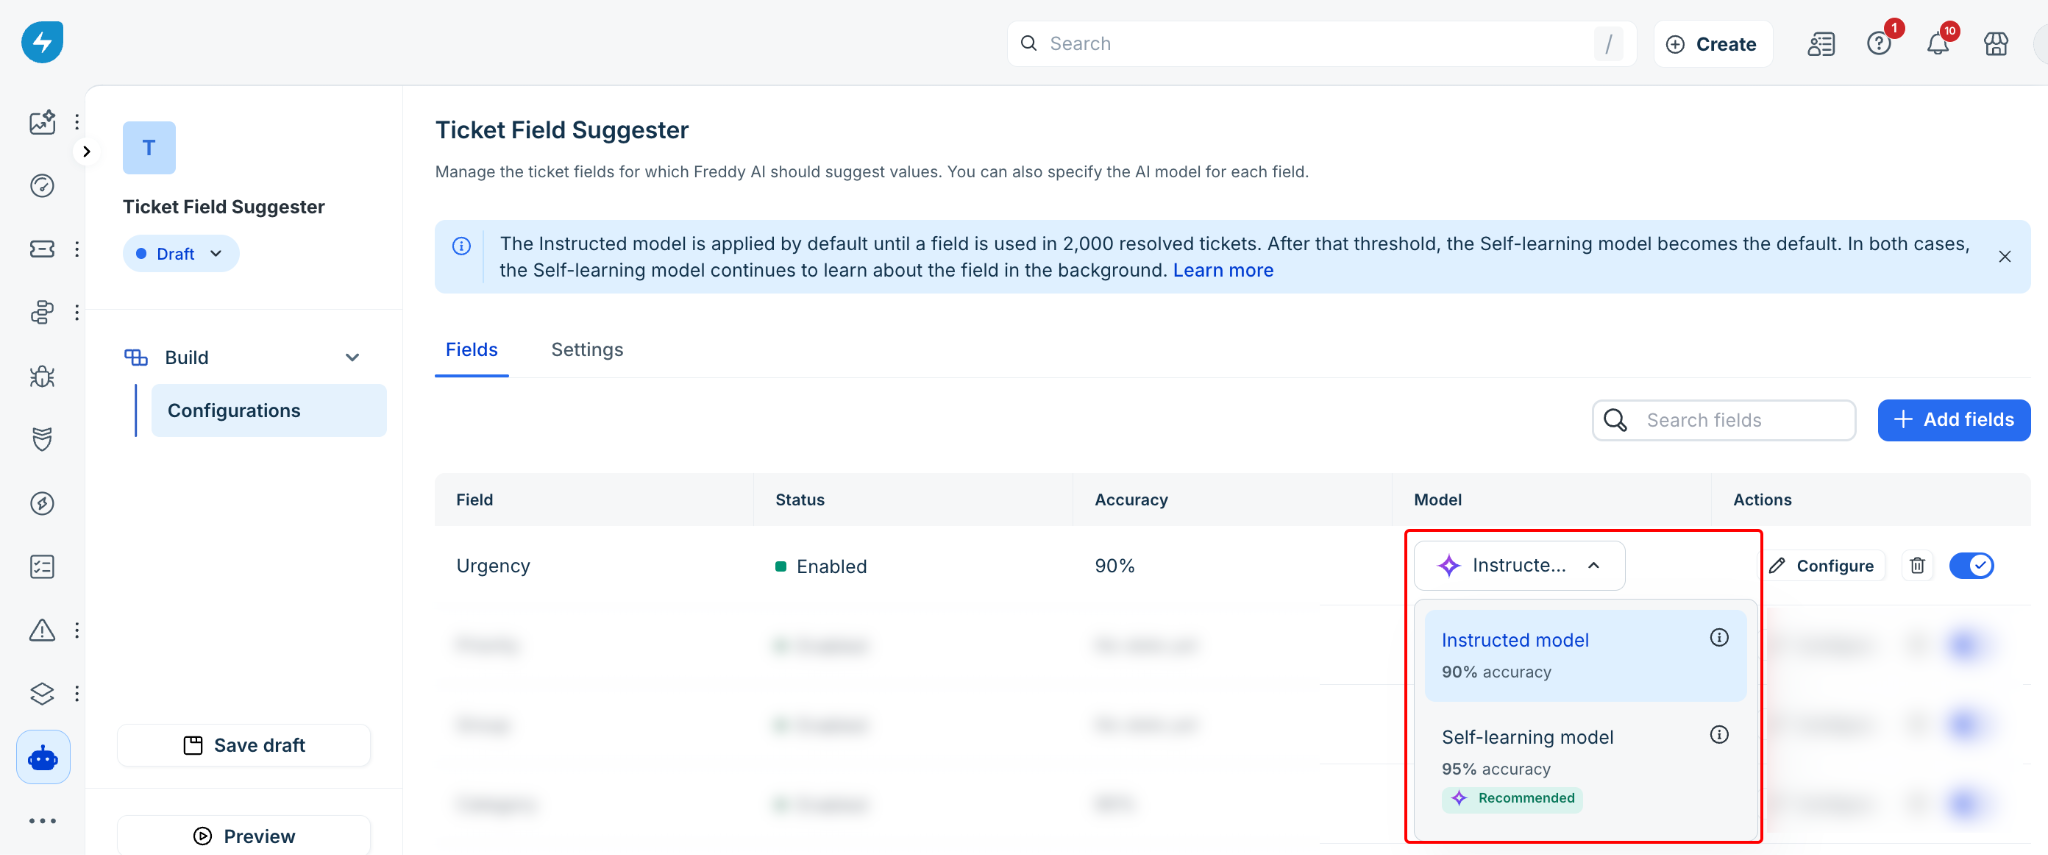
Review the Accuracy column to evaluate how reliably the model generates suggestions.
Fields with low accuracy are marked Needs attention. For fields marked "Needs attention," add or refine the instructions and test them in Preview to improve the accuracy of suggestions.
Enable automatic model switching
You can allow AI Copilot to automatically switch a field from the Instructed model to the Self-learning model when the Self-learning model performs at least 5% better. This eliminates the need to compare the models and switch them manually. To enable automatic model switching, follow these steps:
On the Ticket Field Suggester page, go to the Settings tab.
Turn on Auto switch to Self-learning model.
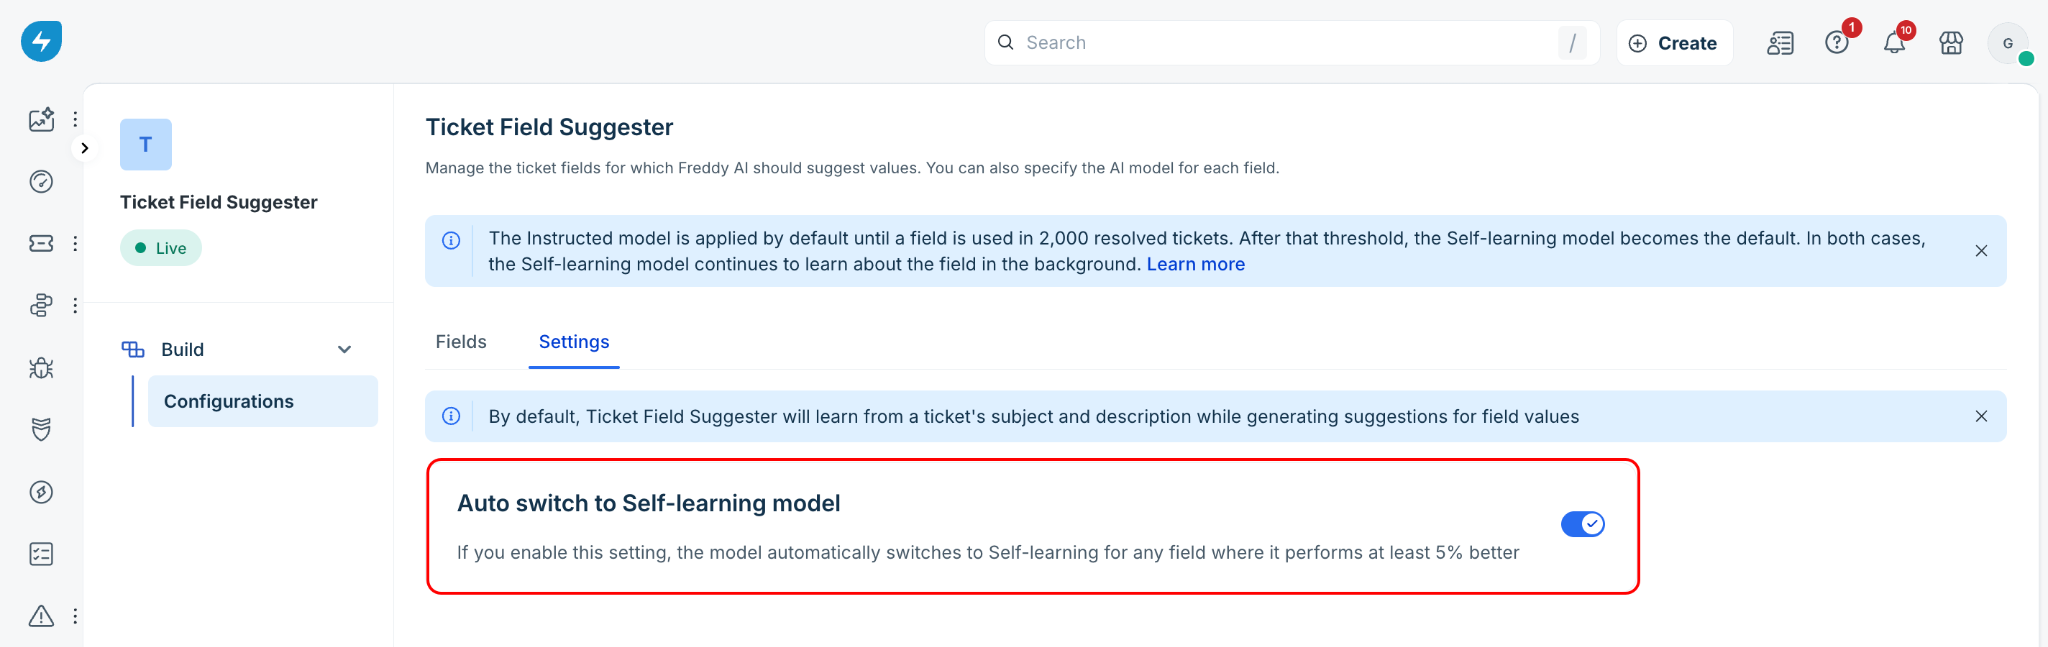
Note: You can update this setting only on the live version of the Ticket Field Suggester.
By default, the Ticket Field Suggester uses the ticket's subject and description to generate field suggestions.
When a field becomes eligible for the Self-learning model, you receive an email notification. The notification depends on whether automatic model switching is enabled:
If automatic model switching is enabled, you receive an email titled We switched of your fields to the Self-learning model. The email includes an accuracy comparison for each affected field.
If automatic model switching is disabled, you receive an email titled of your fields eligible for the Self-learning model. The email includes a link that you can use to switch the fields manually.
Preview suggestions
Before publishing your configuration, preview the suggestions to verify how they will appear to agents by following these steps:
Go to AI Agent Studio > AI Copilot > Ticket Field Suggester.
Click either the Fields or Settings tab.
Click Preview at the bottom-left of the page.
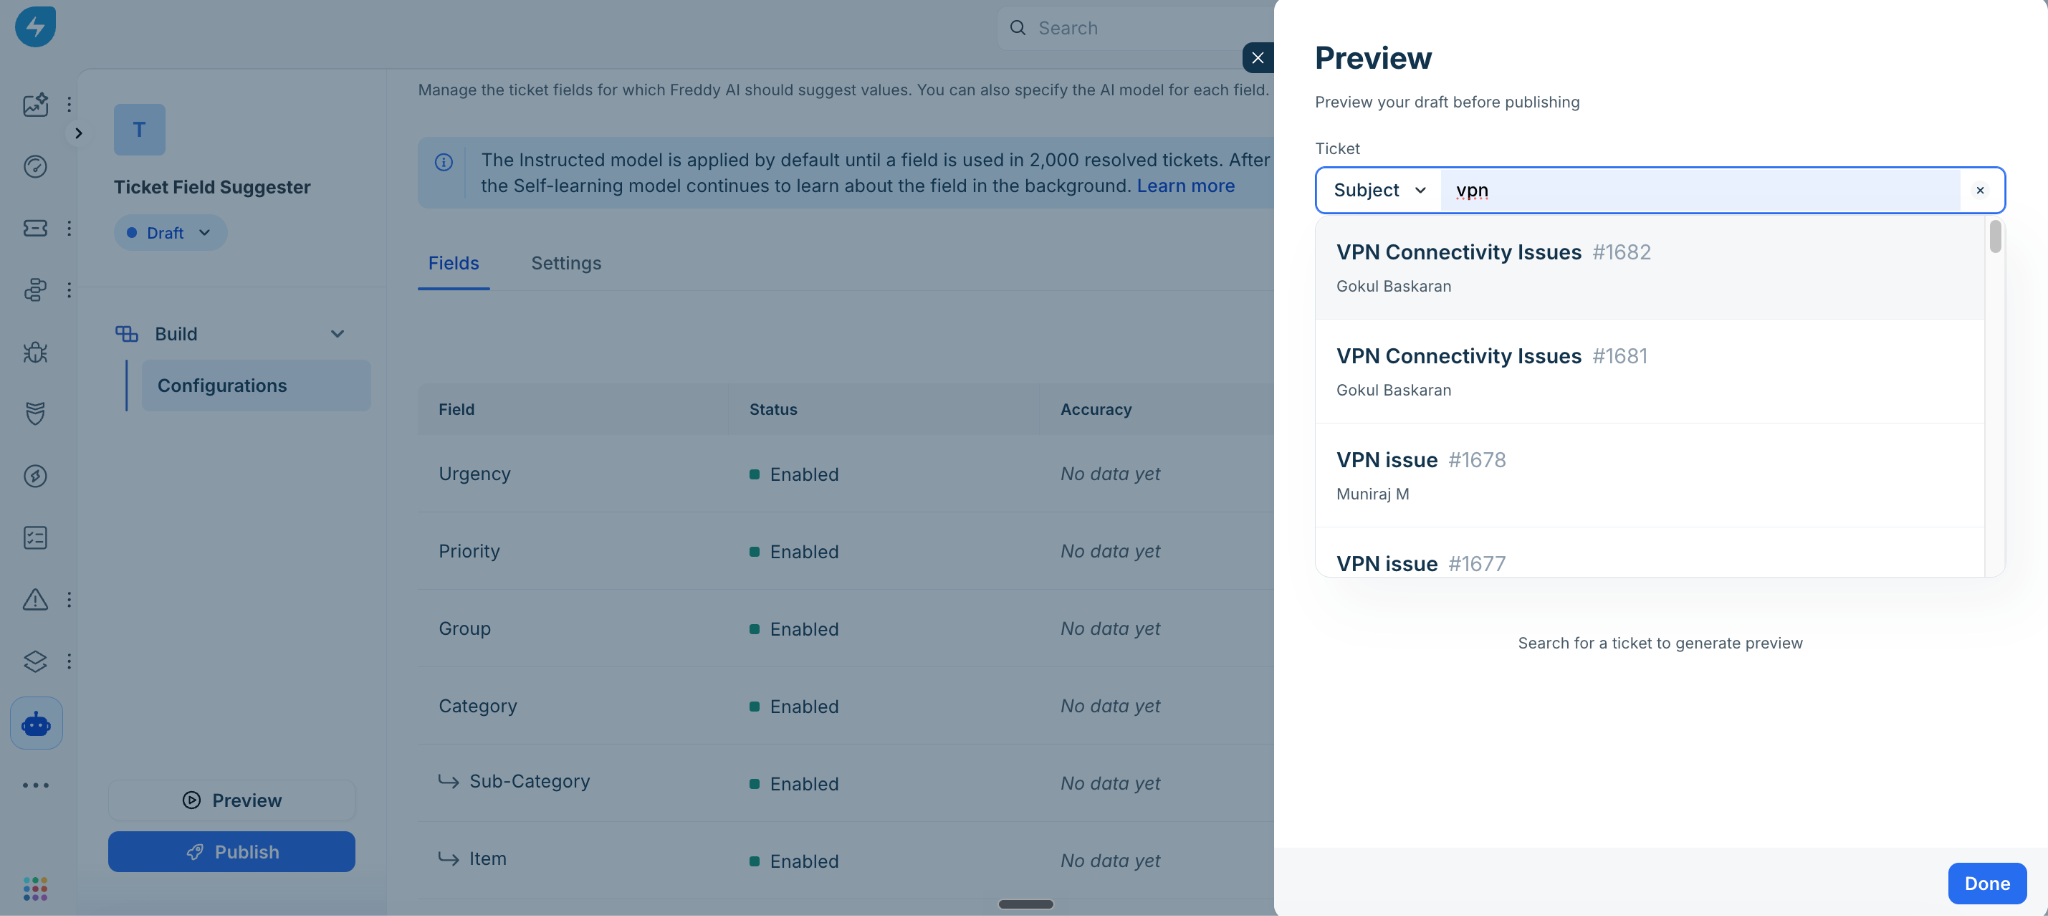
In the preview panel, search for a ticket with its subject or ticket ID.
Review the Output section. It displays the predicted value, confidence percentage, and model used for the prediction.
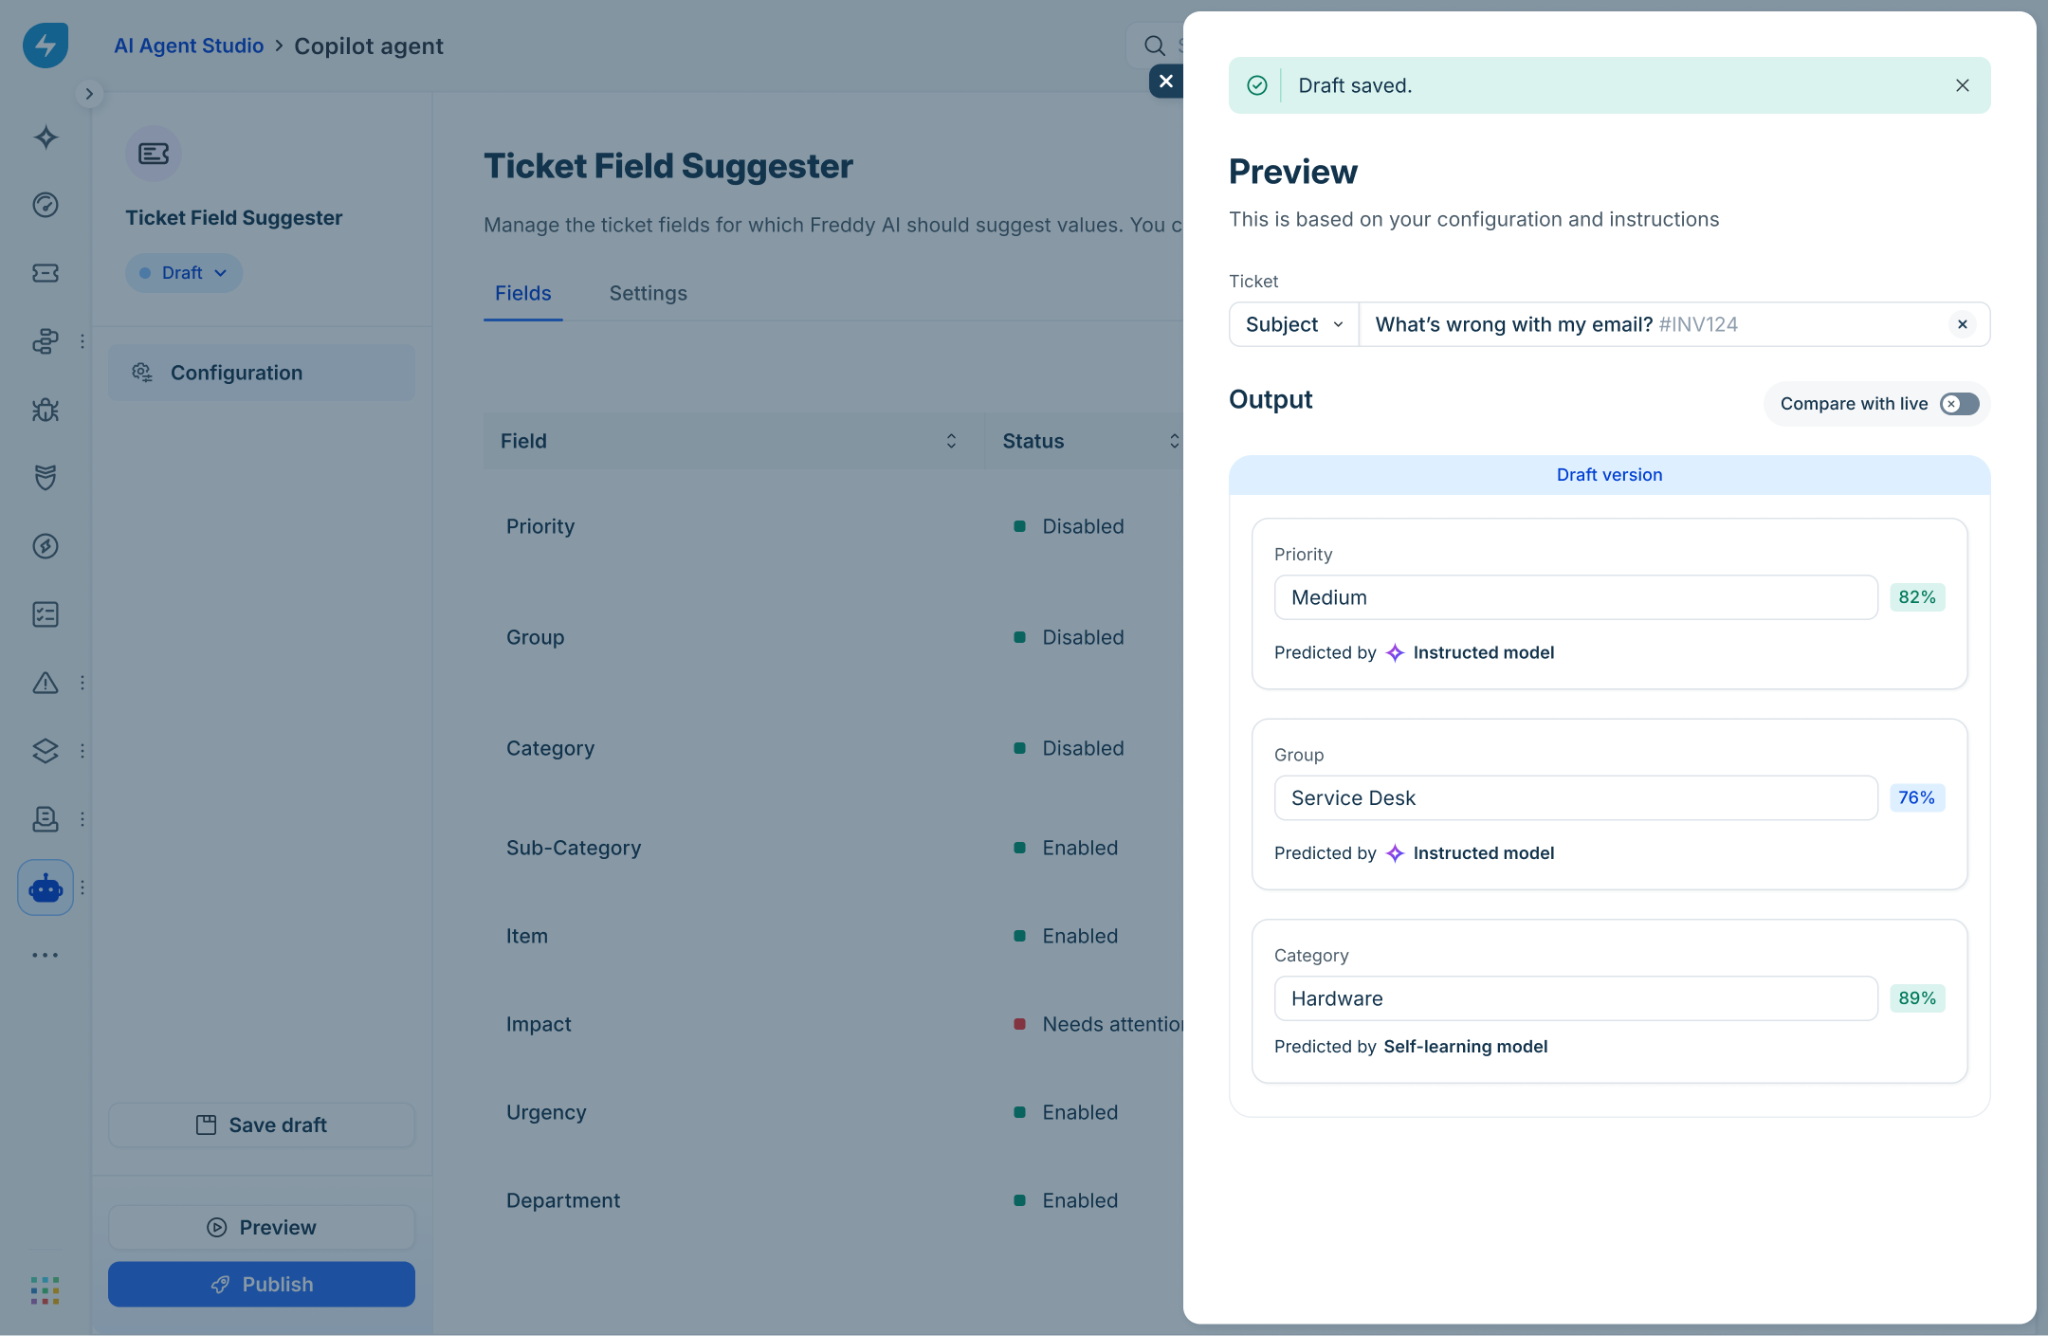
Turn on Compare with live to compare your draft configuration with the configuration currently in use.
Note: You cannot preview suggestions without permission to access tickets. The preview displays a message asking you to contact your admin for access.
Publish the configuration
When you are ready to finalize the configuration, choose one of the following options:
Click Save draft to save your changes without making them available to agents.
Click Publish to make the configuration live and enable suggestions for the configured fields.
Agent experience
Agents can view AI-suggested values for the fields enabled by an admin directly in the ticket's Properties panel. You can review the suggestions, apply selected values, or override an individual suggestion if required.
Review suggested values
Review the suggestions generated by AI Copilot before applying them to the ticket by following these steps:
Open the ticket where you want to review and apply the Ticket Field Suggester recommendations.
In the Properties panel, expand AI suggestions. The section displays the fields for which AI Copilot has generated suggestions and the number of available suggestions.
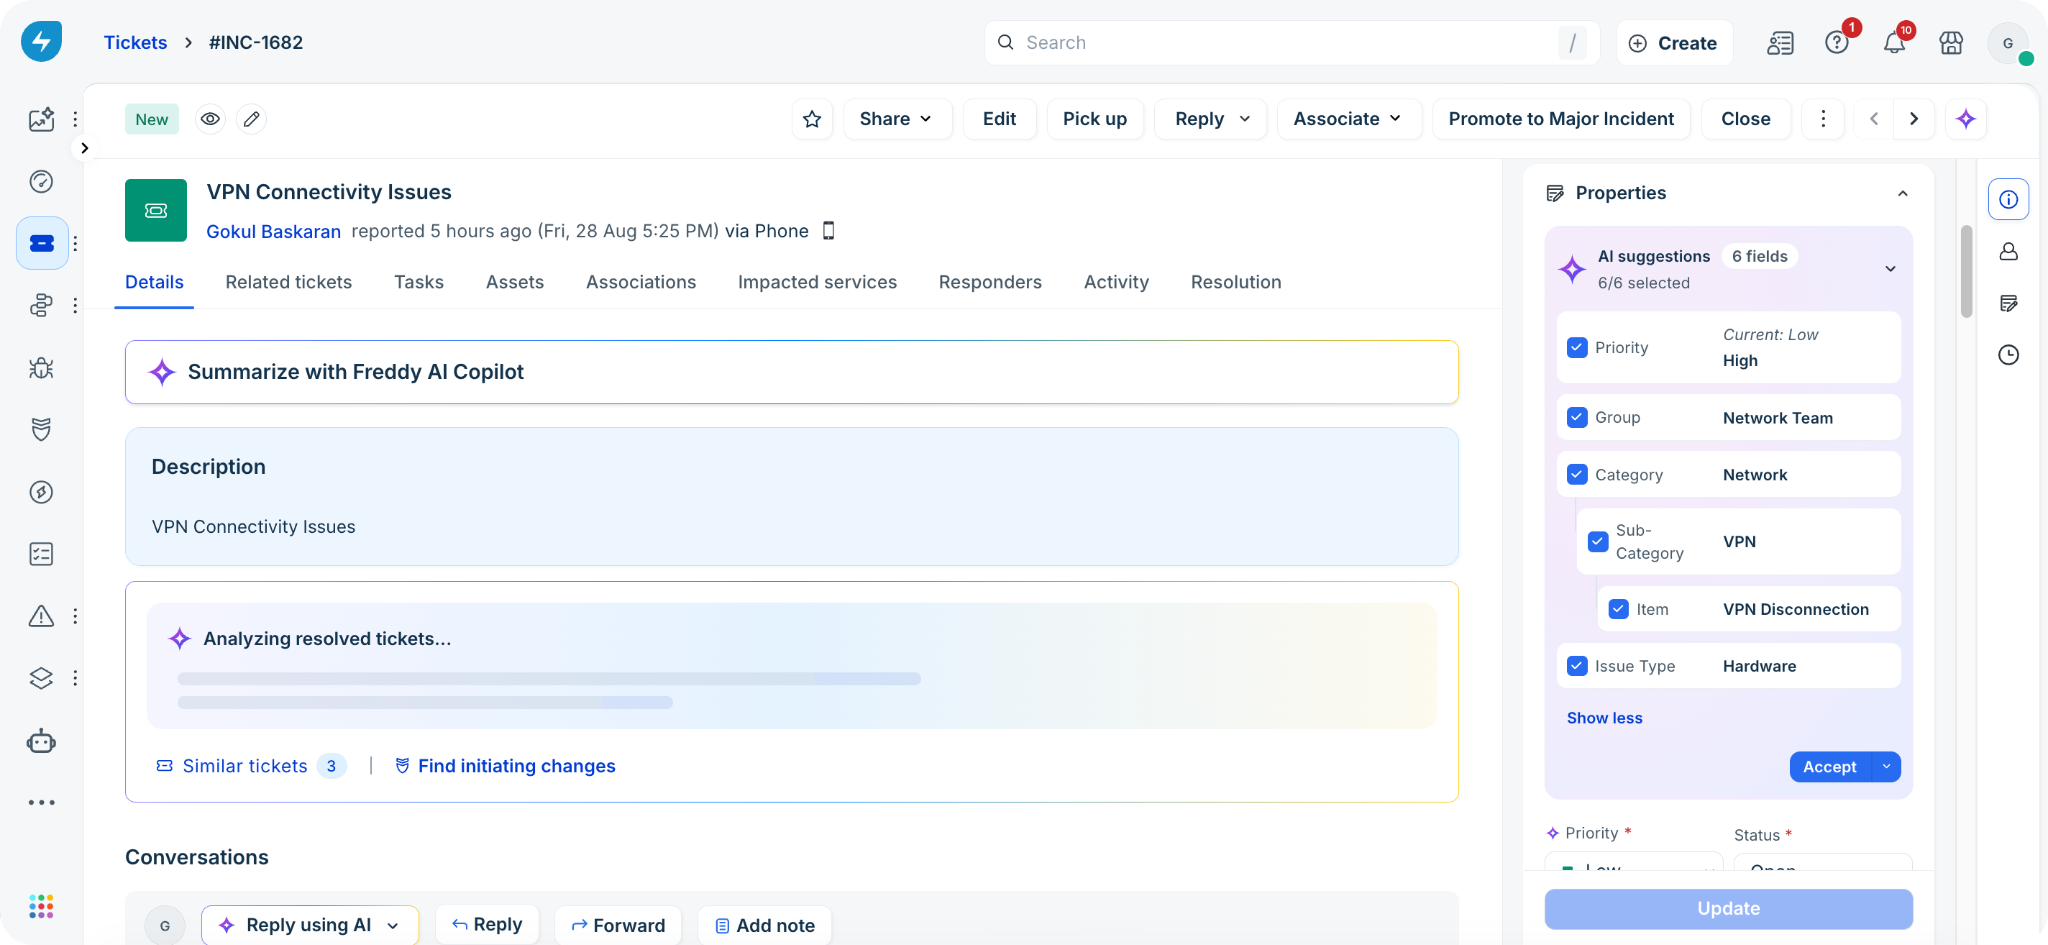
Each suggestion displays the field name, recommended value, and a checkbox that you can use to select or clear the suggestion.
Accept suggested values
To accept the suggested values, follow these steps:
Select the checkbox next to each suggestion that you want to apply.
All suggestions are selected by default.Click Accept to populate the selected values in the corresponding Properties fields without saving them to the ticket.
Alternatively, click the arrow next to Accept and select Accept and update to populate the values and save them to the ticket immediately.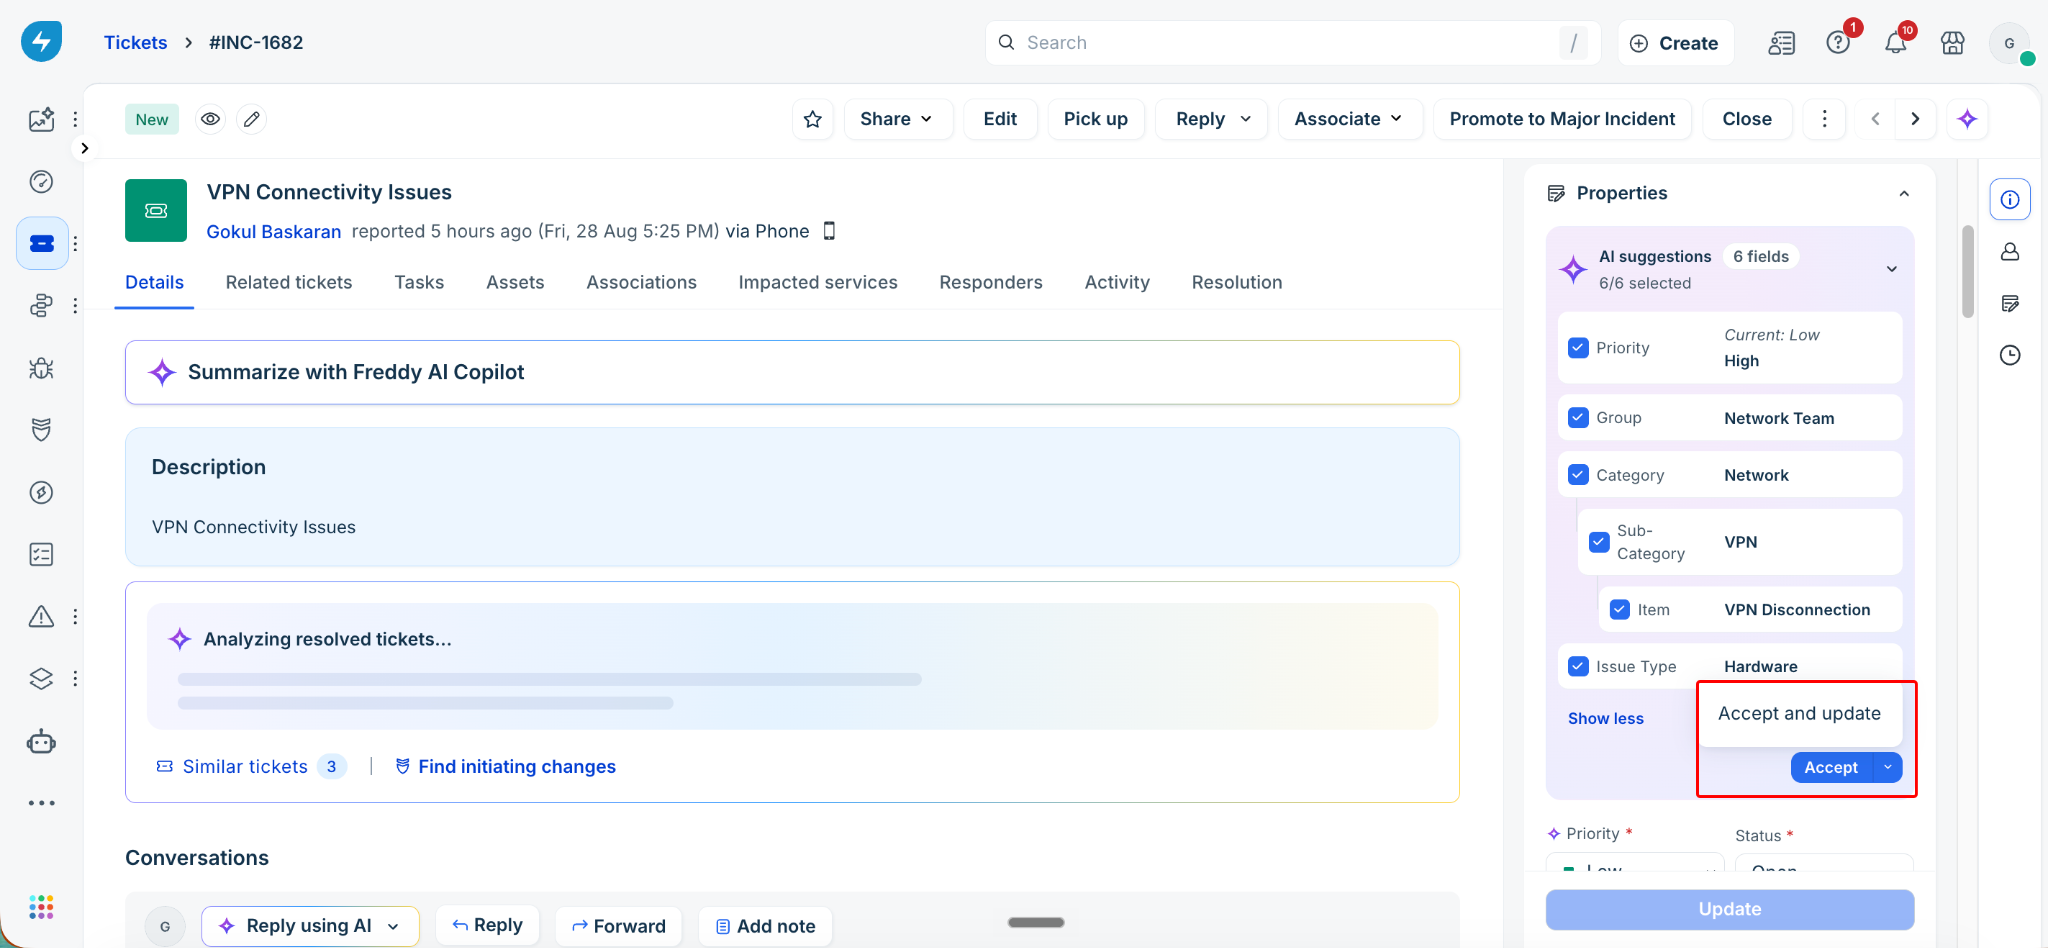
After you click Accept, review the populated values in the Properties fields and click Update to save the changes to the ticket.
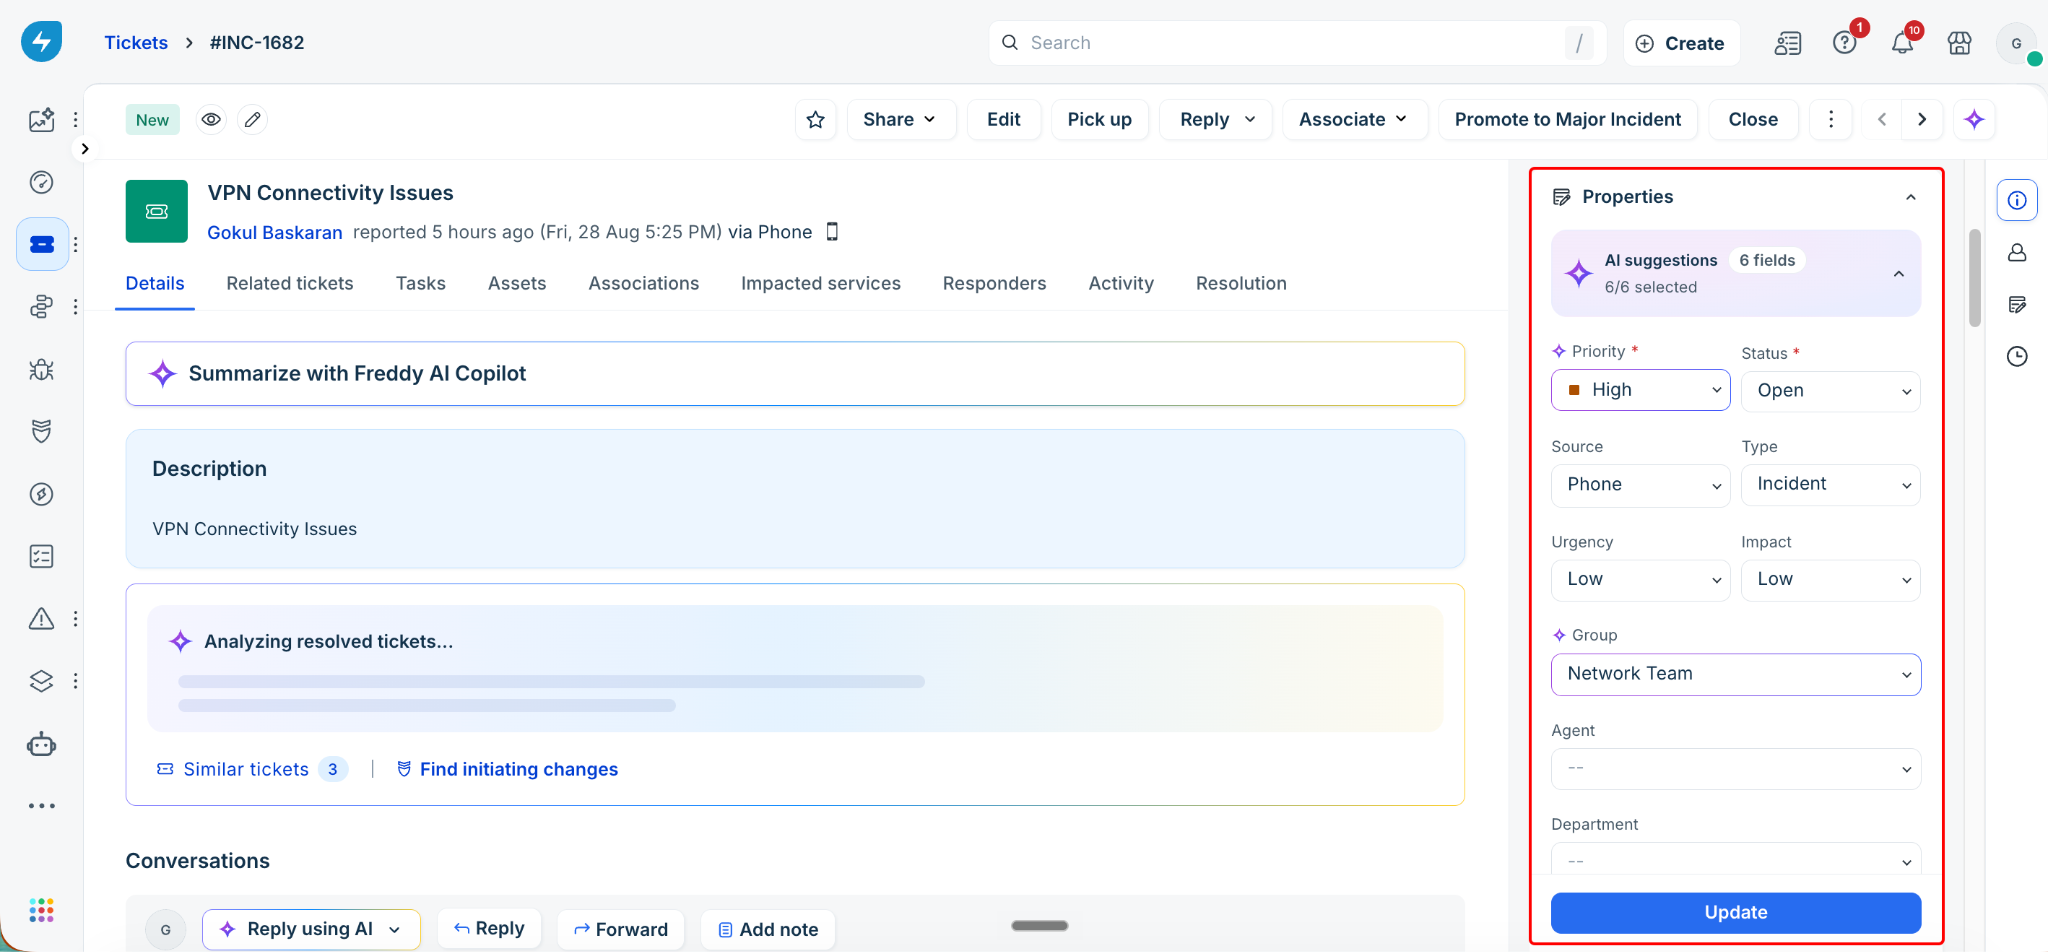
Note: Suggestions that you do not select remain unchanged. You can also edit any field manually before clicking Update.
Override a suggestion for an individual field
Override a suggestion for a field directly from the field's dropdown instead of using the AI suggestions section by following these steps:
Next to the field marked with a sparkle icon, click the dropdown.
Under AI suggestions, review the value recommended by AI Copilot. The recommendation appears above the field's regular options.
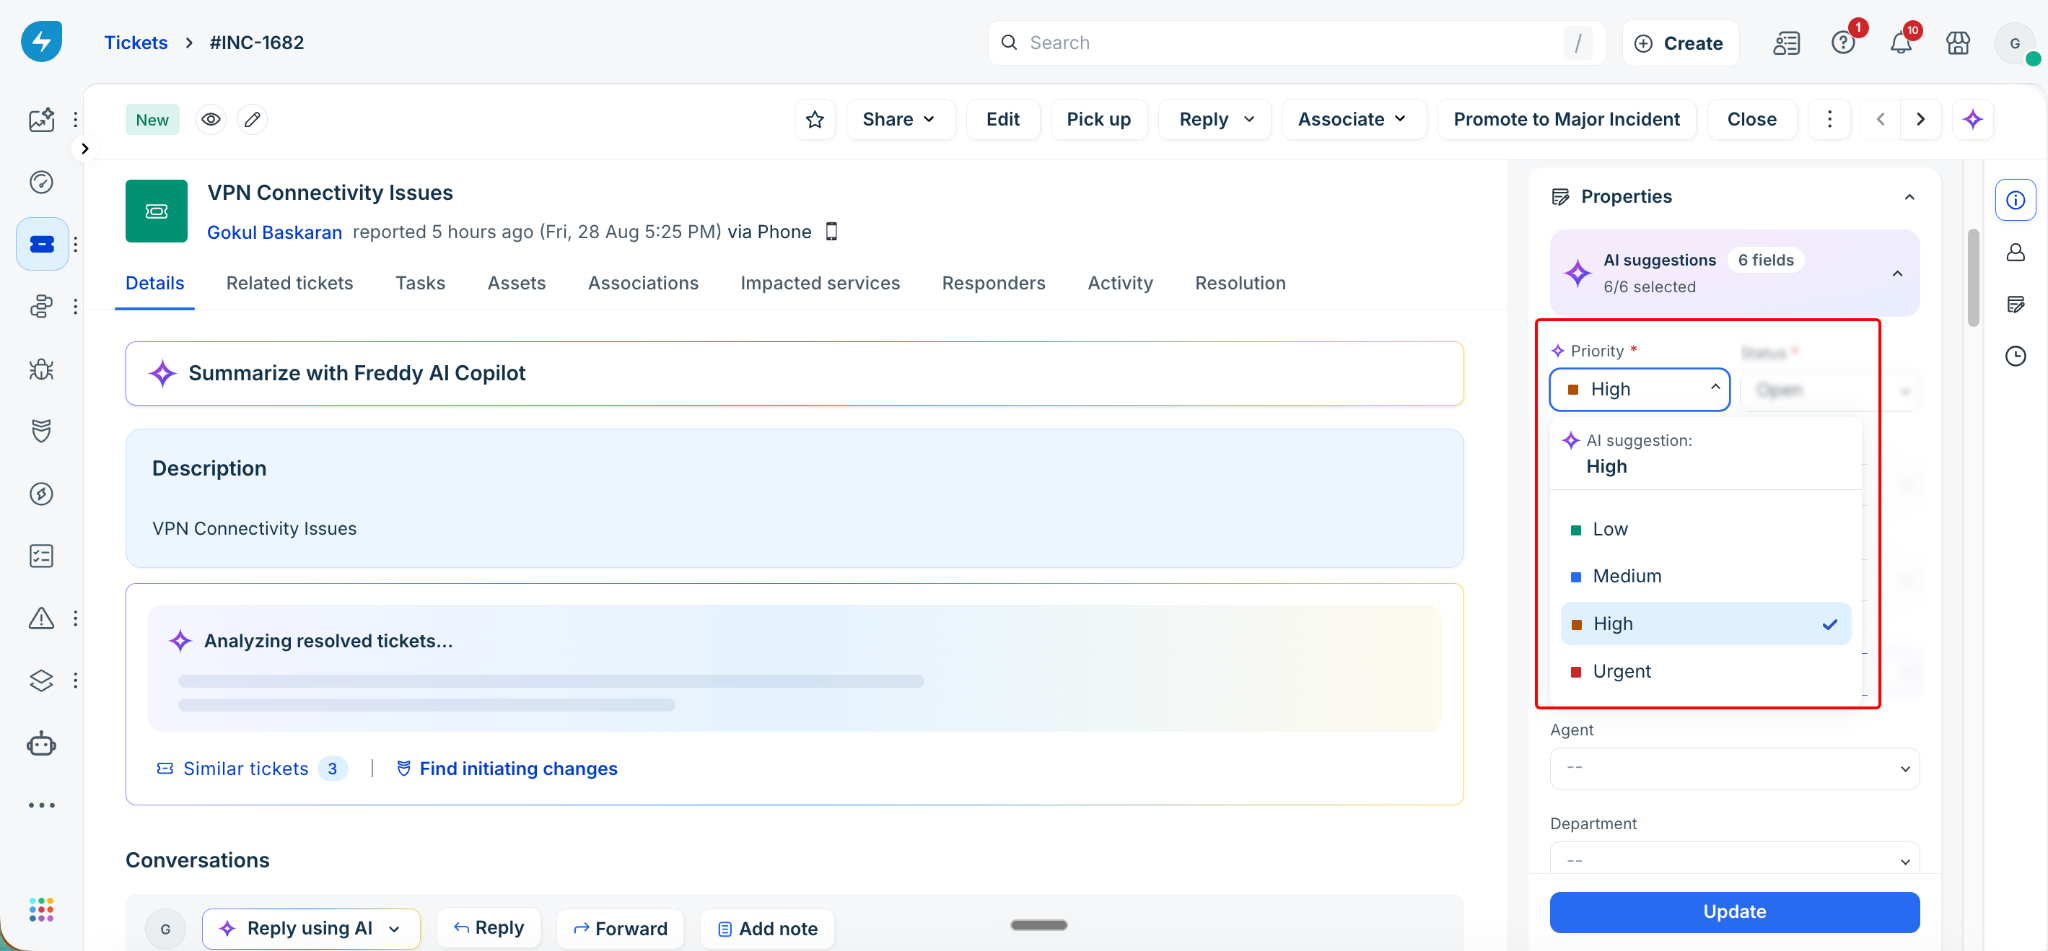
Select the AI-suggested value or select a different value from the list.
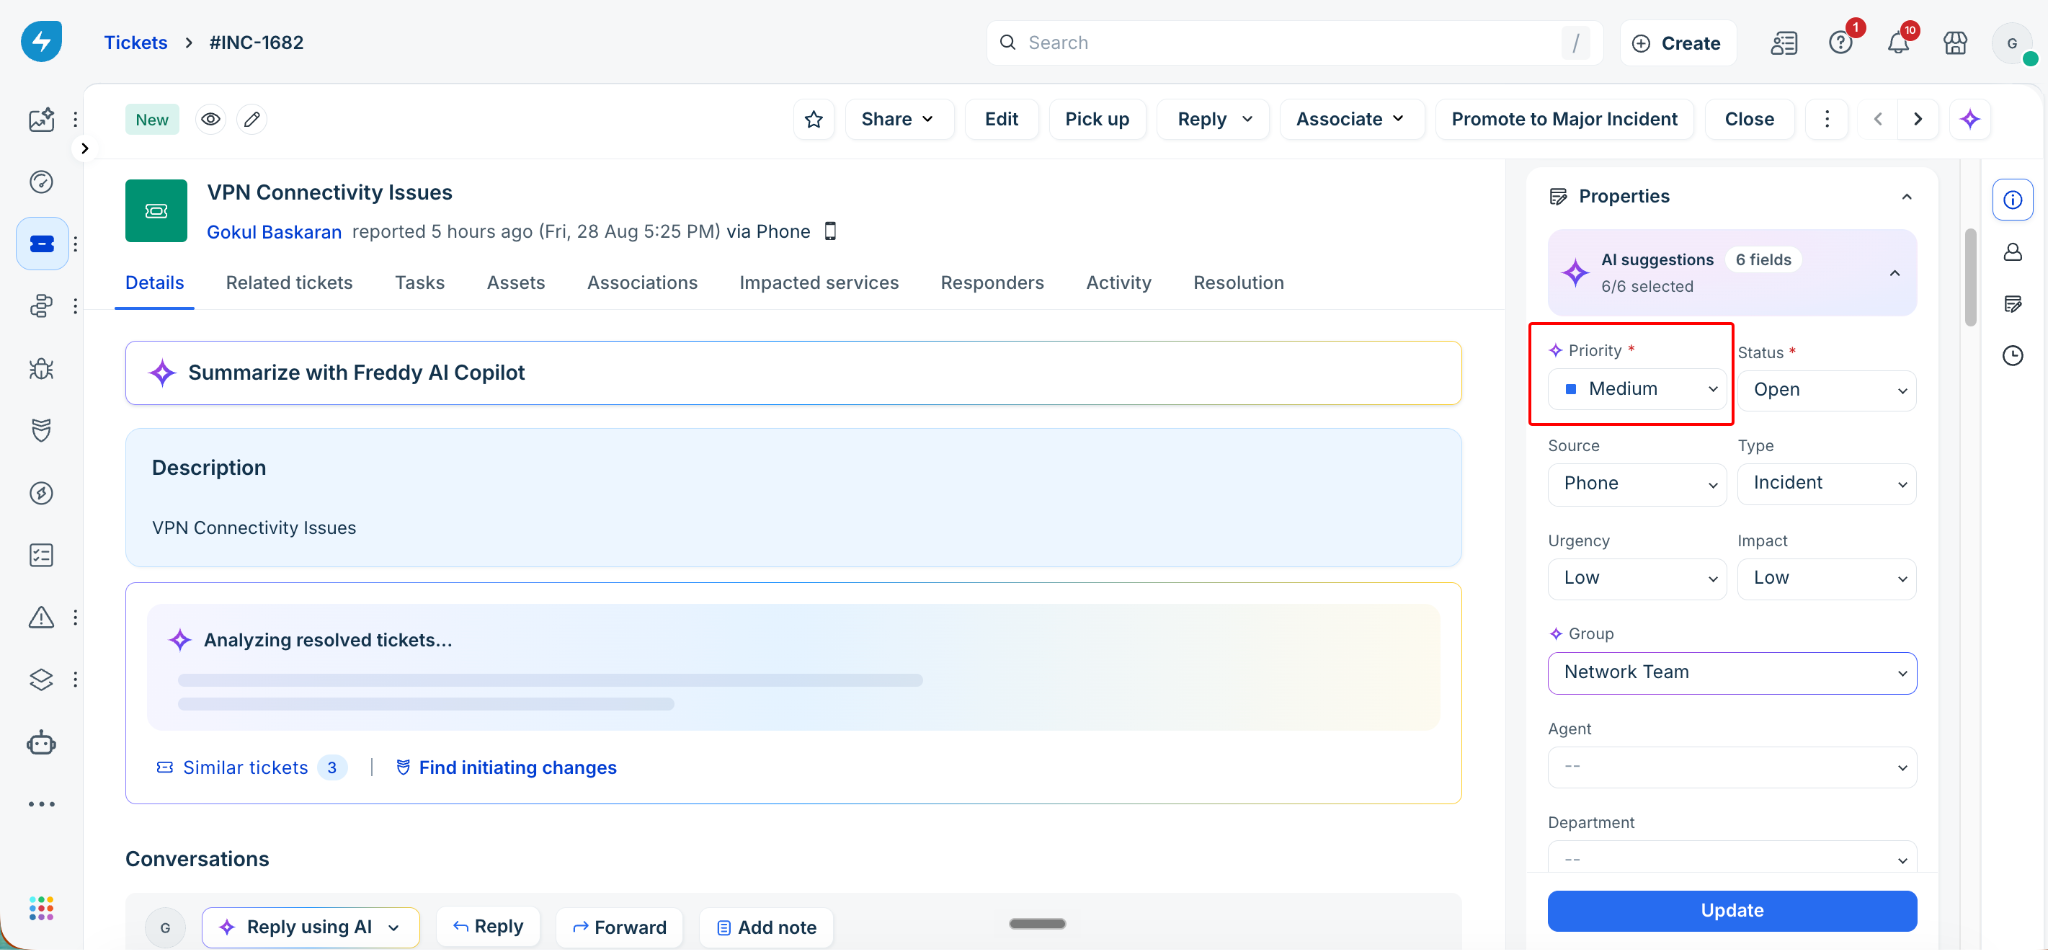
Click Update to save the changes to the ticket.
AI Copilot generates ticket field suggestions the first time the ticket is evaluated. The suggestions are based on the ticket information available at that time. AI Copilot does not re-evaluate the fields or generate new suggestions when additional replies are added to the ticket.
Example instructions for common ticket fields
You can use the following examples as a starting point when configuring instructions for the Instructed model. When writing instructions, follow these guidelines:
Write one rule per line. Each rule should map a condition to a specific field value.
Use the exact field values configured in your Freshservice account.
Include instructions for every possible field value. If a value is not covered, AI Copilot might not suggest it.
If two field values have similar meanings, specify when to use each value.
Add a fallback rule for cases that do not clearly match another condition.
Urgency
Use the following instructions to classify the urgency of a ticket:
If the issue prevents the user from completing a critical business task, set Urgency to High.
If the issue significantly impacts the user's work but has an available workaround, set Urgency to Medium.
If the issue has minimal impact on the user's work and does not require immediate attention, set Urgency to Low.
Priority
Use the following instructions to classify the priority of a ticket:
If the issue causes a complete outage affecting an entire department or a revenue-generating system, set Priority to Urgent.
If the issue causes significant disruption to a team or a business-critical application with no workaround, set Priority to High.
If the issue affects a single user or a small group and a workaround is available, set Priority to Medium.
If the issue is a minor inconvenience, a cosmetic defect, or a general inquiry, set Priority to Low.
Impact
Use the following instructions to classify the impact of a ticket:
If the issue affects an entire organization, multiple departments, or a company-wide service, set Impact to High.
If the issue affects a single department, a specific team, or a shared service used by a group, set Impact to Medium.
If the issue affects only a single user or a single workstation, set Impact to Low.
Group
Use the following instructions to route tickets to the appropriate support group:
If the issue is related to network connectivity, VPN, Wi-Fi, or firewall access, set Group to Network Team.
If the issue is related to laptops, desktops, monitors, keyboards, or other hardware, set Group to Desktop Support.
If the issue is related to email, Microsoft 365, Google Workspace, or collaboration tools, set Group to Messaging and Collaboration.
If the issue is related to Active Directory, password resets, account lockouts, or user provisioning, set Group to Identity and Access Management.
If the issue is related to SAP, Oracle, Salesforce, or any business application, set Group to Enterprise Applications.
If the issue is related to printers, scanners, or telephony equipment, set Group to Facilities IT.
If the issue does not clearly match any of the above, set Group to IT Service Desk.
Note: Use these sample instructions as a starting point when configuring your fields. Customize them to suit your requirements, and use the Preview feature in AI Agent Studio to test them against real tickets before publishing.
Frequently asked questions
The following answers address common questions about the Ticket Field Suggester.
1. Why don't I see AI suggestions on my ticket?
The Ticket Field Suggester displays suggestions only for fields that an admin has enabled and configured. Ensure that the field is enabled and that a learning model is configured for it. A field does not display a suggestion if its toggle is disabled or if its suggestions have not reached the required accuracy.
2. What happens if I select a field's checkbox but don't click Update?
Clicking Accept only populates the suggested value in the Properties panel. The change is not saved to the ticket until you click Update. If you navigate away from the ticket before clicking Update, the change is lost.
3. Do AI suggestions reappear after I reply to a ticket?
No. AI Copilot generates suggestions only once when the ticket is first evaluated. It does not re-evaluate the ticket or generate new suggestions when you add a reply.
4. What's the difference between the Instructed and Self-learning models?
The Instructed model generates suggestions based on the guidelines configured by an admin. The Self-learning model generates suggestions by learning from historical ticket data. Admins can compare the accuracy of both models and switch between them.
5. Can a field's AI model change automatically?
Yes, but only when an admin enables automatic model switching in Settings. When enabled, a field automatically switches to the Self-learning model if it performs at least 5% better than the Instructed model. The admin receives an email notification when this happens.