TABLE OF CONTENTS
- Prerequisites
- Overview
- Plan and product applicability
- Access checklist templates
- Create a checklist template
- Manage checklist templates
- Review the checklist template activity
- Link a checklist template to a service item
- Edit a linked checklist template
- Use checklists with document service items
- Agent experience
- Best practices
- Frequently asked questions
Administrators can use Agent Checklists to standardize service request fulfillment by creating reusable checklist templates and associating them with service catalog items. Agents can then use these checklists to track completed tasks and ensure required steps are completed before fulfilling a service item.
This article explains how to create and manage checklist templates, associate them with service catalog items, configure permissions, and understand the agent experience during service request fulfillment.
Prerequisites
Before you configure Agent Checklists, ensure the following:
Your account is on the Growth, Pro, or Enterprise plan.
You have administrator permissions to create and manage checklist templates.
Service Catalog is configured in your workspace.
You have access to the workspace where you want to create checklist templates.
Overview
Service request fulfillment often involves completing a series of tasks before a requested service item can be fulfilled. When these requests span several hours or days, agents need an easy way to track completed tasks and continue from where they left off without missing important steps.
Agent Checklists help standardize service request fulfillment by enabling administrators to create reusable checklist templates and associate them with service catalog items. When a requester submits a request for a linked service item, the associated checklist is automatically displayed on the ticket, allowing agents to track task completion throughout the fulfillment process.
Each checklist template includes:
Checklist items: Tasks that agents complete while fulfilling the request. Each template supports up to 50 items.
Mandatory items: Tasks that must be completed before the associated requested item can be closed.
Linked service items: Service catalog items associated with the checklist template. A single template can be linked to multiple service items.
Agent Checklists govern service item fulfillment, not ticket closure. Agents can close a ticket without completing every checklist item. However, the associated requested item cannot be closed until all mandatory checklist items are completed.
Plan and product applicability
Before you configure Agent Checklists, review the feature availability and supported scope.
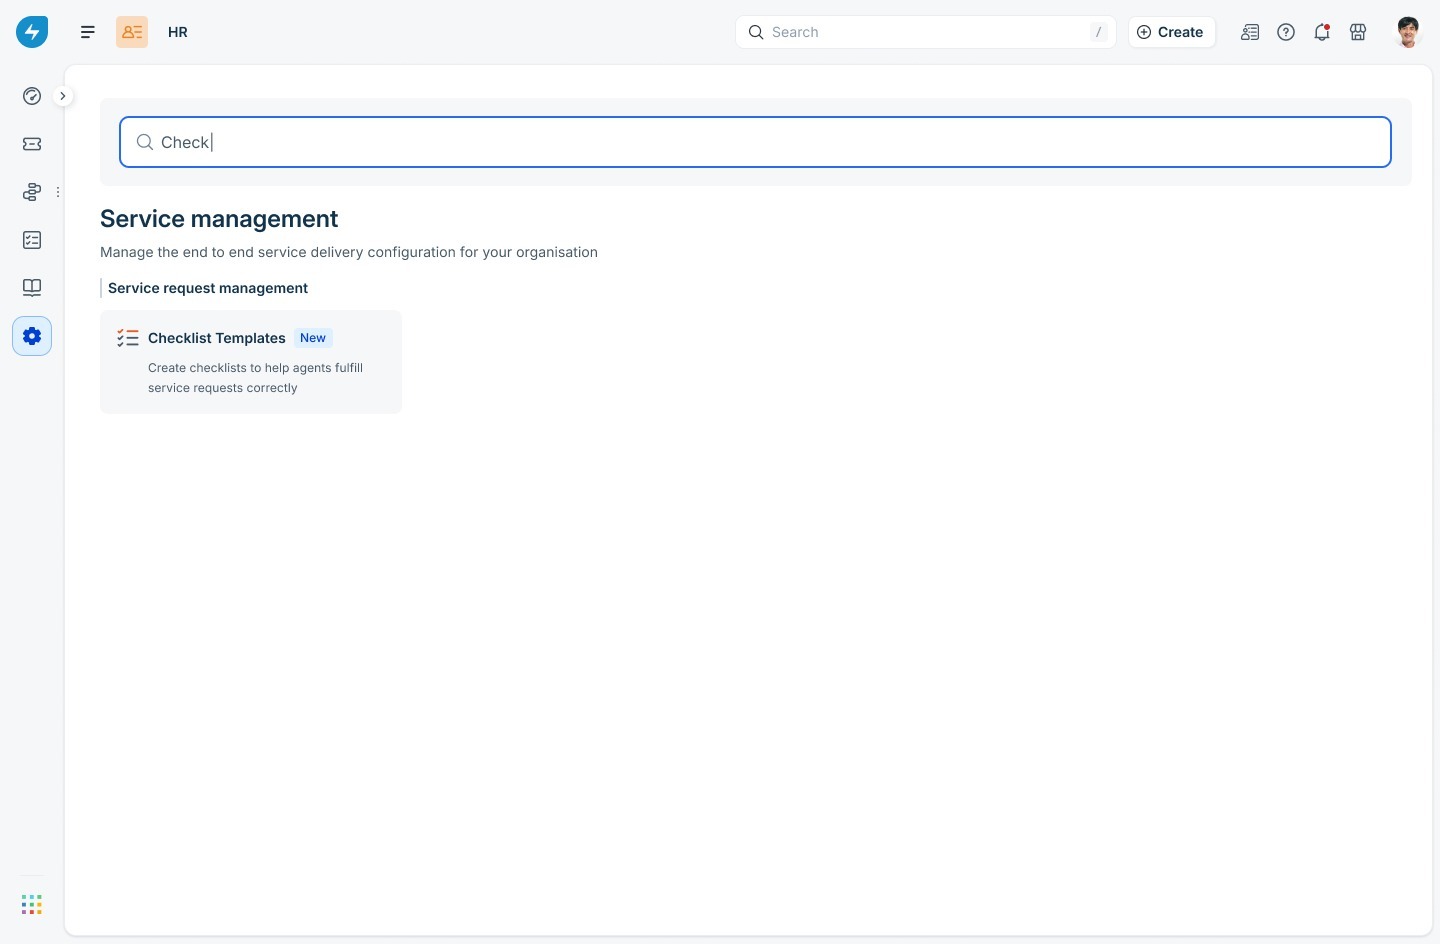
Access checklist templates
Checklist templates are managed at the workspace level. From the Checklist Templates page, you can create new templates, edit existing templates, enable or disable templates, and remove templates that are no longer required.
To open the Checklist Templates page, follow these steps:
Go to Admin settings and click the Workspace hamburger menu in the top-left corner.
Select the desired workspace.
Under Service management, select Checklist Templates.
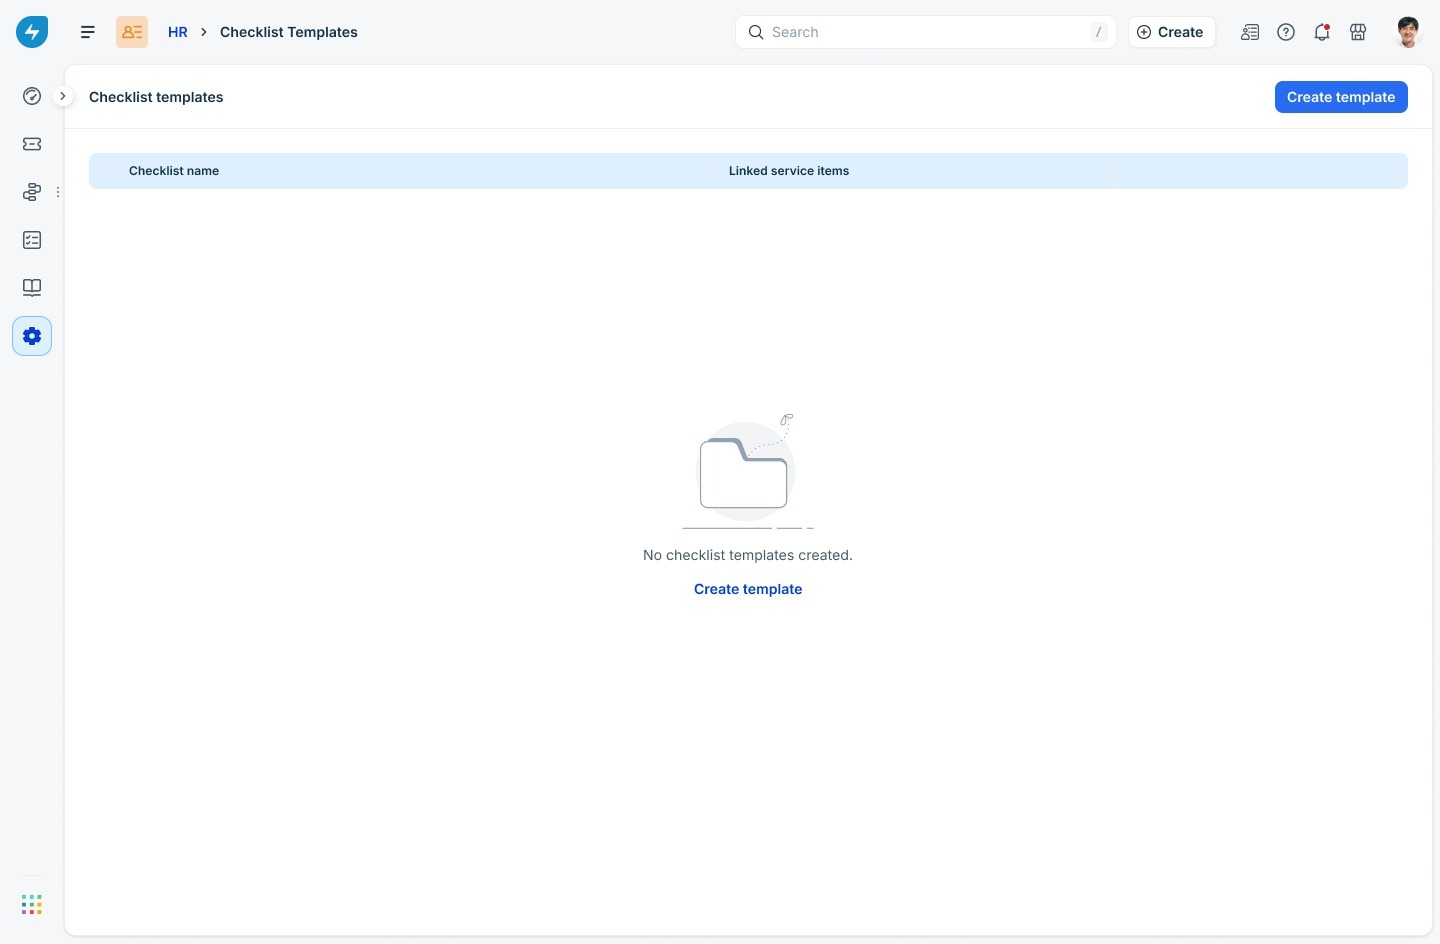
The Checklist Templates page displays all checklist templates available in the selected workspace. For each template, you can view the linked service items and perform management actions such as editing, enabling, disabling, or deleting the template.

If no checklist templates exist, the page displays an empty state with the option to create your first template.
Create a checklist template
Creating a checklist template involves two stages. First, define the checklist and its tasks. Then, associate the checklist with one or more service catalog items.
Step 1: Define the checklist
To define a checklist template, follow these steps:
On the Checklist Templates page, click Create template.
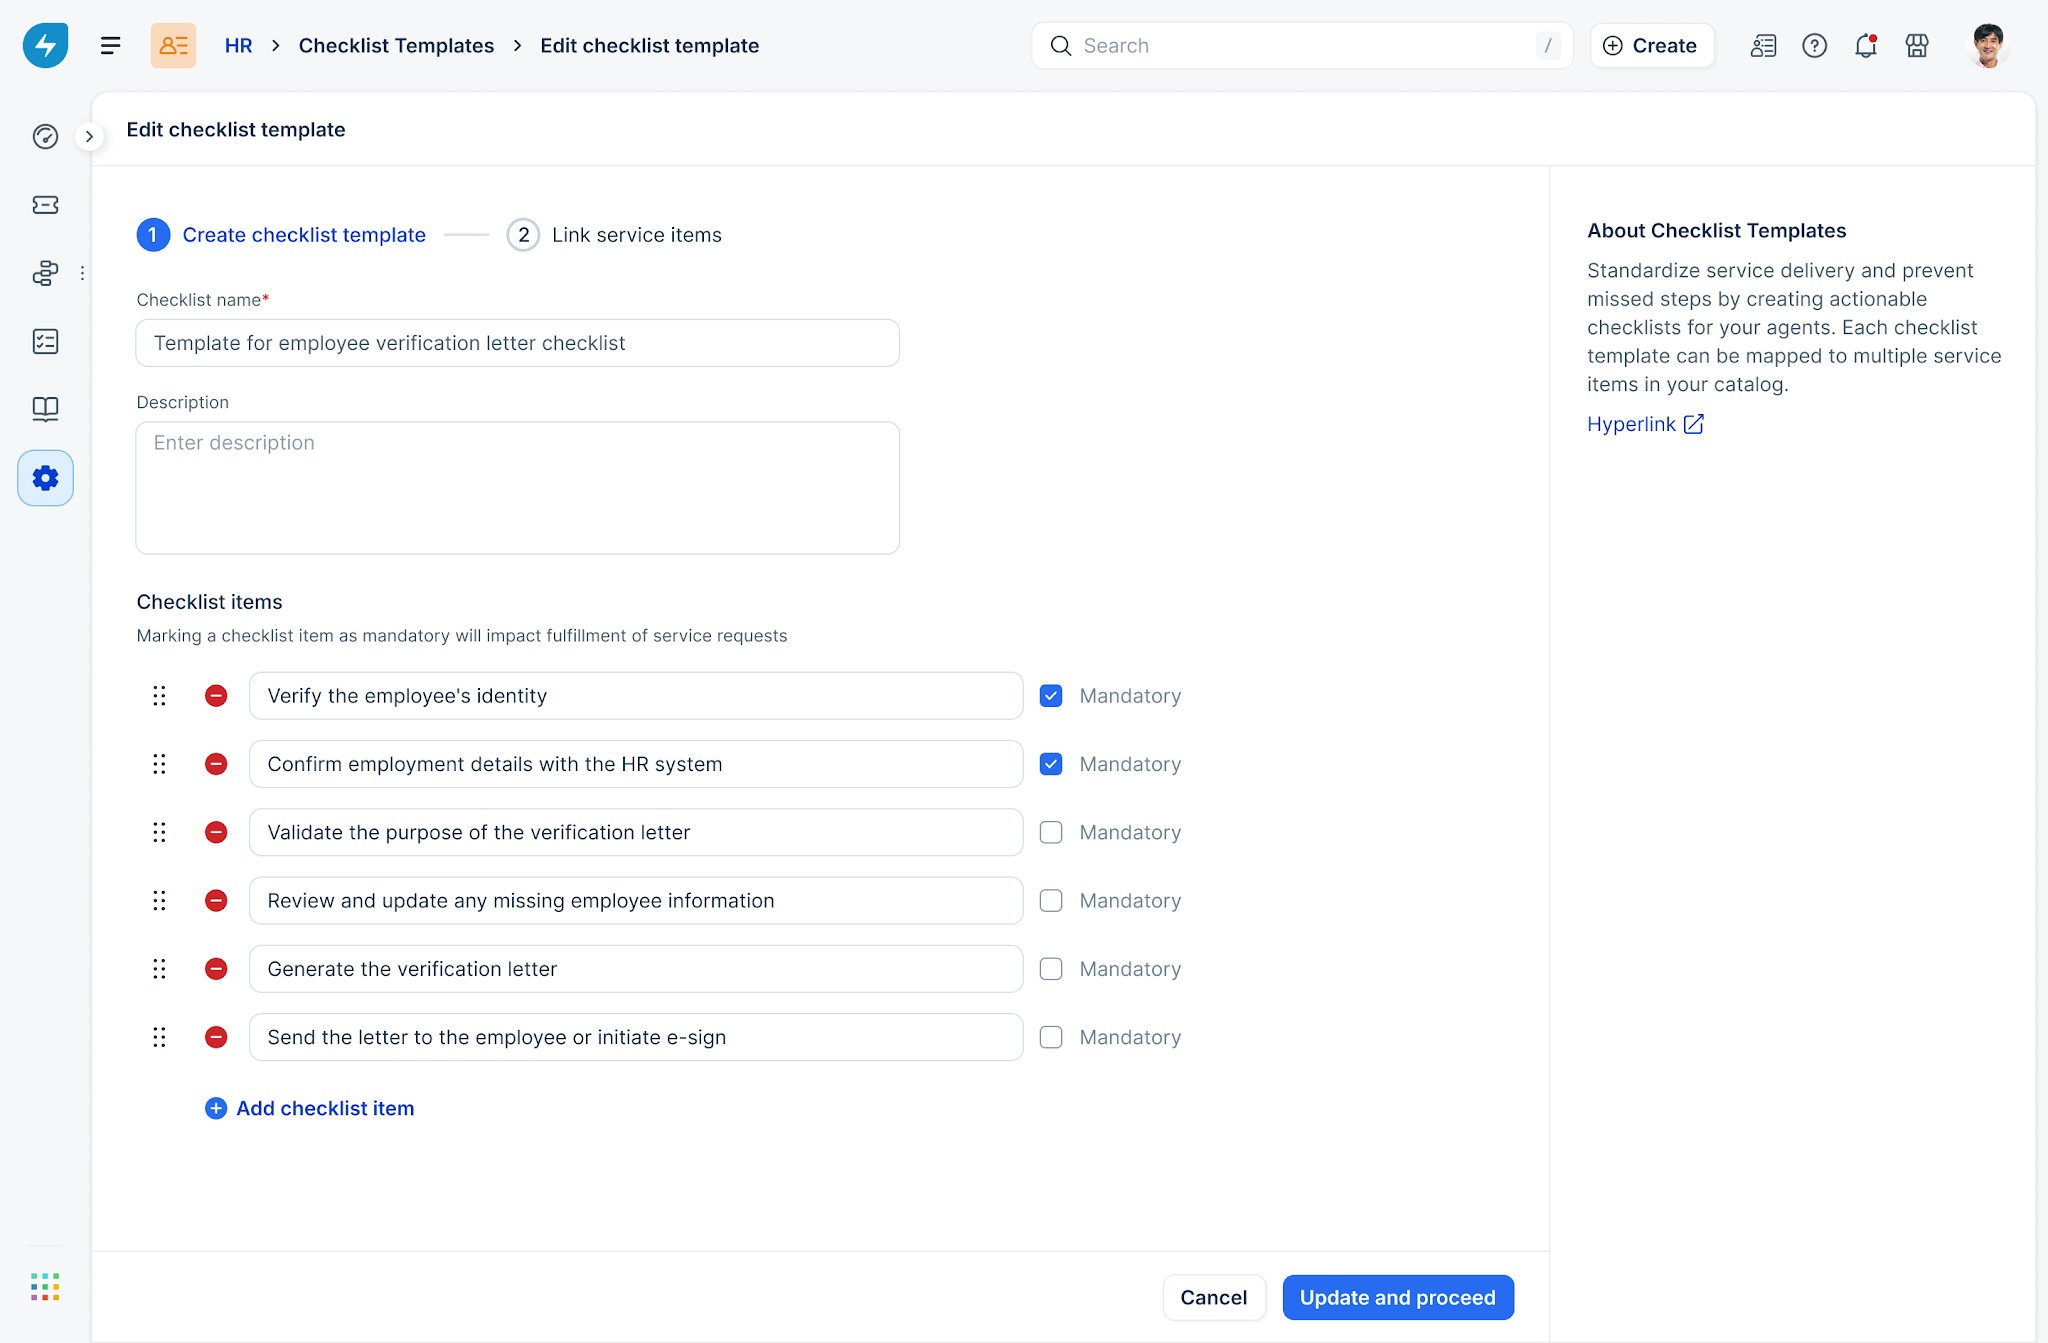
Enter a descriptive name for the checklist. Choose a name that clearly identifies the purpose of the checklist. For example, Employee verification letter checklist or New employee onboarding checklist.
Enter a description (Optional). Use the description to explain when the checklist should be used. This information is visible only to administrators and helps distinguish similar templates.
Under Checklist items, enter the first task.
Click Add checklist item to add additional tasks.
Select Mandatory for any task that must be completed before the associated service item can be fulfilled.
Drag and reorder checklist items as required. Agents see the tasks in the same order that you configure here.

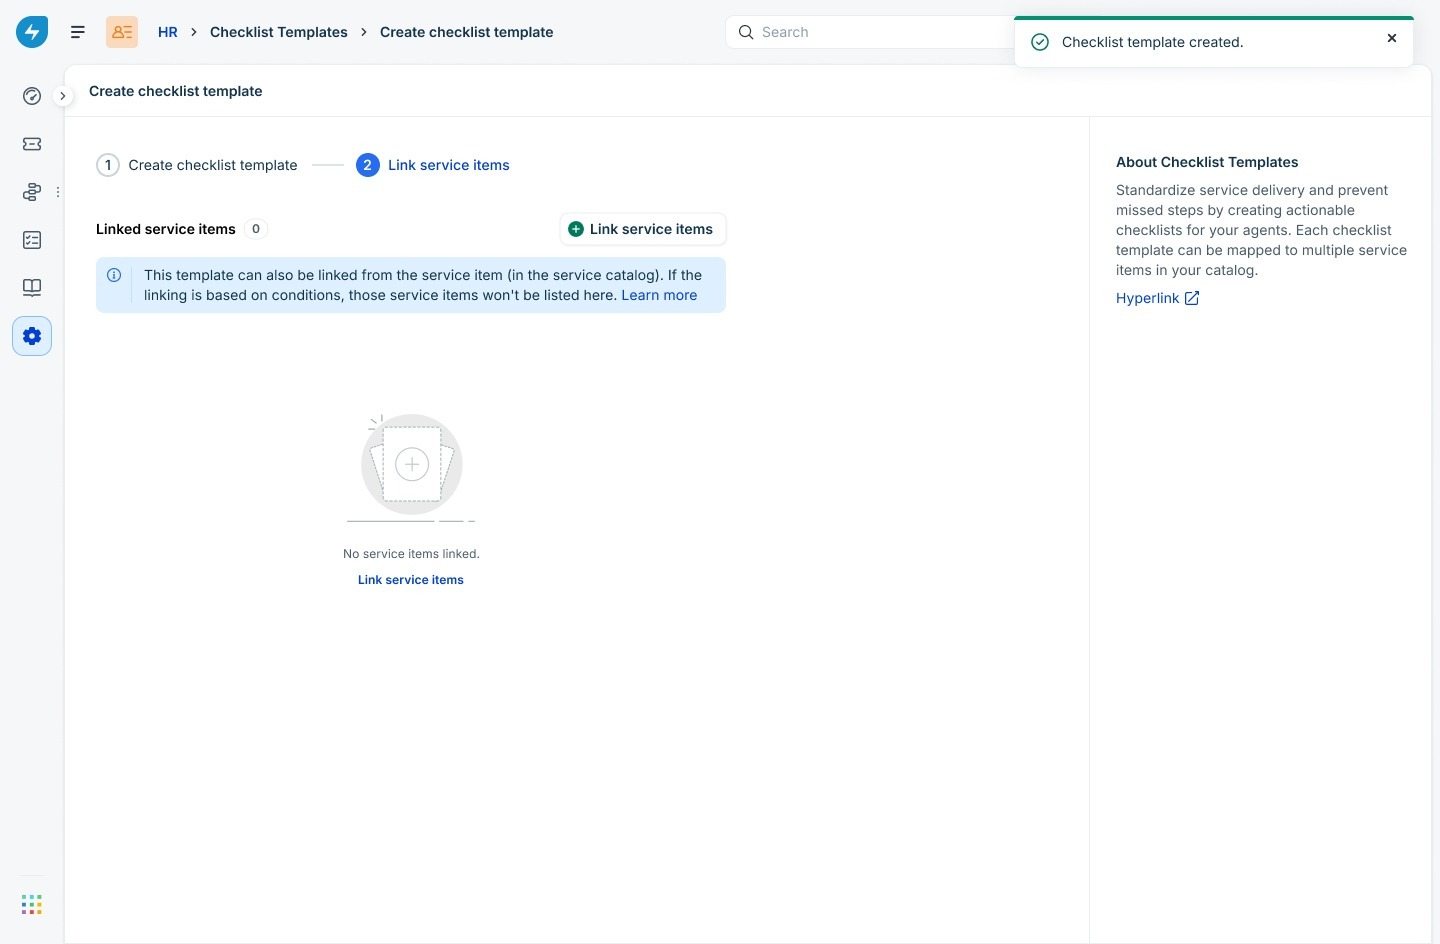
Click Create and proceed.
Step 2: Link service items
A checklist template becomes available to agents only after it is linked to at least one service catalog item.
To link service items, follow these steps:
On the Link service items page, click Link service items.
Search for and select one or more service items. You can select up to five service items at a time. Repeat the process if you need to associate additional service items with the checklist.
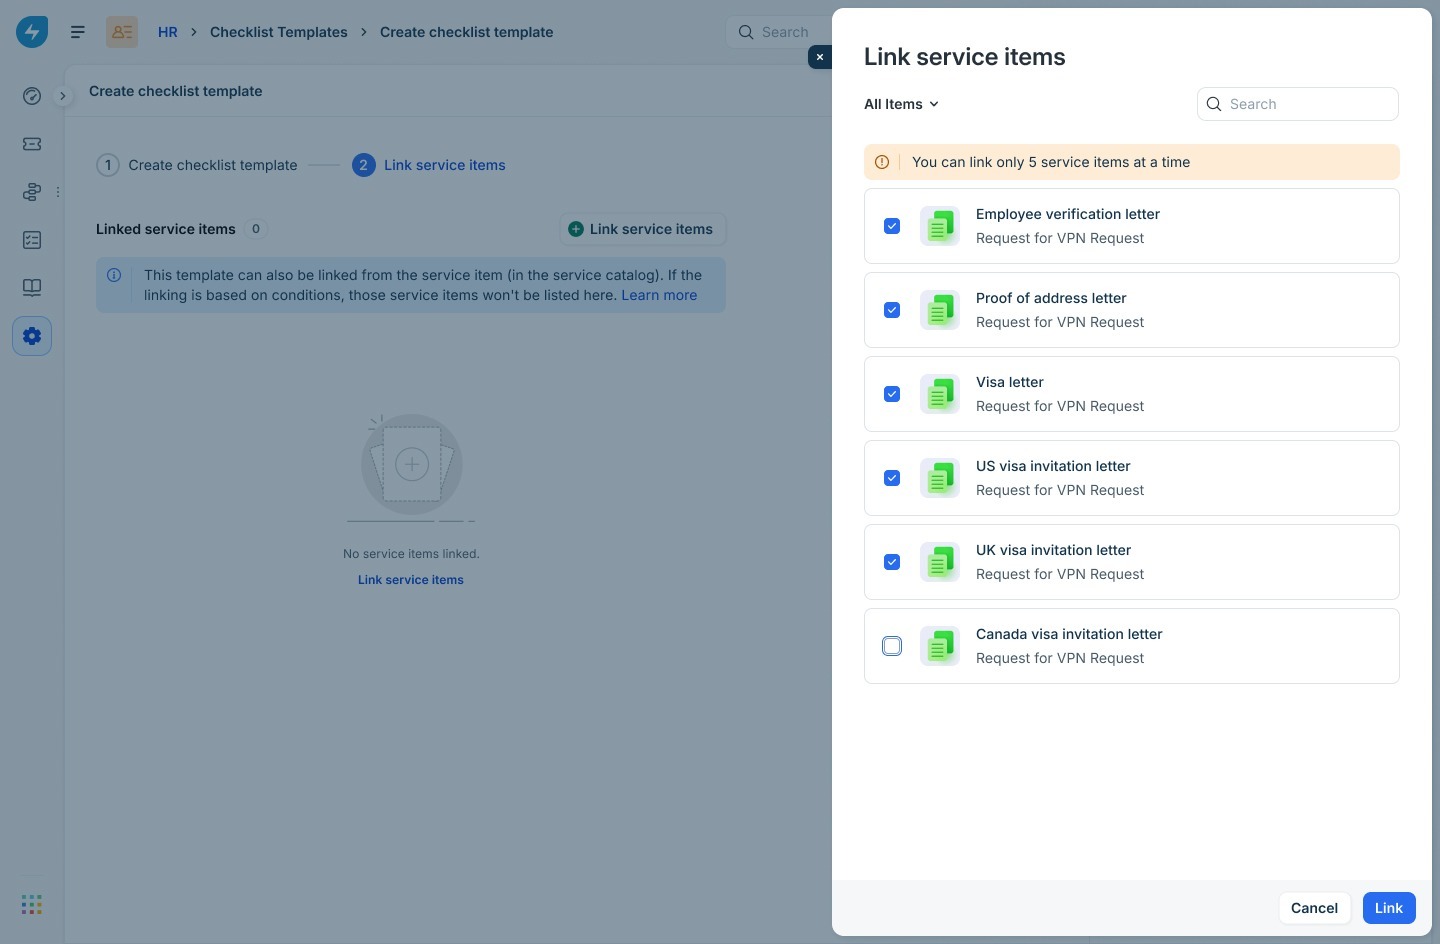
Click Link.
If any selected service item is already linked to another checklist template, the Confirm before linking dialog appears.
Each service item can be associated with only one checklist template at a time. Linking the service item to the current checklist removes its association with the previous checklist.
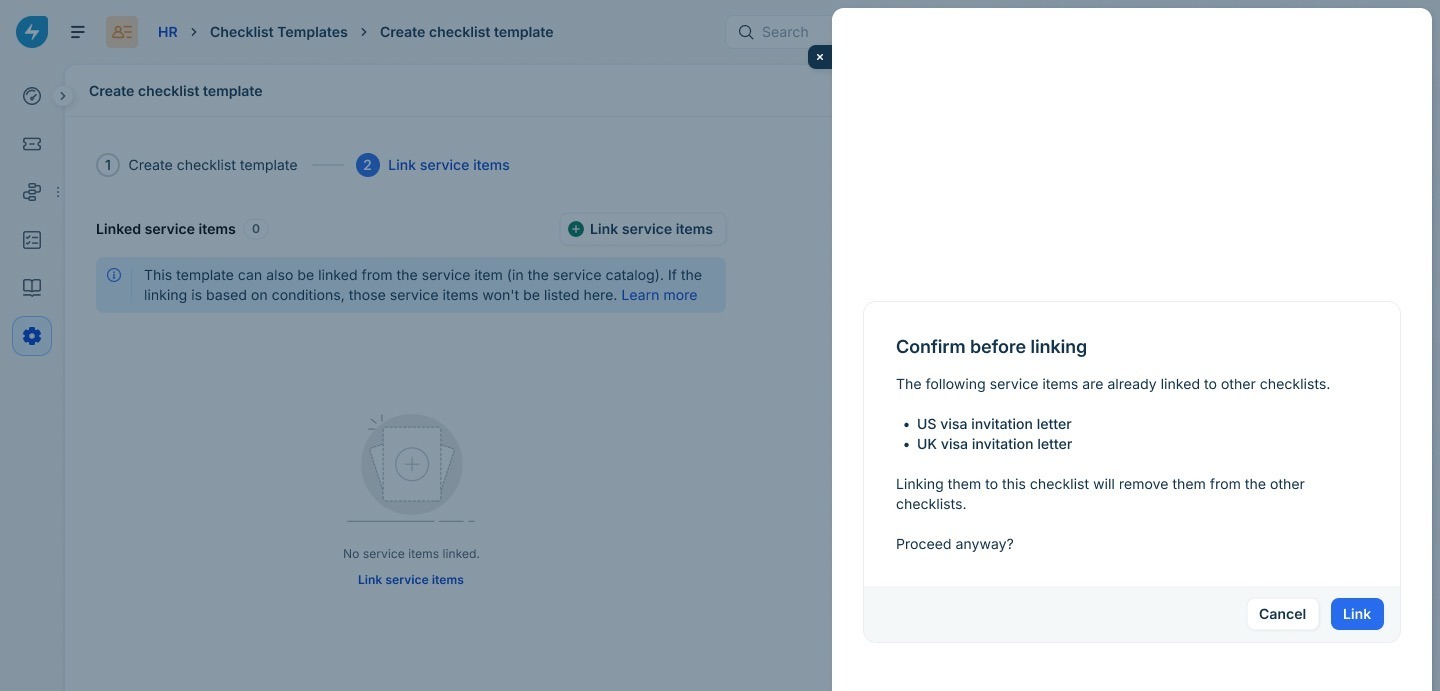
Review the confirmation message and click Link.
Verify that the required service items appear in the linked service items list.
If you exit the setup wizard without linking at least one service item, the checklist template is saved as Inactive. You can return later to link service items and activate the template.
Manage checklist templates
After creating a checklist template, you can update its details, enable or disable it, or delete it when it is no longer required.
Edit a checklist template
You can edit an existing checklist template to update its name, description, or checklist items. Changes apply only to service requests created after the template is updated.
To edit a checklist template, follow these steps:
Go to Admin > Workspace settings > Checklist Templates.
Click the Edit icon next to the required checklist template.
Update the checklist name, description, checklist items, or mandatory settings as required.
Click Update and proceed. If the checklist template is linked to one or more service items, the Confirm before updating dialog displays the number of linked service items.
Review the information and click Proceed.
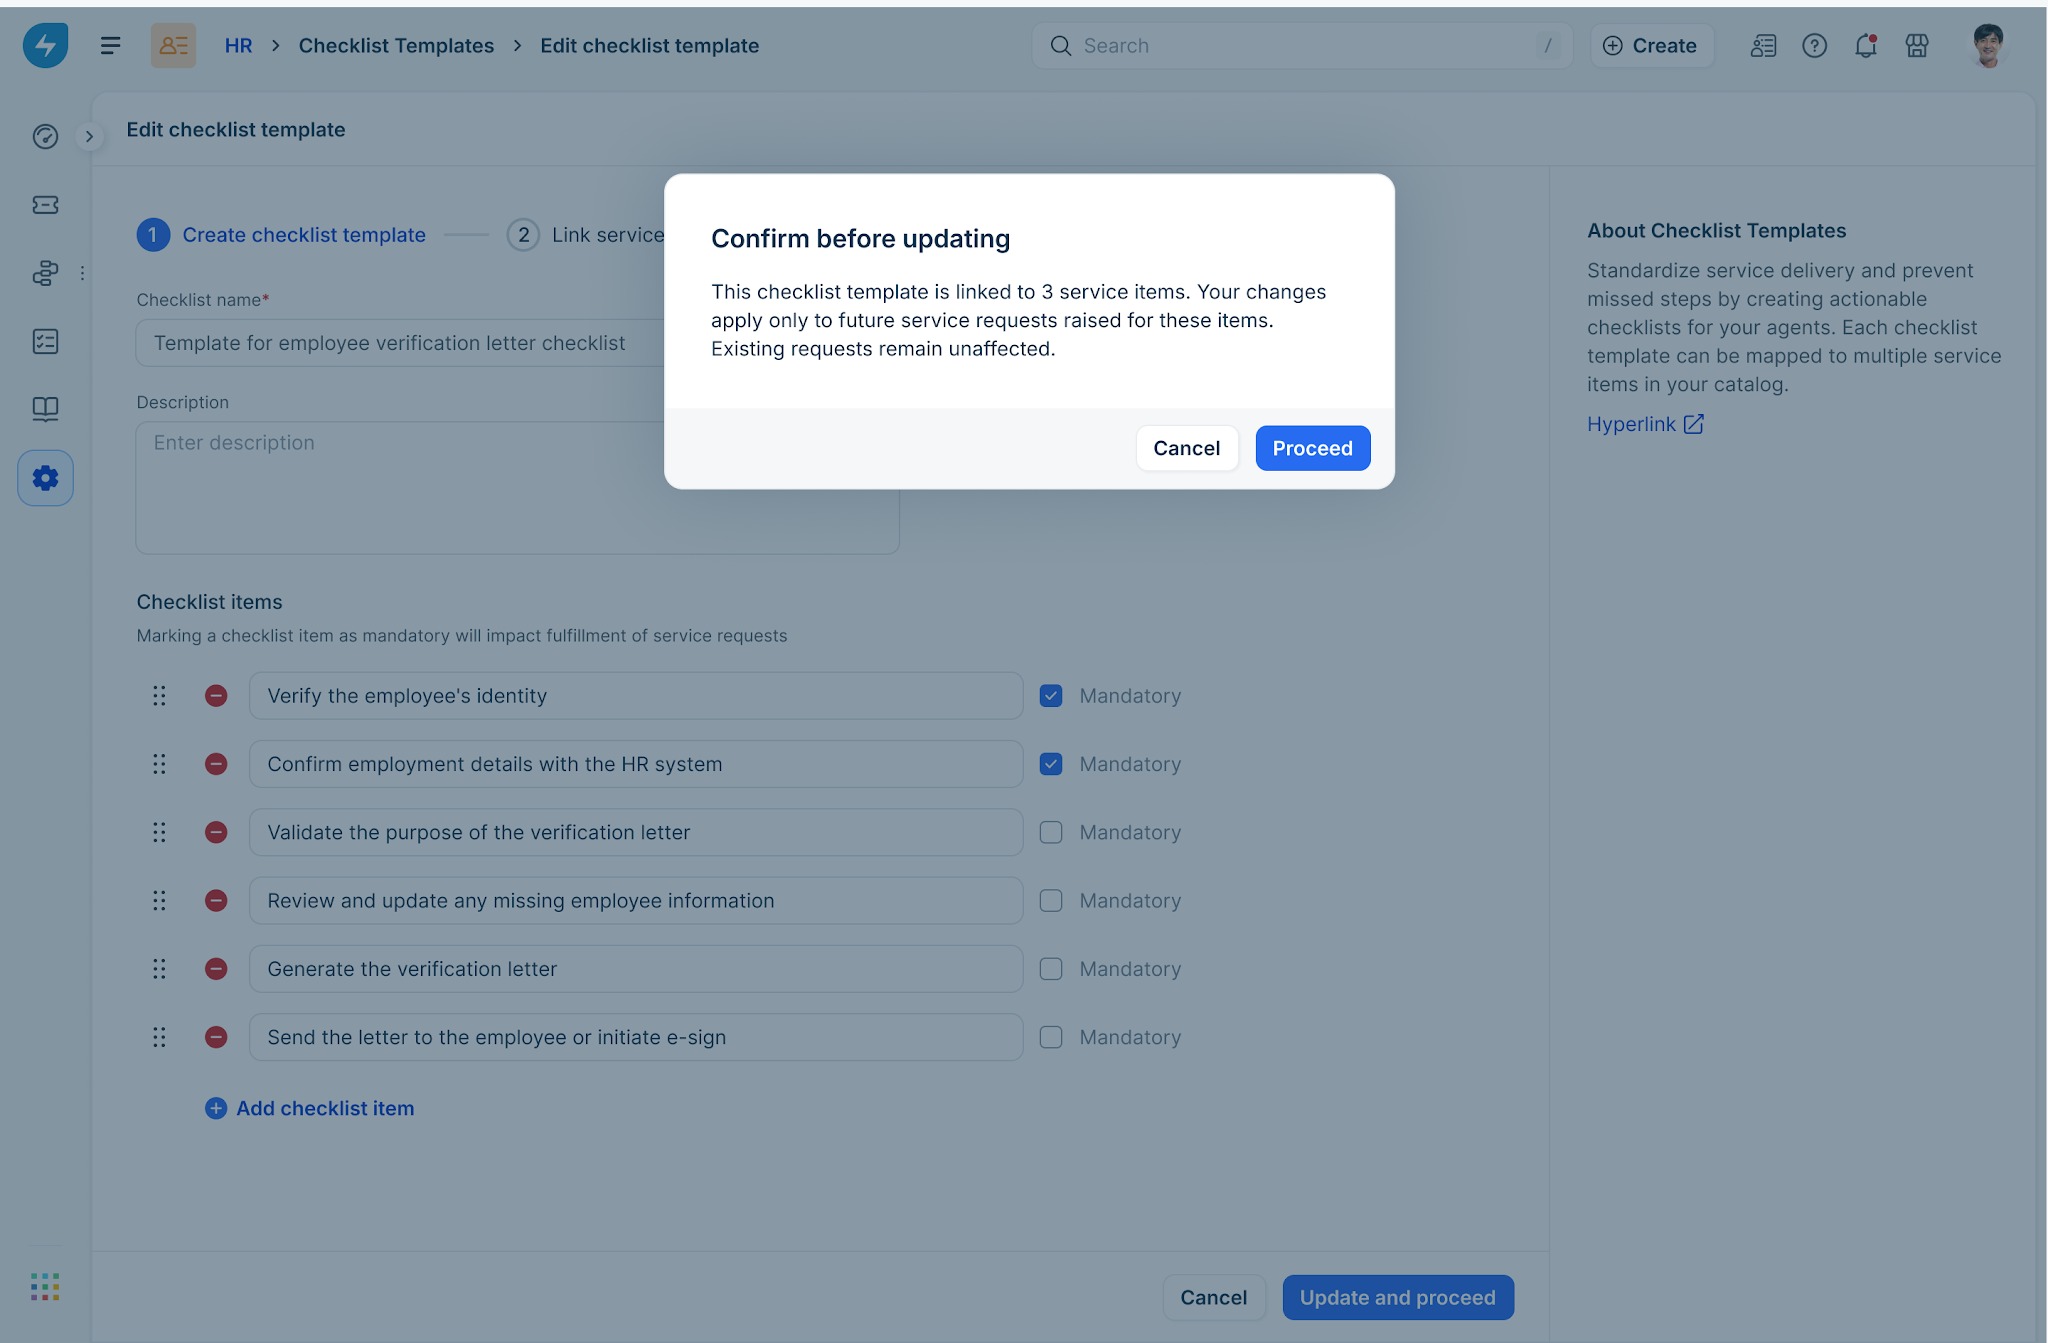
Changes apply only to future service requests. Existing service requests continue to use the version of the checklist that was available when the request was created.
Enable or disable a checklist template
You can temporarily disable a checklist template without deleting it. Disabled templates are not applied to new service requests, while existing service requests remain unaffected.
To enable or disable a checklist template, follow these steps:
Go to Admin > Workspace settings > Checklist Templates.
Turn the toggle next to the required template on or off. When you disable a template, a confirmation dialog displays the number of linked service items and explains the impact of the action.
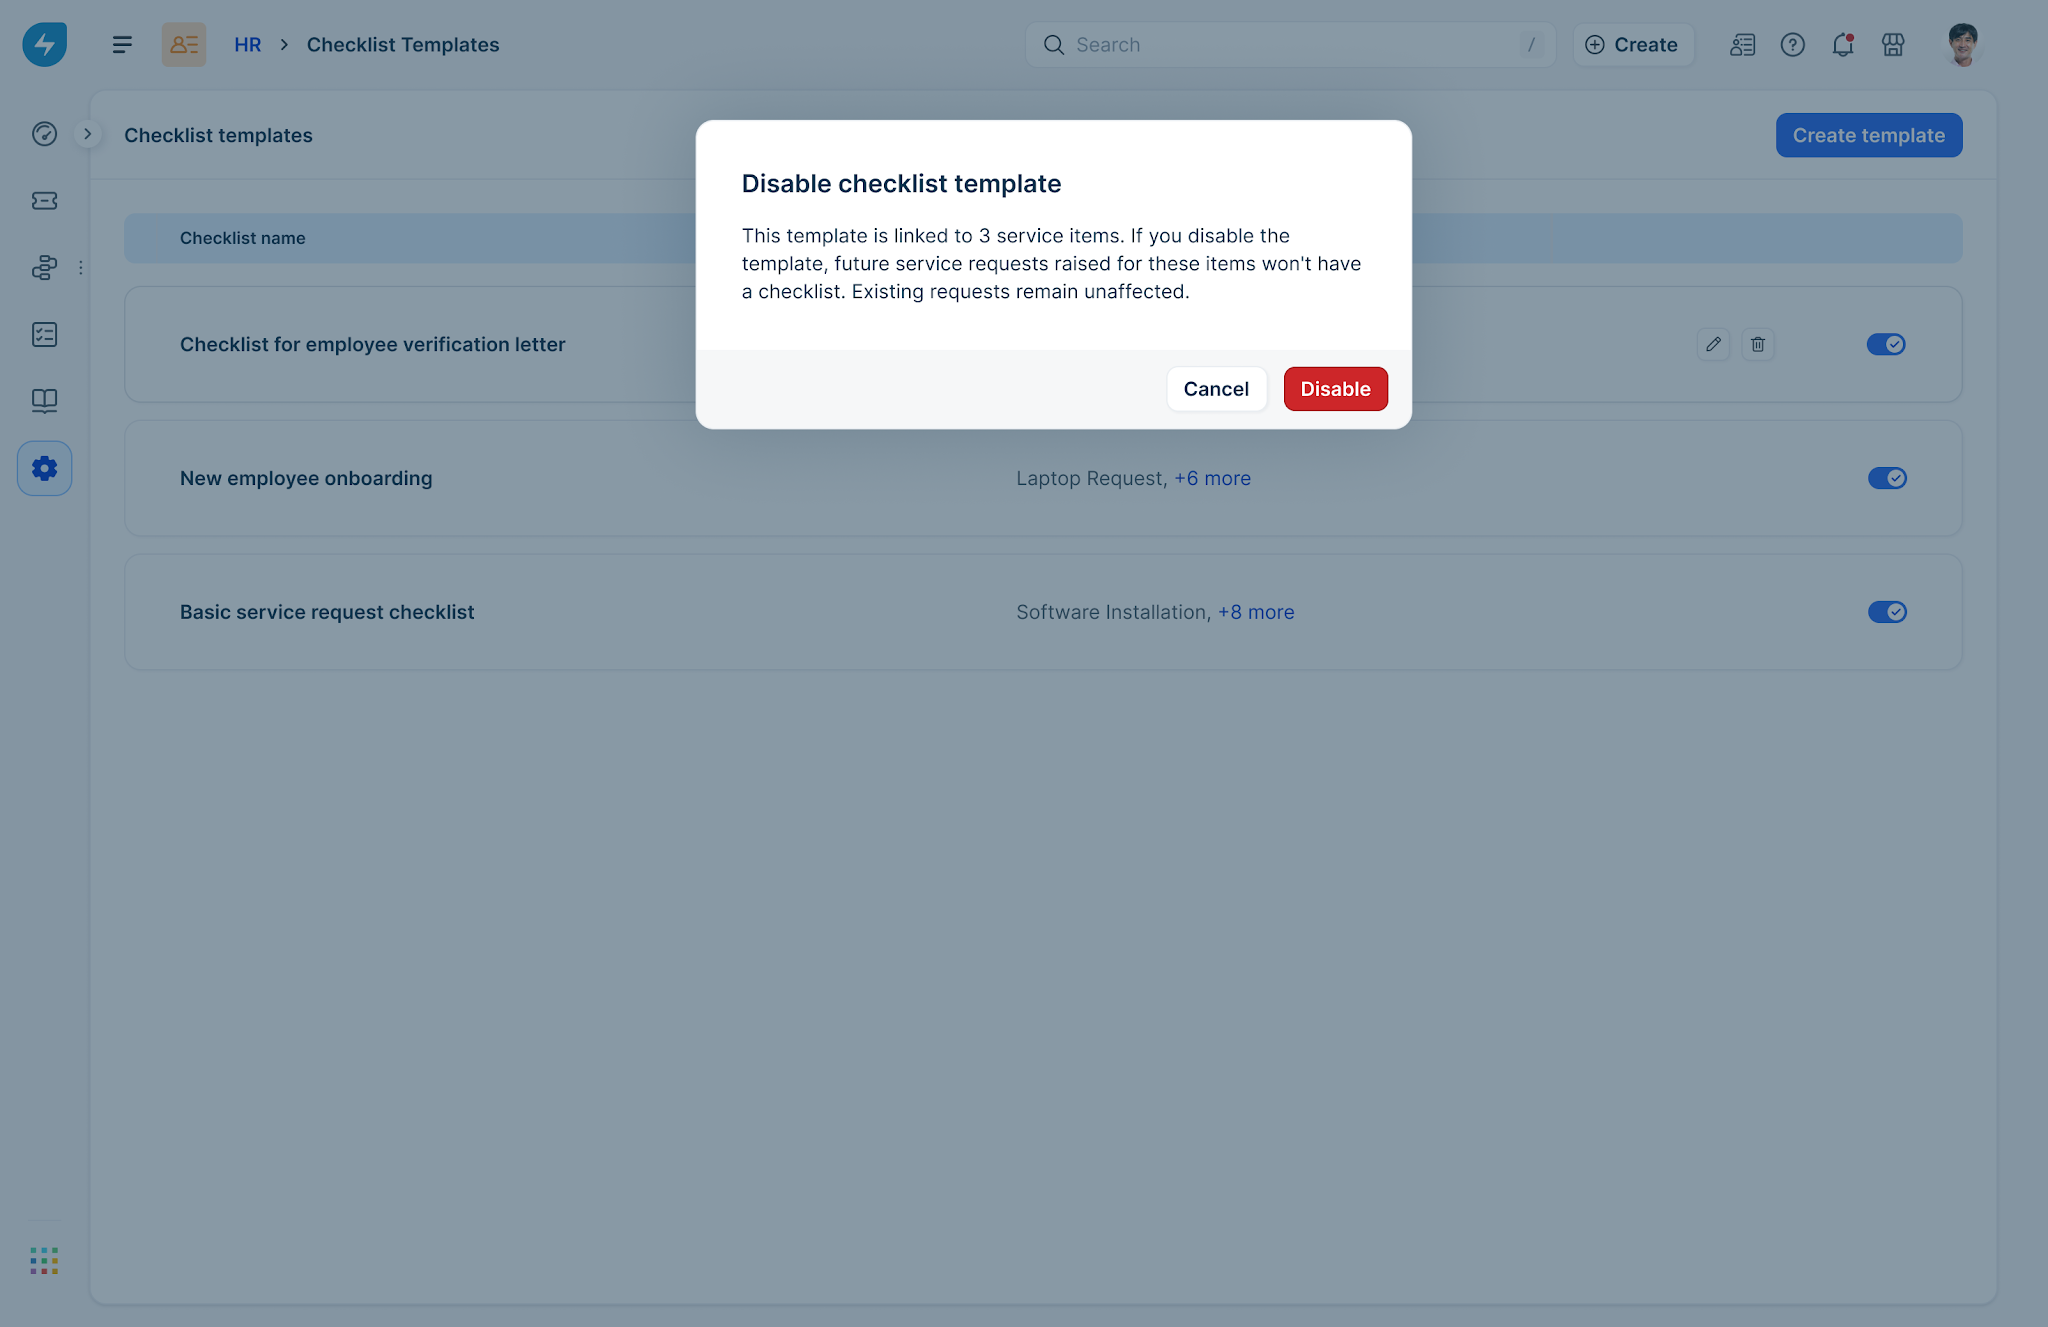
Click Disable to confirm.
To make the template available again, turn the toggle back on. When a template is re-enabled, the service item associations are automatically restored.
Delete a checklist template
Delete a checklist template only if it is no longer required.
To delete a checklist template, follow these steps:
Go to Admin > Workspace settings > Checklist Templates.
Click the Delete icon next to the required template.
Review the number of linked service items displayed in the confirmation dialog. Deleting a checklist template removes it from future service requests. Existing service requests continue to use the checklist that was associated with the request when it was created.
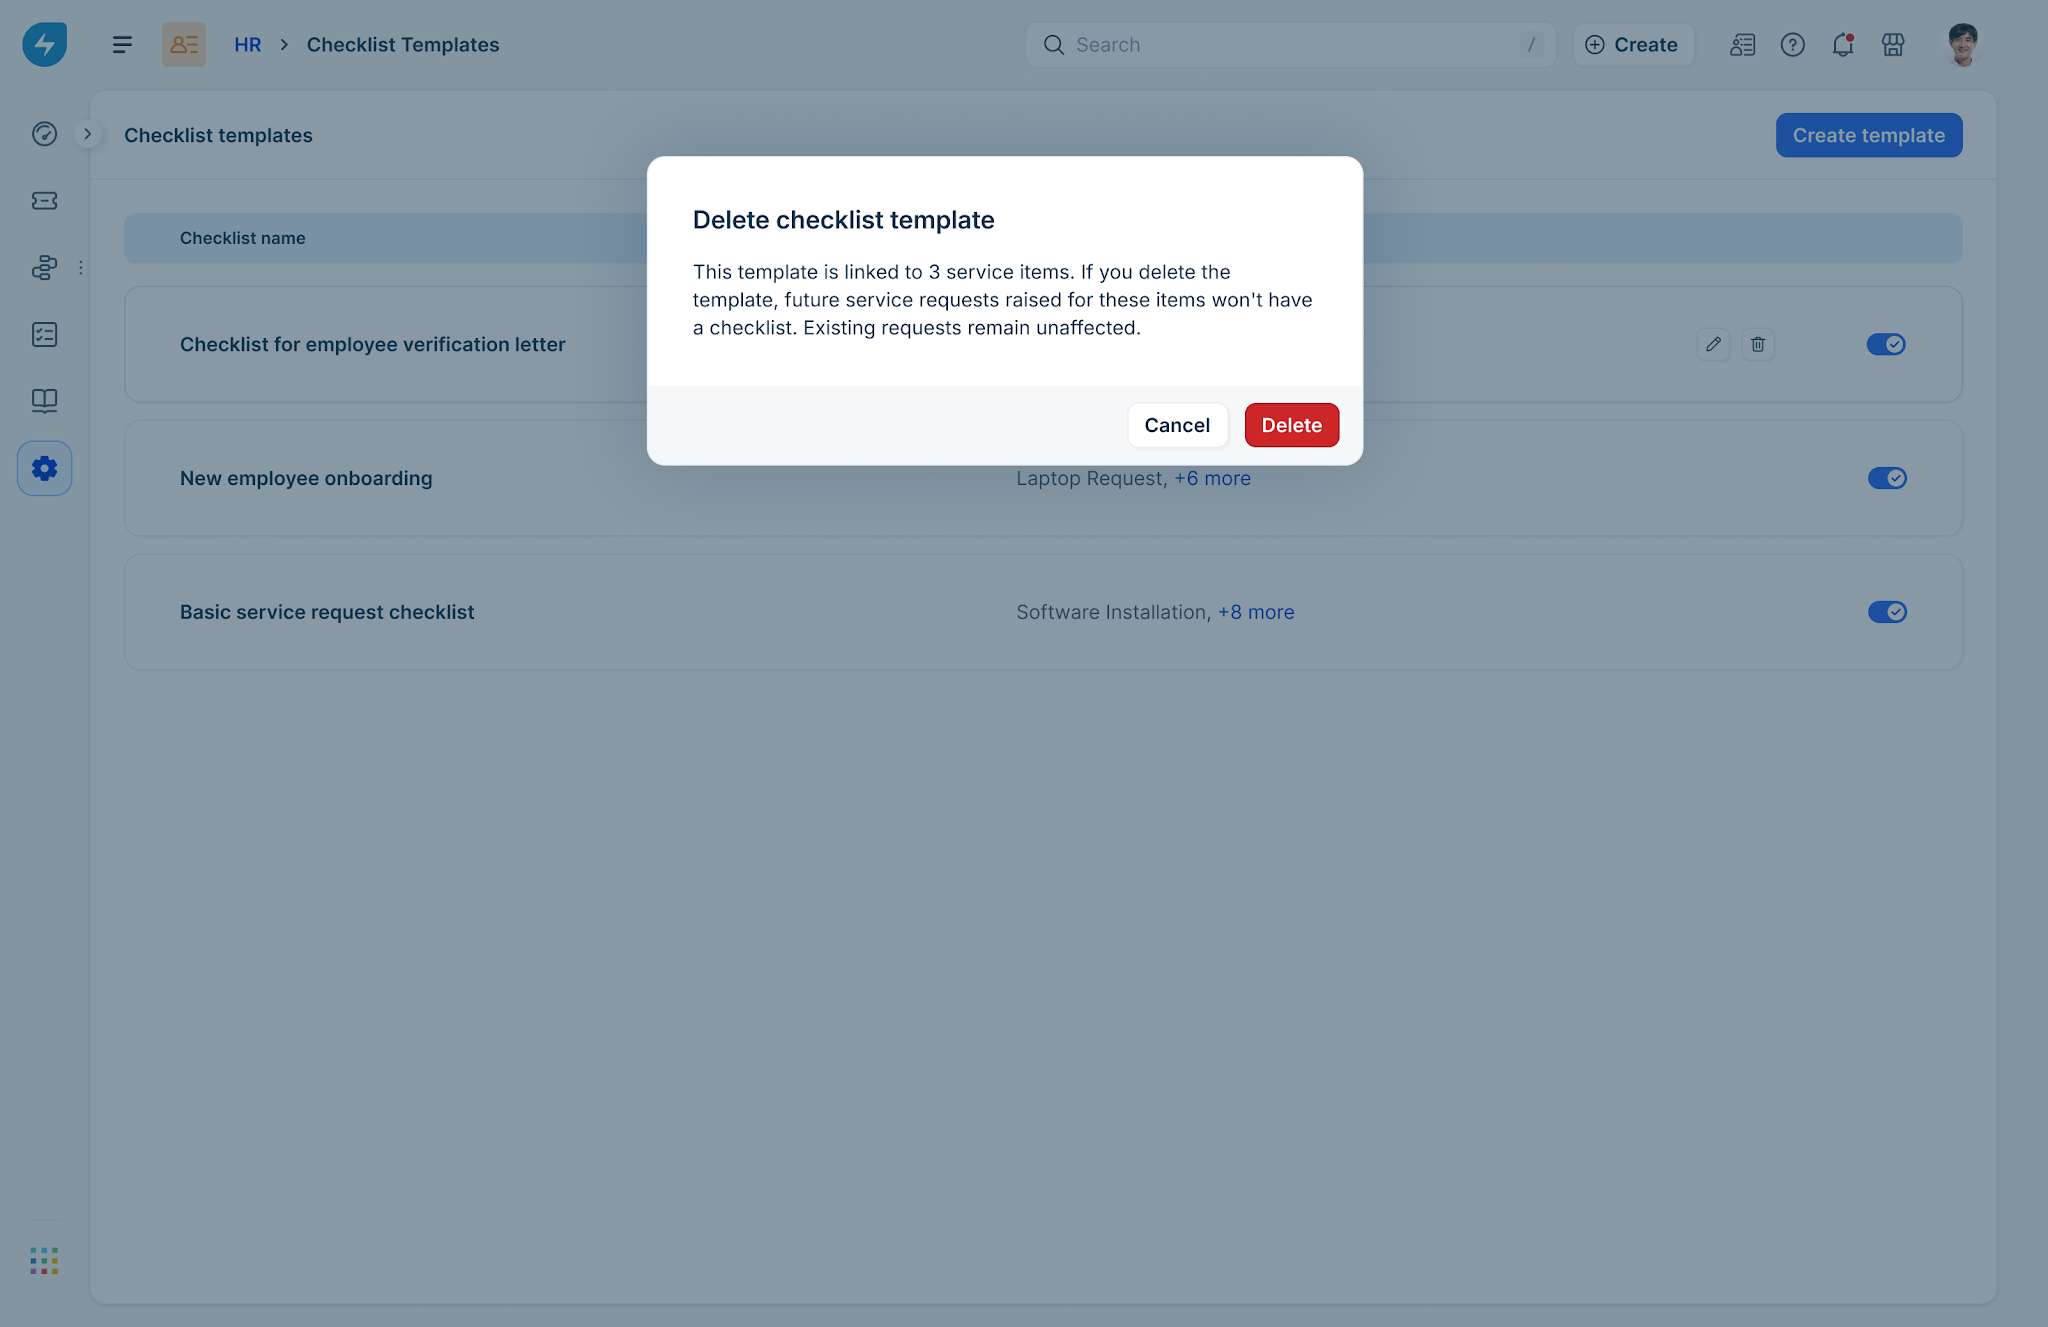
Click Delete to proceed. The deletion is recorded in the workspace audit log.
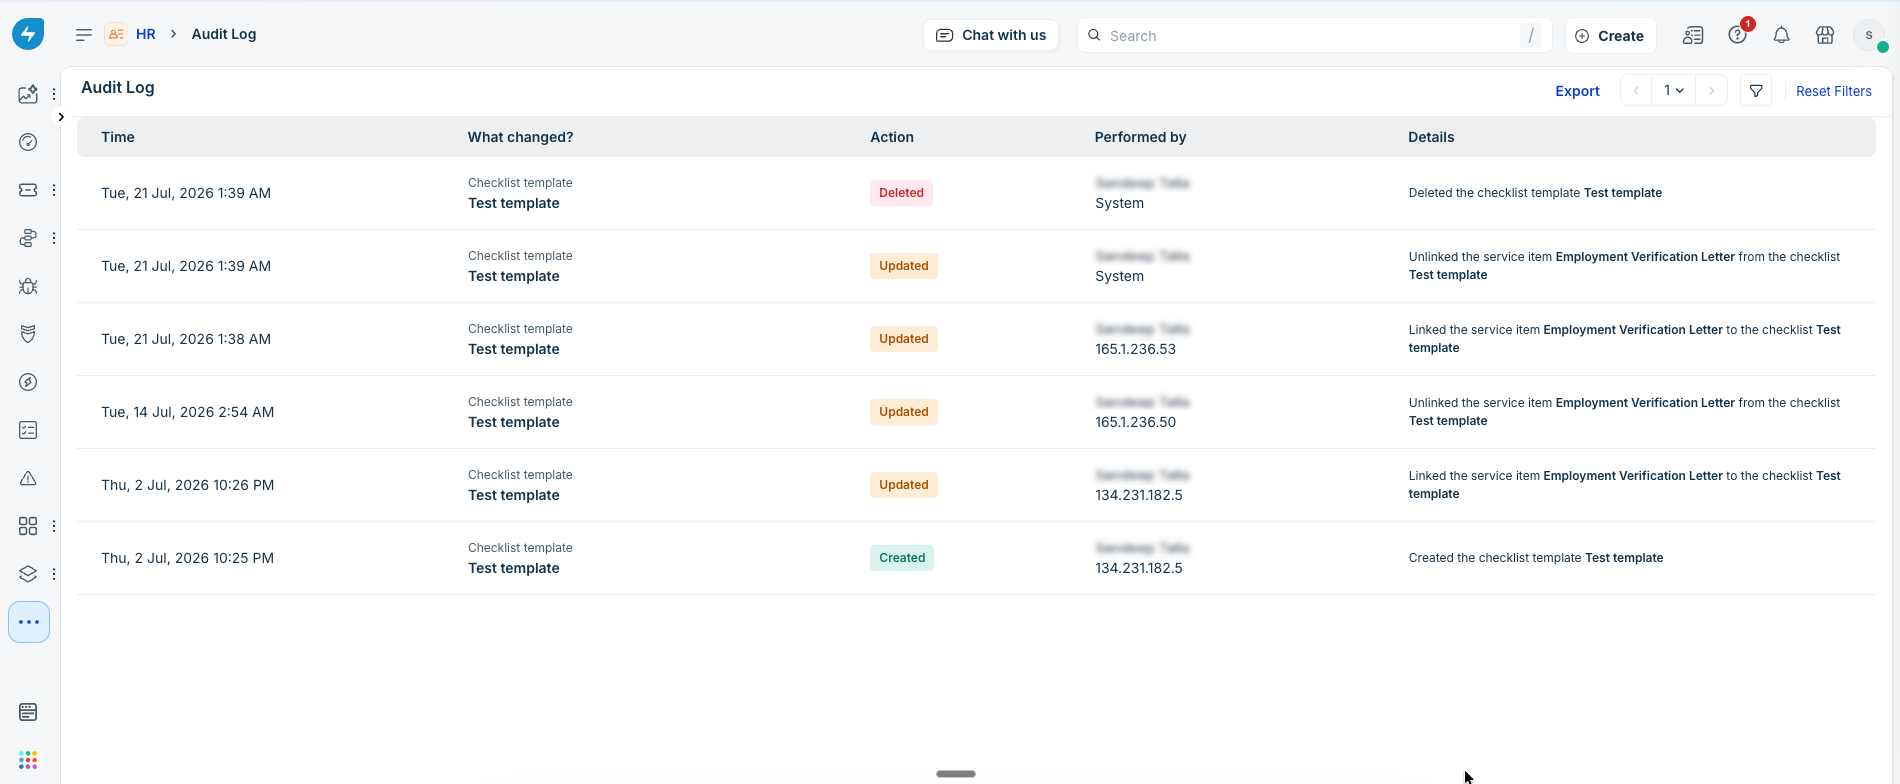
Review the checklist template activity
Freshservice records all activities on checklist templates in the workspace audit log, making it easier to review administrative changes.
The audit log captures the following activities:
Creating checklist templates
Updating checklist templates
Enabling or disabling checklist templates
Deleting checklist templates
Linking or unlinking service items
To review the checklist template activity, follow these steps:
Go to Admin > Workspace settings > Audit log.
Select Filter.
Under What changed?, select Checklist template to view all changes made to the checklist templates.
Each audit log entry displays the date and time of the activity, the administrator who performed the action, the action that was performed, and the affected checklist template.
Link a checklist template to a service item
A checklist template is applied to a service request only after it is linked to a service catalog item. You can link a checklist template directly or configure conditions to apply different checklists based on requester attributes.
To link a checklist template from a service item, follow these steps:
Open the required service item from the Service Catalog.
Open the Checklist tab.
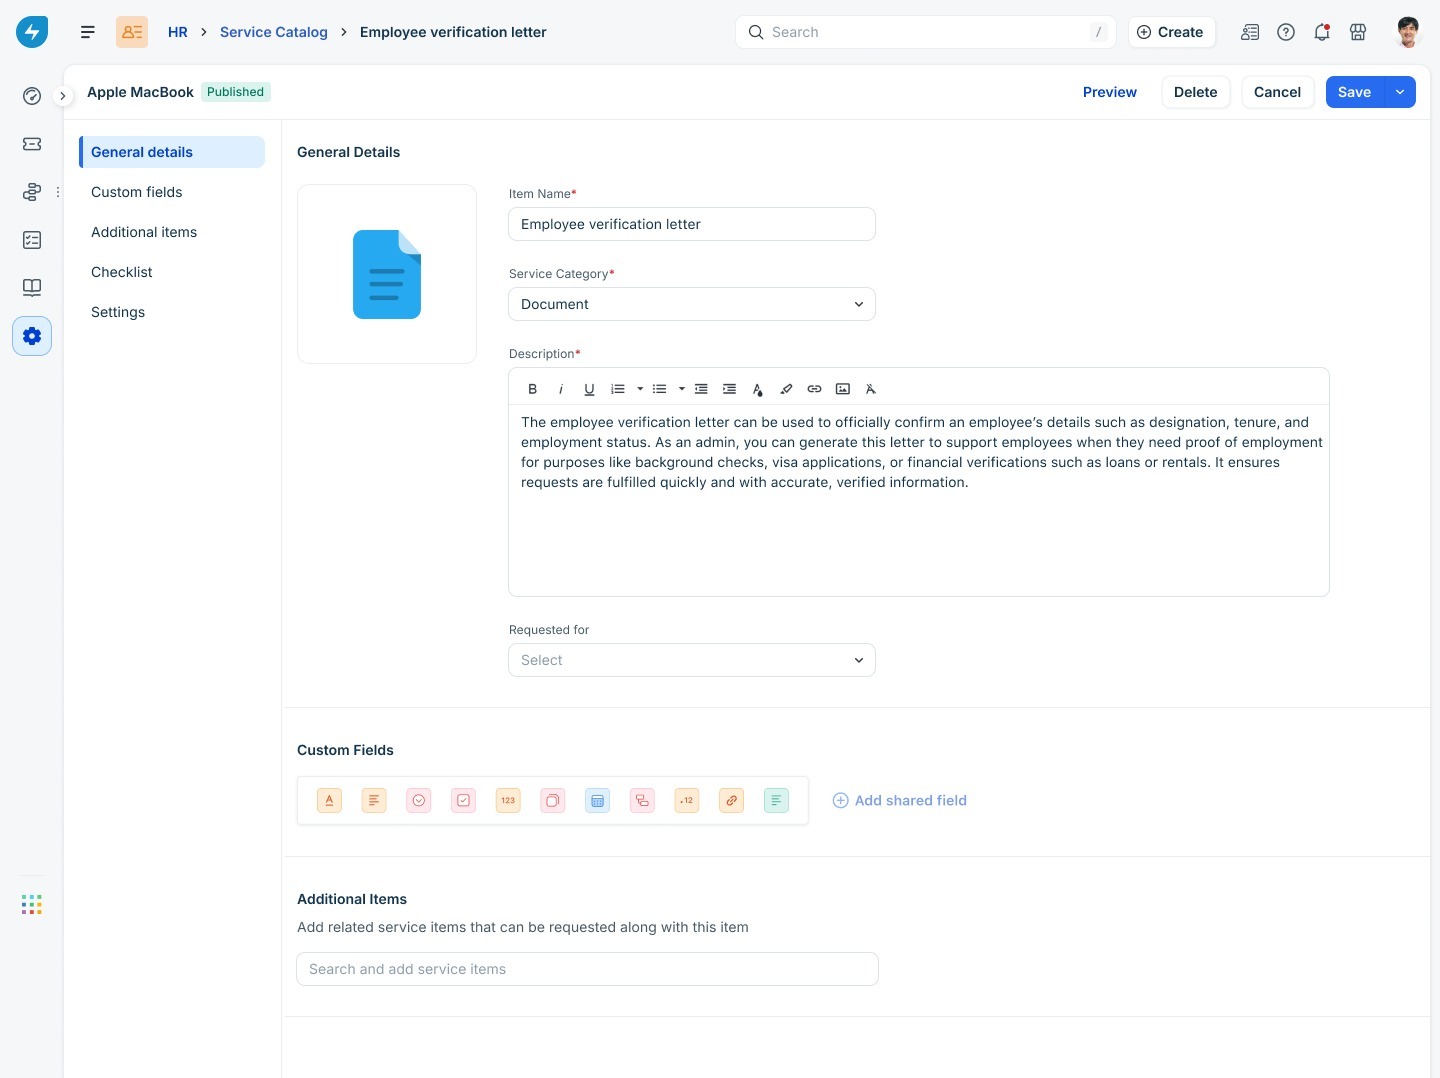
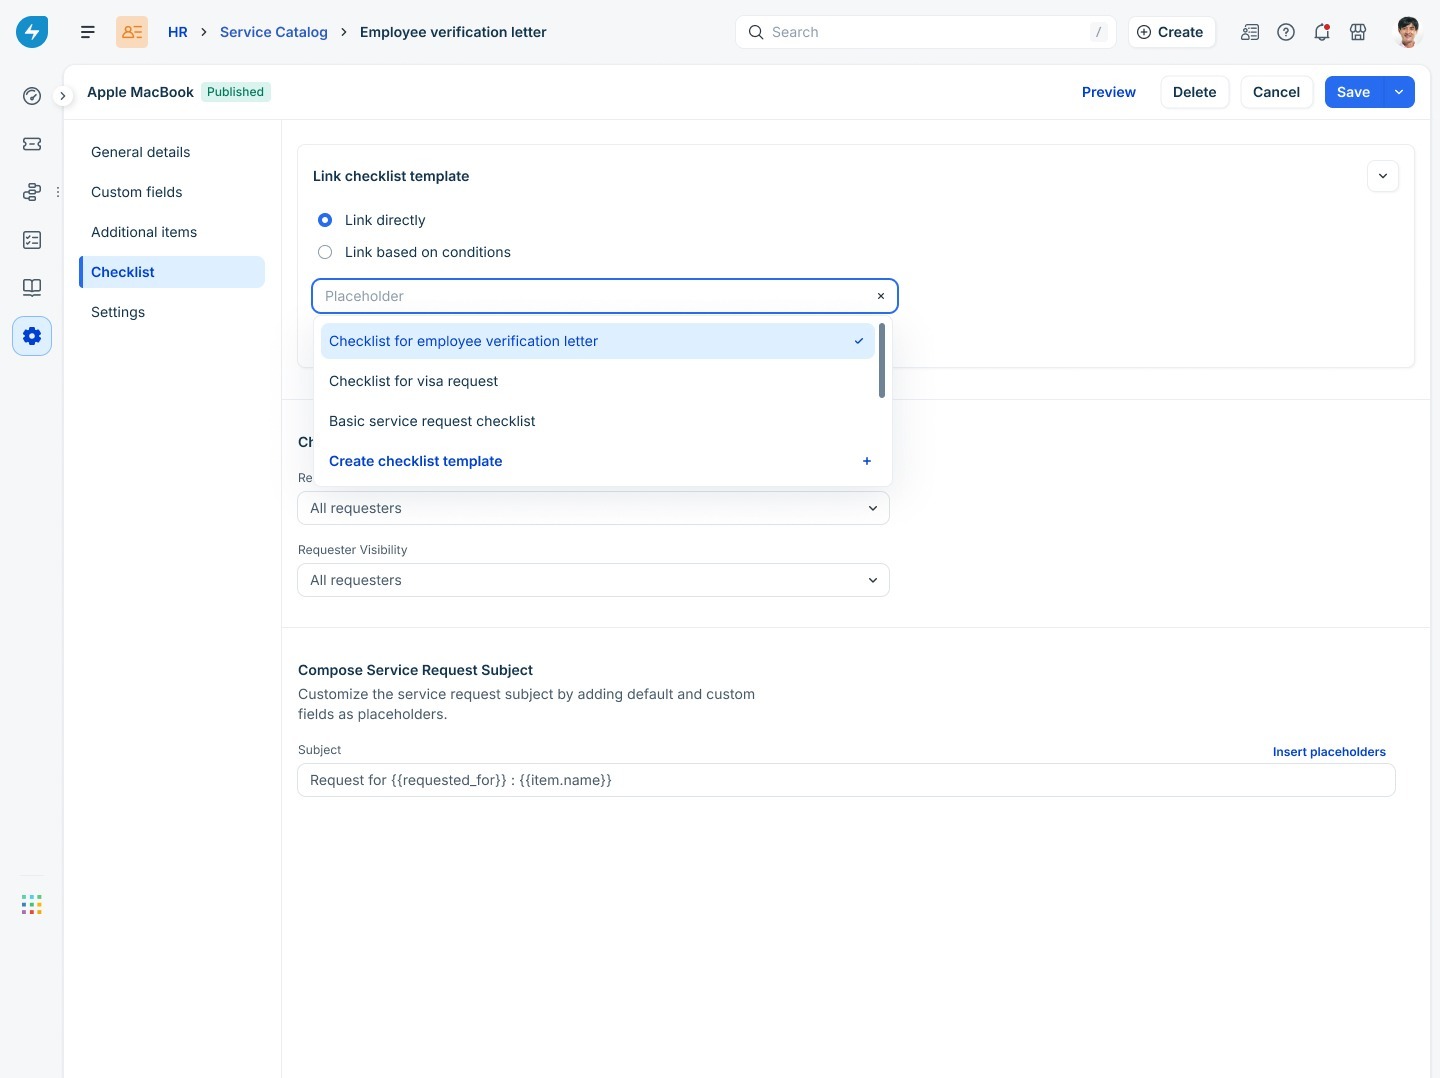
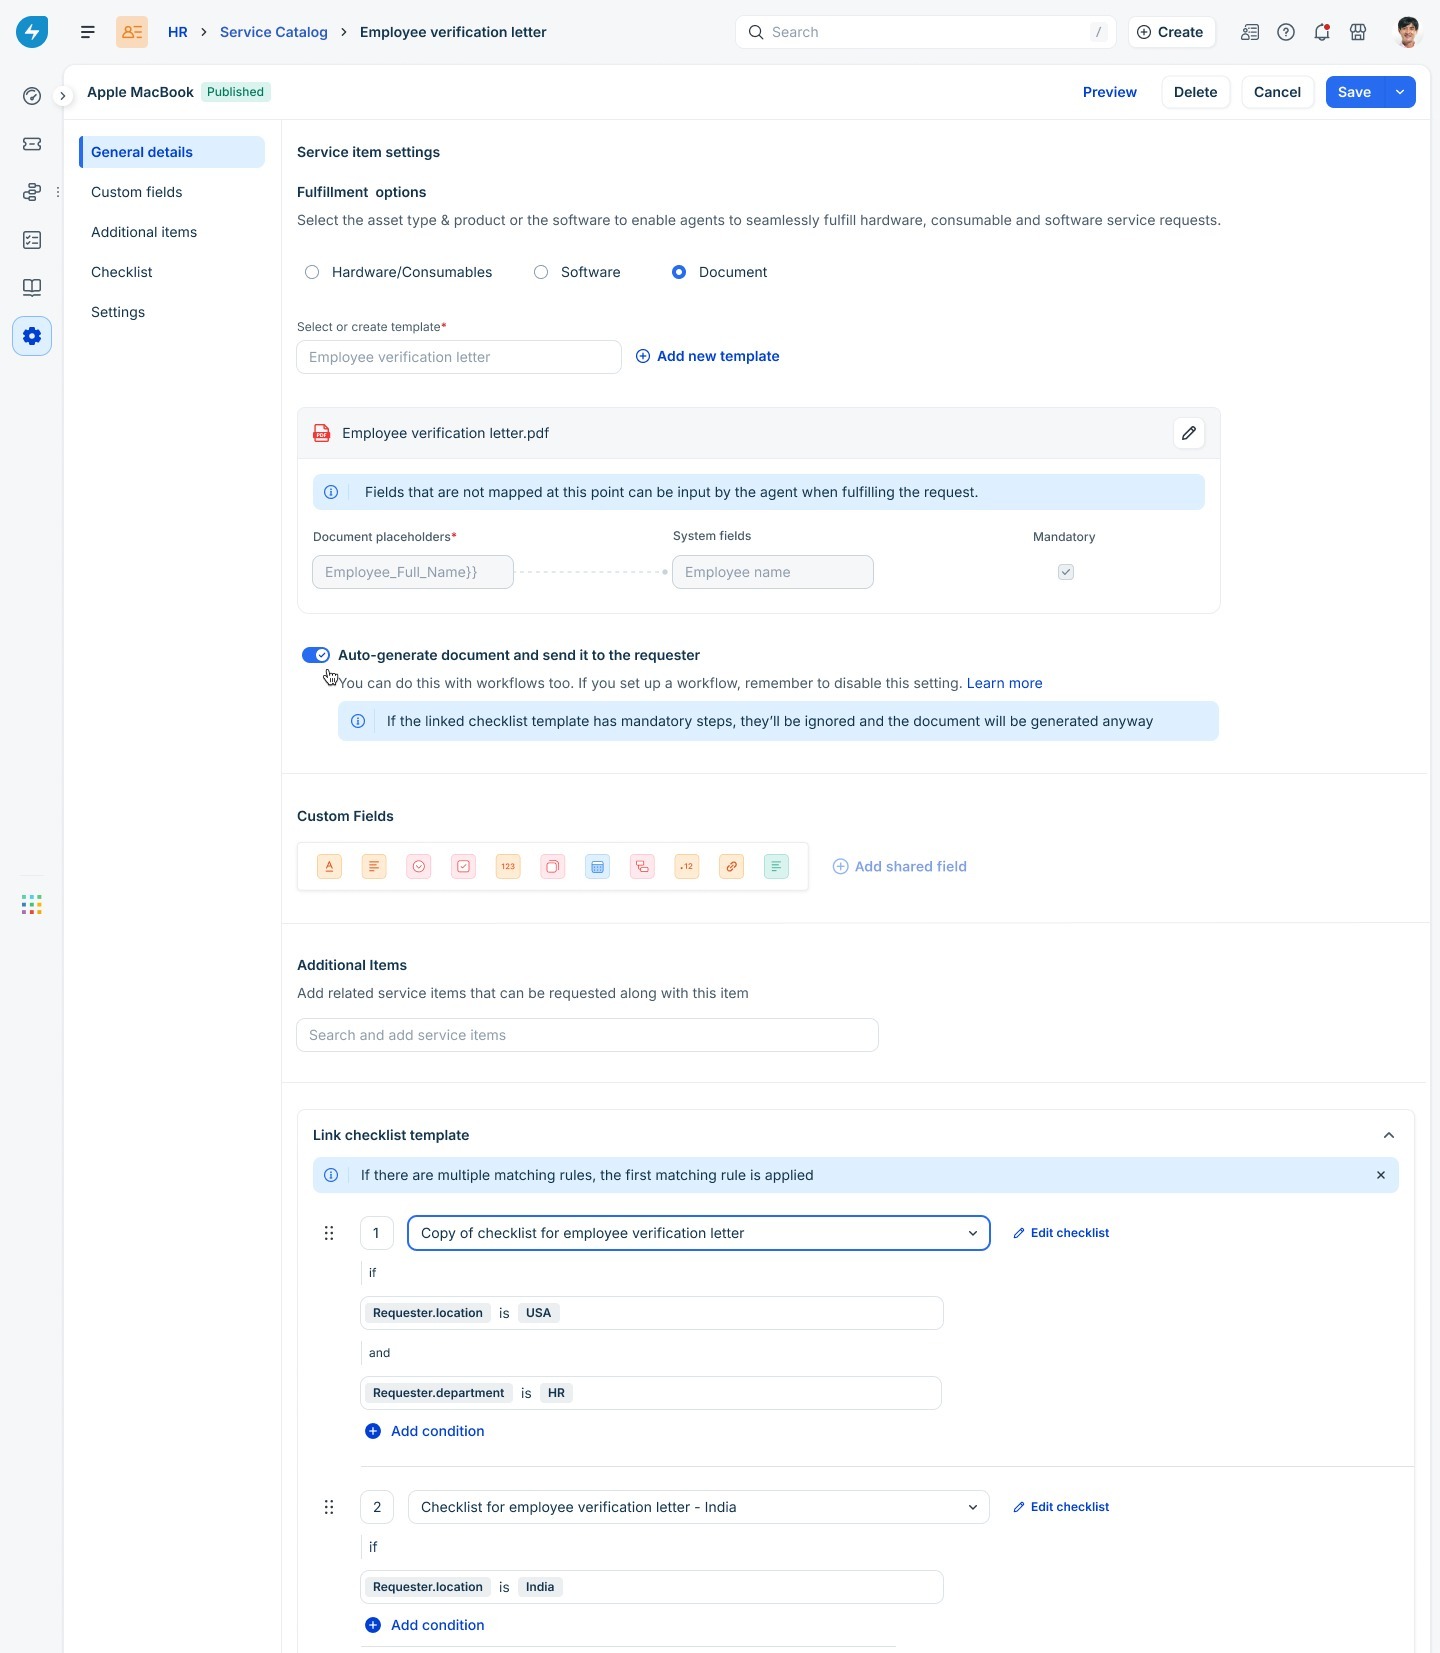
Under Link checklist template, select one of the following options:
Link directly: Associates a single checklist template with the service item. Every request raised for the service item uses the same checklist.
Link based on conditions: Associates different checklist templates based on the ‘requester’ or ‘requested for’ attributes, such as location or department. The first matching rule is applied.
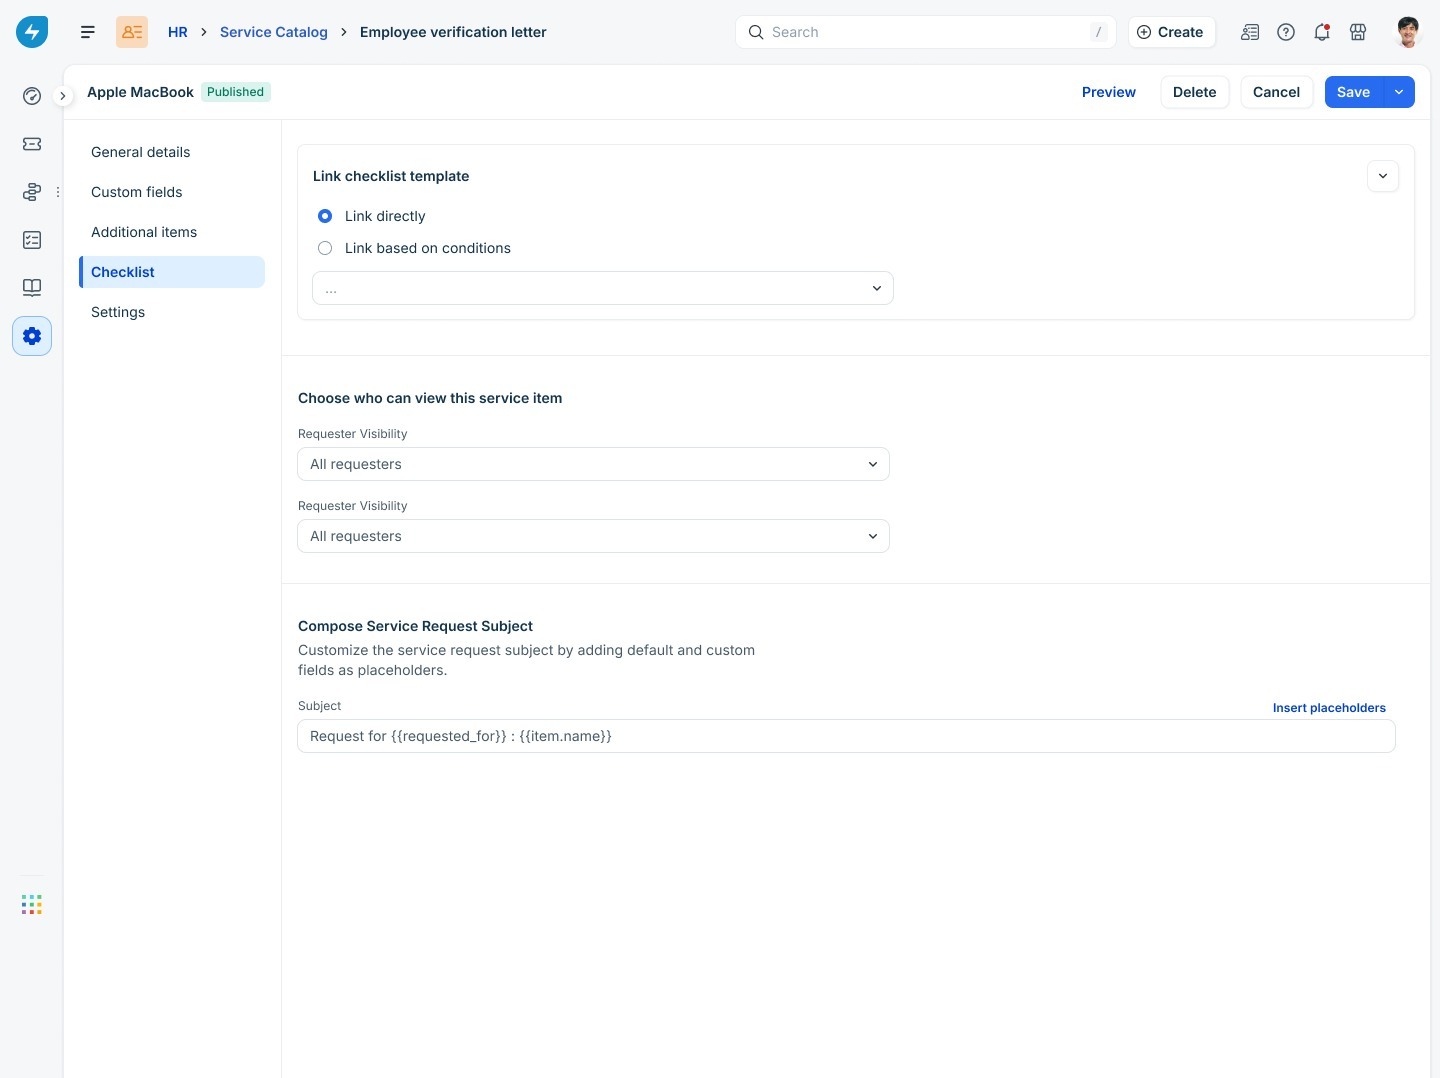
Link a checklist template directly
Select Link directly so that every request for the service item uses the same checklist.
Select Link directly.
Choose an existing checklist template from the list. Alternatively, click Create checklist template to create a new template without leaving the service item.
Click Save.
Link a checklist template based on conditions
Select Link based on conditions when different request scenarios require different fulfillment procedures.
To configure conditional checklist templates, follow these steps:
Select Link based on conditions.
Select the checklist template to apply.
Add one or more ‘requester’ or ‘requested for’ conditions, such as Requester location or Requester department.
Choose whether the conditions should match All or Any.
Click Link another checklist to add additional rules, if required.
Click Save.
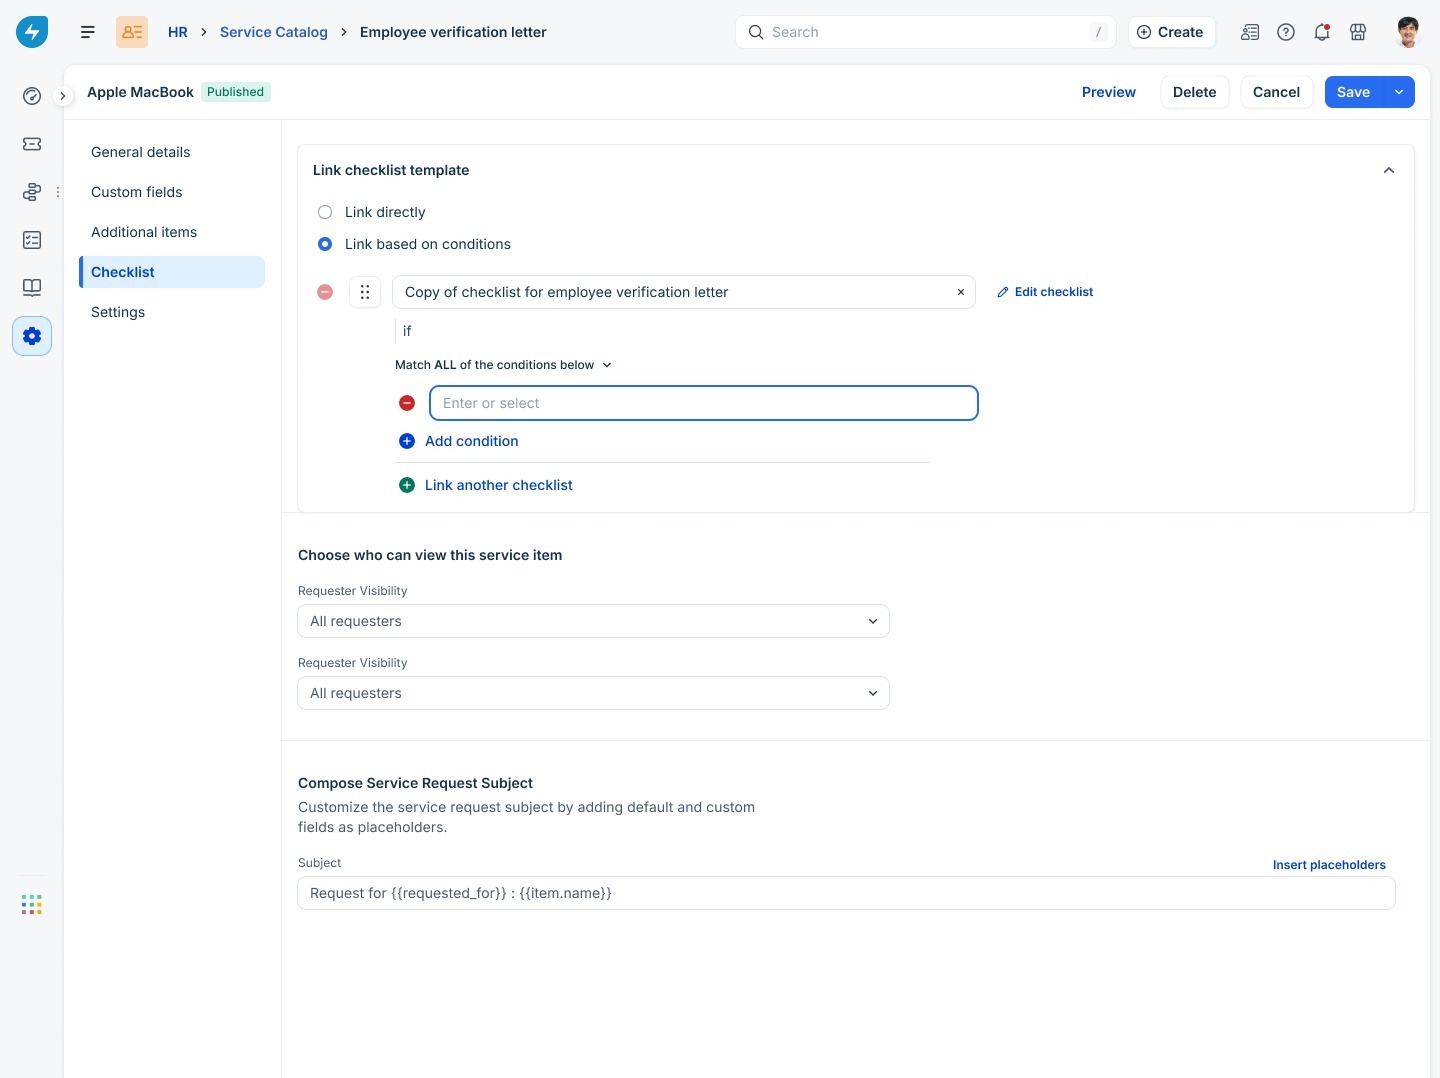
Rules are evaluated from top to bottom. When a rule matches, the corresponding checklist template is applied, and the remaining rules are ignored. If no rule matches, the service request is created without a checklist.
Edit a linked checklist template
You can edit a checklist template directly from a service item without opening the Checklist Templates page.
To edit a linked checklist template, follow these steps:
Open the required service item.
Open the Checklist tab.
Click Edit checklist next to the linked template.
Update the checklist as required.
Click Save.
In the dialog, choose one of the following options:
Update template: Updates the existing checklist template. All linked service items use the updated version for future service requests.
Save as new: Creates a new checklist template and links it only to the current service item. The original template remains unchanged.
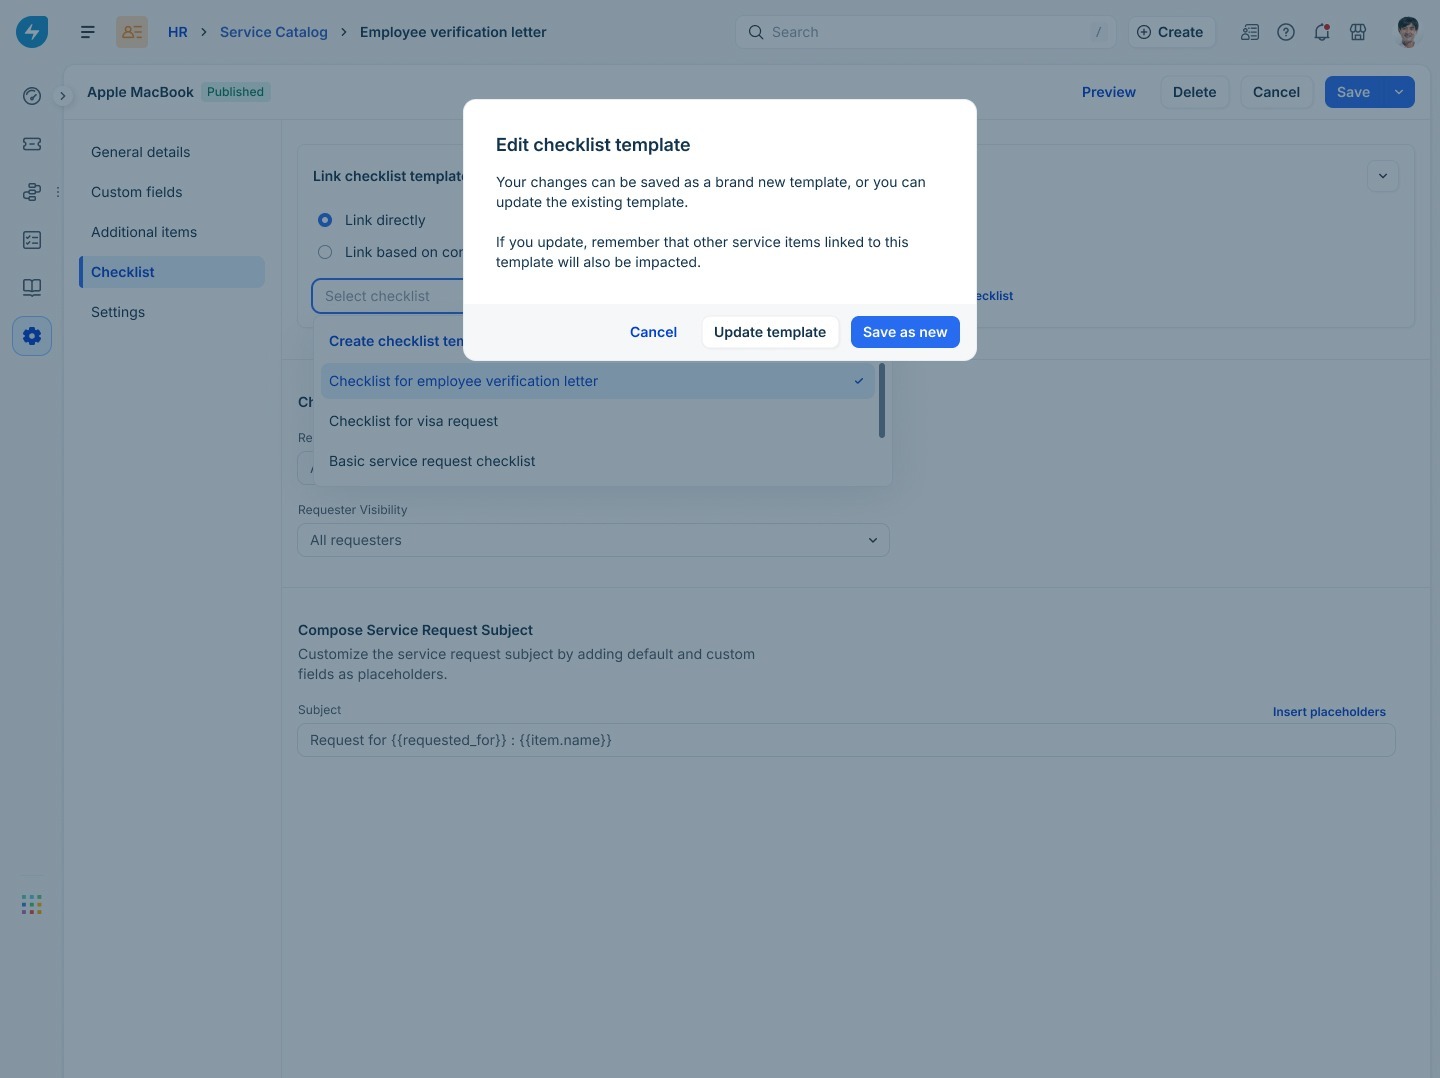
Use Save as new when the changes are specific to the current service item and should not affect other service items that use the same checklist template.
Use checklists with document service items
For document service items, such as employee verification letters, the checklist controls when the document can be generated.
If the linked checklist contains mandatory items, agents must complete those items before Generate and send for e-sign becomes available.
If automatic document generation is enabled for the service item, mandatory checklist items are ignored, and the document is generated automatically.
Agent experience
When an agent opens a service request that includes a linked checklist, the checklist appears on the ticket details page. Agents can use it to track completed tasks and monitor the progress of the fulfillment process.
Ensure that agents who work on service items with mandatory checklist items have the 'Complete checklist items' permission.
View a checklist
The checklist is displayed alongside the requested service item and provides a quick overview of its progress.
Agents can view the following information:
The checklist name.
A progress bar showing the completion status.
The number of completed checklist items.
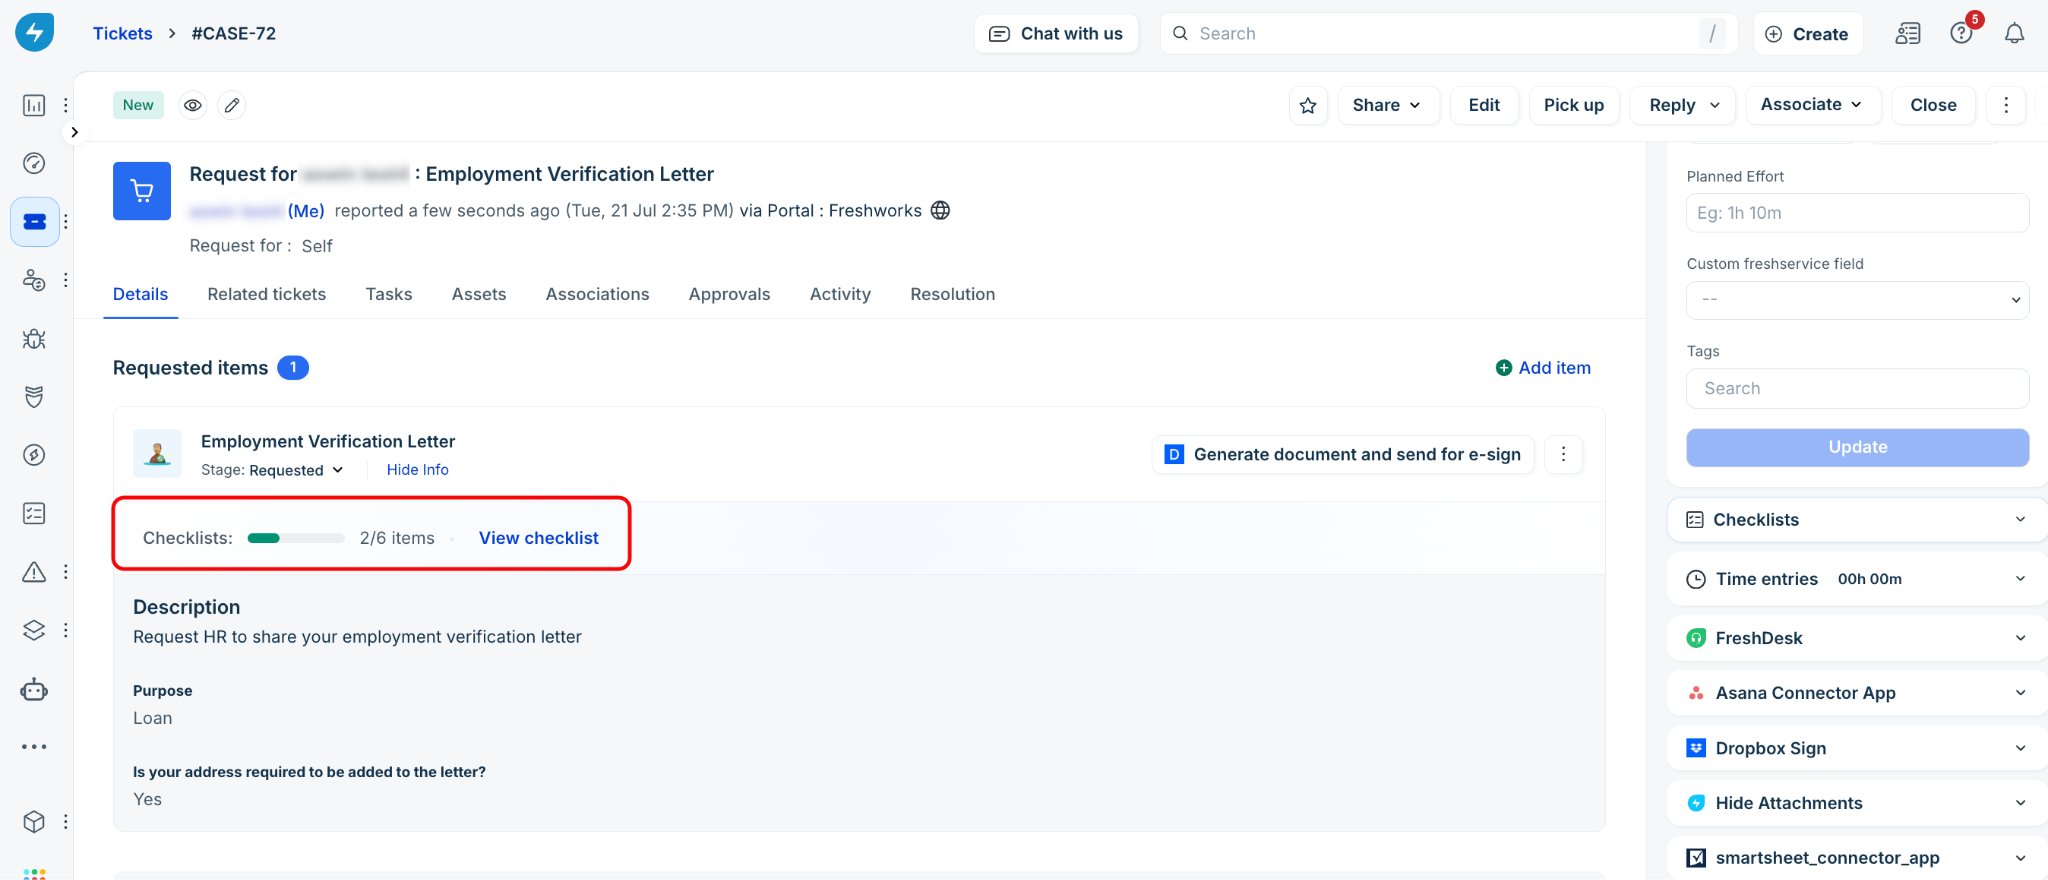
To view all checklist items, click View checklist.
The complete checklist opens in the right-side panel below the ticket properties.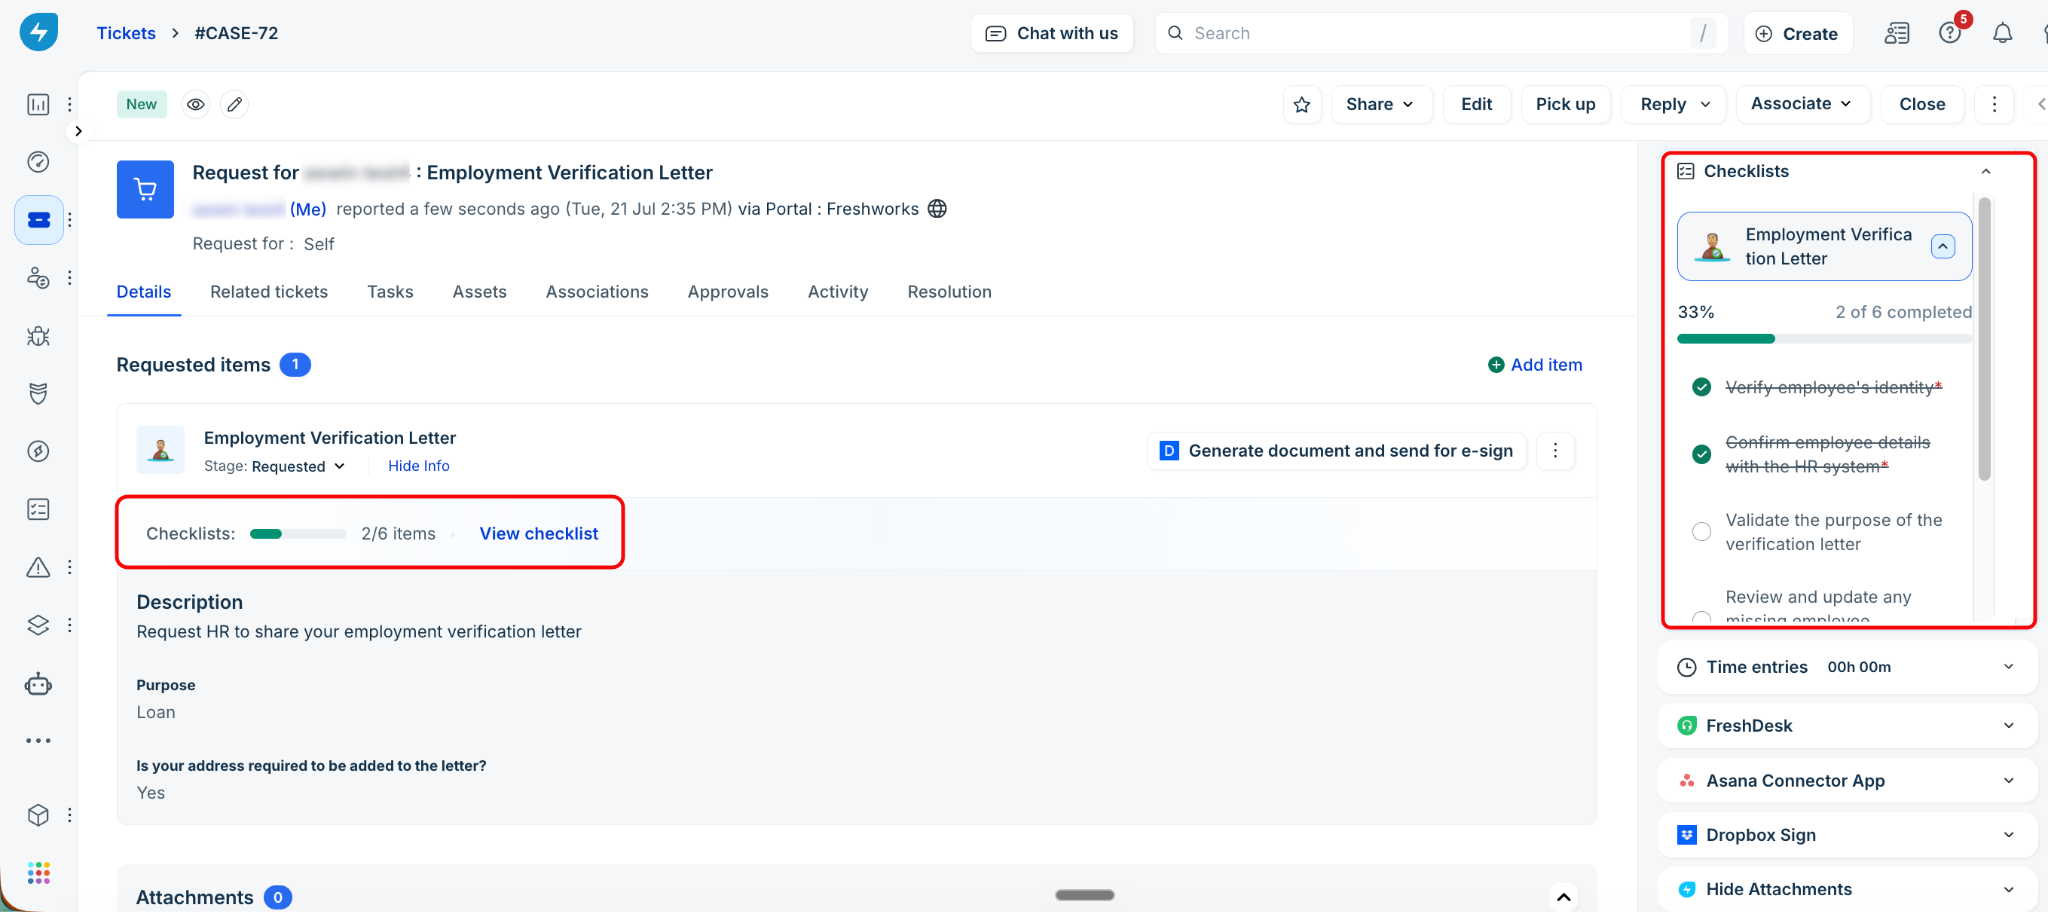
Each checklist item includes:
A radio button to mark the item as completed.
A red asterisk for mandatory items.
Strikethrough formatting for completed items.
If a ticket contains multiple requested service items with linked checklists, each checklist is displayed separately in the right-side panel.
Update checklist items
As you complete each task, update the checklist to reflect its current status.
To update checklist items, follow these steps:
Open the required service request.
Expand the checklist, if it is not already open.
Select the radio button next to a completed checklist item.
Completed checklist items are displayed with strikethrough formatting, and the progress bar is updated automatically.
To mark an item as incomplete, clear its radio button.
Agents with the Complete checklist items permission can mark checklist items as complete.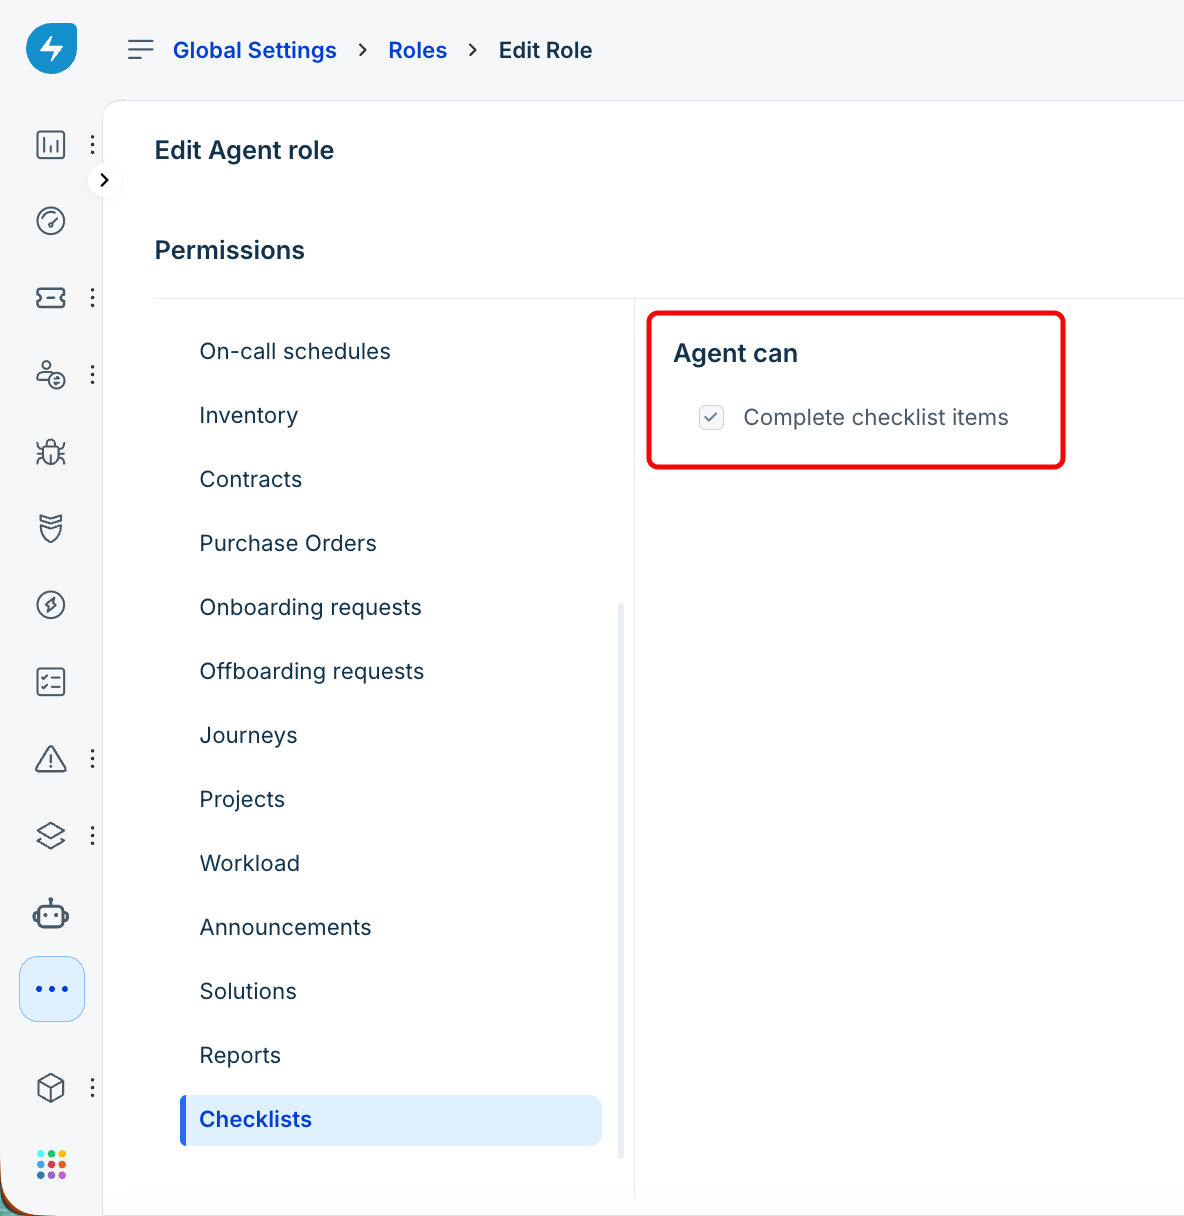
Any agent with permission to update the ticket can mark checklist items as completed. If an agent has permission to update a ticket but does not have the 'Complete checklist items' permission, the checklist is displayed as read-only. The agent cannot mark the requested item as complete if it contains mandatory checklist items.Complete mandatory checklist items
Mandatory checklist items help ensure that required tasks are completed before the requested service item is fulfilled.
Mandatory items are identified with a red asterisk.
For standard service items:
All mandatory checklist items must be completed before the requested service item can be closed.
If you attempt to fulfill the service item before completing all mandatory items, an error message is displayed, and the checklist opens automatically.
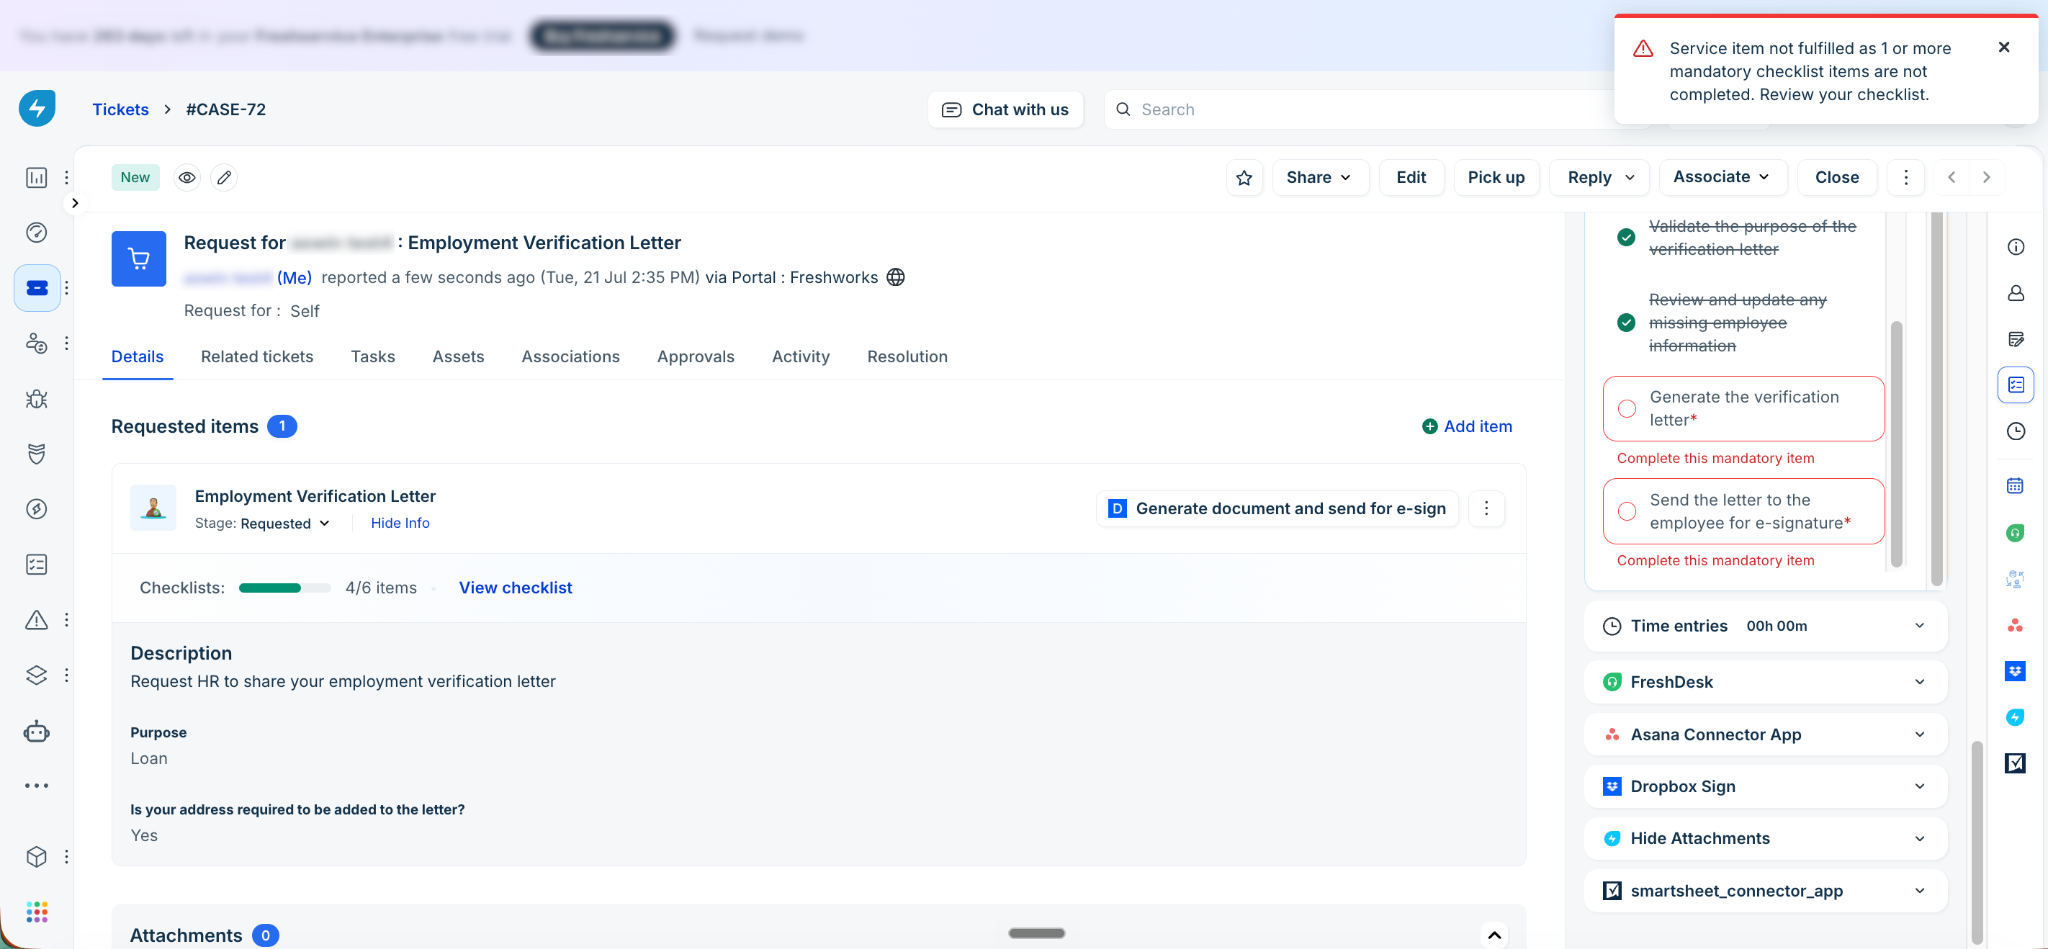
For document service items:
Generate and send for e-sign remains unavailable until all mandatory checklist items are completed.
Optional checklist items do not prevent the service item from being fulfilled.
Review the checklist activity
Freshservice records checklist activity in the Activities tab of the ticket, allowing you to review the progress of the fulfillment process.
The activity log records:
The agent who updated the checklist.
The checklist item that was completed or marked as incomplete.
The date and time of the activity.
Checklist behavior during the ticket lifecycle
Checklist templates remain associated with the ticket throughout its lifecycle.
Note the following behavior:
Agents can mark checklist items as completed or incomplete until the requested service item is fulfilled.
After the requested service item is fulfilled, the checklist becomes read-only.
If the requested service item is moved back to an earlier stage, the completed checklist items are displayed in a disabled state.
Changes made to a checklist template affect only future service requests. Existing service requests continue to use the version of the checklist that was applied when they were created.
Best practices
Consider the following recommendations when implementing Agent Checklists:
Start with high-volume service requests: Configure checklists for frequently requested services where missing steps can lead to delays or rework.
Use mandatory items selectively: Reserve mandatory checklist items for tasks that are essential to completing the service request or meeting compliance requirements.
Write concise checklist items: Use short, action-oriented task names that agents can quickly understand.
Use conditional checklists when processes vary: Create separate checklist templates for different departments, locations, or business scenarios instead of combining multiple workflows into a single checklist.
Test before deploying: Validate checklist templates in a sandbox environment before making them available in production.
Review administrative changes: Periodically review the audit log to verify updates to checklist templates and linked service items.
Communicate process changes: Inform agents when checklist templates are updated so they are aware of changes that apply to future service requests.
Frequently asked questions
The following are answers to common questions about Agent Checklists:
1. Can I associate multiple checklists with a service item?
No. A service item can be associated with only one checklist template at a time. If different request scenarios require different checklists, use Link based on conditions to apply the appropriate checklist.
If a ticket contains multiple requested service items, the Checklists section displays the checklist associated with each requested service item.
2. What happens to existing service requests when I edit or delete a checklist template?
Existing service requests are not affected. Changes apply only to service requests created after the checklist template is updated or deleted.
3. Can agents add checklist items to a service request?
No. Only administrators can create or modify checklist templates. Agents can mark existing checklist items as completed or incomplete.
4. Does completing a checklist close the ticket?
No. Completing a checklist does not close the ticket. Checklists control whether the requested service item can be fulfilled, not whether the ticket can be closed.
5. Can I reorder checklist items after creating a template?
Yes. You can reorder checklist items by editing the checklist template. The new order applies to future service requests only.
6. What happens if I link a service item to another checklist template?
The service item is removed from its existing checklist template and associated with the new one. A service item can be linked directly to only one checklist template. To associate different checklist templates with the same service item based on different scenarios, use Link based on conditions when configuring the service item. When a service request is created, the system evaluates the configured conditions and applies the first checklist template whose conditions are met.
7. Are checklist changes recorded for auditing?
Yes. Administrative actions such as creating, updating, enabling, disabling, deleting, and linking checklist templates are recorded in the workspace audit log. Checklist updates performed by agents are recorded in the Activities tab of the corresponding ticket.