TABLE OF CONTENTS
- Overview
- Prerequisites
- Create knowledge base articles
- Manage the knowledge base
- Collaborative editing and article cloning
- Data recovery through Trash
- Frequently asked questions (FAQs)
Overview
The Freshservice Solutions module helps you create knowledge base articles for resolving your service desk tickets. You can create and manage solution articles, folders, or categories at the default level as well as workspace level.
Prerequisites
Ensure you have administrator or agent privileges to set up or access the Solutions module.
Create knowledge base articles
Follow these steps to create knowledge base articles:
Log in to your Freshservice account.
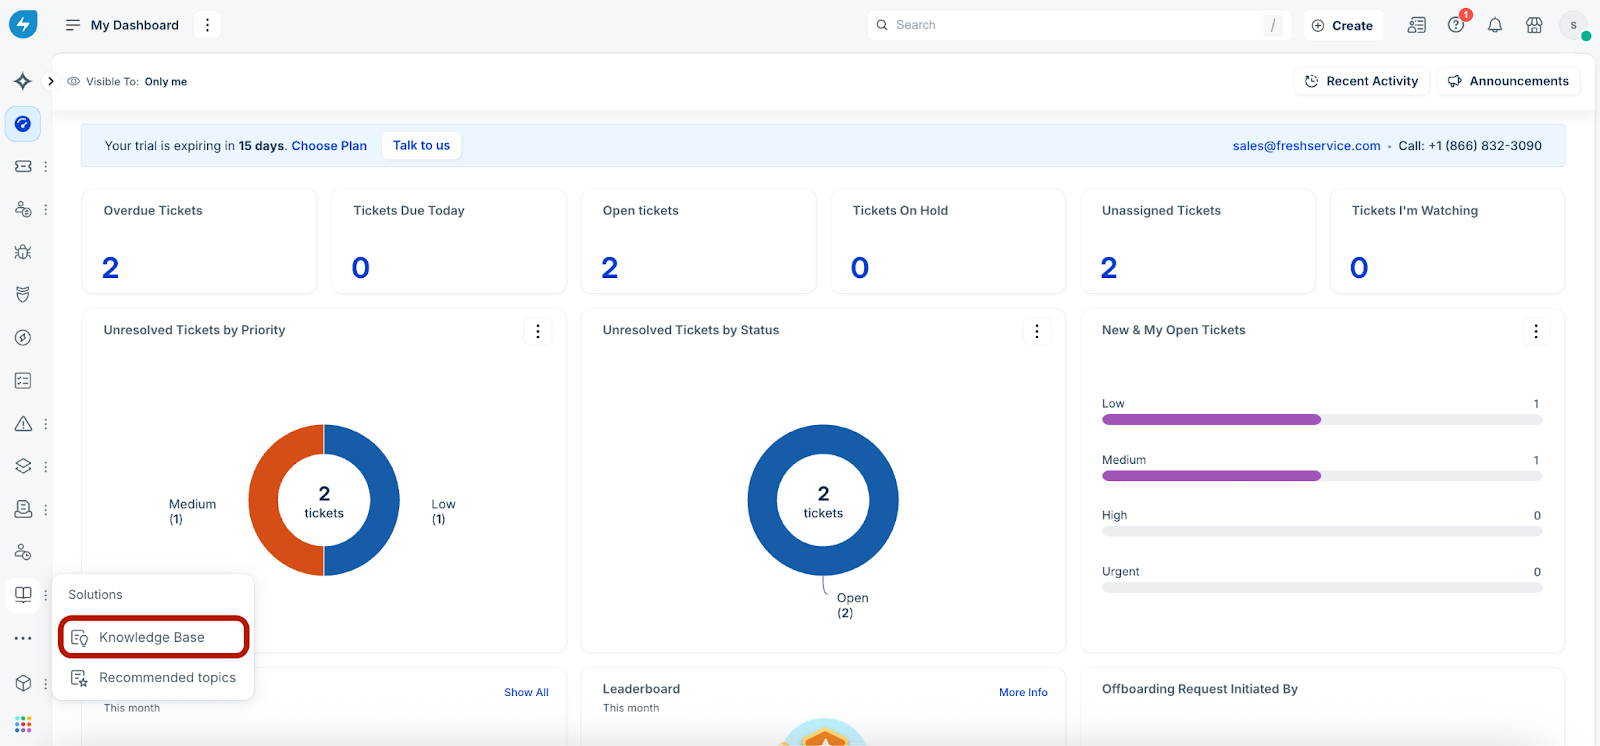
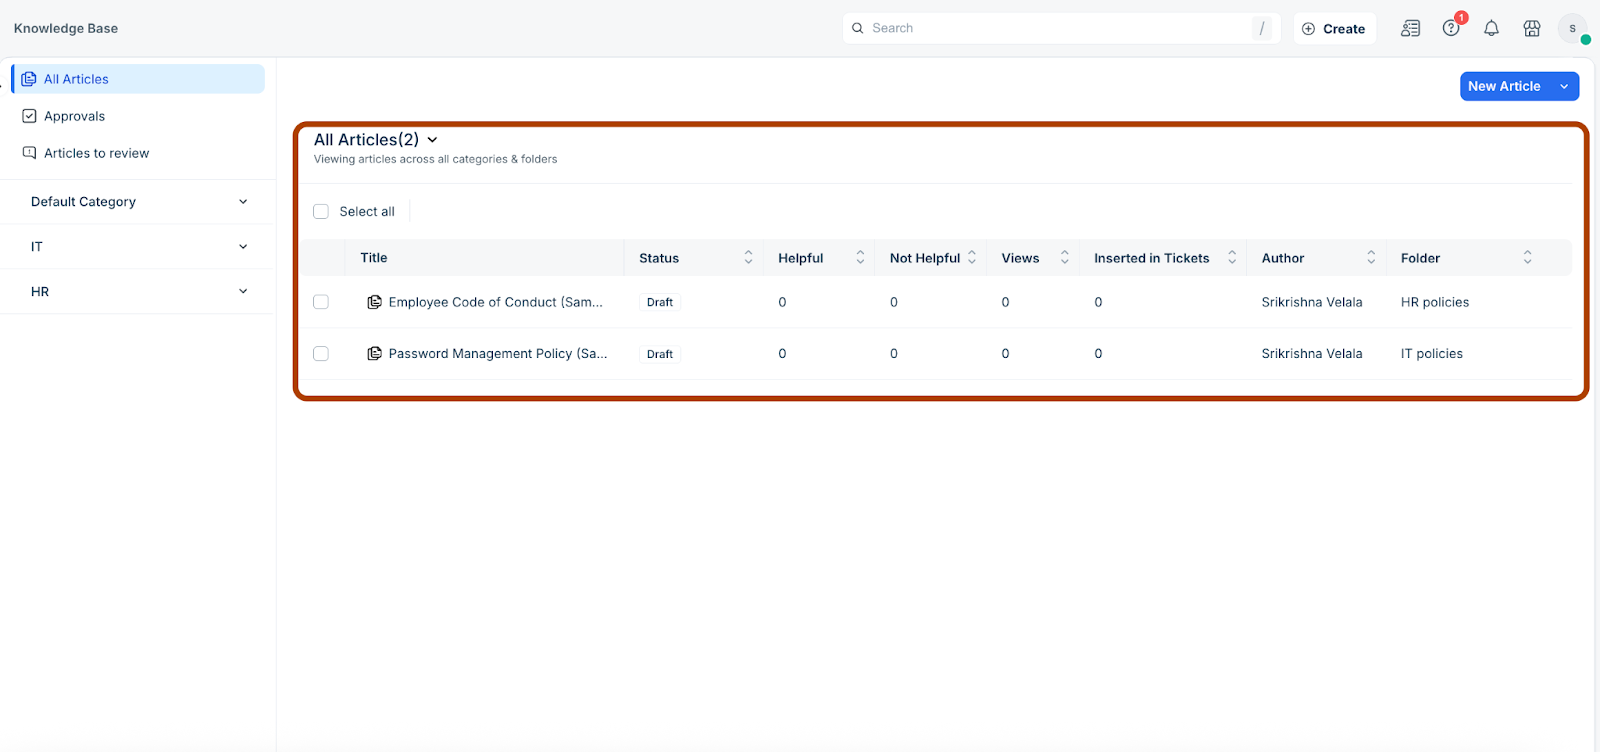
Go to Solutions > Knowledge Base.
The All Articles page displays articles across all categories and folders.
Click New Article to create a new article.
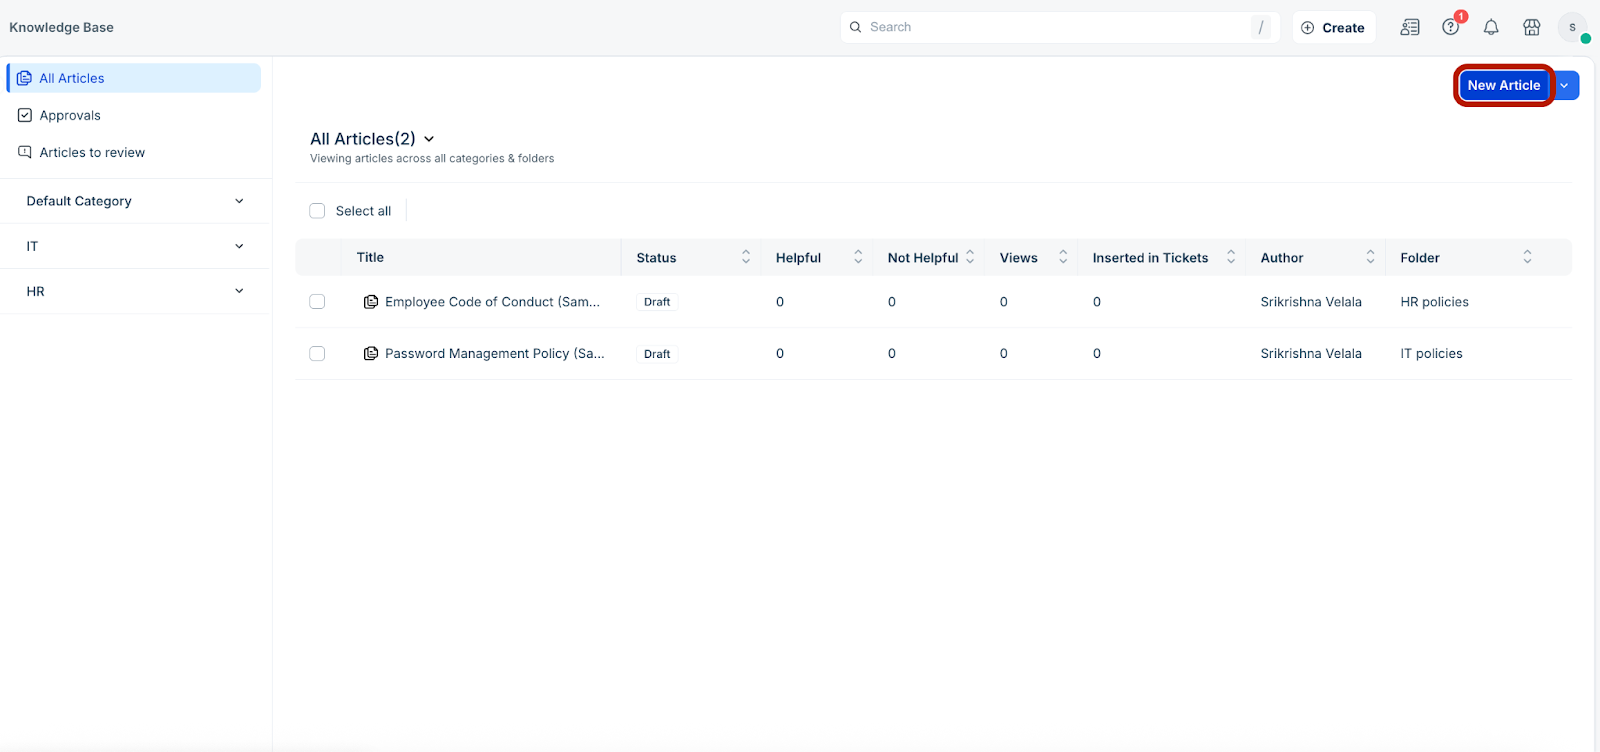
The New Article page is displayed.
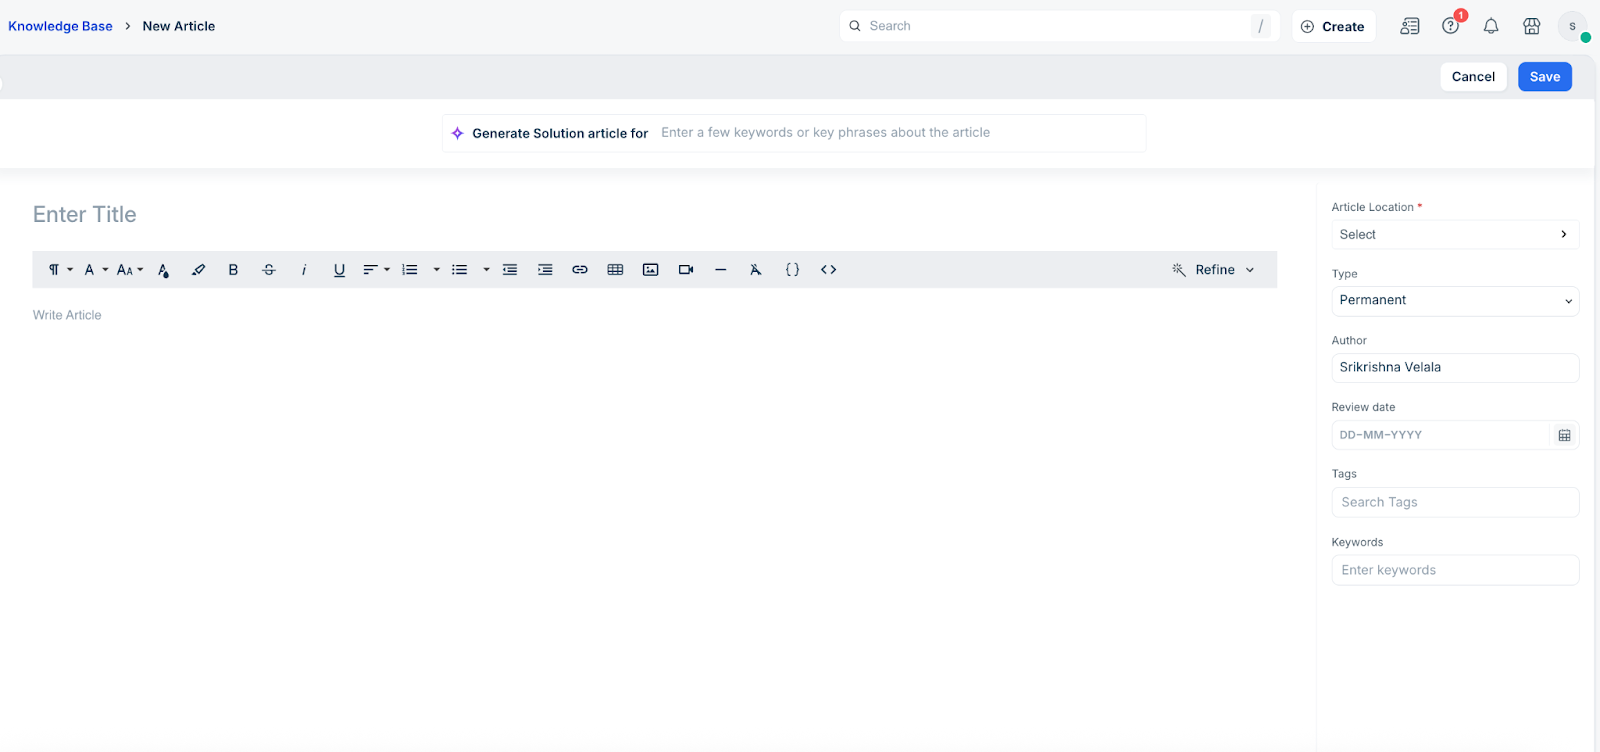
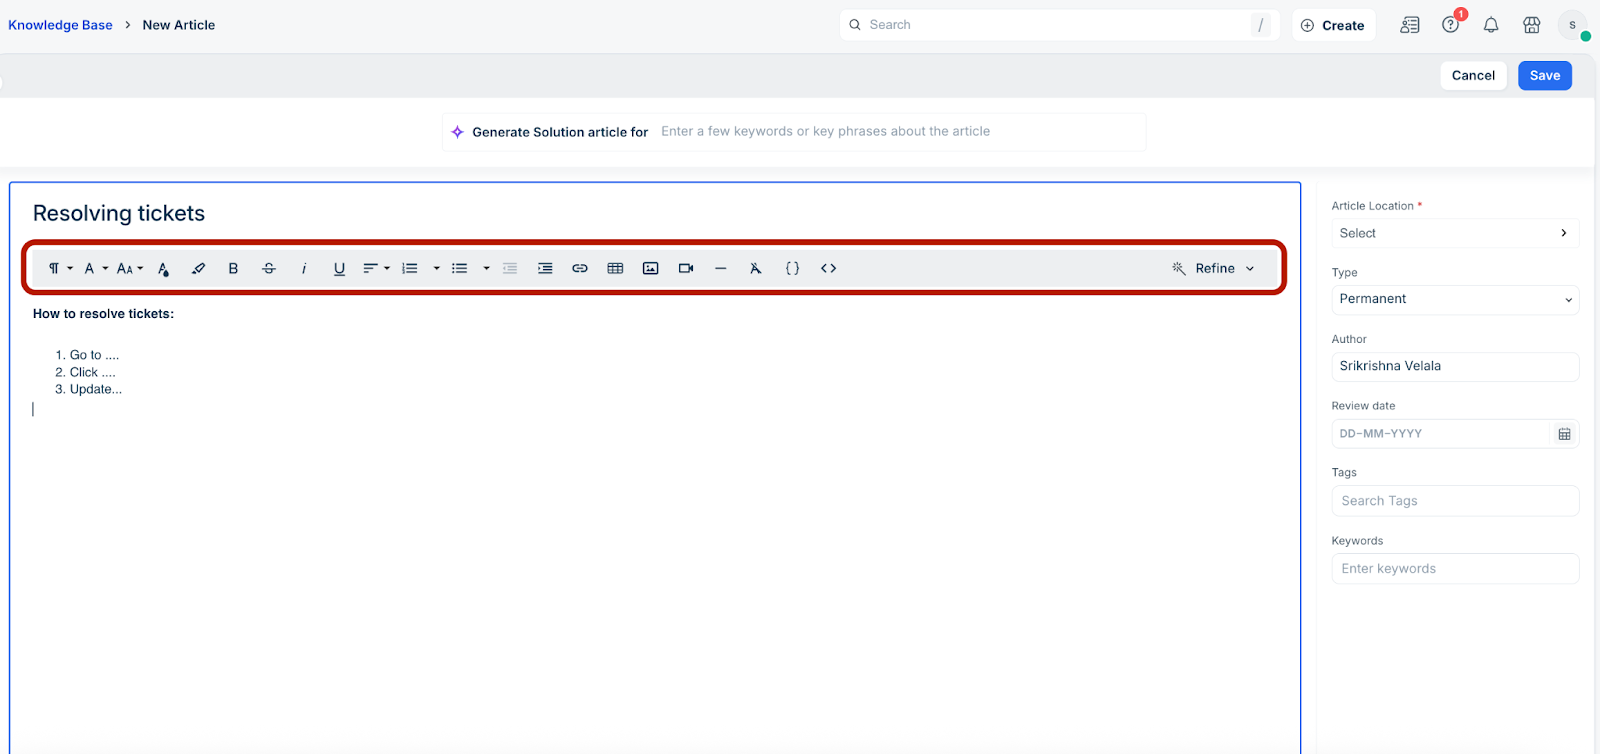
Enter a suitable title in the Enter Title field.
Enter the solution details in the Write Article text box.
Note: Use the formatting options above the Write Article box to format text (as required).
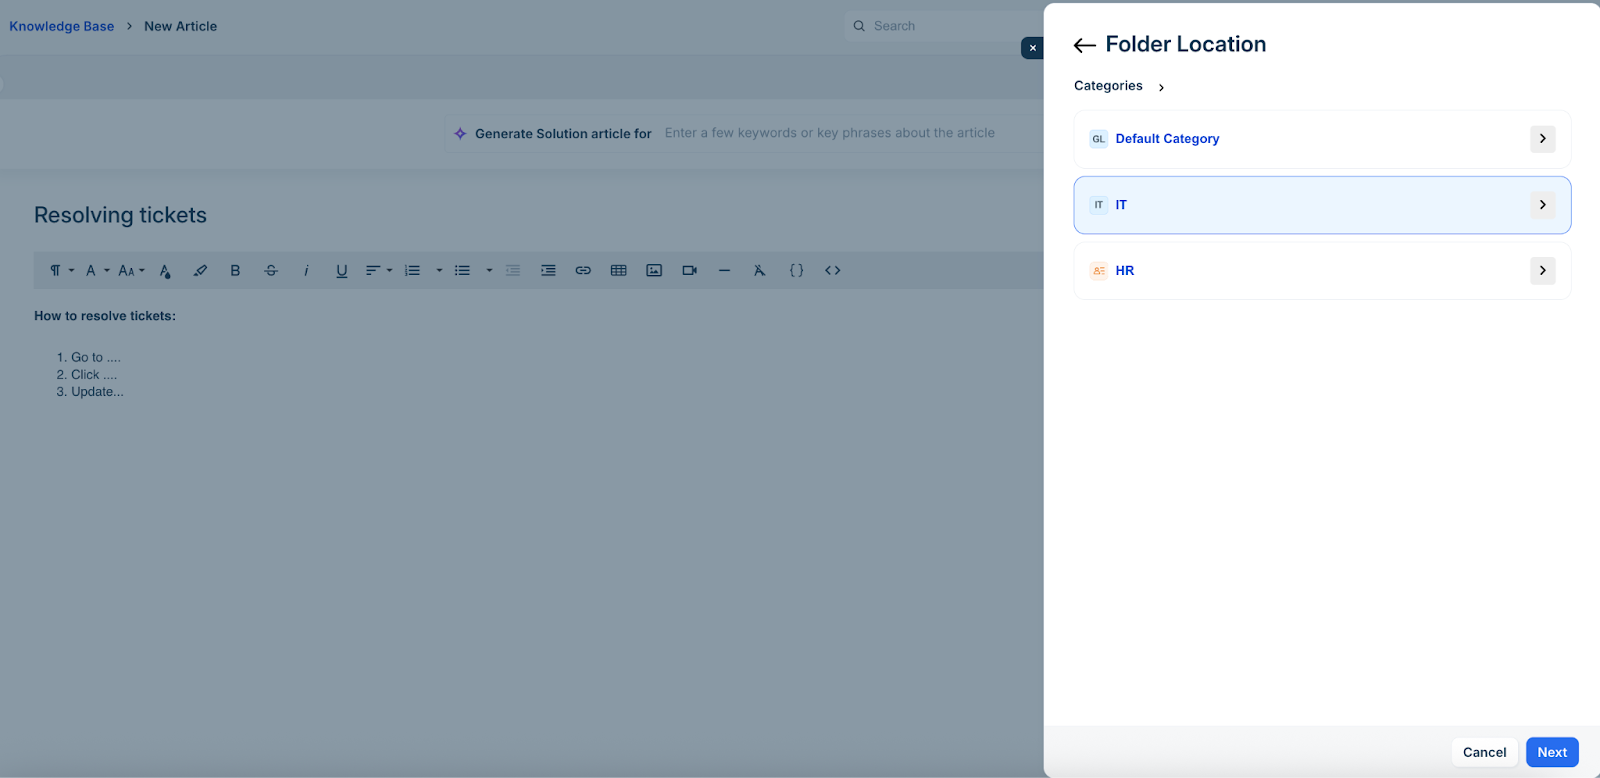
On the right panel, click the Article Location field to select an appropriate category.
The Folder Location slider is displayed.
Select a category (for example, IT), and click Next.
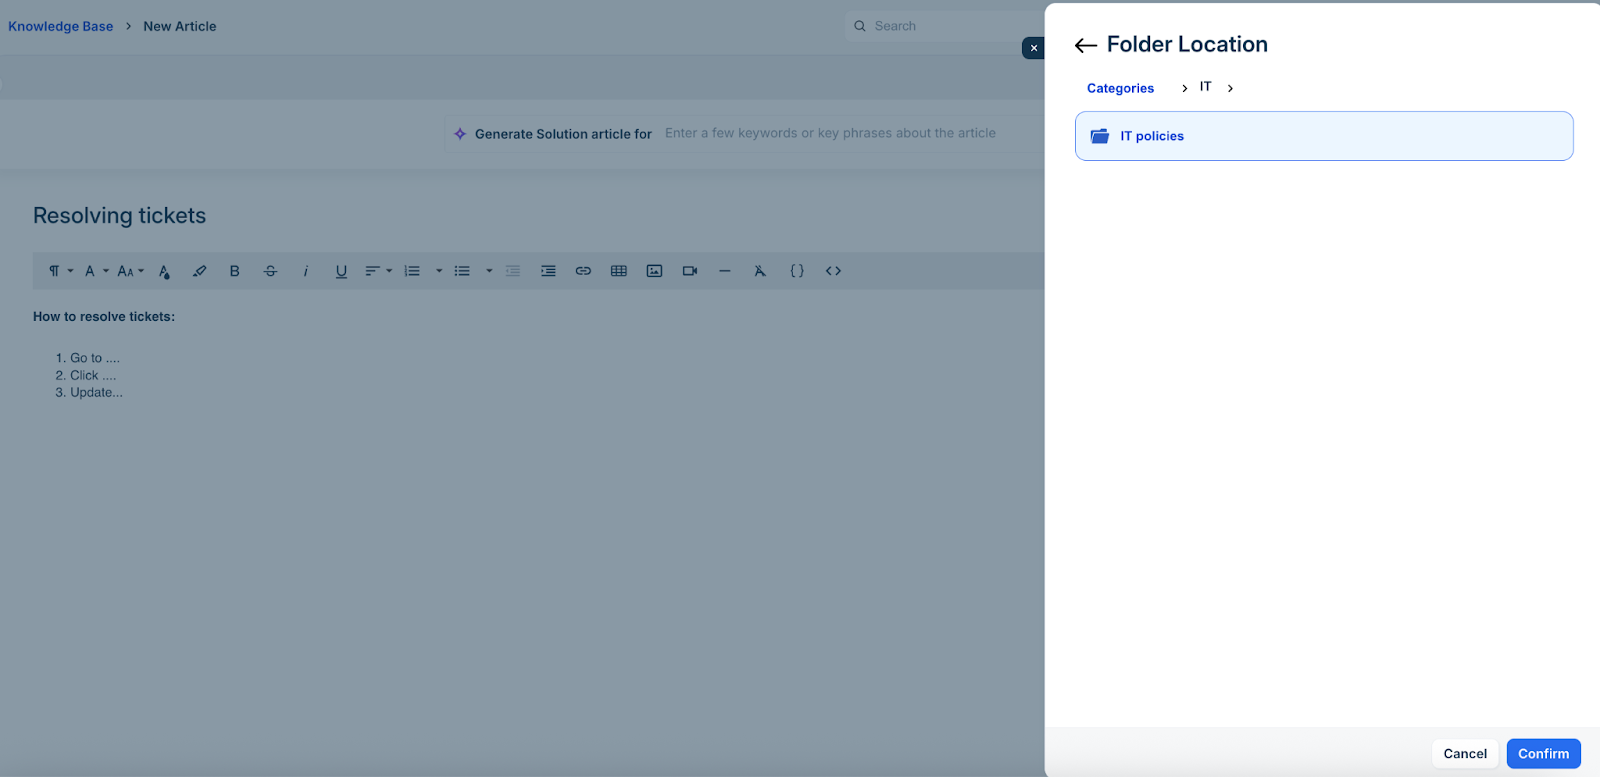
If the selected category has different folders, select an appropriate folder (for example, IT policies), and click Confirm.
Select the article type (Permanent or Workaround) from the Type dropdown.
Update other fields, such as Author, Review date, and Tags.
Add relevant attachments with the Attach files option.
Click Save to save the article as draft.
Alternatively, you can generate solution articles using Freddy AI.
Enter specific keywords in the Generate Solution Article for field (for example, Resolving tickets). Then, click Go.
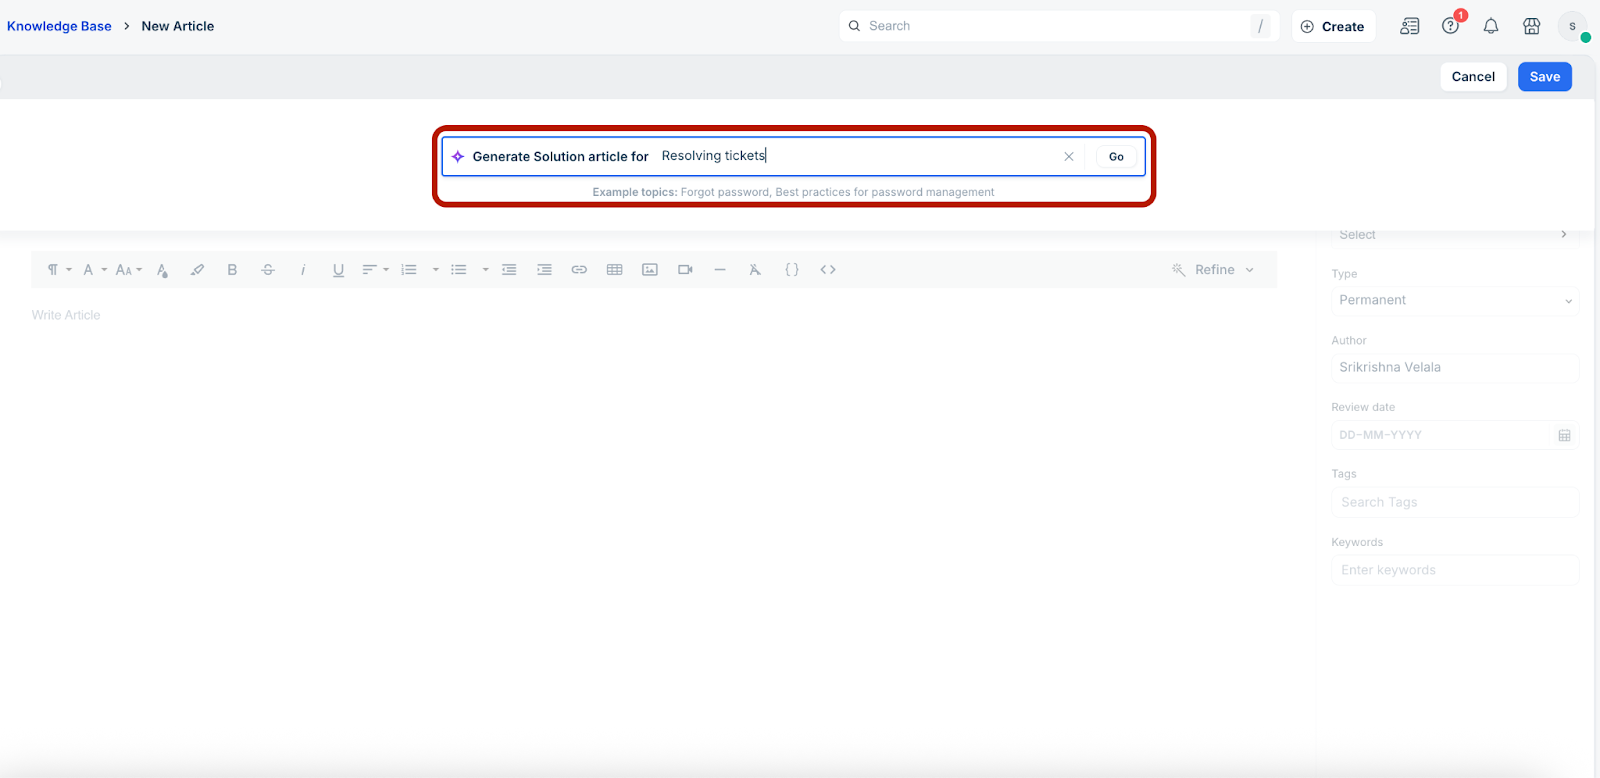
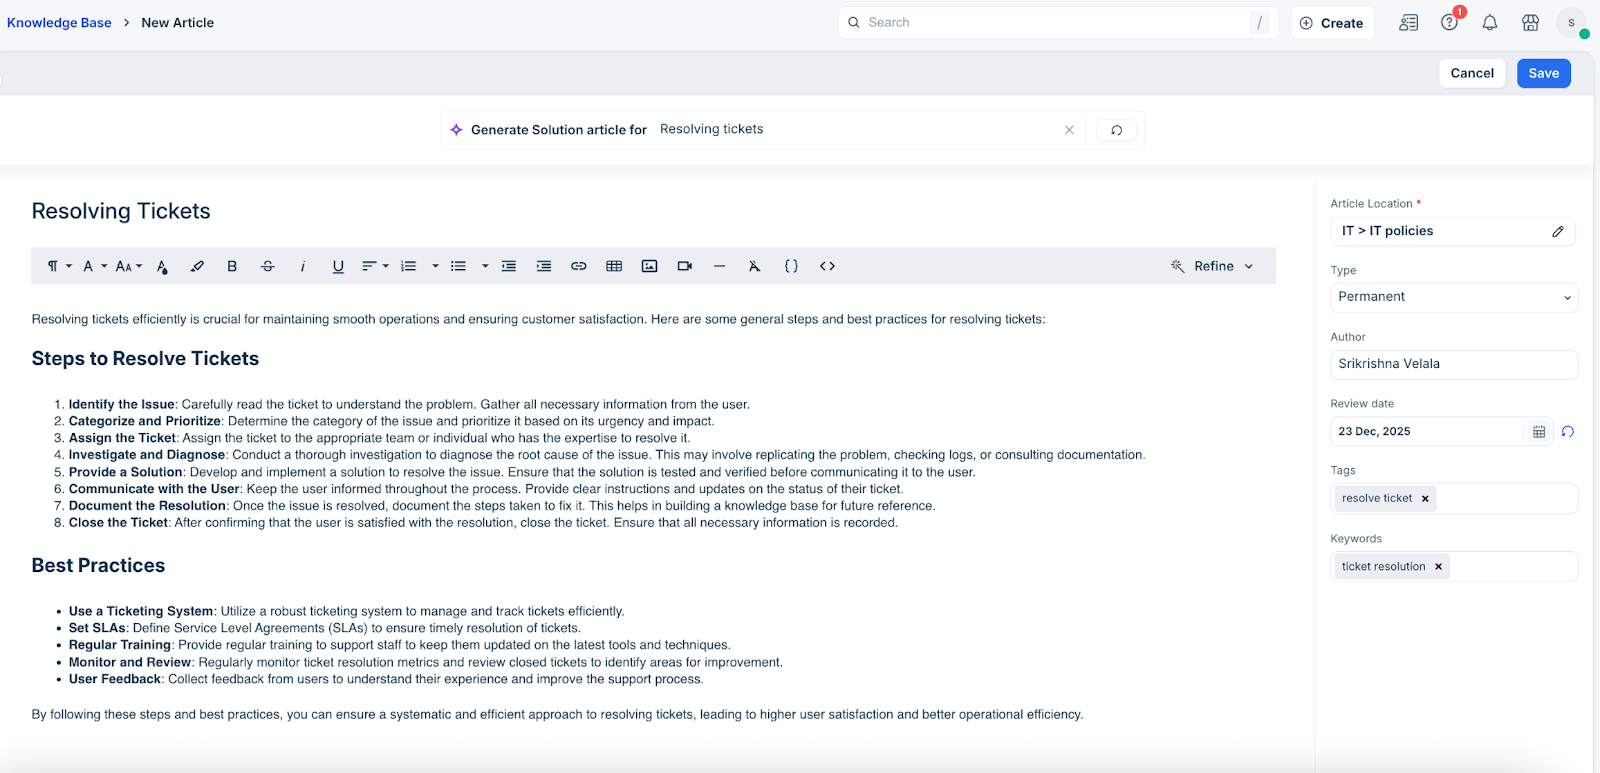
The article title and solutions details are automatically generated.

Update all the required fields on the right panel, such Article Location, Type, Author, and so on. Then, click Save to save the article as draft.
Click Publish to publish the draft article.
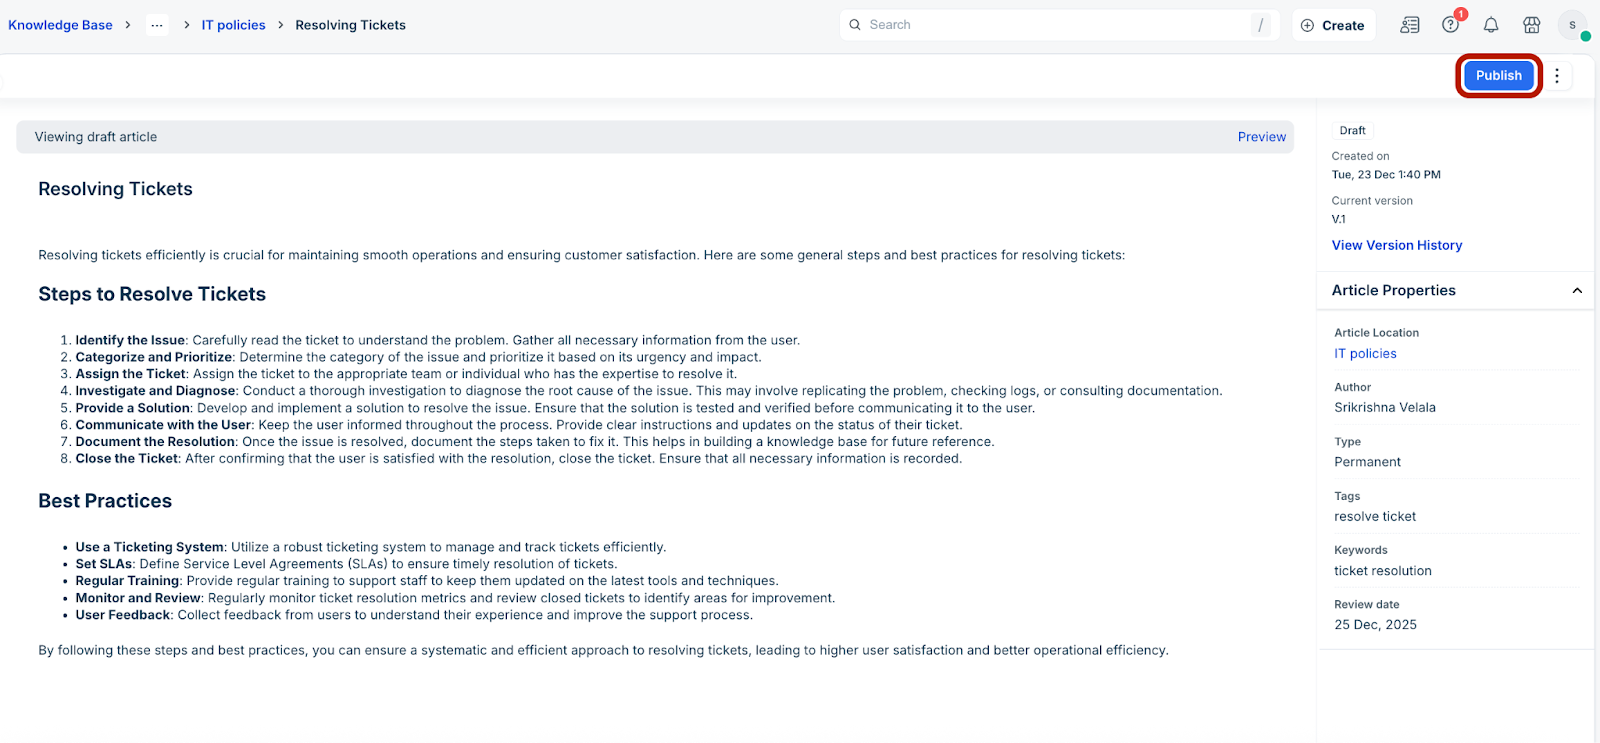
Note: To edit or delete a draft article, click the ellipses icon next to Publish, and select the relevant action.
Manage the knowledge base
While you start creating and publishing solution articles, you can also organise and manage various knowledge base options, such as creating new folders or categories, adding articles from external sources, assigning approvers, sending articles for approval, updating author and status details and so on.
Create categories, folders, or add external articles
Follow these steps to create new categories, folders, or add external articles:
Log in to your Freshservice account.
Go to Solutions > Knowledge Base.
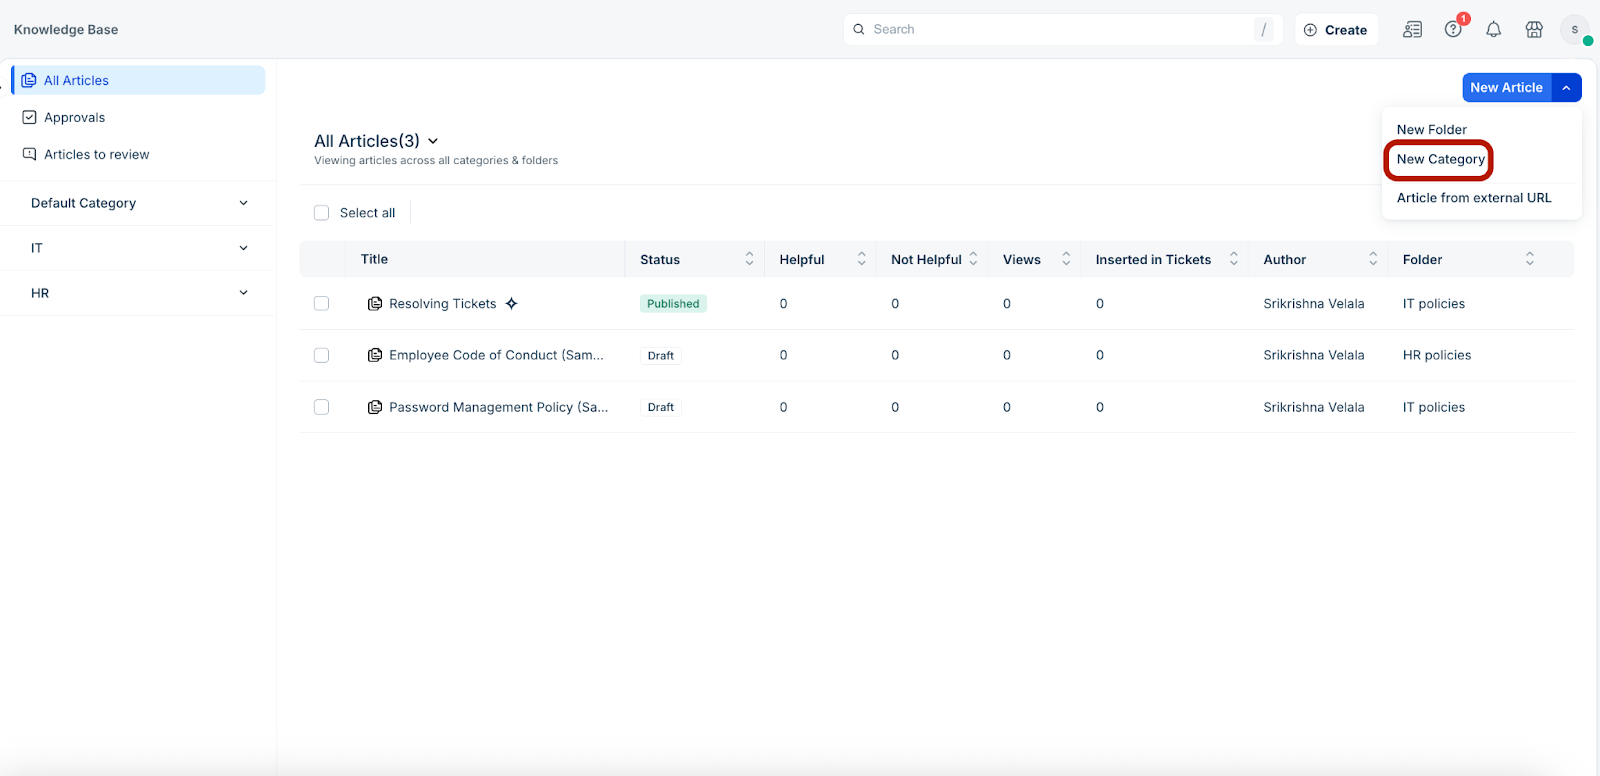
(To create a new category) Click the New Article dropdown icon at the top-right corner, and select New Category.
The New Category dialog is displayed.
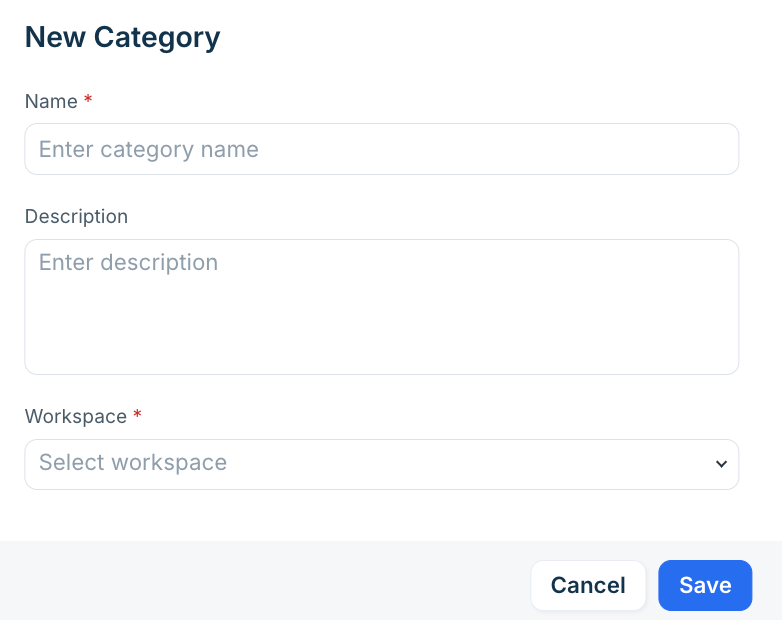
Enter a name and description for the new category.
Select a relevant workspace from the Workspace dropdown.
Click Save.
(To create a new folder) Click the New Article dropdown icon at the top-right corner, and select New Folder. The New Folder slider is displayed.
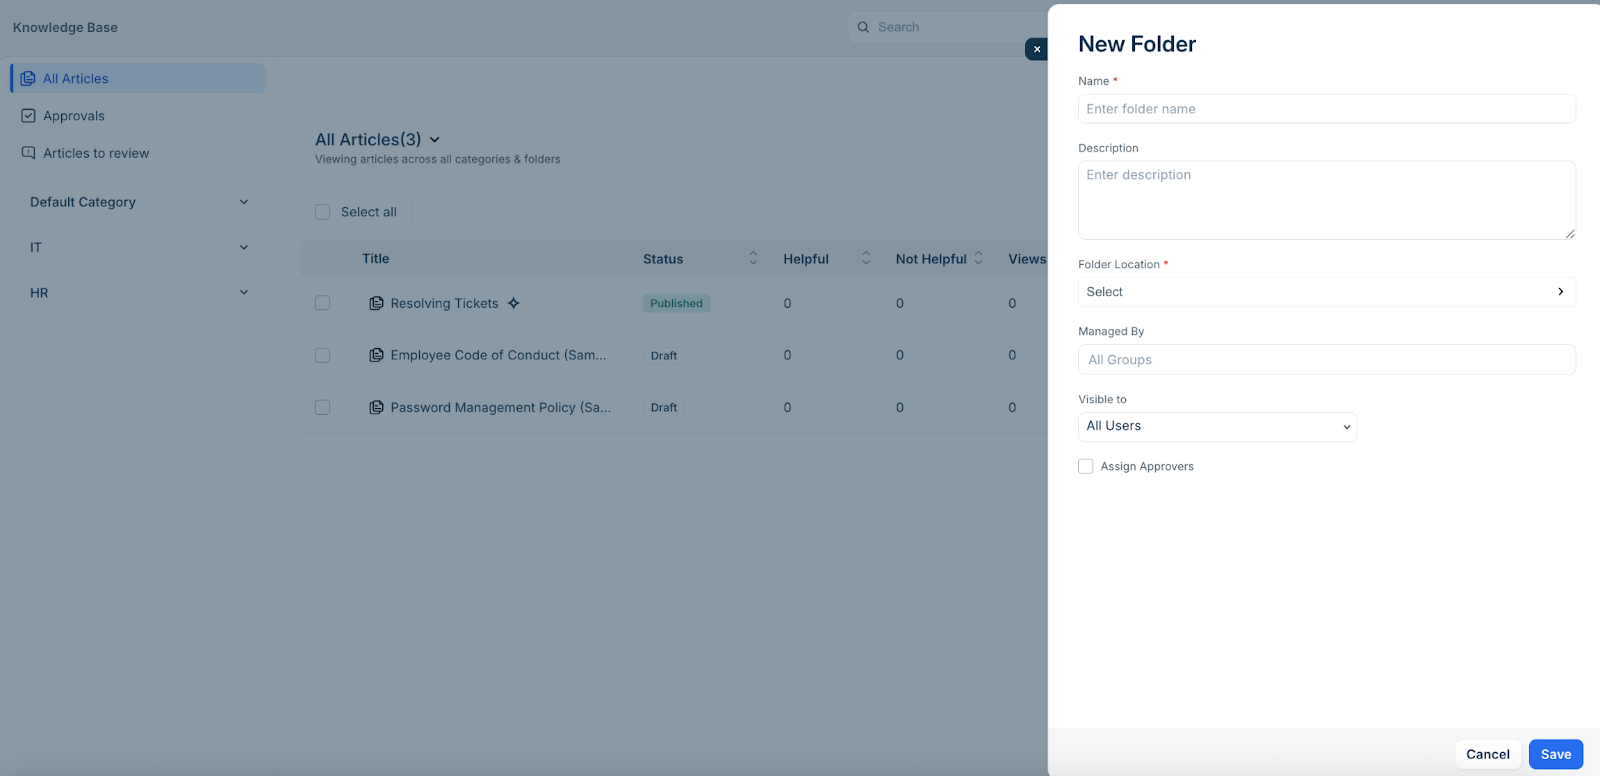
Enter a name and description for the new folder.
Select the relevant folder from the Folder Location options.
Search and add required groups from the Managed By field.
Select the relevant option from the Visible to dropdown (such as, All users, All agents, or Departments).
Enable the Assign Approvers checkbox, and search and select the required approvers.
Select the relevant Approved by option.
Click Save.
(To add an article from an external source) Click the New Article dropdown icon at the top-right corner, and select Article from external URL. The Article from external URL slider is displayed.
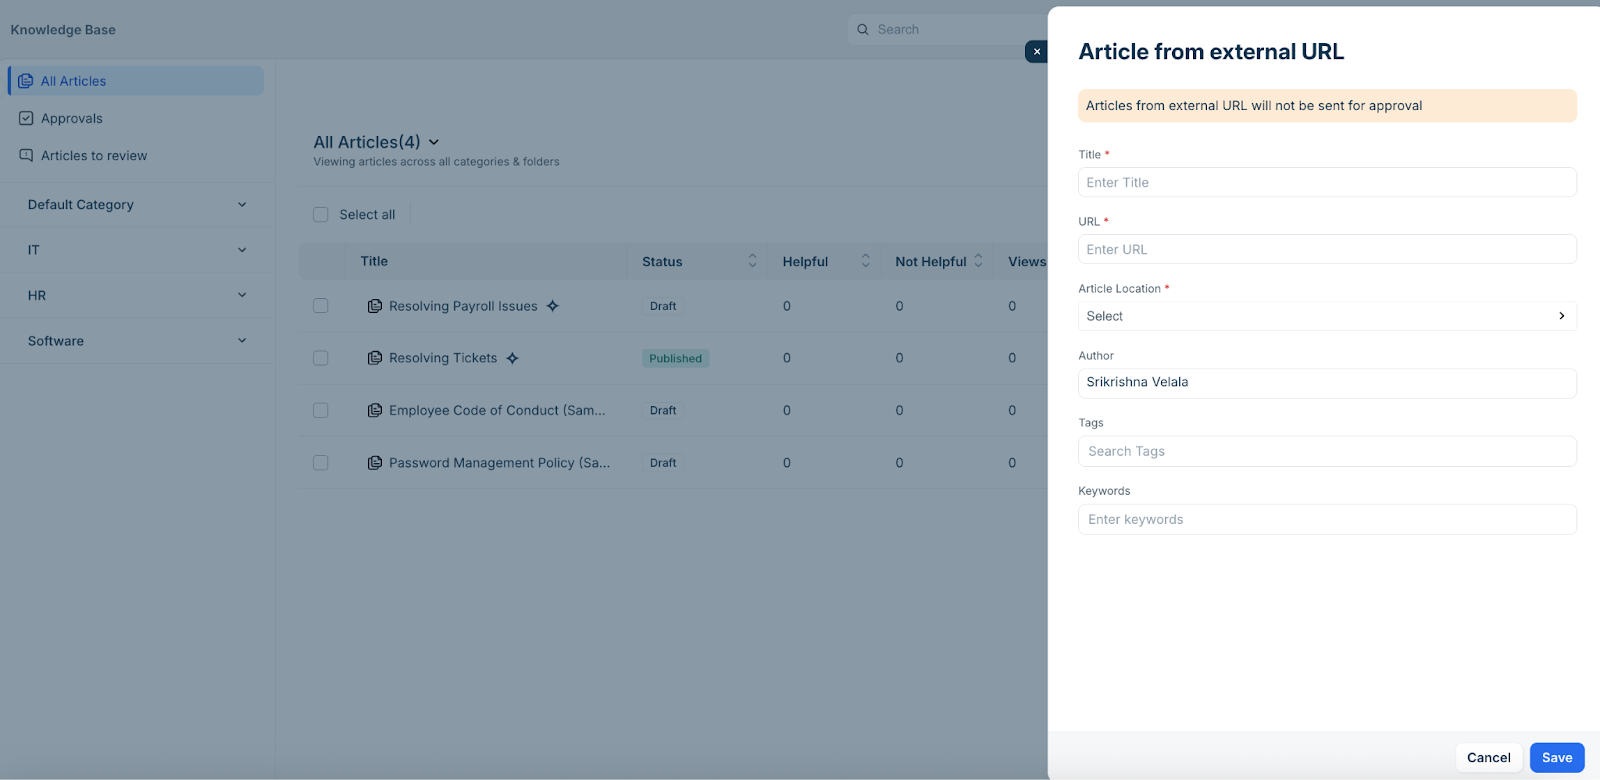
Enter a title and URL.
Select the relevant folder from the Article Location options.
Update other details, such as Tags and Keywords.
Click Save.
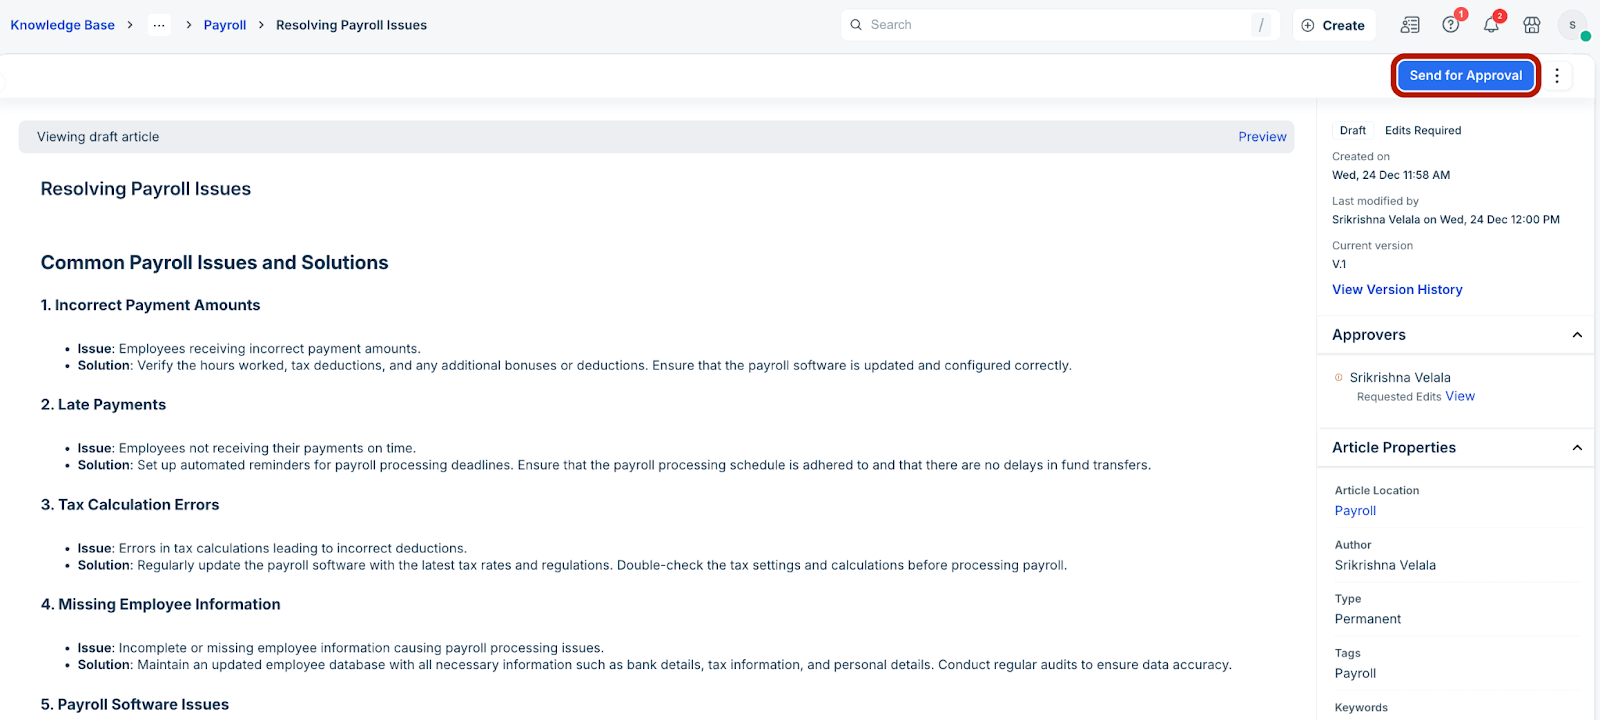
Send articles for approval
If you’ve assigned approvers while creating a new folder, you can send the articles for approval (which are associated with that folder).
Follow these steps to send articles for approval:
Log in to your Freshservice account.
Go to Solutions > Knowledge Base.
Click the article you want to send for approval.
Note: The selected article must be associated with a folder that has approvers assigned.
Click Send for Approval at the top-right corner.
Approve articles
If you’ve been assigned as an approver, you can approve and publish specific articles you receive for approval.
Follow these steps to approve articles:
Log in to your Freshservice account.
Go to Solutions > Knowledge Base.
Click Approvals on the left pane.
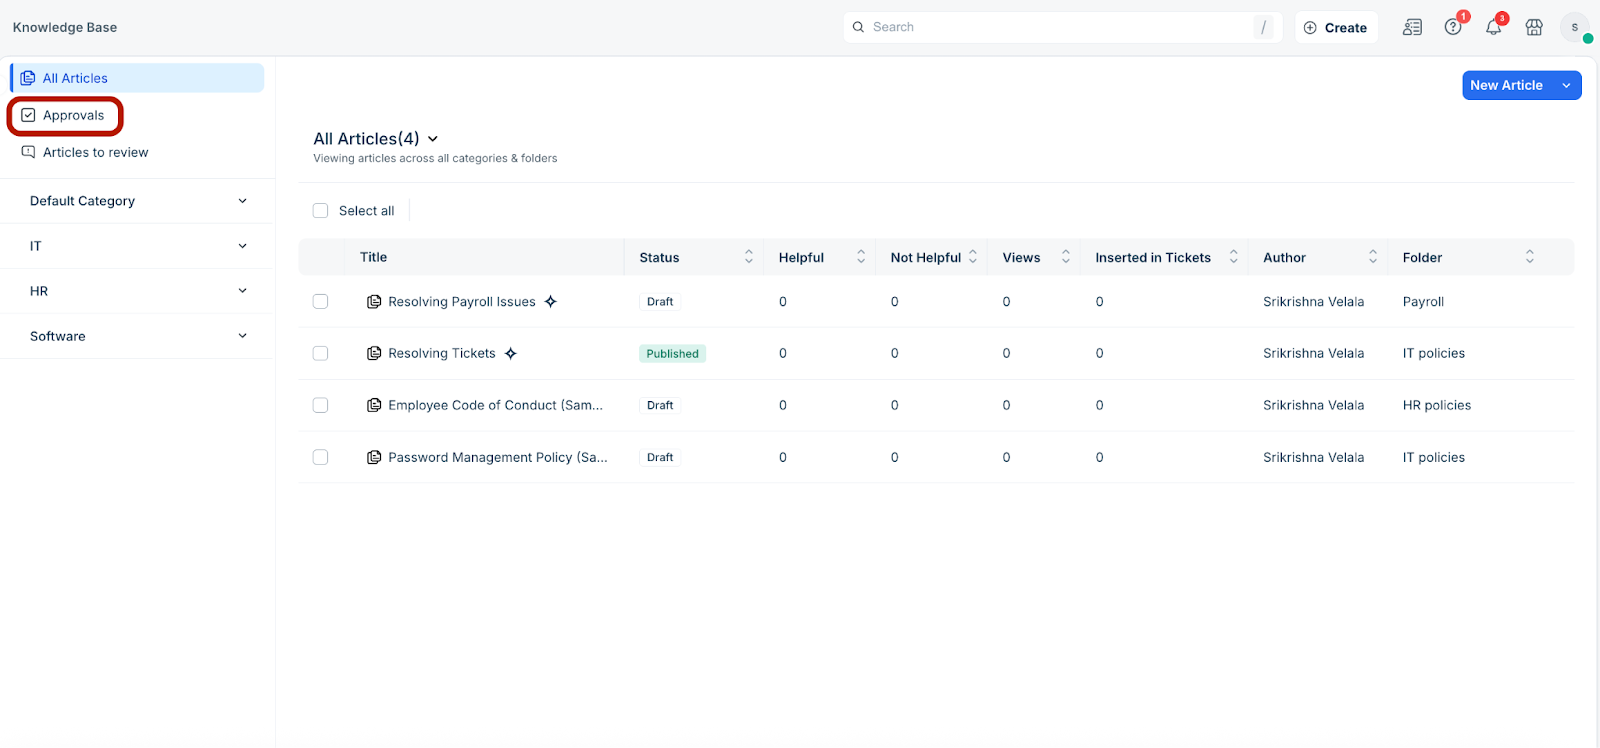
Select the article you want to approve.
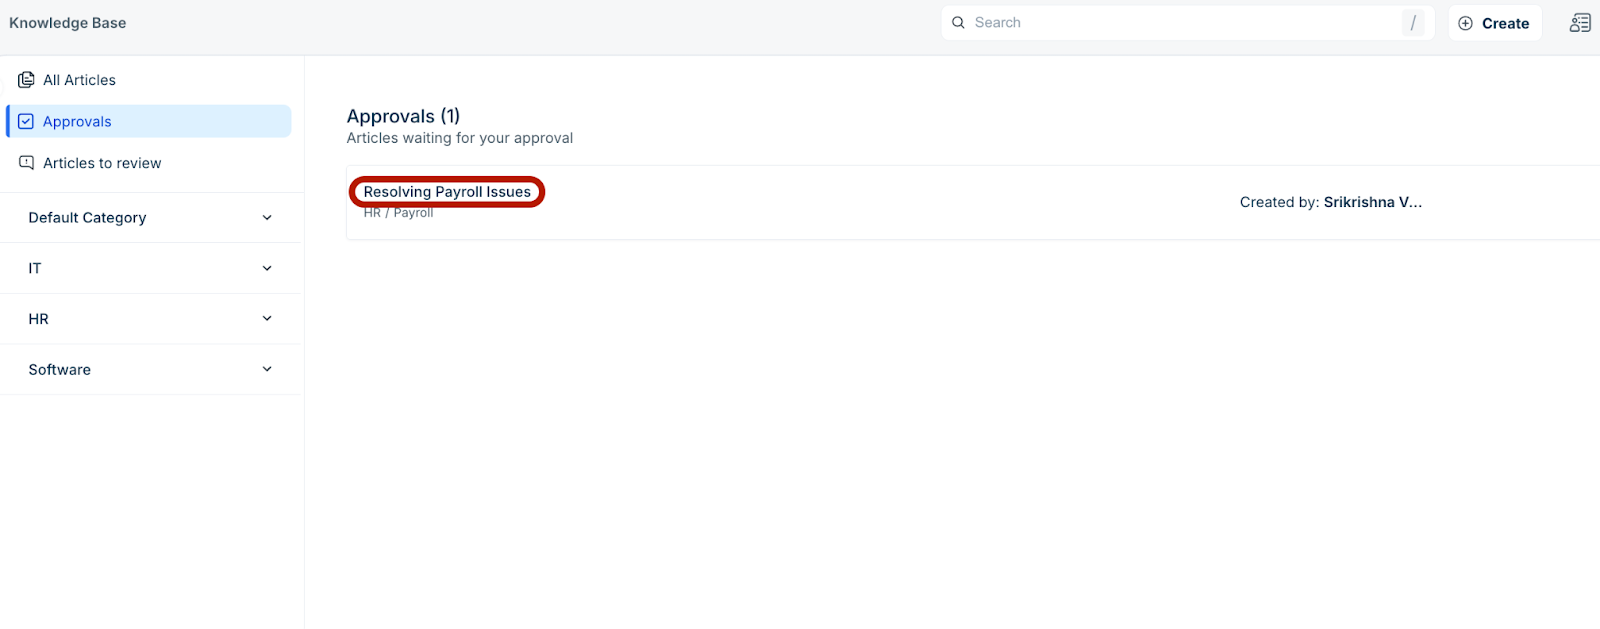
Click the Approve dropdown at the top-right corner, and select the required action (Approve, Approve and Publish, or Edits Required).
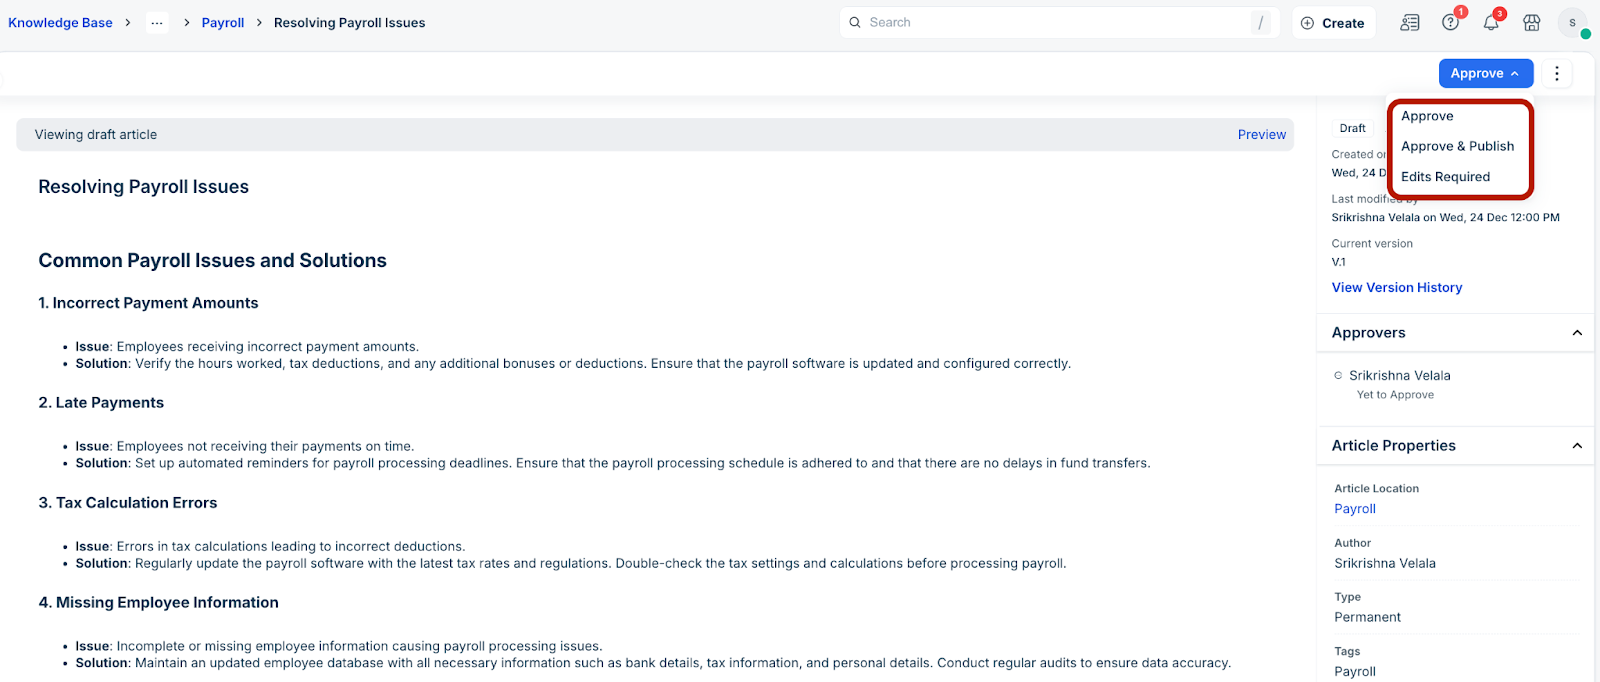
Note: If you select Edits Required, the article is re-sent to the author for edits.
Manage multiple articles
You can manage actions on multiple articles, such as change the author, status, folder, or delete articles.
Follow these steps to manage actions on multiple articles:
Log in to your Freshservice account.
Go to Solutions > Knowledge Base.
Select the articles you want to modify.
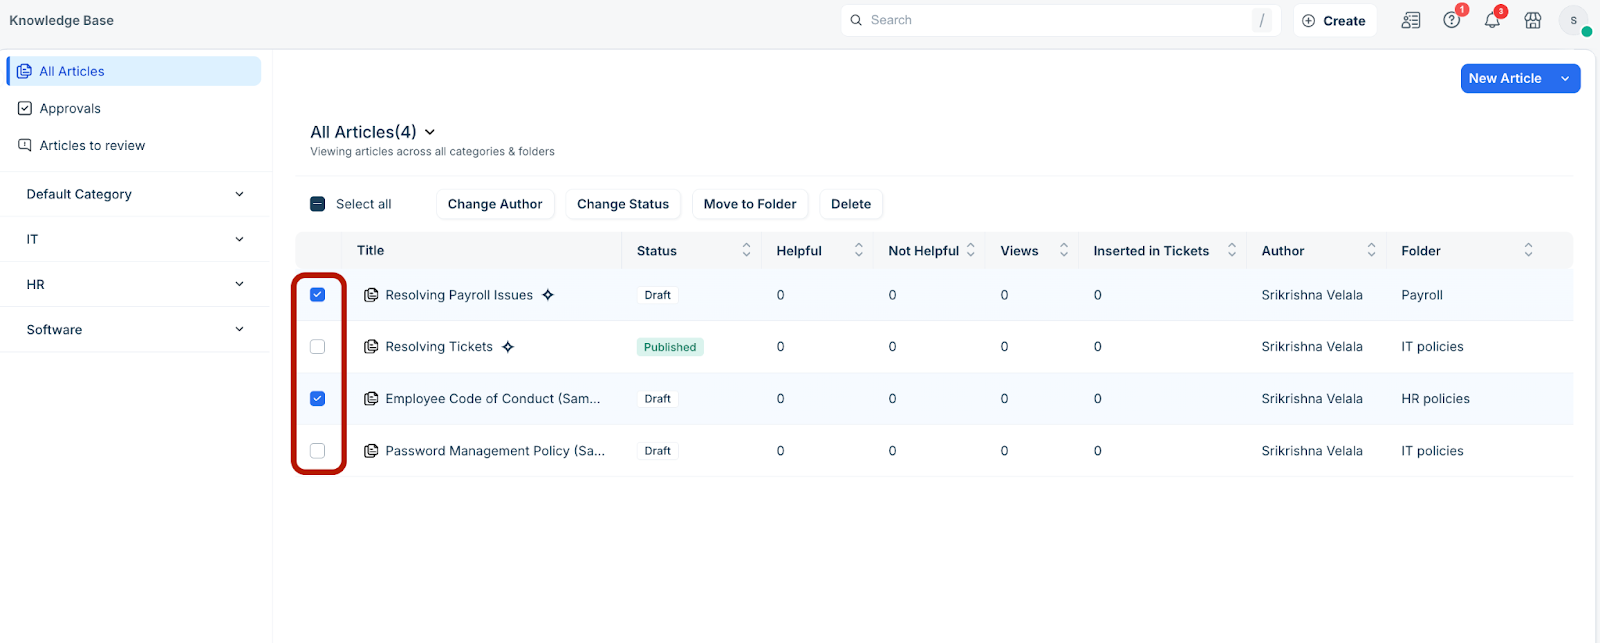
Click Change Author to modify the article author. The Change Author dialog is displayed.
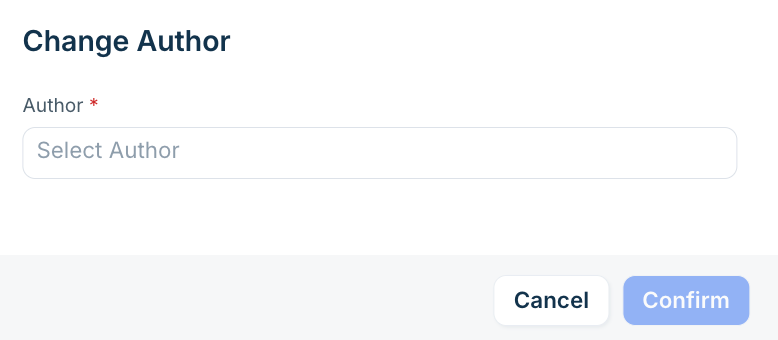
Select the relevant author and click Confirm.
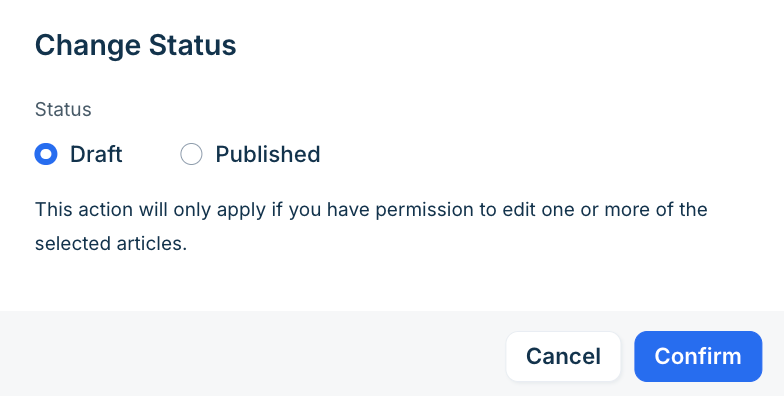
Click Change Status to modify the article status. The Change Status dialog is displayed.
Select the relevant status and click Confirm.
Click Move to Folder to modify the article folder. The Move to Folder dialog is displayed.
Select the relevant folder and click Confirm.

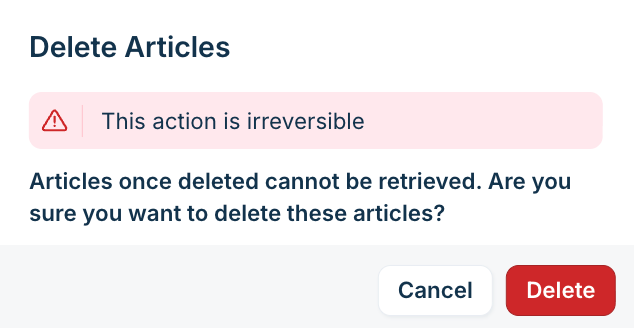
Click Delete to delete the selected articles. The Delete Articles dialog is displayed.
Click Delete.
Manage categories and folders
You can edit or delete the knowledge base categories and folders.
Follow these steps to edit or delete categories and folders:
Log in to your Freshservice account.
Go to Solutions > Knowledge Base.
(To edit a knowledge base category) Click any category on the left pane (for example, HR).
Then, click the pen icon at the top-right corner.
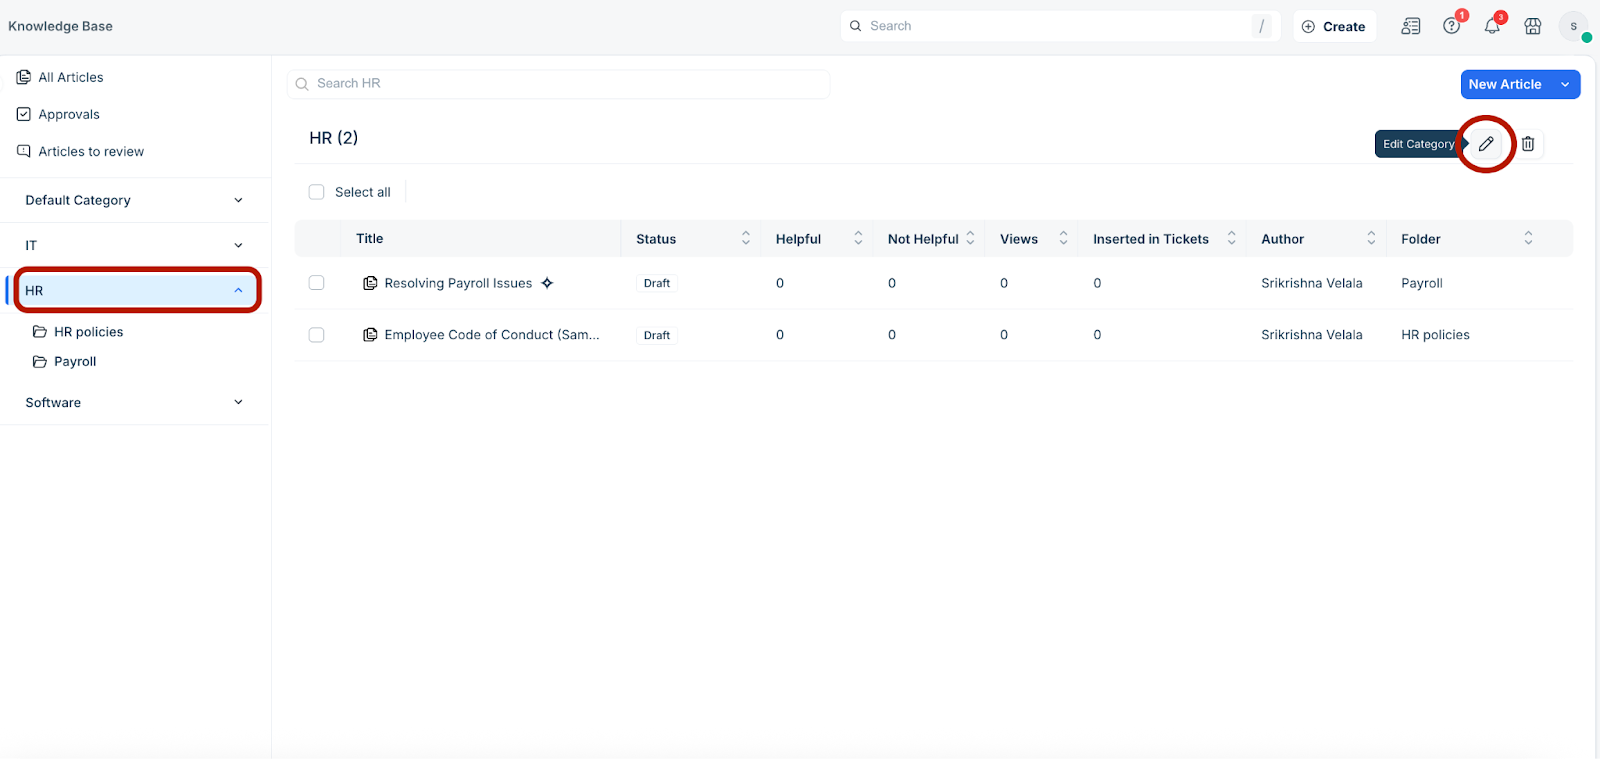
The Edit Category dialog is displayed.
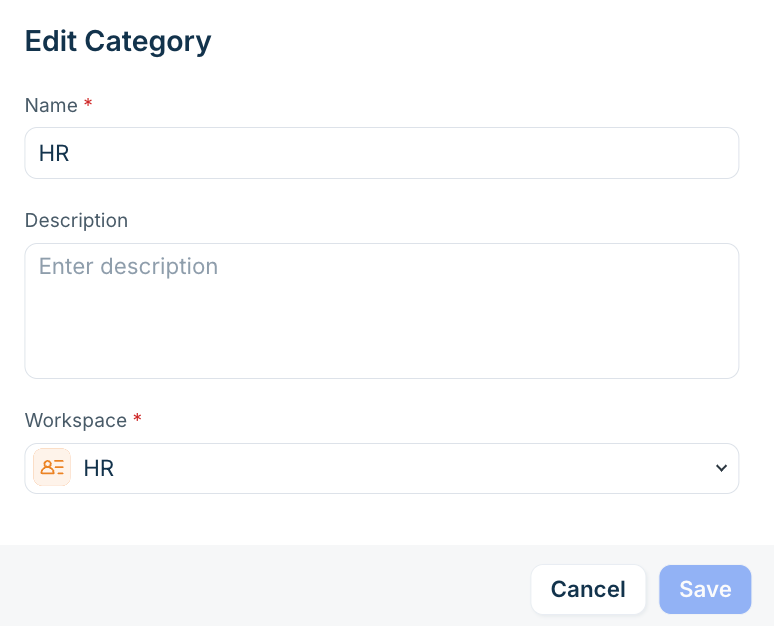
Make the necessary changes, and click Save.
To delete a category, click the bin icon on the top-right corner. The Delete Category dialog is displayed.
Click Delete.
(To edit or delete a knowledge base folder) Click any folder under a category on the left pane (for example, HR policies).
Then, click the ellipses icon at the top-right corner.
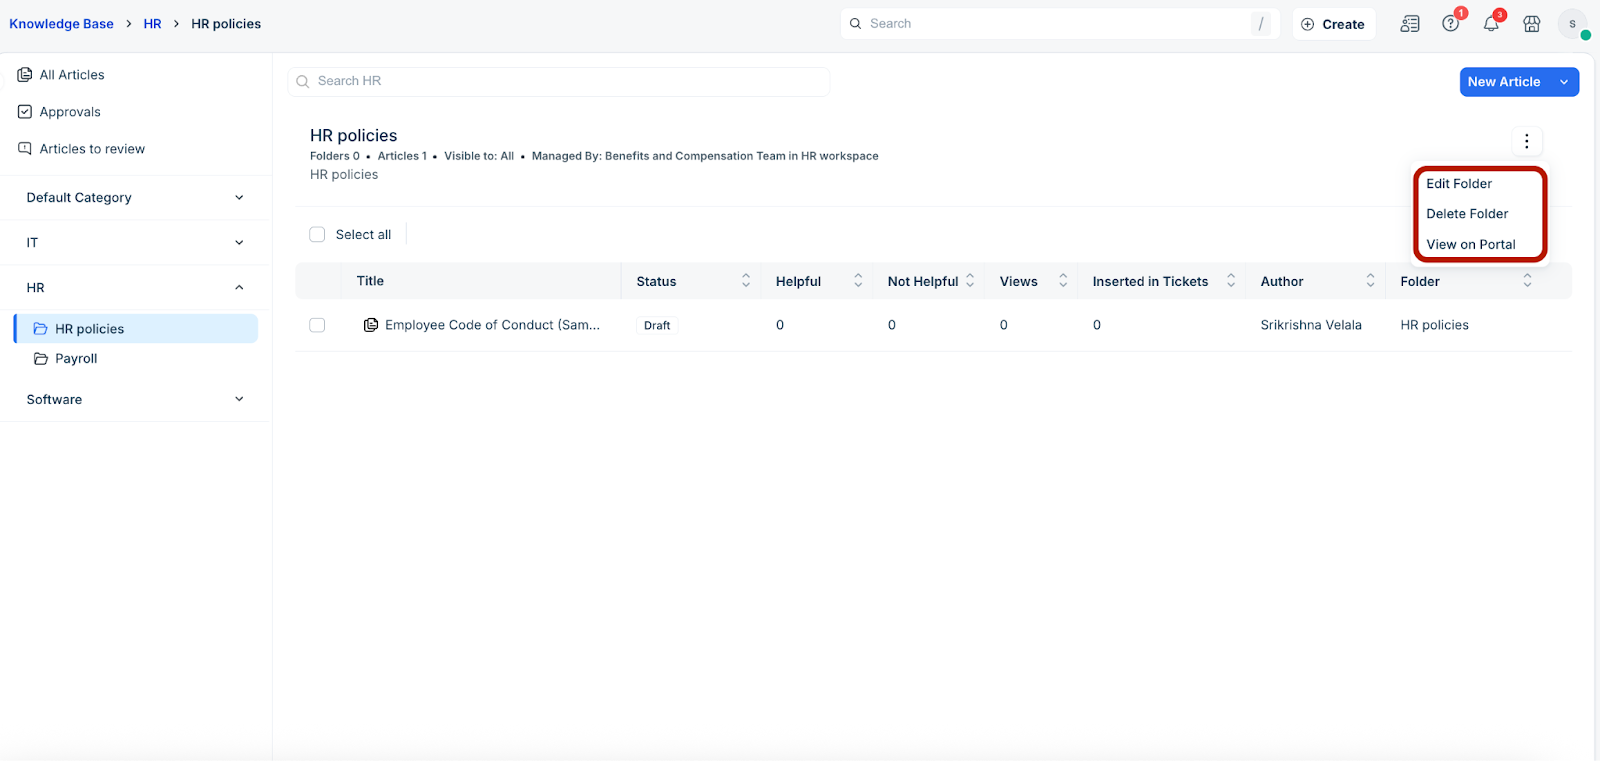
Select the relevant option (Edit Folder or Delete Folder).
Note: Click View on Portal to view this knowledge base folder on the requester portal (which will open in a new tab).
Collaborative editing and article cloning
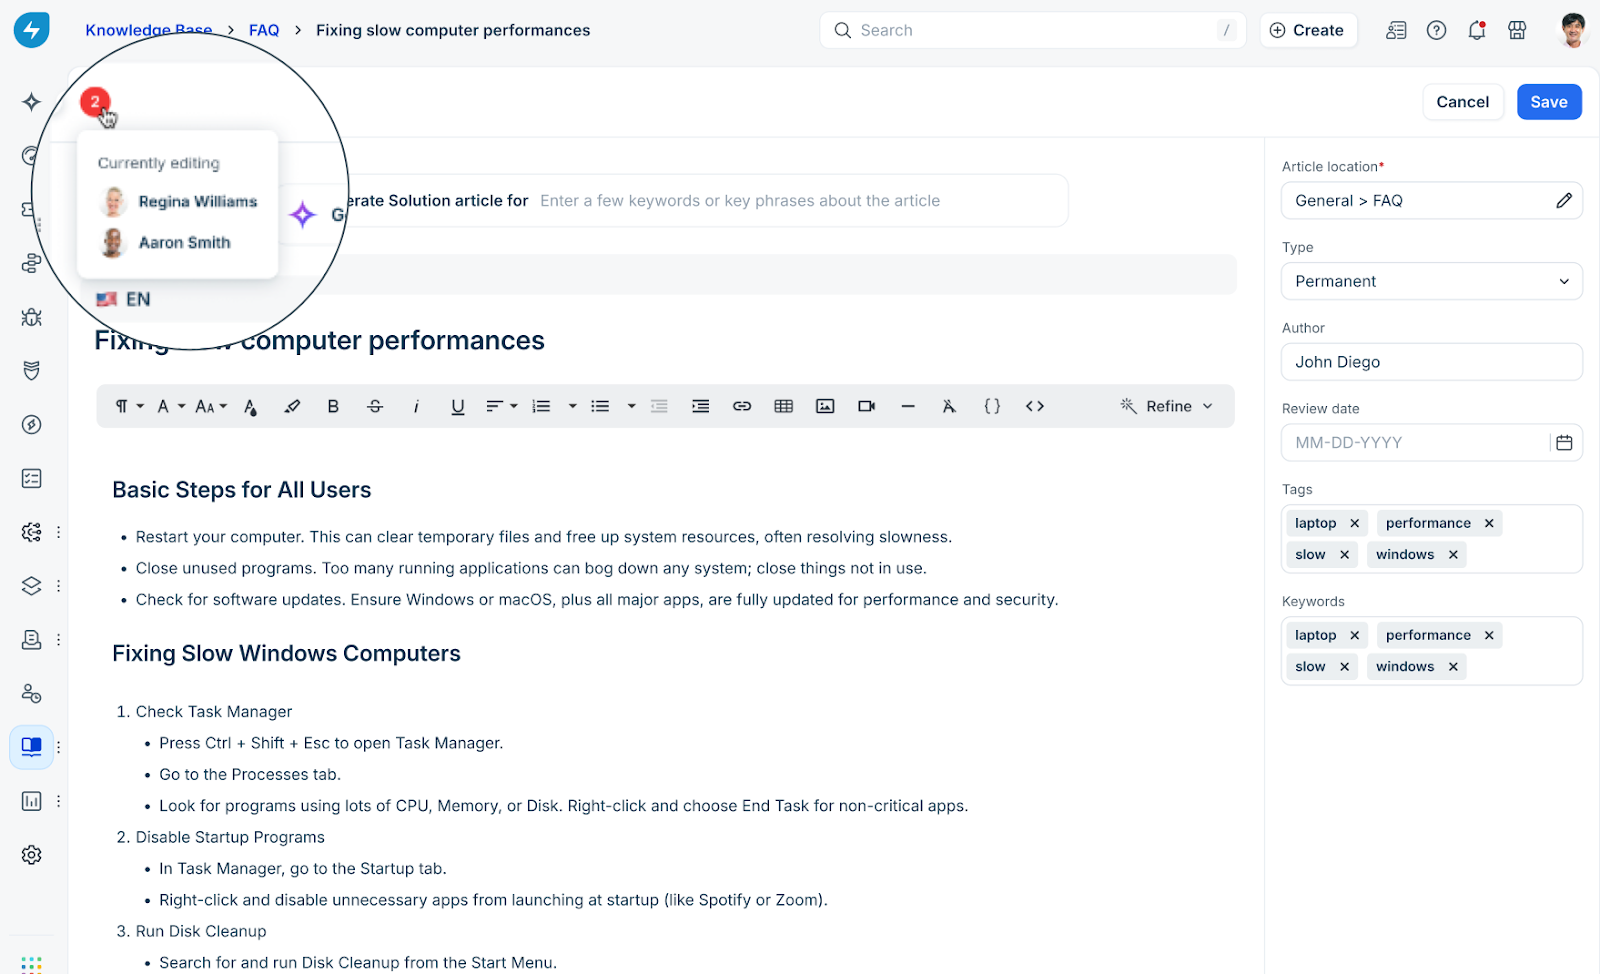
When multiple agents edit the same article, the knowledge base tracks concurrent activity to prevent data loss. Real-time presence indicators and save-time alerts help you coordinate edits and recover content if changes overlap.
This feature provides visibility into editor presence; it does not support live co-authoring. You cannot see the cursor, selections, or text updates of another agent in real time.Track concurrent editing
When you open an article, the editor detects other active editing sessions. If other agents are editing the same article, a Who’s editing indicator appears in the toolbar. This indicator displays the number of active users on the article.
To view editor details, hover over the count. The indicator updates in near real-time as agents enter or leave the editor.
Resolve editing conflicts
If another agent saves changes to an article before you do, the system detects a conflict when you attempt to save. An alert notifies you that saving your version will overwrite the other agent's changes.
When this occurs, select one of the following:
Cancel: Stops the save process. Use this to review the article or coordinate with the other agent.
Save: Proceeds with your save and overwrites the previous agent's changes.
Restore overwritten content using version history
The knowledge base does not automatically merge changes from multiple editors; each save creates a separate version of the article.
If you overwrite another agent's changes, the system preserves their work as a previous version. To view or restore earlier versions:
Open the View Version History tab.
Review the content of the saved versions. Note that the system does not highlight specific text differences between versions.
Select the version you want to restore.
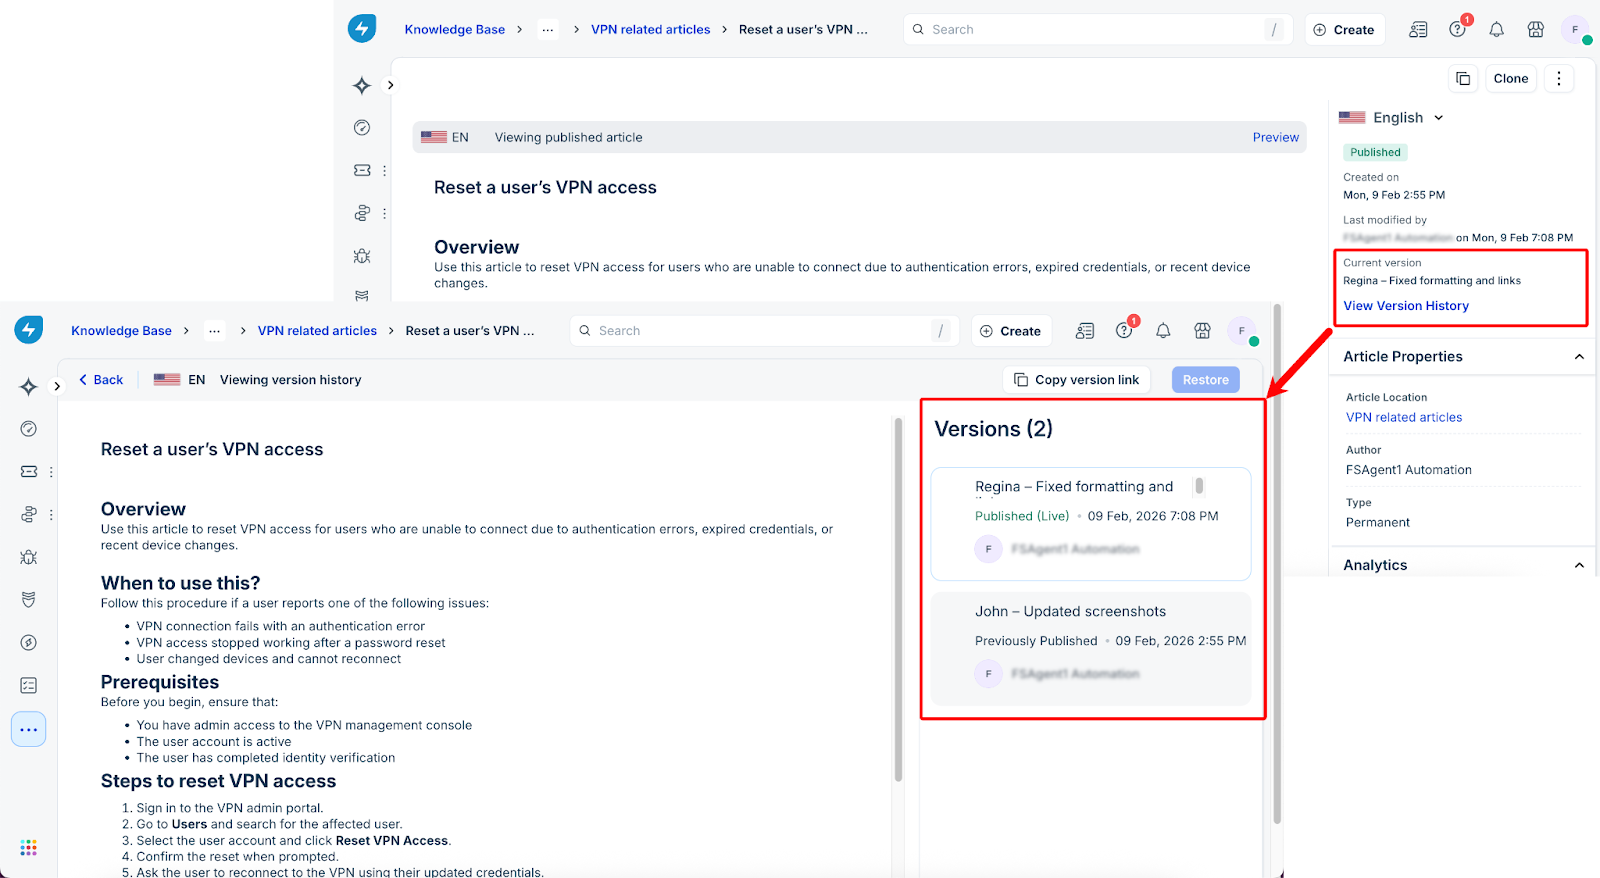
When you collaborate on complex drafts, use the History tab to rename versions with descriptive labels, such as an editor’s name or the draft's purpose, to make them easier to identify.
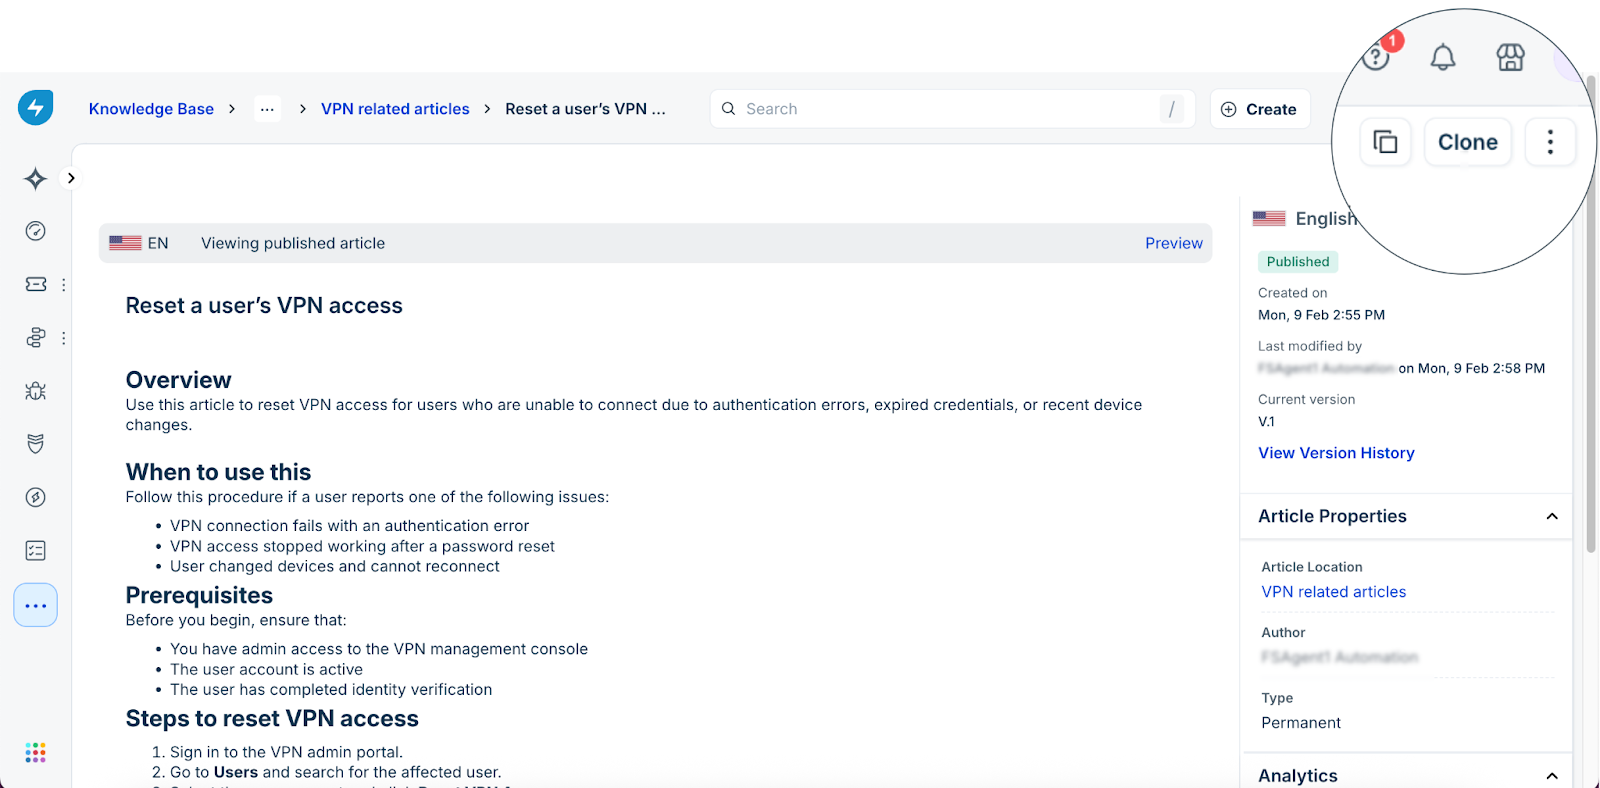
Clone a solution article
Clone a solution article to reuse existing content instead of creating an article from scratch. When an article is cloned, the system saves it as a draft by default and carries over the content, metadata, and attachments. You can also clone translated articles to reuse content across supported languages.
To clone an article, perform the following steps:
Open the article you want to reuse and click Clone. The system creates a copy with a default name, such as Copy of [Article name].
In the Article location field, choose a folder. This step is mandatory.
Click Confirm. The cloned article includes the original article body, tags, and keywords, and is saved in the selected folder.

Clone translated articles
Cloning behavior for translated articles depends on the language of the source article:
Primary language articles: When you clone an article in its primary language, you can also clone all associated translations.
Translated articles: When you clone a translated article, the system automatically clones the primary language version. A translated article must be associated with a primary language parent.
Clone articles in bulk
You can now multi-select several articles directly from the Knowledge Base list views and clone them into a target folder or category in a single operation. The system automatically preserves essential metadata—including tags, keywords, formatting, and attachments—while setting the new copies to Draft status under your authorship. To ensure a smooth workflow, the interface includes a dynamic destination picker that validates your creation rights in real-time, preventing errors before the cloning process begins.
To maintain the integrity of your global knowledge base, the cloning tool now also features smart detection for translated articles. When cloning a primary language article or one of its translations, the system identifies the underlying relationship and prompts you to include all associated language variants. This ensures that entire "translation sets" move together, maintaining their link to the original source. Once confirmed, both the primary and translated articles are deployed to your chosen destination as Drafts, allowing for rapid localized content updates without the manual overhead of recreating language pairs one by one.
Data recovery through Trash
The Knowledge Base now also provides a safety net for your support documentation with the new ‘Trash’ functionality. Previously, accidental deletions of solution articles, folders, or categories required manual efforts in recreation. Now, you can independently restore deleted content directly from the Knowledge Base Trash, ensuring any deletions remain recoverable within the retention period.
Whether it’s a single article or an entire category, you now have the control to undo deletions instantly, keeping your IT and business processes running smoothly.

Frequently asked questions (FAQs)
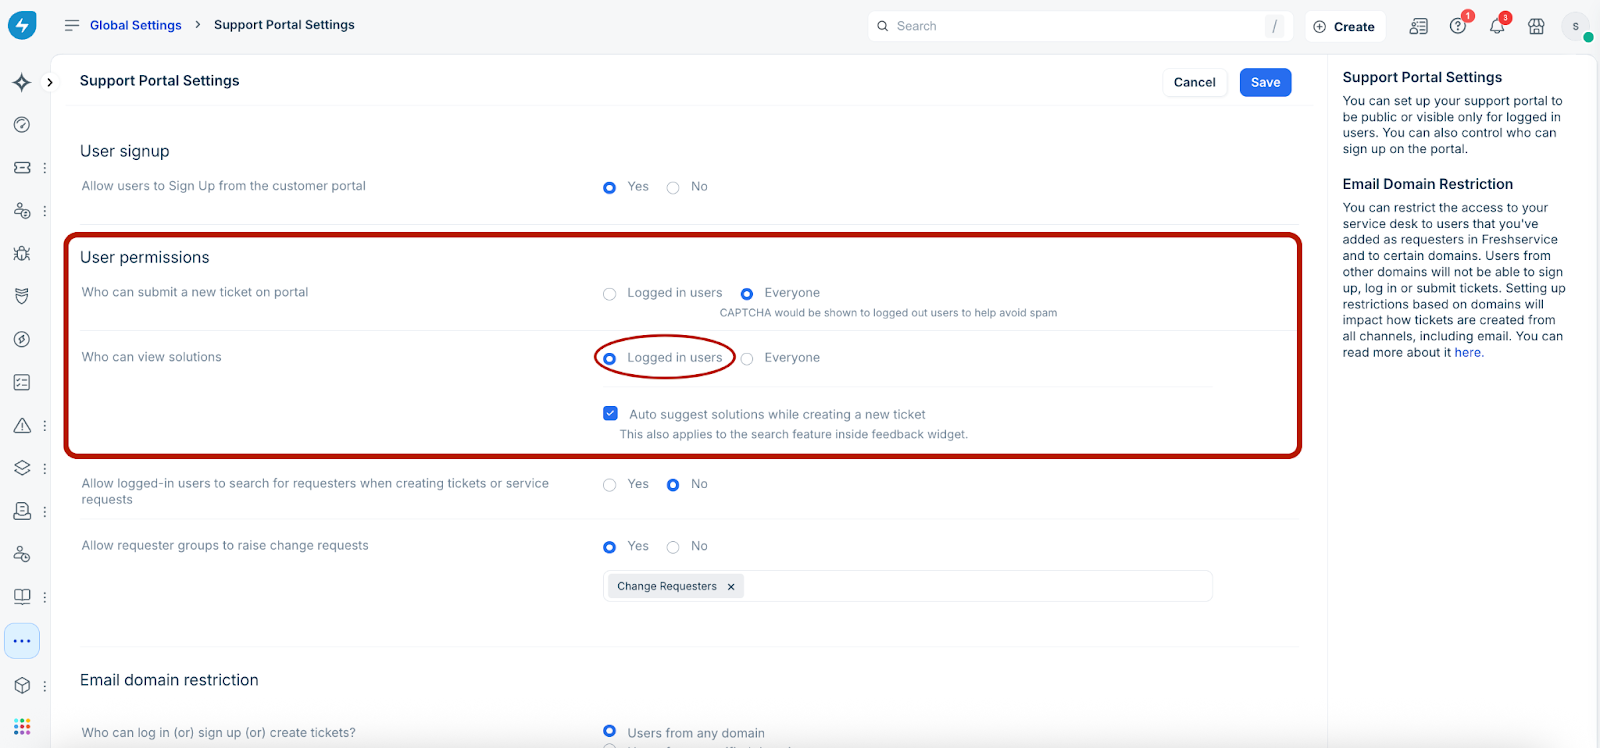
Can I configure the knowledge base solution articles' settings so they are accessible only to logged-in users?
Yes, you can configure knowledge base articles so they can be accessed only by logged-in users. Go to Admin > Global Settings > Channels > Support Portal, and select the Logged in users option under User permissions > Who can view solutions.