Workday has three primary types of services that can be used to integrate data. Firstly, the Workday Web Services is a set of SOAP APIs that enable users t o read and write data in and out of Workday. Next, the Workday REST is a set of REST APIs predominantly used to manipulate custom objects. Lastly, the Workday Report-as-a-Service (RaaS) allows reading data from all custom reports.
TABLE OF CONTENTS
- How to connect to Workday
- Before connecting to Workday
- Setting up the connection to Workday
- How to grant integration permissions between Workday and Freshservice
How to connect to Workday
Before connecting to Workday
Workday recommends using an Integration System User (ISU) for integration using third-party services. There are a few reasons for this. Firstly, all operations performed by the integration will be logged under this worker instead of one dedicated to integration and workflow processes. Furthermore, if this worker's security profile changes, or if the worker is terminated, integrations that rely on this worker's user account will no longer work. For security reasons, each ISU should be restricted to a single integration system.
Furthermore, you may need to register a Workday API client if working with custom objects. This is required since authentication to use the Workday REST API requires an OAuth client setup.
Register Integration System User
The ISU should have all the permissions to perform the required actions for your integration scenario. When building recipes, you may encounter a 403 error, which means that the ISU does not have sufficient permission for the action.
Below is the error message when ISU does not have enough permission.

| Step | Description |
| Create ISU account | Access the Create Integration System User task and configure a Workday user account for the integration. Keep the Session Timeout Minutes default value of 0 to prevent session expiration. An expired session can cause the integration to time out before it successfully completes. Select the Do Not Allow UI Sessions checkbox if you wish to prevent the integration system user from signing in to Workday through the UI. To avoid integration errors caused by expired passwords, Workday recommends that you prevent Workday user passwords from expiring. Access the Maintain Password Rules task and add the integration system user to the System Users exempt from password expiration field. |
| Create Security Group | Access the Create Security Group task and create an Integration System Security Group. Locate the Type of Tenanted Security Group field, choose and name the security group. Workday offers two types of security groups as follows:
Select the appropriate security group to ensure the right security for your integration.
After you create the security group, you must assign members to it. Add the Integration System User you registered in the previous step. Also make sure to specify the organization scope if you picked the constrained group
|
| Grant Domain access to Security Group | To grant the security group access to the domains required by your integration, follow these steps for each domain: Search for Maintain Permissions for Security Group in Workday and select the task. Choose the security group you created in the previous step from the Source Security Group list to modify its permissions. Navigate to the Maintain Permissions for Security Group > Domain Security PolicyPermissions tab and assign necessary permissions for each domain.
|
| Activate Security Policy Changes to ISU | Search Activate Pending Security Policy Changes through the search box in Workday. Select the task - Activate Pending Security Policy Changes. Enter a reason for your audit in the comment field to initiate the task.
Select the confirm checkbox and click ok.
|
| Optional | In the Global Preferences area, select a preferred locale and display language for the integration system user. These settings control what language Workday uses for the integration data. An outbound integration sends data in the preferred language and an inbound integration saves data in the preferred language. If you leave these fields blank, Workday uses the default locale and display language for integration data. |


You may find out more about setting up an ISU in the Workday documentation.
Register API Client
This step is required only if you wish to work with custom objects in Workday. Search for Register API Client for integrations in the Workday search and select the option that appears to access the registration page.

Select the Non-Expiring Refresh Tokens option after you assign a name for your API client. Specify the scope of access for the API client. Make sure to include the Integration scope, which covers essential domain security policies such as Integration Build, Integration Debug, Integration Process, and Integration Event. This is a minimum requirement for establishing a connection with Workday.
Confirm the details to generate the Client ID and Client Secret

Create a non-expiring refresh token
To create a non-expiring refresh token for your API client, search for View API Client reports on Workday. Navigate to the API Clients for Integrations tab and select the API client you registered in the previous step.
Click the ellipsis (...) next to the client name and choose API Client > Manage Refresh Tokens for Integrations for token management.

Input the Workday account of a user authorized to access the custom report in the Workday Account field.
After that navigate to the Delete or Regenerate Refresh Token section and select the Generate New Refresh Token.

Once the above step is completed, copy the refresh token from the Successfully Regenerated Refresh Token page.
Find your token endpoint URL
To find your token endpoint URL in Workday, search and select the View API Clients report through the search option. Save the URL listed in the Token Endpoint field.

Remember to save the Client ID, Client Secret, Authorization Endpoint, and Token Endpoint. They will be required for the Workday integration connector setup.
Setting up the connection to Workday
The Workday connector is currently split into 3: the main Workday connector, the Workday Web Services connector, and the Workday REST connector. All of them generally follow the same authentication pattern, albeit with slight variations on what's supported in each connector.
Workday connector
Tip: We recommend using OAuth 2.0 or basic authentication separately. Do not use the now deprecated 'Hybrid' authentication method.
The Workday connector supports OAuth 2.0 and basic authentication methods. Please note that OAuth 2.0 is required to work with Workday REST API and custom objects.

Connection field | Description |
| Connection name | Give this Workday connection a unique name that identifies which Workday tenant it is connected to. |
| Authentication type | Supports either OAuth 2.0 or basic authentication (username/password). |
| Workday web services version | Select the web services version you want to use from the list of supported web services. |
| Tenant ID | Locate and enter your Tenant ID from the URL when logged into Workday. For example, in https://impl.workday.com/sample_company/d/home.htmld, the tenant ID is sample_company. |
| WSDL URL | This URL is used to generate schema and forms the base URI for every API requests. Find out how to obtain this URL from this Workday article . The default is https://wd2-impl-services1.workday.com/ccx/service/ |
| [OAuth 2.0] Client ID | Client ID of the API Client you created to connect. Only required if using custom objects. |
| [OAuth 2.0] Client secret | Client secret of the API Client you created to connect. Only required if using custom objects. |
| [OAuth 2.0] Refresh token | Refresh token of the API Client you created to connect. Only required if using custom objects. |
| [OAuth 2.0] Authorization endpoint | Authorization endpoint of the API Client you created to connect. Only required if using custom objects. |
| [OAuth 2.0] Token endpoint | Token endpoint of the API Client you created to connect. Only required if using custom objects. |
| [Optional] Workday tenant timezone | The timezone in your Workday tenant settings. By default, Workday returns data effective from the current day in PST time, which might differ from your Workday tenant's timezone. |
| [Optional] Advanced XML payload for multiple ID values | By default, when XML is constructed from your input, fields with multiple values are each wrapped within a container. For example: <languages><language>english</language></languages><languages><language>chinese</language></languages> Setting the value to yes will unwrap them as follows: <languages><language>english</language><language>chinese</language></languages> Consider enabling this for newer Workday Web Services version, or when you encounter invalid payload errors. |
Workday Web Services connector
The Workday Web Services connector supports both basic and OAuth 2.0 authentication methods.

| Connection field | Description |
| Connection name | Give this Workday connection a unique name that identifies which Workday tenant it is connected to. |
| Workday web services version | Select the web services version you want to use from the list of supported web services. |
| Tenant ID | Tenant ID is found in the URL when you are logged into Workday. For example, if the URL of your Workday tenant is https://impl.workday.com/sample_company/d/home.html , tenant ID is sample_company |
| WSDL URL | This URL is used to generate schema and forms the base URI for every API requests. Find out how to obtain this URL from this Workday article . The default is https://wd2-impl-services1.workday.com/ccx/service/ |
| Authentication type | Supports either OAuth 2.0 or basic authentication (username/password). |
| [Basic Auth] Login name | This should be the login name for the ISU. Required when authenticating via basic authentication. |
| [Basic Auth] Password | This should be the login password for the ISU. Required when authenticating via basic authentication. |
| [Optional] Workday tenant timezone | The timezone in your Workday tenant settings. By default, Workday returns data effective from the current day in PST time, which might differ from your Workday tenant's timezone. |
Workday REST connector
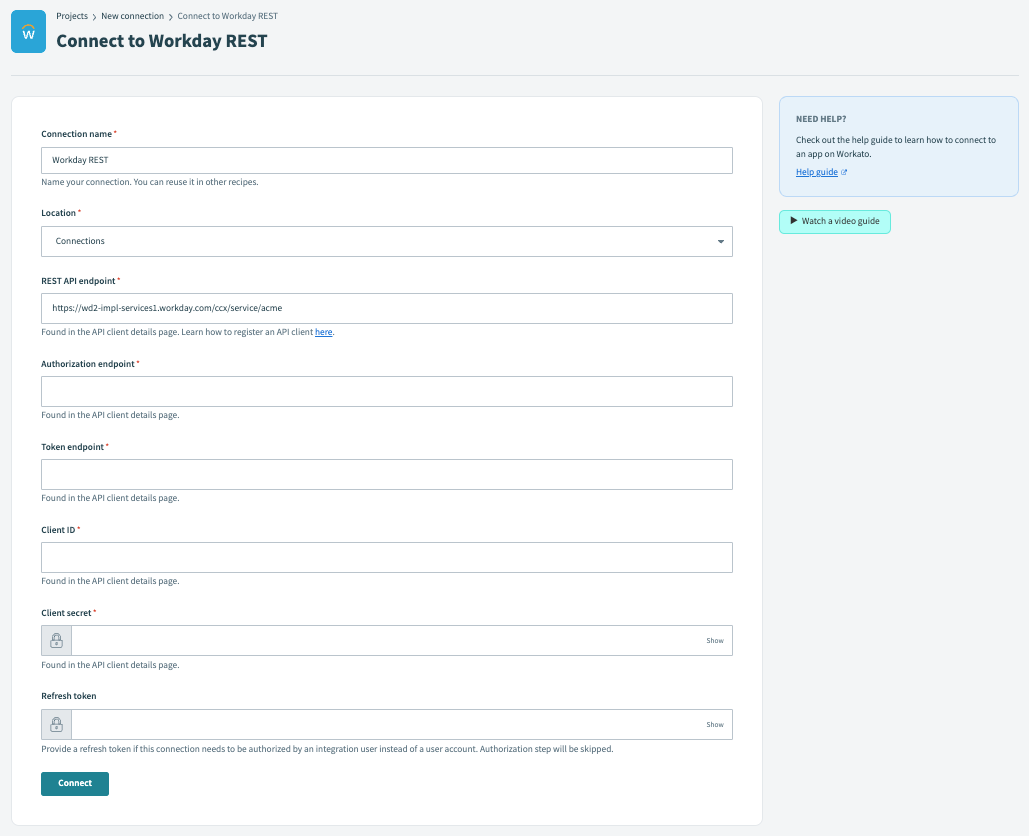
| Connection field | Description |
| Connection name | Give this Workday connection a unique name that identifies which Workday tenant it is connected to. |
| REST API endpoint | The API of the rest endpoint to be used. Can be found in the API client details page. |
| Authorization endpoint | Authorization endpoint of the API Client you created to connect. |
| Token endpoint | Token endpoint of the API Client you created to connect. |
| Client ID | Client ID of the API Client you created to connect. |
| Client secret | Client secret of the API Client you created to connect. |
| Refresh token | Refresh token of the API Client you created to connect. |
How to grant integration permissions between Workday and Freshservice
Grant the follow domain security permission to enable Freshservice to fetch worker data from your Workday account.
