
 Community
 Video Library
 Agent Training
 Freshservice
 Freshdesk
 Freshchat
 Freshcaller
 Freshsales
 Freshteam
 Freshworks Neo
 Freshsurvey
 Freshservice for MSP
 TABLE OF CONTENTS
- Overview
- Prerequisites
- Configure placeholders
- List of available placeholders
- Frequently asked questions (FAQs)
Overview
Utilizing placeholder configurations within canned responses provides an effective method for integrating dynamic content and tailoring automated emails. Addressing customers by name, providing status updates, and incorporating direct ticket links helps successfully maintain the context of the conversation.
Note: For details on various frequently asked questions (FAQs) about placeholders related to email notifications, workflow automations, and dynamic placeholders and functions, see the FAQs section below.
Prerequisites
You must have canned responses configured at the workspace level.
Note:
To learn how to configure canned responses, see Create common reply templates with canned responses.
The canned responses settings will automatically populate all responses across various workspaces an agent is authorized to access.
Configure placeholders
Dynamic placeholders can be included automatically in communications sent to various recipients, including email notifications and canned responses. Examples include utilizing {{ticket.id}} to reference specific ticket IDs or {{ticket.requester.firstname}} to populate the first names of individuals.
To configure dynamic placeholders in canned responses:
Log in to your Freshservice account.
Go to Admin > {Workspace Name} > Automations & Productivity > Agent Productivity > Canned Responses.
Select the Personal or Shared tab (depending on how you want to create canned responses).
To create a new canned response, click the Create dropdown and select Canned Response.
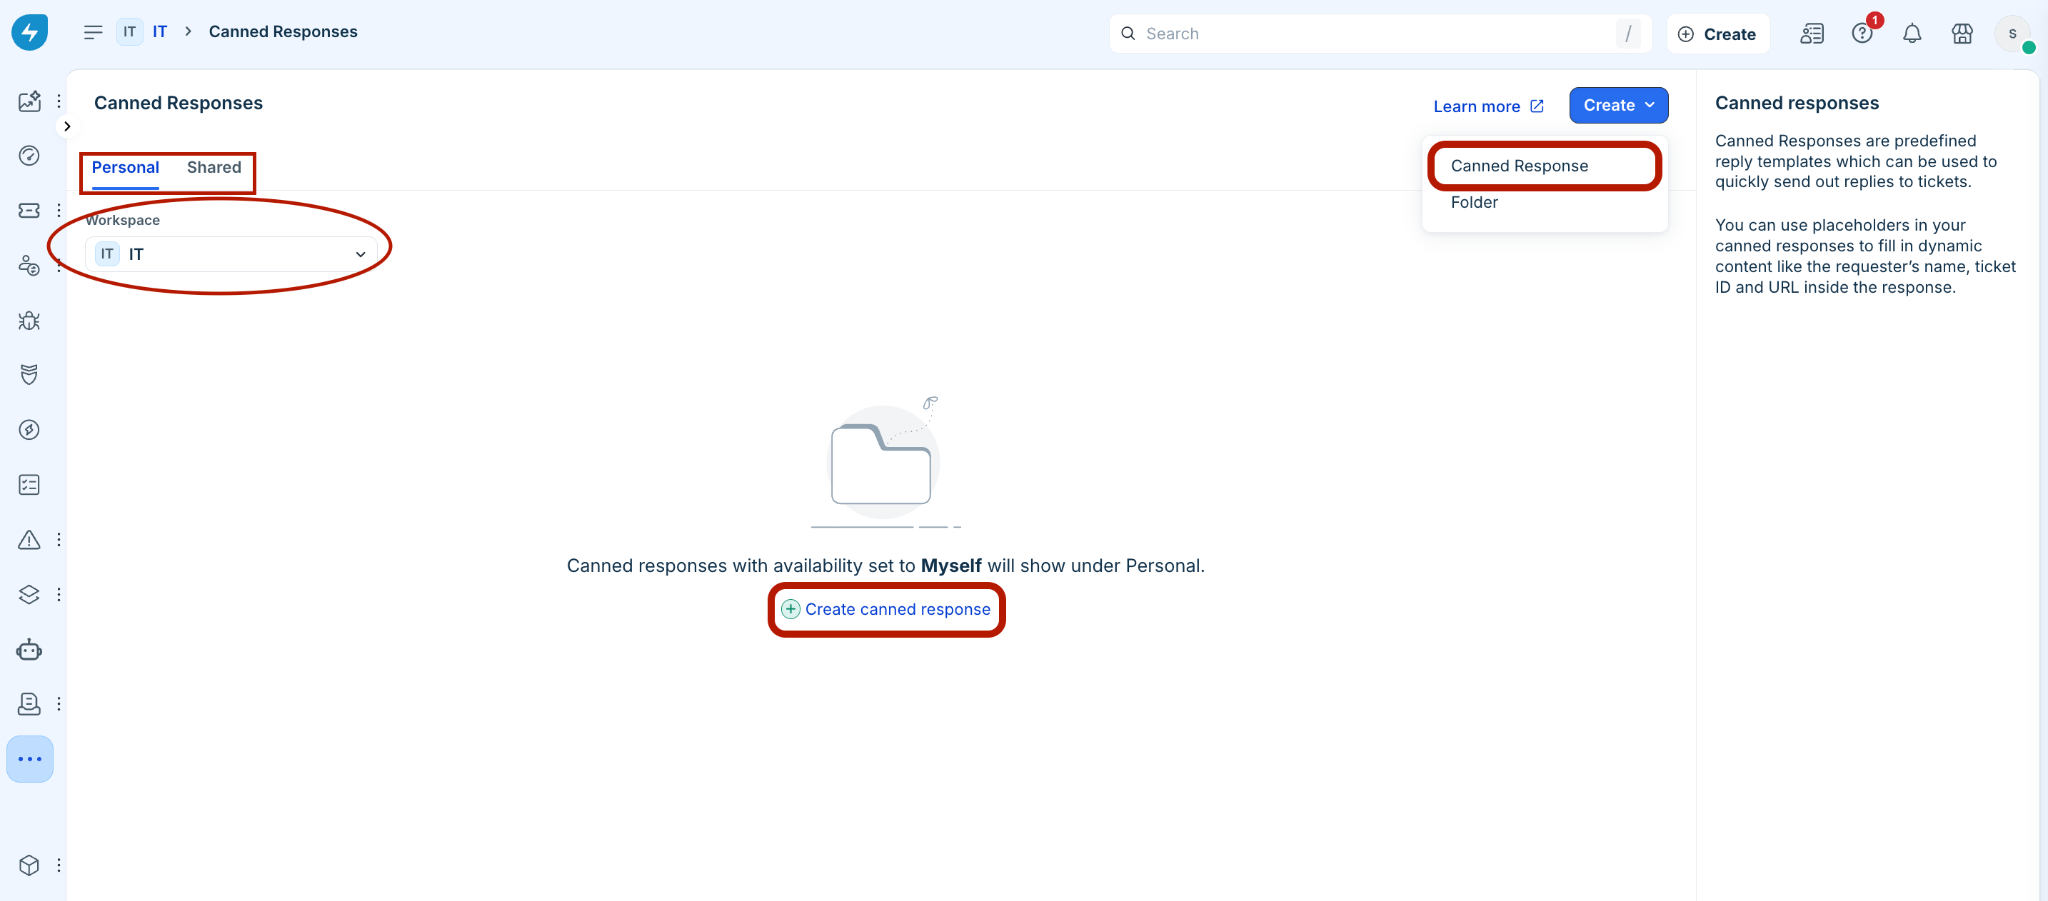
Or, select an existing canned response.
Click Insert Placeholders to add placeholders in the message.
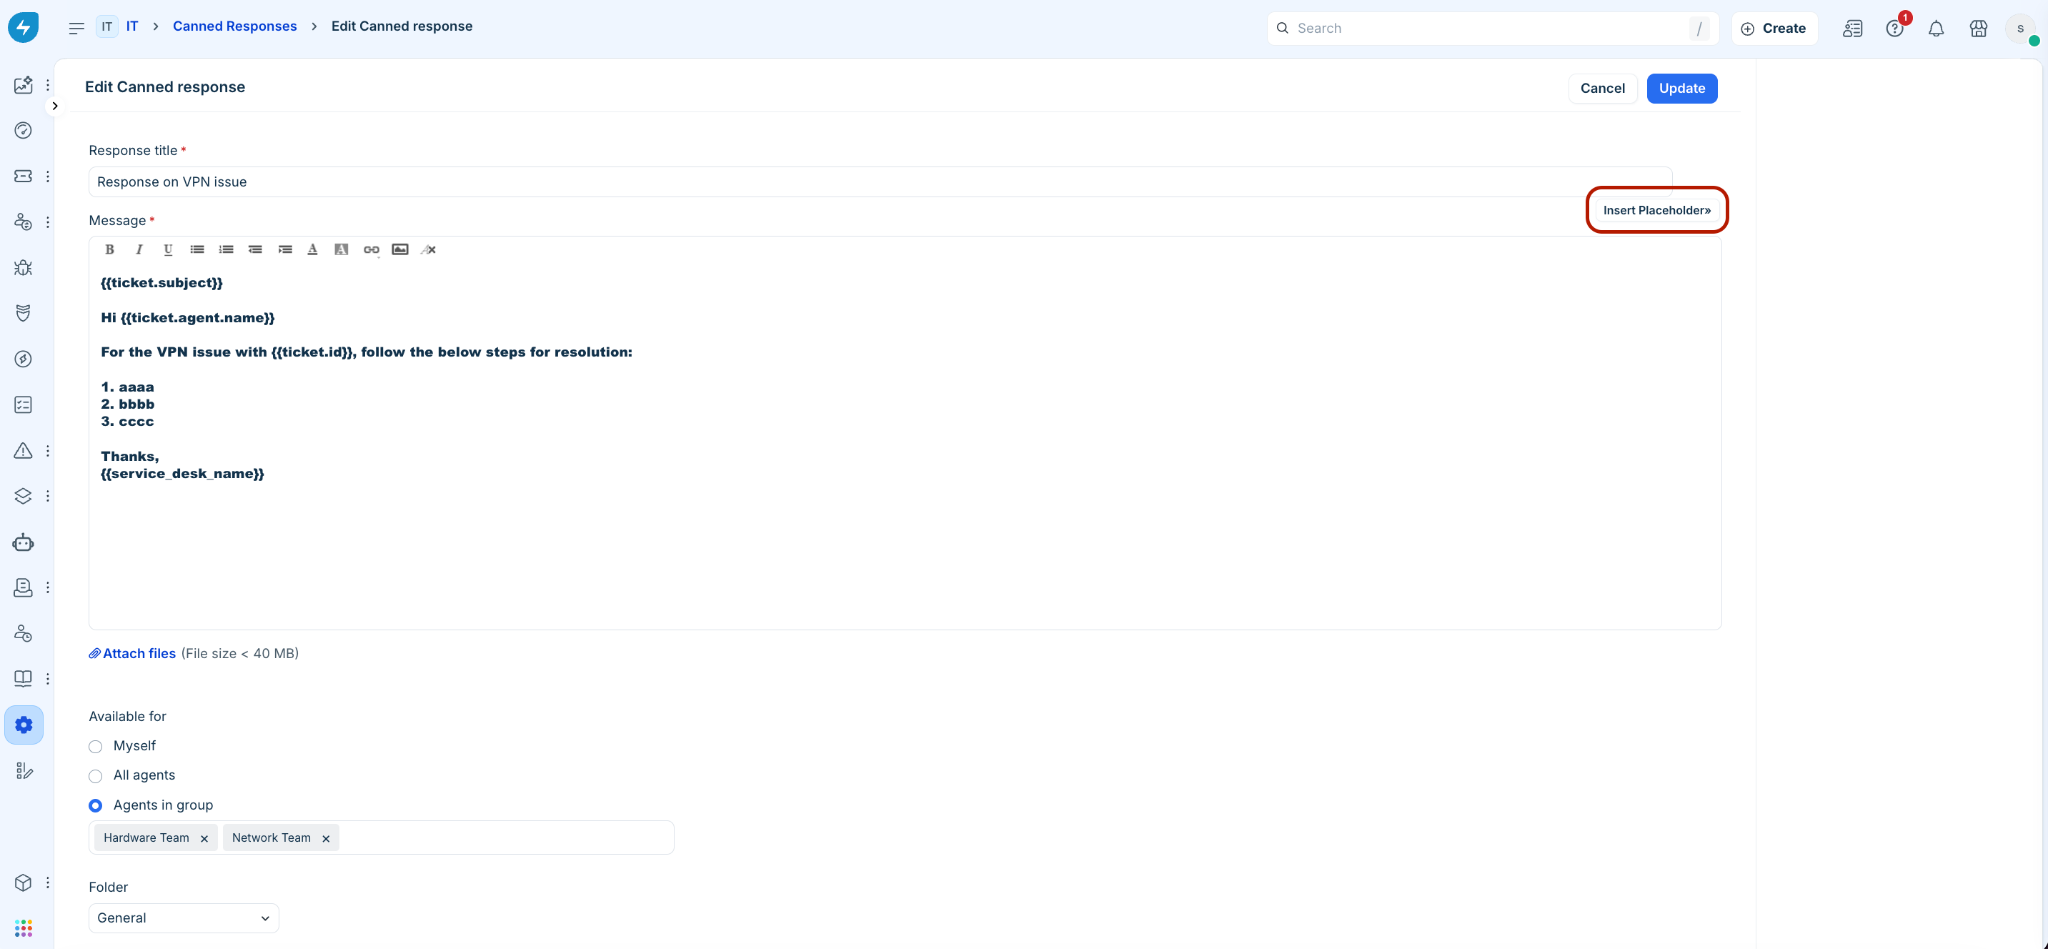
Note: These placeholders can be used within automated email notifications (when enabled), canned responses (which are manually inserted into ticket replies), reply templates in workflow automations, scenario automations, supervisor rules, and so on.
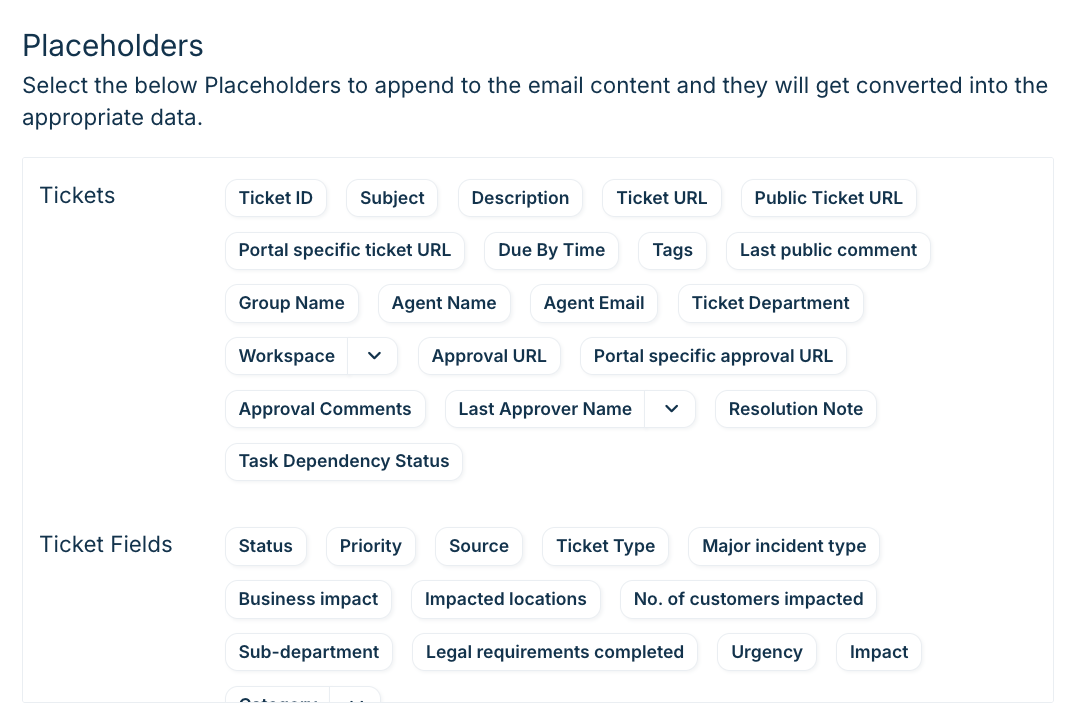
List of available placeholders
The following table provides a suggestive list of the available placeholders.
Note:
By default, Freshservice provides these placeholders across different modules, though the exact list can differ depending on the module.
The availability of certain placeholders, such as {{ticket.billable_hours}} and {{ticket.total_time_spent}} could also vary depending on your specific plan or features.
Frequently asked questions (FAQs)
Email notifications and templates
1. Why is the {{ticket.group.name}} placeholder blank in new ticket email notifications?
The placeholder appears blank if it has not been added to the specific email notification template being sent.
To resolve this issue:
Go to Admin > Email Notifications.
Open the relevant email template.
Ensure the {{ticket.group.name}} placeholder is inserted in the subject or message.
Save your changes.
2. Why are ticket links redirecting to http://view%20ticket/ instead of valid URLs?
This issue occurs when dynamic placeholders are affected by domain or CNAME updates in your account.
To fix this issue:
Check for recent domain or CNAME updates under Admin > Service Desk Settings > Set up SPF and DKIM email authentication.
If CNAME settings were modified, restore the correct configuration.
Open the affected notification template, delete the broken link placeholder, and re-insert it.
Verify that network or firewall settings are not blocking domain resolution.
Note: Re-inserting the placeholder fixes newly generated ticket links. It does not retroactively update links in previously sent emails.
3. How do I update the {{service_desk_name}} placeholder across templates?
To change your service desk name and align placeholders:
Go to Admin > Portals.
Update the Support Portal name.
Go to Admin > Email Notifications and locate your notification templates.
Standardize placeholders across all templates. While {{helpdesk_name}} and {{service_desk_name}} are interchangeable, using {{service_desk_name}} is recommended for service desk mode.
4. How do I add spacing or separators between placeholders in a ticket subject line?
You can enter spaces, hyphens, or other characters directly between dynamic placeholders in the template subject field.
Example: {{ticket.id}} - {{ticket.subject}}
5. Can email notifications display a non-agent responder's name instead of the original requester?
No. Freshservice notification templates rely on {{ticket.requester.name}} to identify non-agent correspondents on a thread. There is currently no dynamic placeholder available to capture third-party or non-agent responder names.
6. Where does the information displayed in Email Notifications originate?
The content (such as ticket URLs or dynamic values) is generated from dynamic placeholders inserted directly into the email template.
To view or modify this content:
Go to Admin > Email Notifications.
Open the specific notification template.
Click Insert Placeholders to select or adjust dynamic fields.
7. Will an email reply append to the original ticket if the subject line is modified?
Yes. As long as the ticket ID placeholder (for example, {{ticket.id}}) remains intact in the subject line, Freshservice appends the incoming response to the existing ticket.
8. How can I remove the timezone suffix from the {{ticket.created_on}} placeholder?
The {{ticket.created_on}} placeholder automatically includes system timezone details by default. This format is hardcoded and cannot be modified or truncated within standard notification templates.
Workflow automations and API integration
9. How do I retrieve a requester's VIP status in automations?
In your workflow automator canvas, drag a Web Request node from the left sidebar (do not use an Action node).
Configure the request details:
Request Type: GET
URL: https://<your-domain>[.freshservice.com/api/v2/requesters/](https://.freshservice.com/api/v2/requesters/){{ticket.requester.id}}
Authentication Type: Select Basic Auth. Enter your API Key as the Username and X (or any string) as the Password.
Click Test Web Request in the node drawer.
Copy the sample response JSON body returned from the test.
Note: In the Freshservice API, the VIP field is named vip_user (a boolean: true or false), not vip_status.Drag a JSON Parser node onto the canvas and connect it after the Web Request node.
Set Source to Web Request > response_body.
Paste the sample JSON into the payload field and click Generate Output.
In subsequent workflow nodes (for example, Conditions or Actions), reference the parsed vip_user field under Parser Fields.
10. Why are onboarding form placeholders missing or blank in automated emails?
Onboarding placeholders appear blank if fields are not mapped on the parent ticket form.
To resolve this issue:
Go to Admin > Employee Onboarding.
Under Create Tickets, edit the parent ticket configuration.
Ensure all required onboarding fields are present on the parent ticket form.
Save your field associations so they populate as available placeholders in automated emails.
11. Why are placeholder values in a previously configured active workflow no longer being sent?
If placeholders suddenly stop populating:
Inspect the target record: Check the specific ticket, requester profile, or asset that had the issue. Verify if the source field actually contains data.
Review ticket activities: Check the ticket's Activity tab to see when fields were updated relative to when the workflow fired.
Check workflow execution logs: Go to Admin > Audit Log to verify the payload that was passed during execution.
Audit admin settings: Ensure no recent changes were made to form fields, custom objects, or user fields.
Contact Freshservice Support if the ticket field clearly contains valid data at the exact moment the workflow runs, but the execution logs show it resolved to blank.
12. How do I include offboarding employee details in service request emails and tickets?
Use the built-in Employee Offboarding module (Admin > Service Request Management > Employee Offboarding) OR create a standard Service Catalog item with your custom fields (for example, Employee Name, Department, Last Working Day).
Go to Admin > Workflow Automator and create a workflow triggered on Ticket Creation.
Add a Condition: Service Item is Employee Offboarding (or your service item's name).
Add a Send Email action node.
In the email body, insert the native placeholder {{ticket.requested_items}} to automatically output a formatted summary of all submitted form fields, OR select individual fields from the Requested Item placeholders list.
If you want the offboarding details added directly into the ticket discussion thread for agents:
Add an Add Private Note action node in your Workflow Automator and insert the {{ticket.requested_items}} placeholder.
13. What steps should I follow to troubleshoot a failing workflow automation?
To troubleshoot common workflow execution issues:
Workspace scope: Ensure the ticket or service request is created in the specific workspace where the workflow rule is active.
Comment scope: Note that {{ticket.latest_public_comment}} evaluates public comments only—it ignores private notes and approval comments.
Condition logic: Do not use AND logic on a single field with multiple values. Use OR conditions or set condition nodes to Fulfill Any Condition.
Session issues: Refresh your browser session, log out, and log back in to clear cached portal states.
If the workflow still fails after verifying these 4 steps, check the Ticket Activity Log / Audit Trail. It will tell you if the workflow was evaluated and skipped, or if a prior webhook/app action block delayed subsequent rule execution.
14. How do I retrieve the ticket ID of a newly created ticket?
You can retrieve the ticket ID using either of the following options:
Dynamic placeholder: Select Insert Placeholder > Ticket ID Numeric in your email template or workflow node.
API call: If the workflow generates a ticket using an external API action, you would call the Create a Ticket API endpoint (POST). The response payload returned by that POST request will contain the new ticket's details, which you can then feed into a JSON Parser node to extract ticket.id. If you need to retrieve an existing ticket ID based on subject, requester, or custom fields, you must use the Filter/Search Tickets API endpoint (GET /api/v2/tickets?query="...").
Use option 1 for standard workflows triggered within the platform. If you are creating tickets externally via webhooks/APIs, parse the response body of the Create a Ticket call rather than attempting a "View a Ticket" request.
15. How do I fix workflow errors caused by non-JSON body payloads?
Workflow webhook payloads require valid JSON formatting.
To resolve formatting errors:
Ensure the request body follows strict JSON syntax.
Insert custom field placeholders directly inside double quotes within the JSON structure.
Dynamic placeholders and functions
16. How do I populate agent-specific details like location or phone in reply templates?
You cannot invoke {{ticket.agent.address}} or {{ticket.agent.phone}} directly in canned responses or reply templates. Manage agent contact info using Agent Profile Signatures instead.
17. Why does the addDays({{ticket.created_on}}, 2) expression return a blank value?
This occurs when the date placeholder is missing single quotes or uses a non-ISO date format.
To resolve this issue:
Use the ISO variant placeholder for date calculations (for example, {{ticket.created_on_iso}}).
Wrap the date placeholder in single quotes inside the Expression Builder Node: addDays('{{ticket.created_on_iso}}', 2)
18. How do I fix a workflow that failed after asset.acquisition_date_iso was removed?
If a workflow referencing {{asset.acquisition_date_iso}} is failing, check these common root causes:
Missing enclosing quotes in expressions In Expression Builder nodes, date placeholders must be wrapped in single quotes:
addDays('{{asset.acquisition_date_iso}}', 30)
Null or blank asset field values If the target asset record lacks a populated acquisition date, {{asset.acquisition_date_iso}} evaluates to empty/null, breaking downstream calculations. Add a condition node earlier in the workflow to verify that Acquisition Date is set / not empty.
Module context mismatch Ensure the workflow is running in the Asset module context (or referencing an asset associated via a reader node/lookup). Calling {{asset.*}} tokens in a pure Ticket workflow without reading asset details first will result in blank values.
Keep the _iso suffix whenever passing dates into expression nodes, webhooks, or API payloads. Reserve standard non-ISO date placeholders for human-facing outputs like email body templates.
19. What is the correct syntax for the addHours function in Freshservice expressions?
Pass an ISO 8601 formatted timestamp directly into the addHours function.
Syntax: addHours('{{ticket.created_at_iso}}', 3)
Note: Valid ISO timestamps must include timezone offsets (for example, 2026-10-30T13:39:23+00:00).