
 Community
 Video Library
 Agent Training
 Freshservice
 Freshdesk
 Freshchat
 Freshcaller
 Freshsales
 Freshteam
 Freshworks Neo
 Freshsurvey
 Freshservice for MSP
 Use Views to quickly find the tickets you need. You can filter tickets based on properties such as source, type, status, assigned agent, tags, and custom fields. Use the built-in views or create custom views that align with how your team works.
This article explains how to:
Use the default ticket views.
Create and share custom views.
Use saved views in dashboards and scorecards.
Troubleshoot common filtering issues.
Prerequisites
Before you begin, ensure that:
You have an active Freshservice agent account.
Your role includes the View tickets permission.
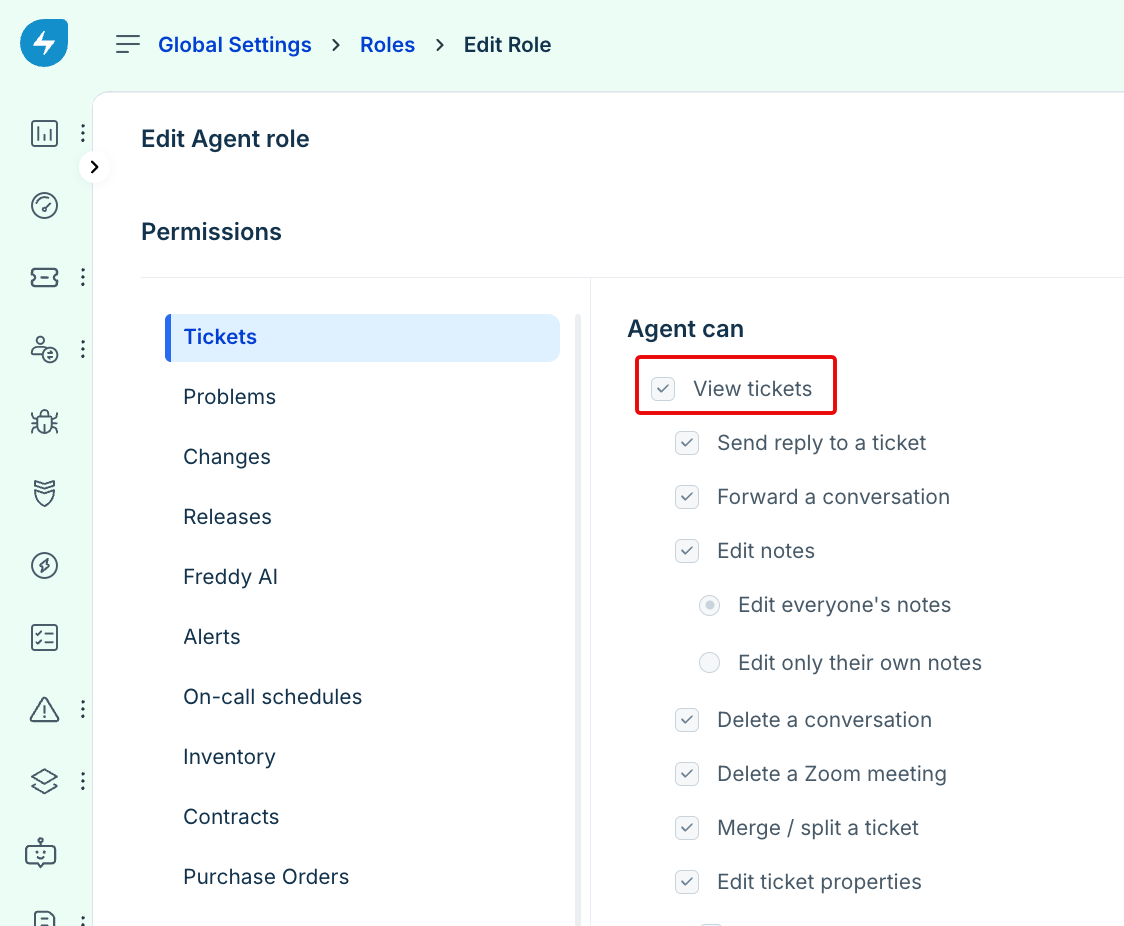
You have the Admin or Account Admin role if you want to create views that are available to all agents.
Your Freshservice plan includes dashboards if you want to use saved views in dashboard scorecards.
Overview of ticket views
Views help you focus on the tickets that matter most. You can filter tickets using properties such as source, type, status, assigned agent, tags, and custom fields.
When you apply or update a filter, Freshservice refreshes the ticket list to display only the matching tickets. You can combine multiple filters to further narrow your results.
For example, you can:
View tickets assigned to a specific agent.
Find tickets from a particular requester.
Review tickets with a specific status.
Locate historical tickets for reporting or analysis.
You can display filtered tickets in either List or Board view.
Default views
Freshservice includes several built-in views to help you access commonly used ticket lists without creating custom filters.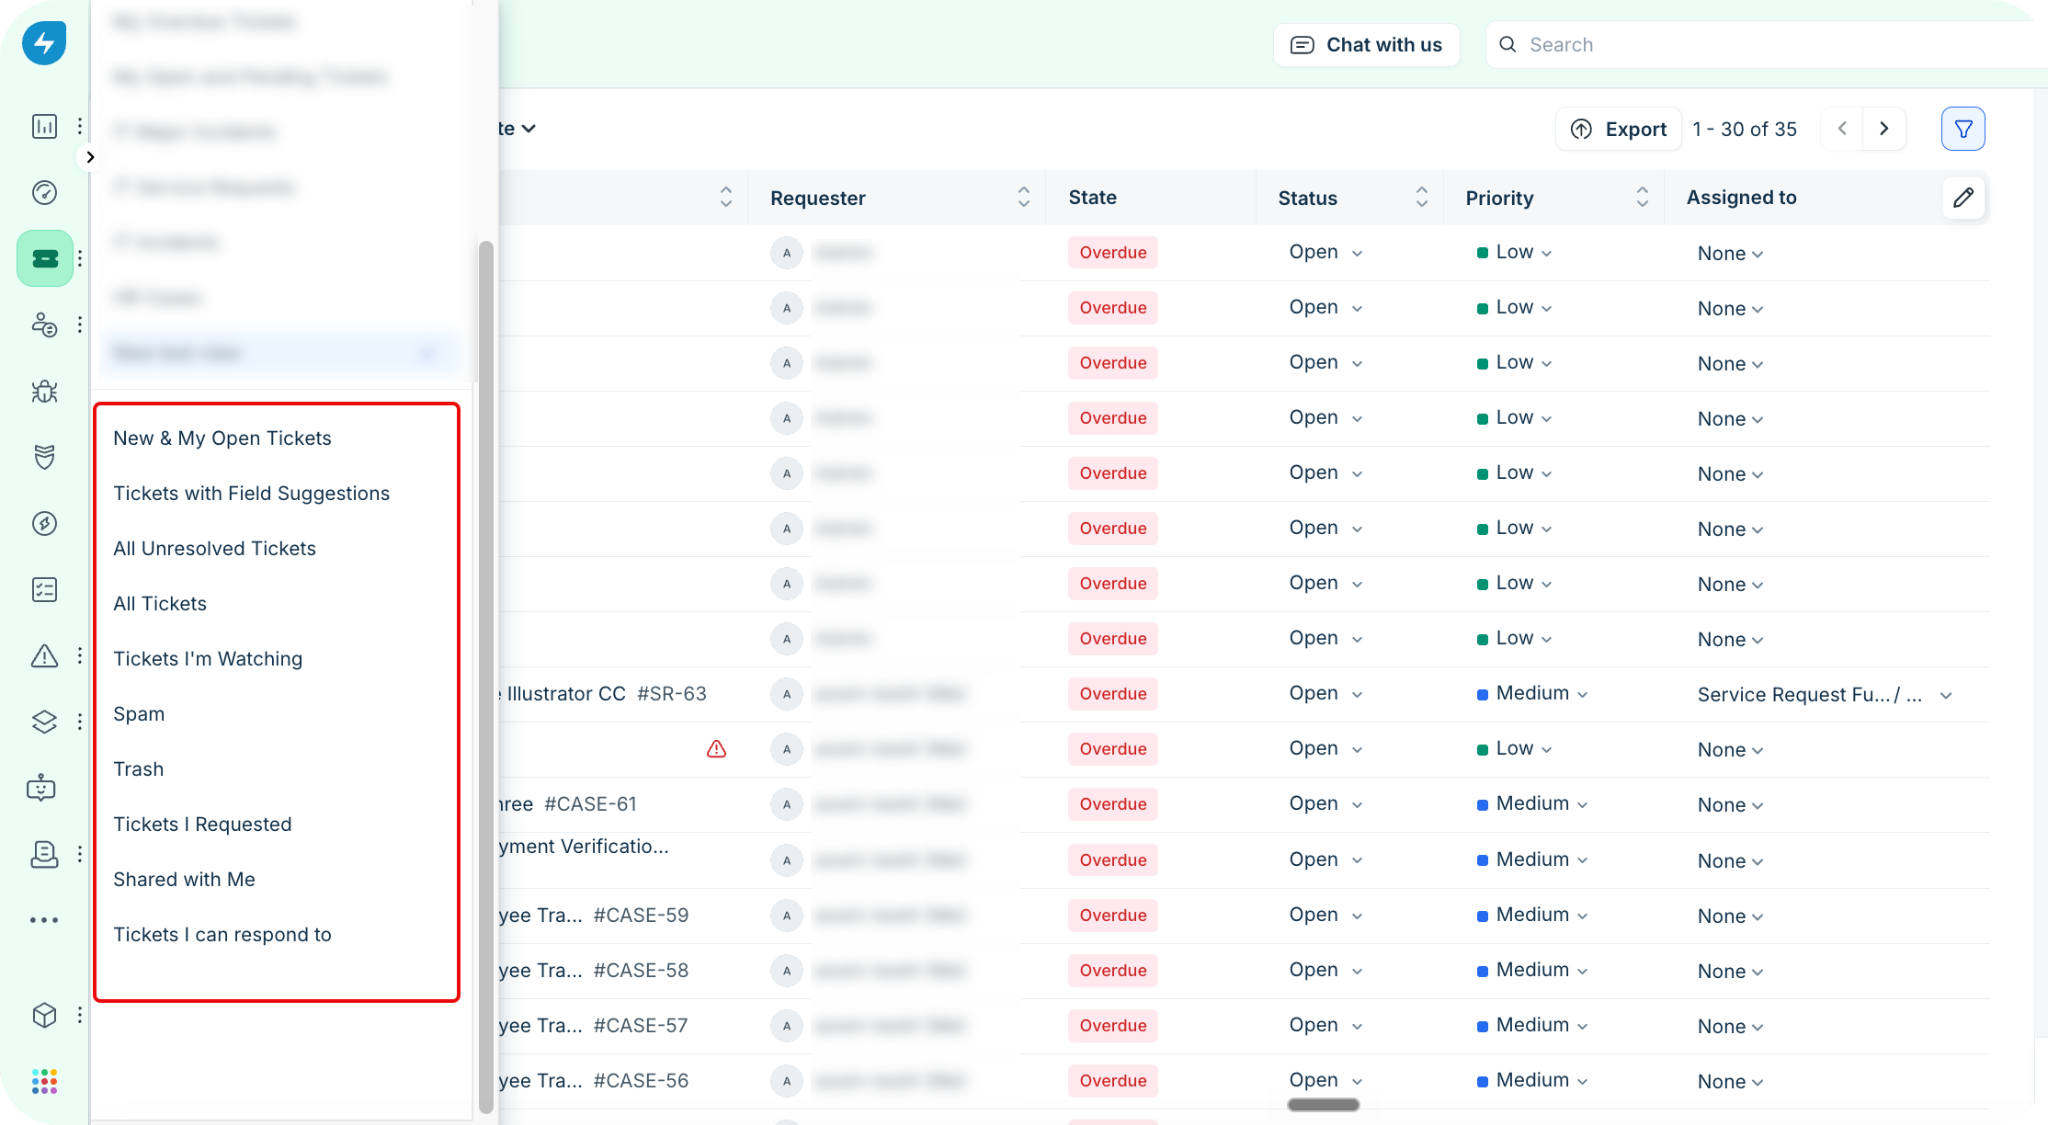
Create and save a view
Create a custom view when the default views don't meet your requirements. You can save the view and reuse it whenever you need it. You can also share the view with other agents.
To create and save a ticket view:
Go to Tickets.
Select List or Board view.
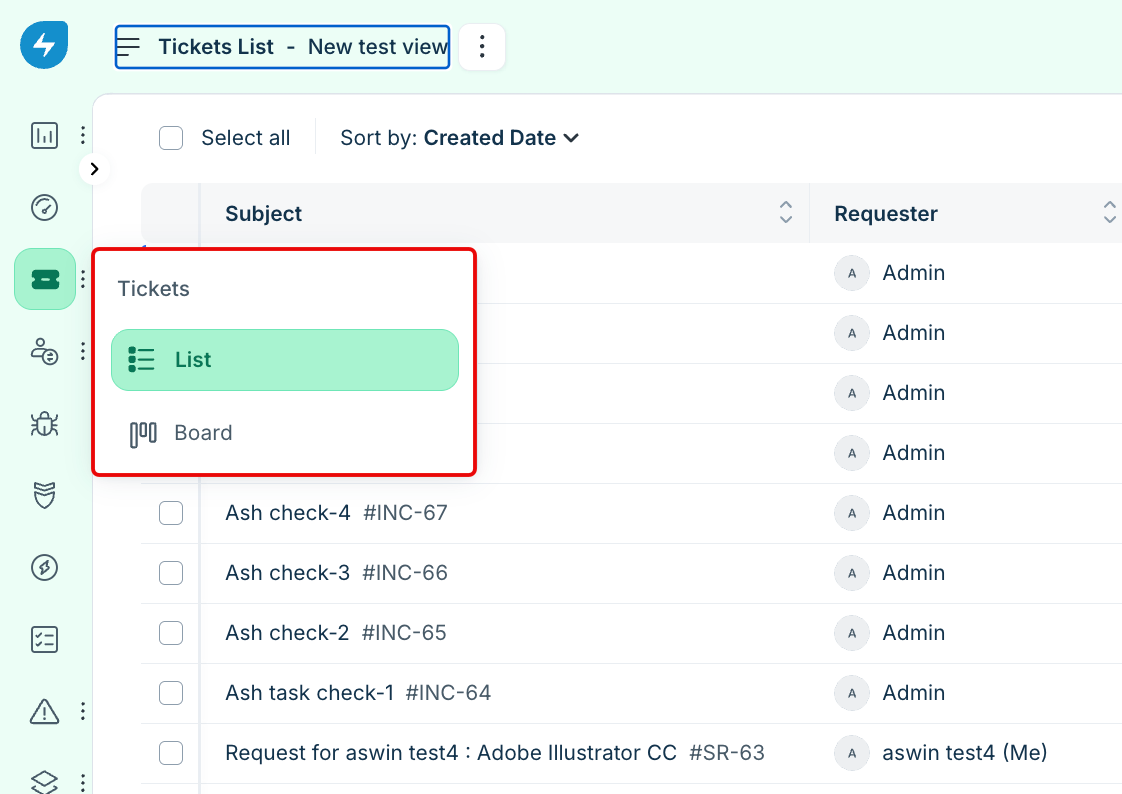
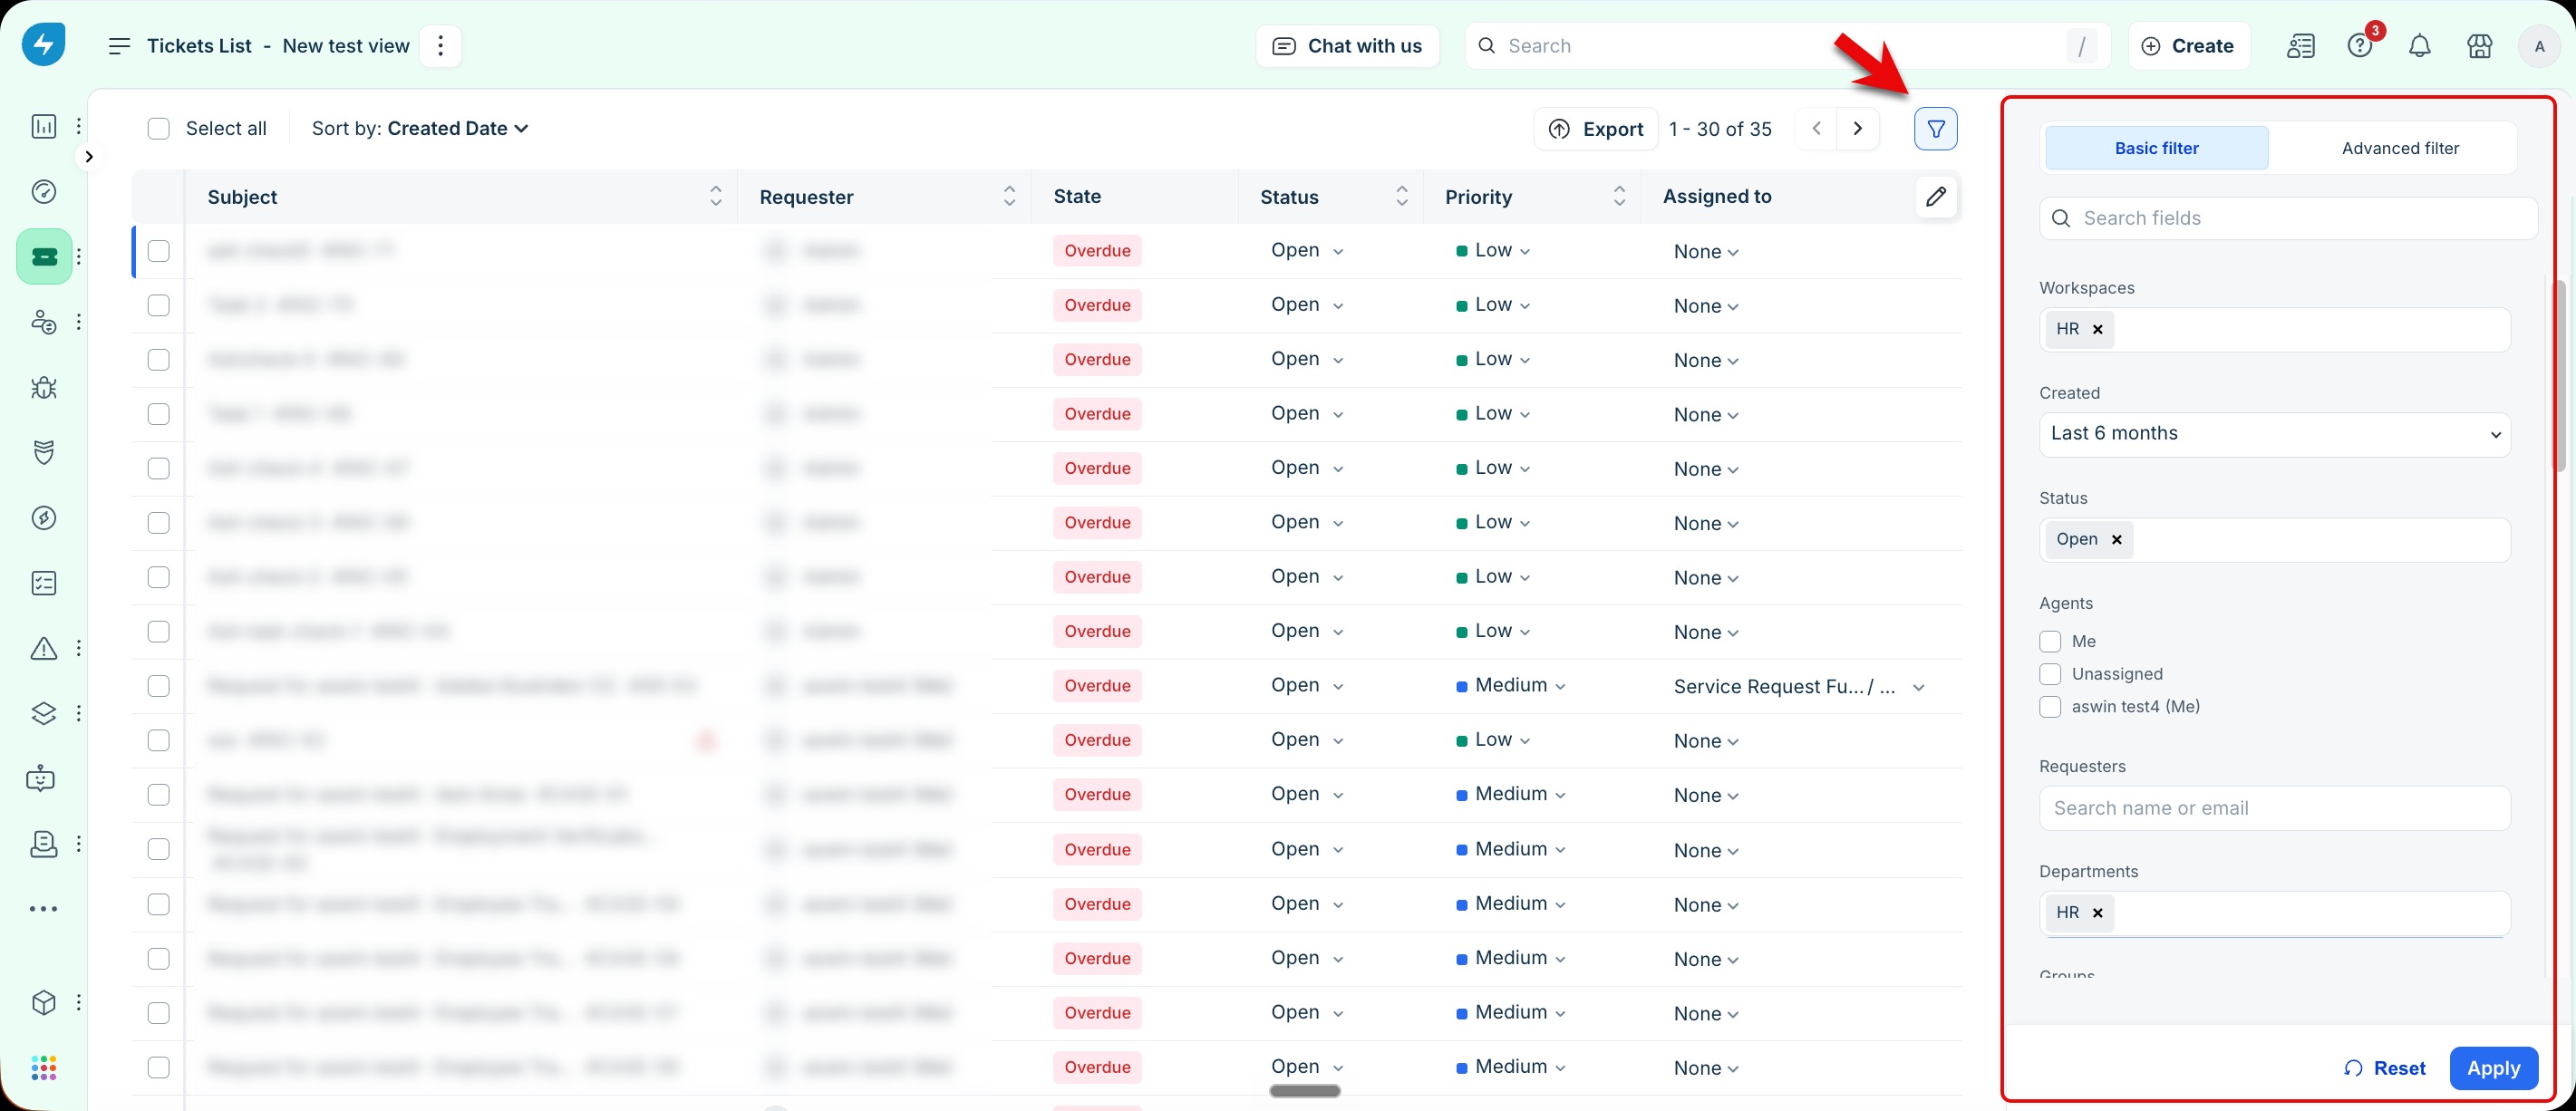
Use the filter panel to apply the filters you need.
Click Save as next to the view name.
Enter a name for the view.
Choose one of the following sharing options:
Only me: Makes the view available only to you.
Agents in the group: Makes the view available to agents in the selected group.
All Agents: Makes the view available to every agent in the account.
Click Save.
Note: Only users with the Admin or Account Admin role can create views that are available to all agents.
After you save the view, it appears in the Views list on the Tickets page.
Share views with agents and groups
When you save a view, you can decide who can access it.
The available sharing options are:
Only me: Only you can view and use the saved view.
Agents in the group: Agents in the selected group can access the view.
All Agents: Every agent in the account can access the view.
Choose the option that best matches how you want to share the view.
Note: Selecting All Agents requires the Admin or Account Admin role.
Make a group available for ticket assignment and dashboard sharing
If a newly created group does not appear when you assign tickets or configure dashboard sharing, review your business rules to ensure the group is available.
To verify the group settings:
Go to Admin > Business Rules for Forms.
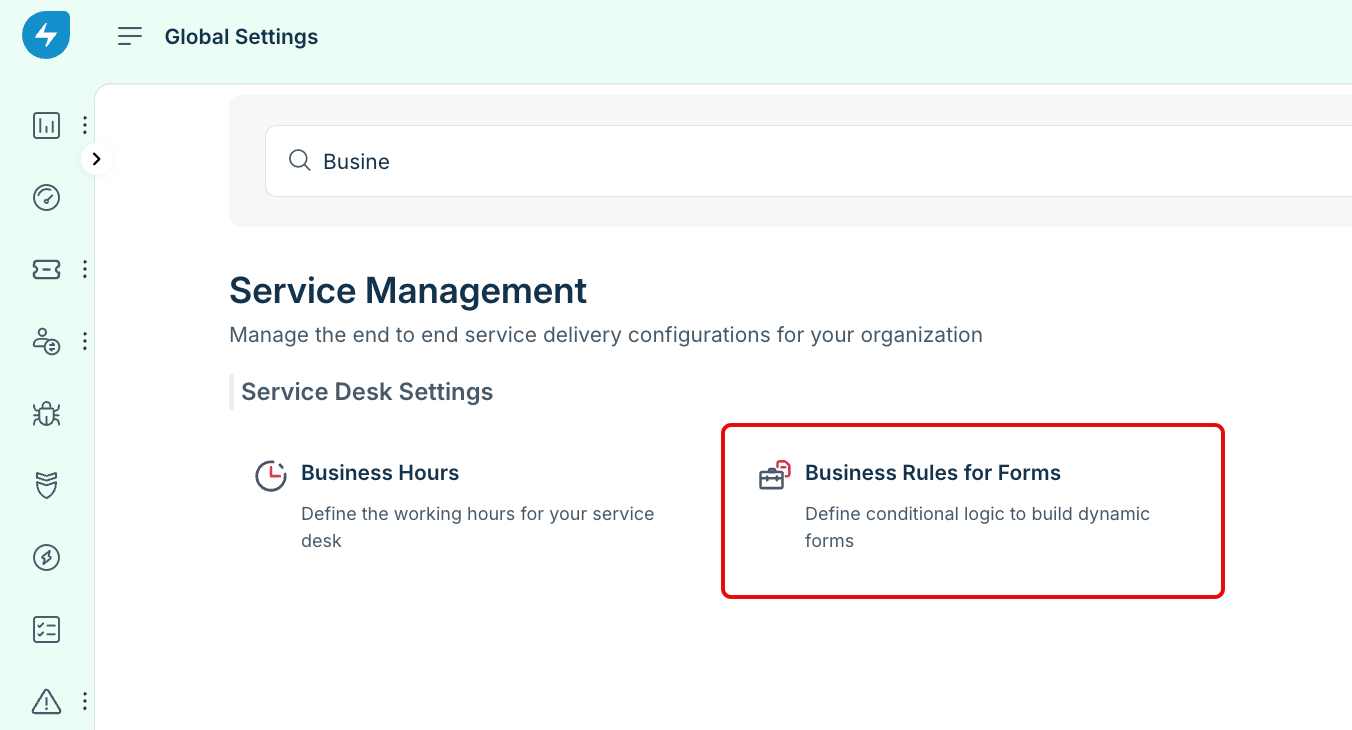
Review the existing business rules.
Confirm that no rule prevents the group from appearing as an assignment option.
After the group becomes available, create and save a ticket view that filters tickets for the group.
Use the saved view when configuring dashboard widgets.
Use saved views in dashboard widgets and scorecards
Use saved views as the data source for dashboard widgets and scorecards. This helps you build dashboards that display the tickets you want to monitor.
Add a scorecard widget
To create a scorecard widget based on a saved view:
Select the appropriate module, such as Tickets.
Create and save a ticket view with the required filters.
Go to the Dashboard > Edit.
From the Add Widget panel on the right side, select Scorecard Widget.
Select the saved view.
Save the widget.
Freshservice uses the selected view to display ticket data in the widget.
Show tickets for a specific group
To display tickets for a specific group in a scorecard:
Go to Tickets.
Open the filter panel.
Filter tickets for the required group.
Include all ticket statuses if you want to display the complete ticket count.
Save the view.
Edit or create the scorecard widget in the Dashboards.
Select the saved view as the widget's data source.
The widget displays only the tickets that match the selected view.
Show tickets for specific agents
You can also create views that display tickets assigned to specific agents.
To create an agent-based view:
Go to Tickets.
Filter tickets by the required agents.
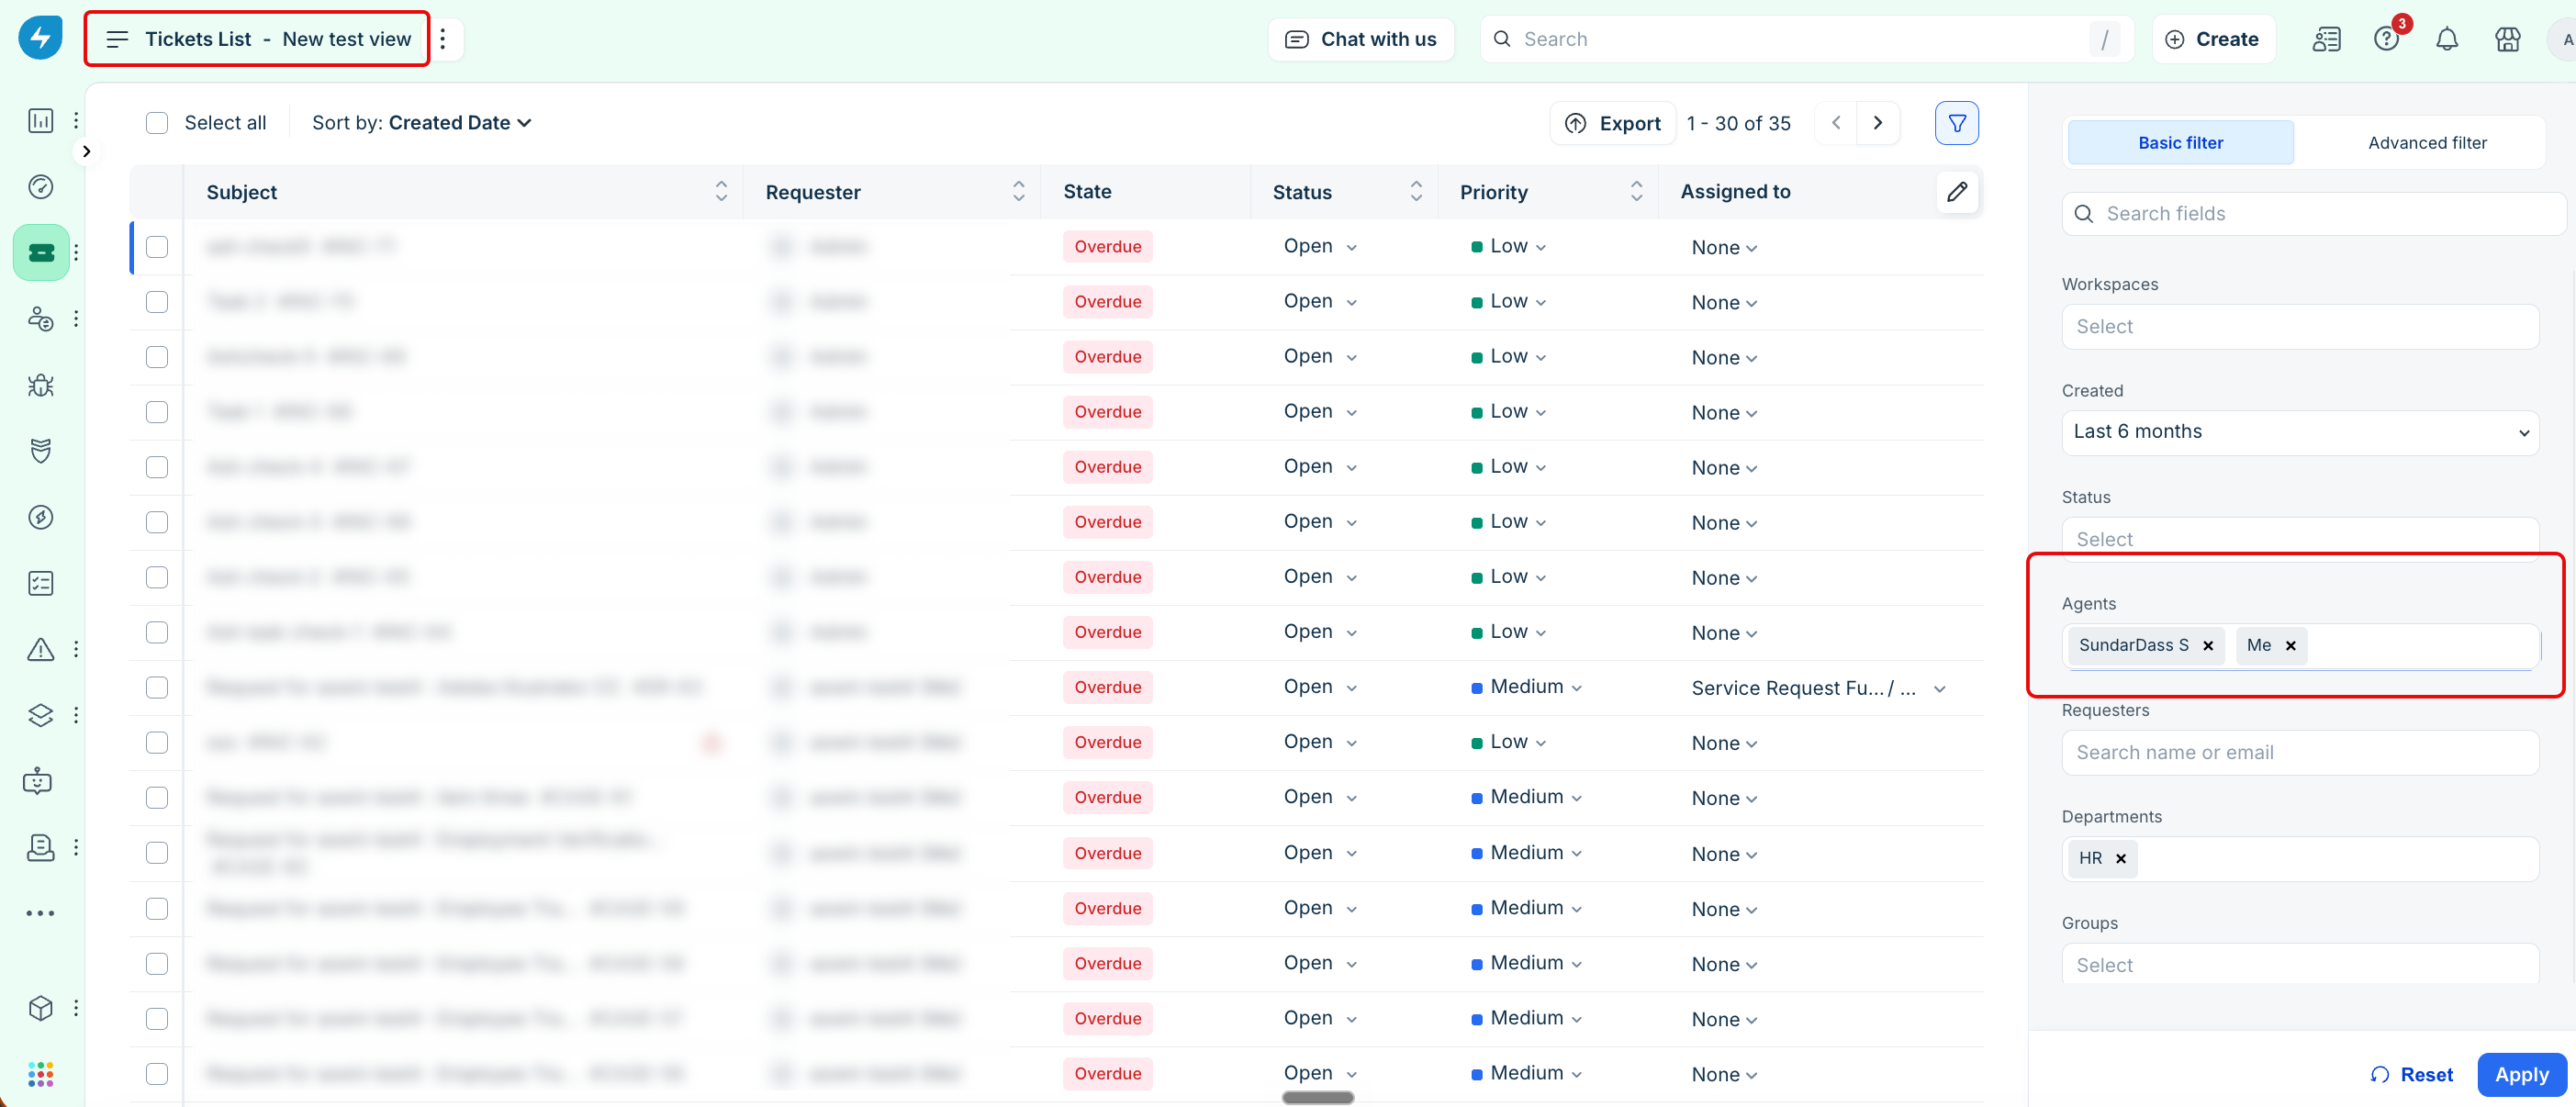
Save the view with a descriptive name.
Use the saved view when configuring dashboard widgets.
This approach is useful when you want to monitor individual workloads instead of group-level activity.
Display a specific ticket status in a dashboard widget
Dashboard widgets display the tickets returned by the selected view. If a widget includes tickets with statuses that you don't want to display, create a dedicated view for the required status.
For example, if you want to display only On Hold tickets:
Create a new ticket view.
Filter tickets with the On Hold status.
Save the view.
Edit the dashboard widget.
Select the new view as the widget's data source.
The widget now displays only tickets with the On Hold status.
Use advanced filters
Use advanced filters when the default filters don't meet your requirements. Advanced filters let you create more specific ticket views for reporting, dashboards, and day-to-day ticket management.
Filter by subcategory
The basic filter does not support filtering by subcategory. Use the Advanced Filter option instead.
To filter tickets by subcategory:
Ensure that the required category and subcategory are configured in the ticket form.
Go to Tickets.
Click Advanced Filter.
Select the required Category.
Select the required Subcategory.
(Optional) Add the Subcategory column to the ticket list for easier identification.
Save the view if you plan to reuse it.
If you regularly monitor multiple subcategories, create a separate saved view for each one.
Filter by VIP contacts
You can filter tickets submitted by VIP contacts in two ways.
Option 1: Filter using a custom field or tag
If your organization identifies VIP users with a custom field or tag:
Open the ticket filter panel.
Filter tickets using the appropriate custom field, tag, requester group, or company.
Save the view for future use.
Option 2: Filter using Advanced Filter
If the VIP field is available in Advanced Filter:
Go to Tickets.
Click Advanced Filter.
Search for the VIP field.
If the field is unavailable, click Add Association.
Select the VIP field.
Apply the filter.
Save the view.
Filter by mailbox
Freshservice does not include a built-in filter for support mailboxes. You can filter tickets by Source, such as Email, but not by the mailbox that received the ticket.
As a workaround, you can use a hidden custom field and a workflow.
To filter tickets by mailbox:
Create a custom field to store the mailbox name.
Hide the field so agents do not update it manually.
Go to Admin > Workflow Automator.
Create a workflow that updates the custom field based on the To email address.
Filter tickets using the custom field.
Save the view.
Filter by source
Use the Source filter to include or exclude tickets based on how they were created.
Common sources include:
Email
Portal
Phone
Onboarding
For example, if you want to exclude tickets created through email, remove Email from the selected sources.
Filter by specific agents and groups
Create custom views when you need to monitor tickets assigned to individual agents or specific groups.
Create an agent view
To display tickets assigned to specific agents:
Go to Tickets.
Open the filter panel.
Select the required agents.
Save the view with a descriptive name.
Use the saved view in dashboards or whenever you need to monitor those agents.
Agent-level views are useful for tracking workloads, performance, or individual queues.
Allow managers to view team tickets
Managers can view team tickets based on their role and scope.
To configure access for an agent:
Assign the IT Supervisor role or an equivalent role.
Configure the visibility scope for the required workspace or group.
If the manager is a contact instead of an agent, they can view only the tickets that portal permissions allow.
To allow contacts to view tickets for their department:
Create the required department.
Go to Admin > Portal Settings.
Enable department visibility.
Associate tickets with the appropriate department.
Use analytics reports for advanced filtering
Some filtering scenarios are better suited to Analytics than ticket views. Use Analytics when you need more advanced conditions, keyword searches, or historical reporting.
Find tickets by subject keyword
To create a report based on keywords in the ticket subject:
Go to Analytics.
Create a new report.
Select Tickets as the metric.
Add a Subject contains filter.
Enter the keyword.
(Optional) Add a Created date filter to limit the results.
Save the report.
Note: Save the report if you want to keep the report configuration and visualizations.
Count unresolved tickets as of a past date
Freshservice does not store ticket status exactly as it existed on a previous date. Reports use the current ticket status together with date-based filters.
To estimate unresolved tickets for a past date:
Create or open a ticket report.
Filter tickets created on or before the required date.
Exclude Resolved and Closed statuses.
Display the ticket count.
Save the report if you want to reuse it.
Exclude tickets by source or module
Use the Source filter in Analytics to include or exclude tickets from specific sources or modules.
For example, you can exclude Onboarding or Offboarding tickets when generating reports for operational support teams.
Create custom views for specific statuses
The default views may include multiple ticket statuses. If you need to monitor only one status, create a custom view.
For example, to display only On Hold tickets:
Go to Tickets.
Open the filter panel.
Select On Hold as the only status.
Save the view.
Update any dashboard widgets that should use the new view.
You can use the same approach for any combination of ticket statuses.
Roles and permissions for views
The actions you can perform on ticket views depend on your role and permissions.
Troubleshoot filter issues
If ticket filters do not work as expected, review the following troubleshooting steps.
Filters are unavailable or disabled
If filters appear disabled or are unavailable:
Verify that your role includes the View tickets permission.
Clear your browser cache and cookies.
Sign out and sign back in.
Open Freshservice in a different browser.
If the issue affects only one user, it is likely caused by browser settings or a local system issue rather than the Freshservice account.
Filter panel is blank
If the filter panel does not load:
Verify that affected users have the View tickets permission.
Check whether users are opening Freshservice from a saved browser bookmark.
Remove outdated bookmarks.
Clear the browser cache and cookies.
Open the Freshservice portal directly instead of using a bookmark.
Try the page in an incognito or private browsing window.
If the issue persists, contact Freshservice Support.
Filter tickets using the API
Use the Freshservice API when you need to retrieve filtered ticket data programmatically for integrations or automation.
Use the filter endpoint
To retrieve tickets that match specific criteria, use the ticket filter endpoint.
Example:
curl -v -u api_key:X -X GET 'https://domain.freshservice.com/api/v2/tickets/filter?query="priority:3"'
Replace the query with the filter that matches your requirements.
Using the standard /tickets endpoint with filter query parameters returns a validation error because filtering is supported only through the /tickets/filter endpoint.
Note: For more information about supported filter queries and API endpoints, see the Freshservice API documentation.
Use ticket creation time in Workflow Automator
Workflow Automator does not provide ticket creation time as a direct condition. You can use the ticket API as a workaround.
To use ticket creation time in a workflow:
Send a GET request to retrieve the ticket details.
Verify that the response includes the ticket creation date and time.
Add a Web Request node in Workflow Automator.
Configure the node to call the same API.
Use the returned creation time in subsequent workflow steps.
Frequently asked questions
The following answers address common questions about creating, managing, and using ticket views in Freshservice.
How do I create a view that shows only service request tickets?
Create a custom ticket view and filter tickets by the Service Request type. Save the view so you can access it from the Tickets page whenever you need it.Can I create a view that all agents can access?
Yes. When you save a view, select All Agents as the sharing option.
Note: Only users with the Admin or Account Admin role can create views that are available to all agents.How do I filter tickets by urgency?
Create a custom view and filter tickets by the required Priority value, such as Urgent. You can also use the default Urgent and High Priority Tickets view if it meets your requirements.Can I use a saved view in a dashboard scorecard?
Yes. Create and save the required ticket view, then select it as the data source when configuring the scorecard widget. Make sure you select the correct module, such as Tickets, before adding the widget.How do I create a view for VIP users?
Use Advanced Filter to search for the VIP field. If the field is unavailable, click Add Association, apply the filter, and save the view.Why don't my filters return any results?
This issue is usually caused by one of the following:
Missing permissions.
Browser cache or cookies.
Outdated browser bookmarks.
Verify that your role includes the required permissions, clear the browser cache, and access Freshservice directly instead of using saved bookmarks.
Can I filter tickets by mailbox?
Not by default. As a workaround, create a hidden custom field, populate it through Workflow Automator, and use that field when creating ticket views.