Device42 (D42) is a comprehensive IT infrastructure management platform that helps organizations discover, track, and manage their hardware, software, and network assets. By integrating Freshservice with D42, organizations can bridge the gap between their ITSM and asset management.
TABLE OF CONTENTS
- Setting up the Integration with Device 42
- How to set up Schedule syncs and run manual syncs?
- How to view the sync history?
- List of data types transferred from D42 to Freshservice
- Freshservice - Device 42 data mapping
Requirements
- Device42 version 16.12.00+
- Freshservice agent account with access to the Freshservice Marketplace.
- Freshservice API token
Setting up the Integration with Device 42
Integrating Freshservice with Device 42 requires a few straightforward steps. Here's a step-by-step guide to help you get started:
Step 1: Obtain the API key from Freshservice
Generate the API key in Freshservice to establish a secure connection between the two systems. Freshservice API key will serve as authentication credentials to import D42 devices and software items into Freshservice and also create relational mappings between them.
Login to your Freshservice dashboard with an agent profile.
Select the logged-in user profile in the top right corner of the page and navigate to profile settings.
API token will be displayed on the right side of the page. Copy this code to use later to set up your integration in Device42.


Step 2: Configure the Freshservice API token in Device42.
Access the Device42 menu bar and select "Secrets."

On the "Select Password to view" page, click on "Add Password" located at the top right corner.
In the "Username" field, enter a name for the API token. This can be of any value, but remember to use it when creating the integration later.
In the "Password" field, enter the Freshservice API token. Make sure there are no white spaces or newline characters before or after the API token.
Finally, save the API token by clicking on "Save" at the bottom right corner of the page.

Step 3: Setup Freshservice Integration in D42
Access the menu bar and navigate to Tools > Integrations > External Integrations.
Click on "Add External Integration," located at the top right of the page.

On the integration configuration page, fill in the required fields, starting with your Freshservice URL (e.g., https://demo-instance.freshservice.com/).
From the drop-down field labeled "Type," select the option for Freshservice.
To populate the "Token" field, click on the magnifying glass icon and select the secret that contains your Freshservice API token.
Once you have entered all the required fields, copy the displayed Verification Token. This token will be used later during the installation of the Device42 Freshservice App.
Finally, click on "Save" at the bottom right corner of the page to save your integration settings.

Step 4: Install the D42 Integration app in Freshservice
Access the Freshservice dashboard and navigate to the Settings page.
From the Settings page, go to the Agent Productivity section and select "Apps." Kindly ensure that you are logged in using an administrative account.

On the Apps page, click the left arrow across Manage apps.

Search for "Device42." You should find an application titled "Device42 For Freshservice." If multiple applications are listed for Device42, make sure to choose the one with this specific name and the option to install the application. If the install button says "Visit the site to install," close the window and select the other Device42 application.

After selecting the Install button, you will be directed to a settings page where you need to provide certain information to proceed with the installation.
Enter your Freshservice Domain Name, which is part of your Freshservice URL between "https://" and ".freshservice.com."
In addition, provide a Cloud Connector. This can be either "connect.device42.net" or "connect-eu.device42.net." To determine the correct Cloud Connector, navigate to Tools > Settings > Global Settings and refer to the External Integration Settings section.
The Cloud Connector listed there will determine which option you should choose. If you are uncertain, feel free to contact Device42 Support for assistance in setting up your Device42 integration.
With the latest version of Freshservice, a default approver is a new required field and should now be selected and set in the new section of the D42 Freshservice Application.
Once you have entered the required fields, click the " Save " button located at the bottom right of the window.

How to set up Schedule syncs and run manual syncs?
Setting up and running syncs between Device42 and Freshservice is a seamless process that allows you to transfer discovered data efficiently. The integration eliminates the need for external environments and manual scripts, making the entire syncing process hassle-free.
Scheduled Sync:
Access the Freshservice Dashboard and navigate to Settings > Apps.
Locate the Device42 application among your installed applications and click on the settings icon associated with it.
On the Device42 application settings page, you will find additional configuration options.
To set up a scheduled sync, select the checkbox for the "Scheduled Sync" option.
Choose the desired time for the scheduled sync to run. This allows you to specify when the sync will occur automatically on a daily basis.
Once you have selected the checkbox and set the time, click "Save" to apply the scheduled sync settings.

Manual sync
If you prefer to initiate syncs on-demand instead of setting up a scheduled sync job, you can easily run manual syncs between Device42 and Freshservice.
Access the Freshservice Dashboard and navigate to Settings > Apps.
Locate the Device42 application among your installed applications and click on the settings icon associated with it.
On the Device42 application settings page, you will find the option to run a manual sync.
Look for the "Manual Sync" button displayed on the page and click on it. This will expand a panel with additional options.
In the expanded panel, you will have two sync options available:
Full Sync: This option synchronizes all items from Device42 to Freshservice, regardless of when those items were added or updated in Device42.
Partial Sync: This option only syncs items that have changed in Device42 (added or updated) since the last successful sync between the two systems.
Select the appropriate sync type based on your requirements.
If a sync is currently running, you will also have the option to stop the ongoing sync process using the provided button.
Once you have made your selection, the manual sync process will be initiated, and the data transfer will take place between Device42 and Freshservice.
Wait for the sync to complete, and you will see the updated data reflected in your Freshservice instance.

Full Sync Forced Upon Certain Upgrades
During certain upgrades, a full sync is forced to capture all new data from Device42 (D42). In the synchronization history, this forced full sync will be labeled as a "Full Upgrade." It occurs when there is a scheduled synchronization or a Partial Sync. This forced full sync happens once until a successful sync is completed.
How to view the sync history?
Viewing the synchronization history provides valuable insights for troubleshooting issues and monitoring the number of devices synced into Freshservice. Follow these steps to access the sync history:
Access the Freshservice Dashboard and navigate to Settings > Apps.
Among the installed applications, locate the Device42 application and click on the settings icon associated with it.
From the options displayed, select "Sync History." This will take you to the sync history page, where you can view past synchronizations and ongoing ones.
On the sync history page, you will find a table displaying the history of syncs. Each row represents a specific sync process.
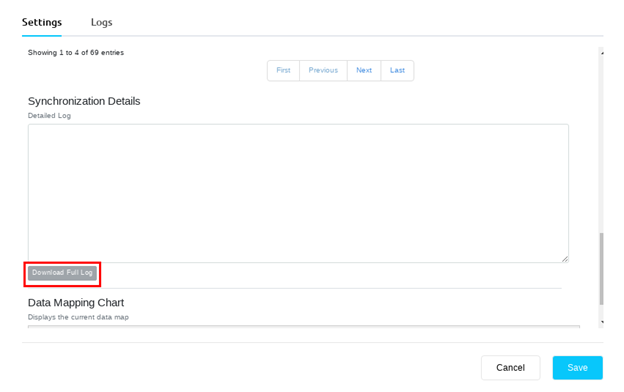
To view detailed logs associated with a particular sync, select the respective row in the table. This allows you to review any logs or additional information related to that sync.
Note: Keep in mind that the displayed text is limited to approximately 4000 characters.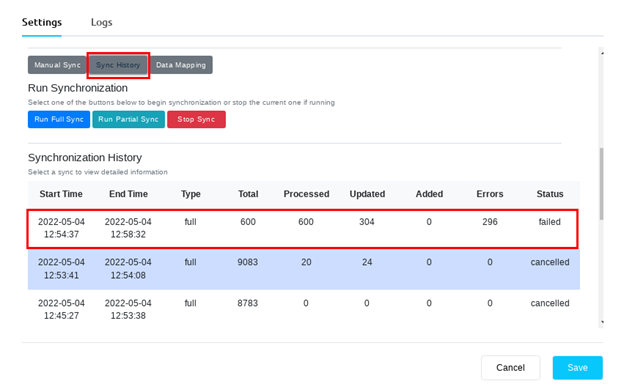
If you need to download the full logs for further analysis, you can use the "Download Full Log" button located at the lower-left corner of the text area. Clicking this button will initiate the download of the complete log file.
List of data types transferred from D42 to Freshservice
Freshservice - Device 42 data mapping
Data Mapping UI
With the updated Data Mapping UI, users can now view additional mapping types available on the Data Mapping Chart screen. This enhancement expands the types of information that can be mapped, including warranties, licenses, business apps, and more. Previously, users were limited to mapping devices and software types only.

Access Current Data Mappings
To view the current data mappings between Device42 and Freshservice, follow these simple steps:
Navigate to the Freshservice Dashboard and click on "Settings" followed by "Apps" in the sidebar menu.
Among the installed applications, locate the Device42 application and click on the settings icon associated with it.
From the options displayed, select the "Data Mapping" button. This will take you to the Data Mapping page.
On the Data Mapping page, you can easily view the fields from Device42 that are currently mapped to Freshservice for both device and software items.


View Mapped and Unmapped Data for Specific Assets
To easily access and view mapped and unmapped data for a device within Freshservice, follow these steps:
From the Freshservice Dashboard, navigate to "Assets" and select "Inventory."

On the inventory screen, locate and select the asset that has been imported from Device42. This is the asset for which you want to view the mapped and unmapped data.
On the right panel of the page, you will find the Device42 application. Click on it to expand the application details.
Once the Device42 application window is expanded, click on the "View Device42 Data" button.

A new window will open, displaying the mapped and unmapped data for the selected device. This allows you to conveniently view all the required fields from one location, eliminating the need to navigate between applications.
Additionally, if you choose to close this window and select the "View Asset in Device42" option, you will be redirected to the corresponding asset within the Device42 application.

