
 Community
 Video Library
 Agent Training
 Freshservice
 Freshdesk
 Freshchat
 Freshcaller
 Freshsales
 Freshteam
 Freshworks Neo
 Freshsurvey
 Freshservice for MSP
 Note: This feature works the same across all Freshservice products. If certain options do not appear in your account, they may not be included in your current plan.TABLE OF CONTENTS
- Prerequisites
- Overview of ticket properties
- Update ticket properties
- Update ticket due dates manually
- Manage ticket property visibility
- Automate ticket property updates
- Populate ticket properties from ticket content
- Understand workspace and license behavior
- Create or promote a major incident
- Frequently asked questions
This article explains how to manage and update ticket properties, and configure how they are displayed and updated by using business rules, workflows, and role permissions.
Prerequisites
Before you manage ticket properties, ensure that you meet the following prerequisites:
You have agent access to the workspace that contains the ticket.
You have administrator privileges to configure business rules, workflows, or agent roles.
Your role includes permission to update the required ticket properties.
Overview of ticket properties
Ticket properties contain the information required to manage a ticket from creation to resolution. These properties help agents categorize, prioritize, assign, and track tickets while ensuring that organizational processes and SLA commitments are maintained.
The Ticket properties panel displays both system fields and custom fields configured for your account. Depending on your role and permissions, you can update ticket properties directly from the ticket page or automate updates by using Workflow Automator.
Some ticket properties, such as the first response and resolution due dates, are calculated automatically based on the applicable SLA policy. Other properties can be updated manually or through workflows to support your organization's business processes.
Update ticket properties
You can update ticket properties while working on a ticket to keep the ticket information accurate and ensure that the ticket follows the appropriate workflow.
To update ticket properties, follow these steps:
Open the required ticket.
In the Ticket properties panel, review the existing ticket information.
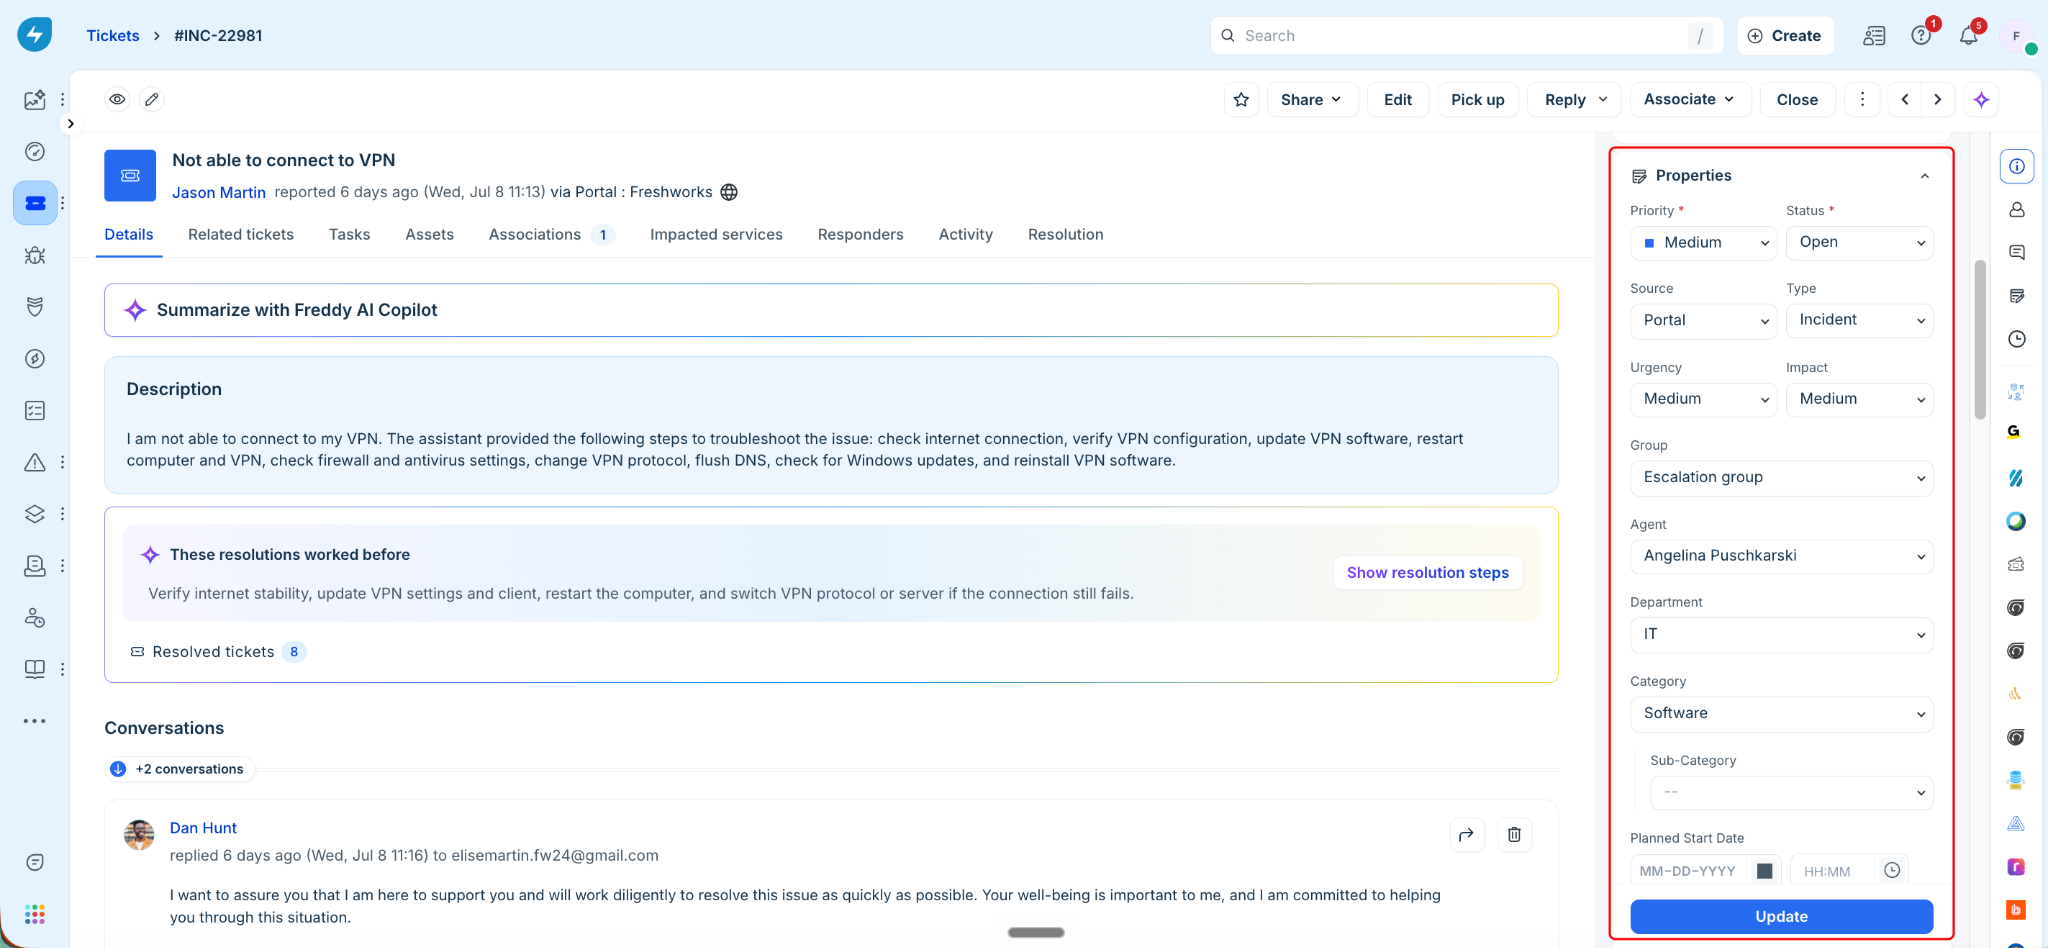
Update the required fields, such as Status, Priority, Category, Subcategory, Item, or Assigned to.
Click Update. The updated values are immediately available for reporting, automation, and ticket processing.
Update ticket due dates manually
Freshservice automatically calculates ticket due dates based on the SLA policy associated with the ticket. If required, you can update the due date manually or prevent agents from modifying it.
To change the ticket due date, follow these steps:
Open the ticket.
In the Ticket properties panel, locate the Resolution due field and click the edit icon.
Select one of the available date options or specify a custom date and time using Pick date and time.
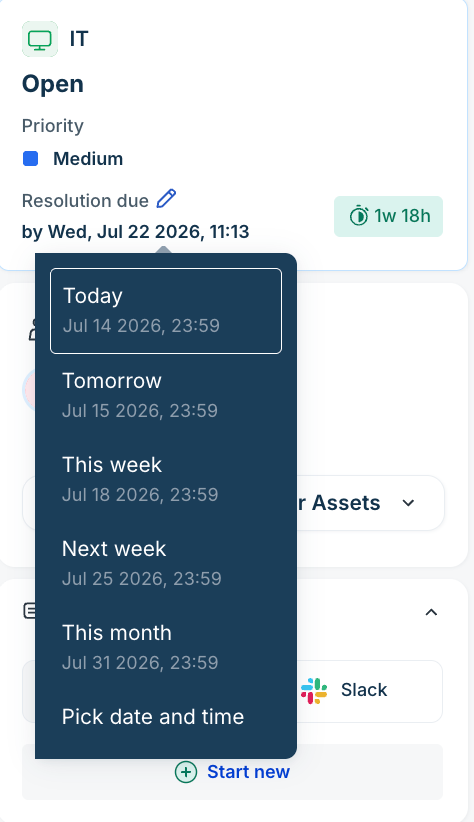
Click Update.
Restrict due date updates
If your organization does not allow agents to modify ticket due dates, you can configure a workflow to restrict updates to the due date field.
To restrict due date updates, follow these steps:
Go to Admin > Workflow Automator.
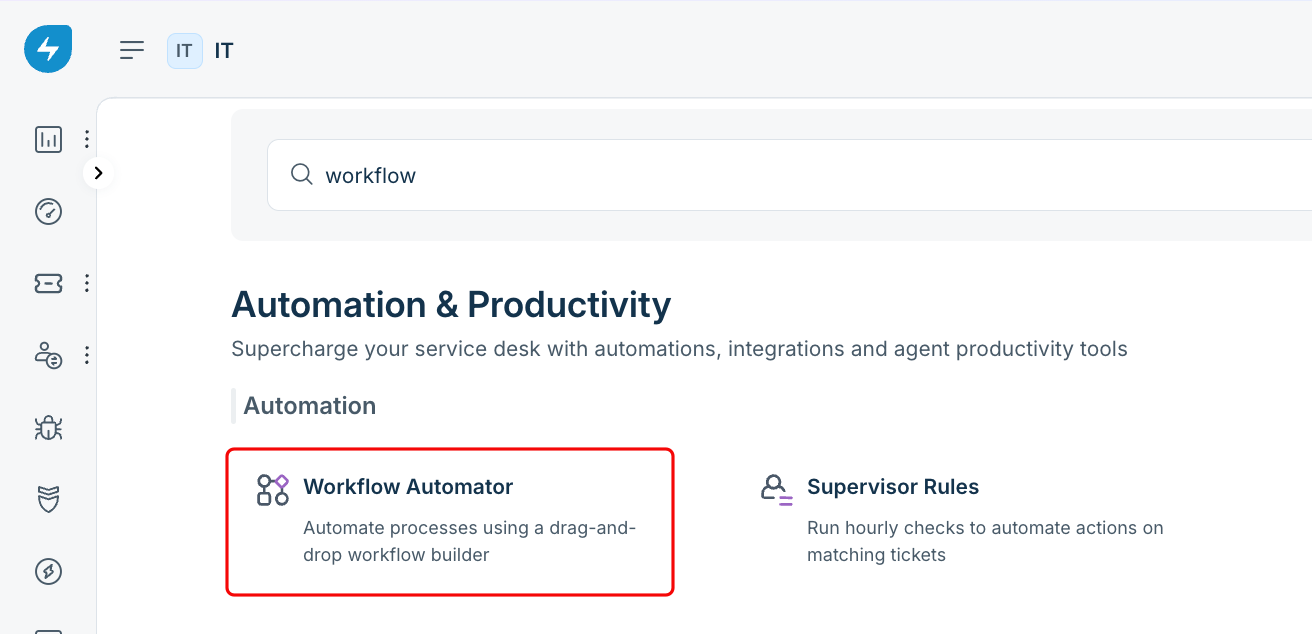
Create a new workflow or edit an existing workflow.
Add conditions to prevent agents from editing the due date field.
Use restrictions to allow only specific roles or users to modify the due date.
Save the changes and activate the workflow to enforce the restrictions.
Manage ticket property visibility
Business rules help you control which ticket properties and actions are available to agents. You can configure rules to hide fields, disable editing, or display different fields for different workspaces or agent groups.
Hide ticket properties for a workspace
You can configure business rules to display different ticket properties for different workspaces.
To hide a ticket property for a workspace, follow these steps:
Go to Admin > Business Rules.
Create a business rule or edit an existing rule.
Specify the workspace where the rule must apply.
Configure the rule to hide the required ticket property.
Save and enable the rule.
Show or hide ticket properties for agent groups
You can configure business rules to display different ticket properties for different agent groups.
To configure ticket property visibility for an agent group, follow these steps:
Go to Admin > Business Rules.
Create a business rule or edit an existing rule.
Specify the required agent group.
Configure the fields that you want to show or hide.
Save and enable the rule.
Hide the Close button
You can hide the Close button without affecting workflows that automatically close tickets.
To hide the Close button, follow these steps:
Go to Admin > Business Rules.
Create a business rule or edit an existing rule.
Configure the rule to hide the Close button.
Save and enable the rule.
Automatic ticket closure continues to work based on your configured workflows.
Automate ticket property updates
Workflow Automator helps you keep ticket properties consistent by updating fields automatically when specified conditions are met. You can use workflows to populate ticket descriptions, update custom fields, or synchronize ticket information without requiring manual intervention.
Automatically populate the ticket description
To automatically populate the ticket description, follow these steps:
Go to Admin > Workflow Automator.
Create a workflow that runs when a service item ticket is created.
Configure the workflow to update the ticket description by using the service item name.
Save and activate the workflow.
Populate ticket properties from ticket content
You can extract values from ticket descriptions and populate custom ticket properties for reporting or automation.
To populate ticket properties from ticket content, follow these steps:
Go to Admin > Workflow Automator.
Open the required workflow.
Configure an extraction step to retrieve the required information from the ticket description.
Map the extracted value to the required ticket property.
Save and activate the workflow.
Understand workspace and license behavior
The ticket properties that an agent can update depend on both the workspace that contains the ticket and the license assigned to the agent.
Business-licensed agents have limited editing capabilities in IT workspaces. They can view tickets and add private notes, but cannot edit ticket properties or resolution notes. Agents assigned to Business workspaces can edit ticket properties for tickets within those workspaces, subject to their assigned permissions.
Create or promote a major incident
The option to create or promote a ticket as a major incident is available only when the required permissions and ticket conditions are met.
Promote a ticket to a major incident
To promote a ticket to a major incident, follow these steps:
Open the required ticket.
Ensure that the ticket status is Open.
Verify that your role includes the required major incident permissions.
Click Create major incident or Promote to major incident.
Frequently asked questions
Why can't I edit a ticket property?
A business rule or role permission may be preventing updates to the field. Review the applicable business rules and verify that your role has permission to edit the ticket property.
Why do ticket headlines differ?
The ticket headline displays the subject entered when the ticket was created. Using a consistent subject format helps maintain consistent ticket headlines.
Why are approval options unavailable for an agent role?
Approval-related actions are available only when the required role permissions are enabled. Verify that the role has permission to manage approval groups, cancel approvals, and update approval chain rules.