
 Community
 Video Library
 Agent Training
 Freshservice
 Freshdesk
 Freshchat
 Freshcaller
 Freshsales
 Freshteam
 Freshworks Neo
 Freshsurvey
 Freshservice for MSP
 Note: This feature works the same across all Freshservice products. Some screenshots or articles may reflect older designs, but the functionality remains unchanged. If certain options do not appear in your account, they may not be included in your current plan.
You're viewing Freshservice/FSBT documentation. For Freshservice for MSPs, visit the MSP Support Portal.TABLE OF CONTENTS
- How to set up your support email
- Add BCC email
- Forward emails from a private inbox to your support portal
- For Exchange/Office 365 Customers
- Frequently asked questions (FAQs)
Once you have signed up for a Freshservice/FSBT account, the first thing you probably want to do is start taking requests from your employees. The most common way to do this would be to set up a support email address where your users can send in issues and service requests.
By default, your Freshservice/FSBT account comes with a default address that looks like support@yourcompany.freshservice.com. Any email sent to this address gets converted into a ticket inside Freshservice/FSBT automatically.
You can also set up your own vanity email (for example, help@yourcompany.com) as your primary support email. To do this, you will need access to your company’s contact email and a few minutes to set things up with Freshservice/FSBT.
How to set up your support email
Set up your support mailbox in Freshservice/FSBT
1. Login to your Freshservice/FSBT account.
2. Go to Admin > Channels > Email > Email Settings and Mailbox.
If your account has more than one workspace, go to Admin > {Workspace Name} > Channels > Email > Email Settings and Mailbox.
Note:
Each workspace can have its own support emails configured. In case you want to use the same support email across all workspaces, you can configure a unified helpdesk email for the primary workspace and use global workflow automation to route tickets to the right workspace based on the content of the email.
When emails are sent to two addresses within the same workspace, only a single ticket is created; generating separate tickets for each address requires the use of distinct workspaces.
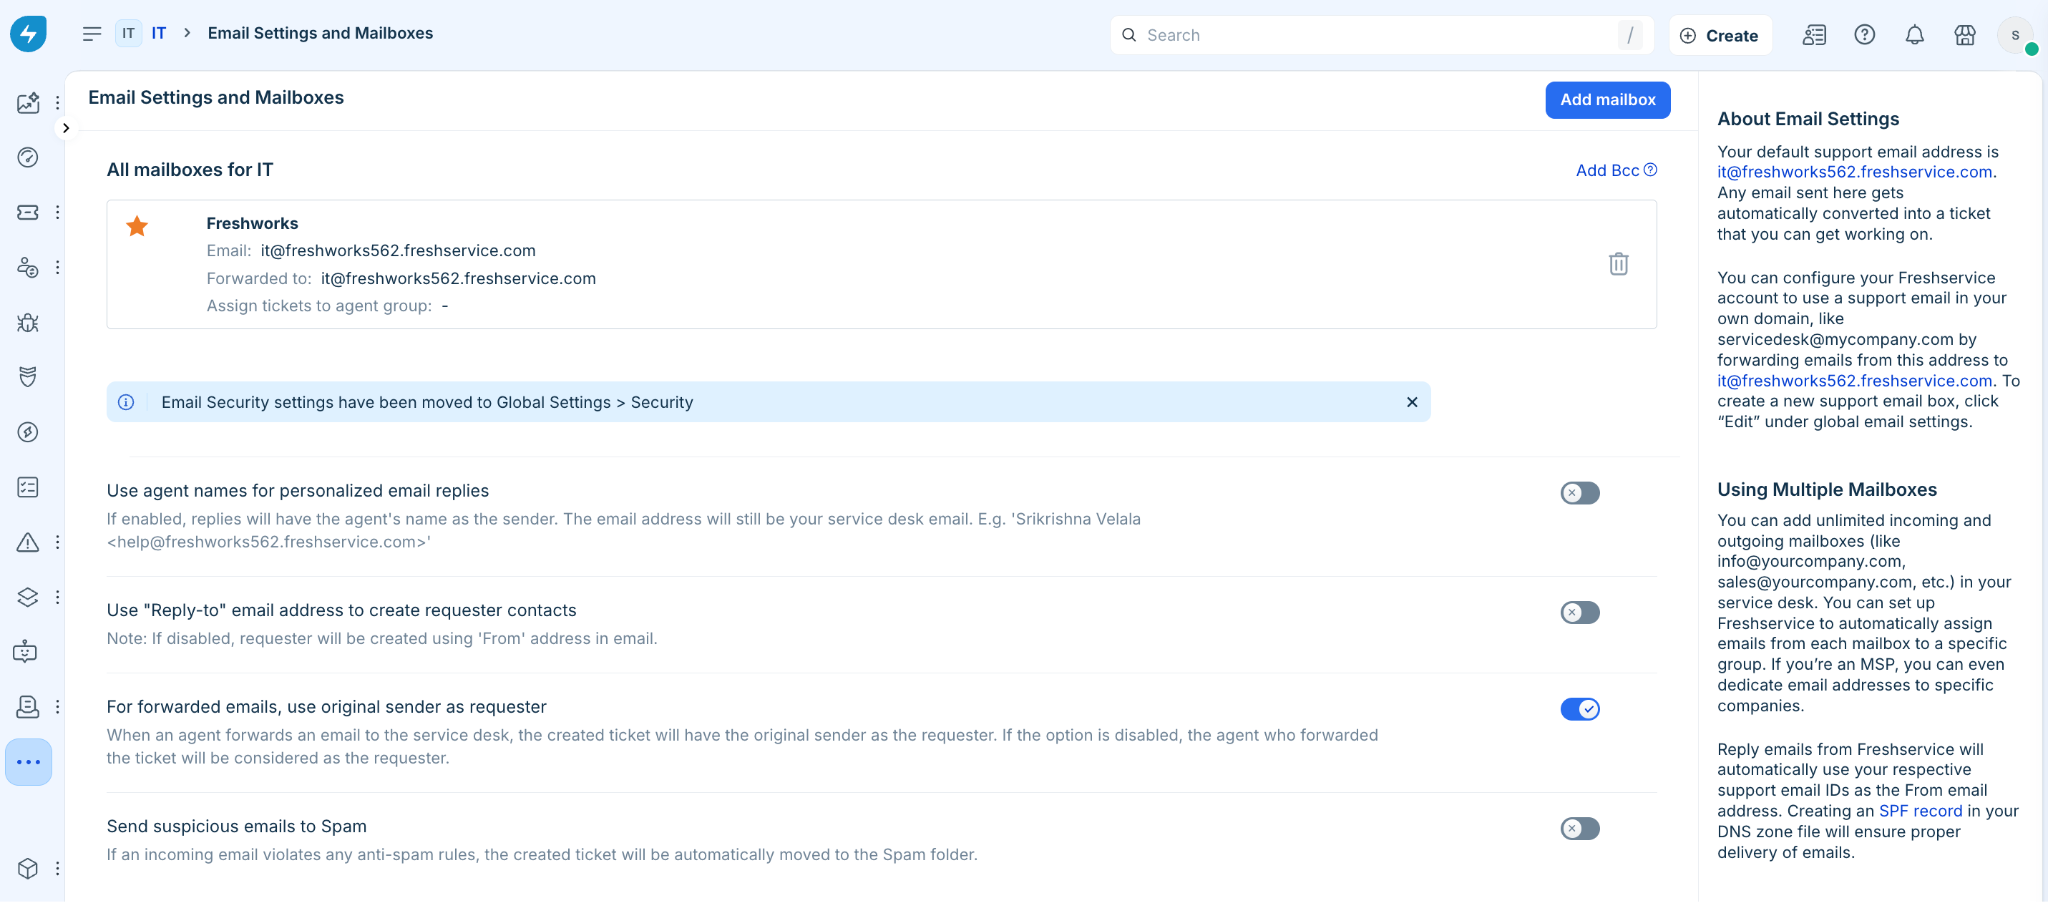
3. Under All mailboxes or All mailboxes for {Workspace Name}, click the primary email address to edit it. If you want to create multiple support addresses, click Add mailbox.
4. Give your support email a name (like MyCompany Helpdesk). This will be the “From” name that your customers see in your reply emails.
5. Enter your support email address. This will also be the reply-to address for the emails you send from your service desk.
6. Save your email configuration settings.
Note:
Using Workflow Automator, you can automatically route tickets received in a specific mailbox to various groups or boards. See Create workflows using Workflow Automator for more information.
When tickets are misrouted to an incorrect workspace or group, administrators must evaluate workspace-specific workflow automation rules to adjust or deactivate assignment workflows.
Direct option to disable ticket creation via email is not supported, however a workflow automation can be set up to automatically close email-generated tickets and notify the requester to submit their requests through the support portal instead.
Verify your email and set up forwarding rules
1. You would have received an email from your help desk to the email id you've set up.
2. Click the verification link in the email to confirm your email. You can also copy-paste the link into your browser.
3. Create a rule in your mailbox to forward incoming emails to your Freshservice/FSBT specified email id (for example, support@yourcompany.freshservice.com).
Create an SPF record to improve deliverability
1. Sometimes your receiver's mail servers may mark the emails you send through Freshservice/FSBT as SPAM. This happens because you have not yet "authorized" freshservice.com to send emails on your behalf. To ensure your emails are delivered, you should create a Sender Policy Framework (SPF) record in your DNS servers.
2. Create an SPF record in your DNS Zone file to include email.freshservice.com. See Sender Policy Framework for more information.
Add BCC email
The top-level management may want to know what's going on in your support without being added as agents. You can add these email addresses as BCC while setting up the support mailbox.
1. Login to your support portal as an Administrator.
2. Go to Admin > Channels > Email > Email Settings and Mailbox.
If your account has more than one workspace, go to Admin > {Workspace Name} > Channels > Email > Email Settings and Mailbox.
Note: Each workspace can have its own support emails configured. In case you want to use the same support email across all workspaces, you can configure a unified helpdesk email for the primary workspace and use global workflow automation to route tickets to the right workspace based on the content of the email.
3. Click Add Bcc above the listed support emails.
4. Enter all the email addresses you want to add as Bcc, separated by commas.
5. Save your email configuration settings.
Forward emails from a private inbox to your support portal
Occasionally, your customers may email your support agents directly or you may have a mailbox full of emails that need to be converted to support tickets. This can be done by just forwarding them to your support email address. Tickets forwarded from a verified agent's email address are created in the name of the customer who sent the email to the agent. But when you forward existing emails from a mailbox (where this mailbox is not associated with an agent), the requester will be the mailbox and the timestamp of the ticket will be the time the email was forwarded.
Note:
Avoid using a Group Email to convert emails into tickets. Certain providers, like Gmail, suppress notifications when an email is sent to group addresses. Consequently, tickets may fail to be created without leaving any log entry.
Typically, external mailbox mapping or threading rules cause multiple emails to be consolidated into a single ticket. To ensure separate tickets are created, each mailbox configured in Freshservice must forward independently.
When shared mailboxes (for example, HR and Payroll) forward the same email to one Freshservice address, it can result in a single ticket being created. To ensure separate tickets are generated, each team mailbox should forward to a unique Freshservice support address.
See Configuring Email Notifications For New Tickets to understand how to configure email notifications. Configurations for tickets and projects that cut across all workspaces can be configured globally. For example, user activation and agent activation emails that apply to the entire account can be configured globally. To configure notifications specific to your workspace, you can configure email notifications at the workspace level.
Also, whenever an email is sent from one of the mailboxes you configured in Freshservice/FSBT to another (or if one of the configured mailboxes is in the CC), a ticket will not be generated. This has been done to prevent email looping. So it's always a better idea to forward emails to support to create tickets.
For Exchange/Office 365 Customers
Microsoft rules state that the emails will be ‘redirected’ to the other contact.
To check the properties of the shared mailbox, click Mail Flow settings under Mailbox Features. This has the option to Enable forwarding. You must enable this and select the internal mailbox/contact to forward to.
Frequently asked questions (FAQs)
1. Why do I receive an error message stating "Reply email cannot be one of the user emails" when attempting to add a support email?
This error occurs when a requester or agent profile is using the same email address. Once you remove the respective user from the portal (Go to Admin > Agent/Requester > Select the respective email > Click the ellipsis icon on the top right > Click Forget user), you will be able to add this email to your mailbox.
2. How to restrict certain email domains from creating tickets in my instance?
Go to Global Settings > Admin > Support Portal. Then, under "Email Domain Restriction," choose "Users from specified domains" and add the relevant domains. Note that existing user profiles from domains not specified can still generate tickets within your portal. Furthermore, enforcing domain restrictions alone will not block the creation of new tickets from reply emails containing modified subject lines. To resolve issues where domain restrictions prevent ticket submission, you can modify your configuration settings to permit email tickets from any domain.
3. Tickets are not being created from specific users, how to resolve them?
The issue might be caused by one of the following reasons:
Email Domain Restriction: If you have restricted users from specific email domains, make sure the user's domain is allowed by going to Admin (or the respective workspace) > Support Portal > Email Domain Restriction. This will allow external emails to create tickets.
Spam folder: Navigate to the Tickets List, click on the three lines, and go to Spam. If you find any tickets there, unmark them as spam. Also, review and adjust any automation rules that might be sending tickets to spam.
Configuration for Reply-to Email Address: Under Admin > Email Settings and Mailboxes, verify that the option to Use the Reply-to email address to create contacts is turned off. Activating this feature assigns the Reply-to address as the contact or requester, which can conflict with Domain Restrictions and block ticket or contact creation. Furthermore, a poorly configured Reply-To address may cause Outlook responses to bypass the system entirely.
Support Email Addresses: If both the From and To addresses are helpdesk support emails, this issue will be caused and is the expected behavior.
For forwarded emails, consider original sender as ticket's contact: If you have domain restriction in your portal (Admin > Global Settings > Support Portal) and also if "For forwarded emails, consider original sender as ticket's contact" is enabled, this may be the cause of the issue if the respective user domain is not added. Also, note that if the original sender is a helpdesk email, and this option is enabled, this issue will be observed. This is because the From and To addresses both cannot be support mailbox emails from the instance.
4. When an agent forwards an email to the help desk, it creates the original sender as the requester. How can we prevent this functionality?
Go to the respective workspace Admin > Email Settings and Mailboxes > For forwarded emails, consider original sender as ticket's contact, which might be the cause of this issue.
5. How can we allow external users to send emails to create tickets without creating an account?
If the user does not have an existing account with your portal, an account will be automatically created when they submit a ticket. This is the default behavior.
6. When an external party is CCed on a ticket, their replies are being blocked. How can I allow these emails to go through?
Verify if your email domain restriction is enabled by navigating to Admin (or the respective workspace) > Support Portal > Email Domain Restriction. Add the domain of the CC'ed user to the allowed list. This will ensure that users' replies are received and that they are also created as requesters.
7. How can I create a service request ticket through email?
By default, emails will only create incidents. To create a service request, users must go to the portal and raise a service item request.
8. How can I forward an email to Freshservice/FSBT and have it added as a note to an existing ticket?
When you have an email thread that created a ticket, Freshservice/FSBT will append replies to the ticket if the reply is from the ticket requester or anyone involved in the ticket conversation (e.g., CCed in the ticket conversation, added as an approver, or if the ticket was forwarded to them). Freshservice/FSBT checks for the Message ID and Ticket ID in the subject line to append the reply to the original ticket accordingly. The system looks for the Ticket ID in the subject line, which must be in the format [#{{ticket.id}}] (e.g., [#INC-12345], where the ticket ID is INC-12345). This method is used for replies to emails sent by Automations or Email Notifications.
Note:
Generating multiple new tickets from a single thread is usually due to missing or incorrectly formatted Ticket IDs in the subject line, or replies sent by individuals who are not associated with the ticket.
To align email replies with the correct ticket, Freshservice evaluates several threading identifiers: the Ticket ID in the Subject line, Message ID, References headers, a hidden ticket identifier span, and a sender match.
9. How does the mail threading process work in Freshservice?
Mail threading in Freshservice ensures that replies are correctly associated with the original ticket and prevents duplication or looping issues. The process involves several key configurations:
When forwarding emails to the support email address, tickets are created under the customer who sent the email to the agent. If the email is forwarded from a mailbox not associated with an agent, the requester itself is considered as the mailbox and the timestamp will reflect the time of forwarding.
Freshservice prevents email looping by ensuring that emails sent from one configured mailbox to another do not generate new tickets, avoiding multiple tickets for the same issue.
For Exchange or Office 365 accounts, enable forwarding in the Mail Flow settings under Mailbox Features and select the internal mailbox or contact to forward to.
Restrict certain email domains from creating tickets by configuring email domain restriction settings in the support portal.
To prevent duplicate tickets from being created by email replies, refer to the guide on preventing duplicate tickets.
These measures streamline email communication and maintain ticket integrity.
10. How to restrict new ticket creation through email while still allowing default email notifications to be sent from the primary mailbox to ensure that requester replies to email notifications are appended to existing tickets created through the portal?
Restrict ticket creation through email by setting the mailbox configuration to "Outgoing Only." This prevents new tickets from being created via incoming emails.
If ticket creation is only through the portal, apply email domain restrictions under Admin > Channels > Support Portal > Email Domain Restrictions. Add a dummy domain here to restrict users from raising tickets via email.
11. How to configure an automatic email response workflow in Freshservice when a ticket is created from an incoming email and restrict ticket creation to internal users only?
Configure a workflow to send an email to the requester when a ticket is created through email. The email will be sent directly to the requester's mailbox but will not appear as a reply in the ticket.
Verify that the workflow automator is enabled and configured correctly to send an email when a ticket is created.
If the workflow does not execute, check the Activity tab of the ticket to confirm if the action was triggered.
Grant temporary access to Freshworks Support with both 'Account Admin' and 'IT Supervisor' permissions to allow troubleshooting and testing.
Allow the creation of test tickets to validate that the workflow functions correctly.
Confirm that the workflow sends the email successfully. The email sent through the workflow will not be appended as a ticket reply but will reach the requester's mailbox.
To restrict ticket creation to internal users only, set email domain restrictions from Admin > Support Portal. This ensures that only emails from specific domains can create tickets.
12. How can email replies be configured to update existing tickets instead of creating new ones in Freshservice?
To ensure email replies are added to existing tickets rather than creating new ones, the following steps should be followed:
Email Threading: Replies must be sent within the same email thread. Freshservice identifies the sender's email to correctly thread the reply to the existing conversation. The sender's email should match one of the following: requester email address, agent email address, CC email address, or forwarding email address.
Email Marker Checks: Replies are appended to existing tickets only when they satisfy one of the Email Marker Checks and one of the Requester Checks.
Ticket ID in Subject Line: The ticket ID must appear in the subject line in the correct format, such as [#{ticket.id}] (for example, [#INC-12345]). This allows the system to recognize the reply as part of the existing ticket.
Email Settings Configuration: Go to Admin > Email Settings and Mailboxes. Confirm that threading settings are correctly configured, including SMTP and mailbox setup.
Domain Restrictions: Verify that domains are allowed under Support Portal > Email Domain Restrictions to prevent replies from being blocked.